Inleiding
The Juwel Aeroplus 6000 is a high-quality, vertical 3-stage composter designed for efficient and easy composting. Its robust construction ensures durability, while its innovative design simplifies the composting process. This manual provides essential information for the setup, operation, maintenance, and troubleshooting of your Aeroplus 6000 composter.
Sleutel kenmerke sluit in:
- A durable, larger design for extended lifespan and easier operation.
- A unique crank handle mechanism to effortlessly move waste between chambers and ensure thorough mixing.
- A relatively airtight top chamber to prevent flying insects.
- 'N 3-stage system for continuous composting: collection, active composting, and maturation.
Opstelling en samestelling
Careful assembly is crucial for the stability and longevity of your composter. While the process is straightforward, having a second person can significantly ease assembly.
Uitpak en inspeksie
- Unpack all components and verify against the parts list (not provided in this manual, refer to original packaging).
- Inspect all parts for any damage during transit. Contact customer support if any parts are missing or damaged.
Die keuse van 'n ligging
- Select a level, well-drained area in your garden.
- Ensure the location is easily accessible for adding waste and collecting finished compost.
- Consider partial shade to prevent the composter from drying out too quickly in direct sunlight.
Monteerstappe
The composter consists of multiple plastic panels and a metal frame for rigidity.
- Begin by assembling the base frame, ensuring it is square and stable.
- Attach the side panels for the lowest (maturation) chamber. The plastic is flexible but durable.
- Install the rotating base mechanism and the crank handle. Use a PZ2 cross-head screwdriver for screws and a 10mm socket wrench for hex bolts. Do not overtighten screws; finish the last half turn by hand to prevent stripping.
- Proceed to assemble the middle (composting) chamber, stacking it securely on the maturation chamber.
- Finally, assemble the top (collection) chamber and attach the lid.
- Ensure all connections are secure and the composter stands upright and stable.

Beeld: Ontplof view illustrating the multi-chamber structure of the Juwel Aeroplus 6000 composter, useful for understanding assembly.

Image: The Juwel Aeroplus 6000 composter situated in a garden, providing a visual reference for its installed size and aesthetic.
Bedryfsinstruksies
The Aeroplus 6000 utilizes a 3-stage system to efficiently convert organic waste into valuable compost.
The 3-Chamber System
- 1. Collection Chamber (Top): This is where fresh organic waste is initially added. The design helps keep flying insects out.
- 2. Composting Chamber (Middle): Waste from the collection chamber moves here. This chamber is designed for intensive air supply, promoting rapid decomposition.
- 3. Maturation Chamber (Bottom): Die finale stage where valuable, finished compost is created and collected.

Image: Visual representation of the top collection chamber for fresh waste and the middle composting chamber for active decomposition.
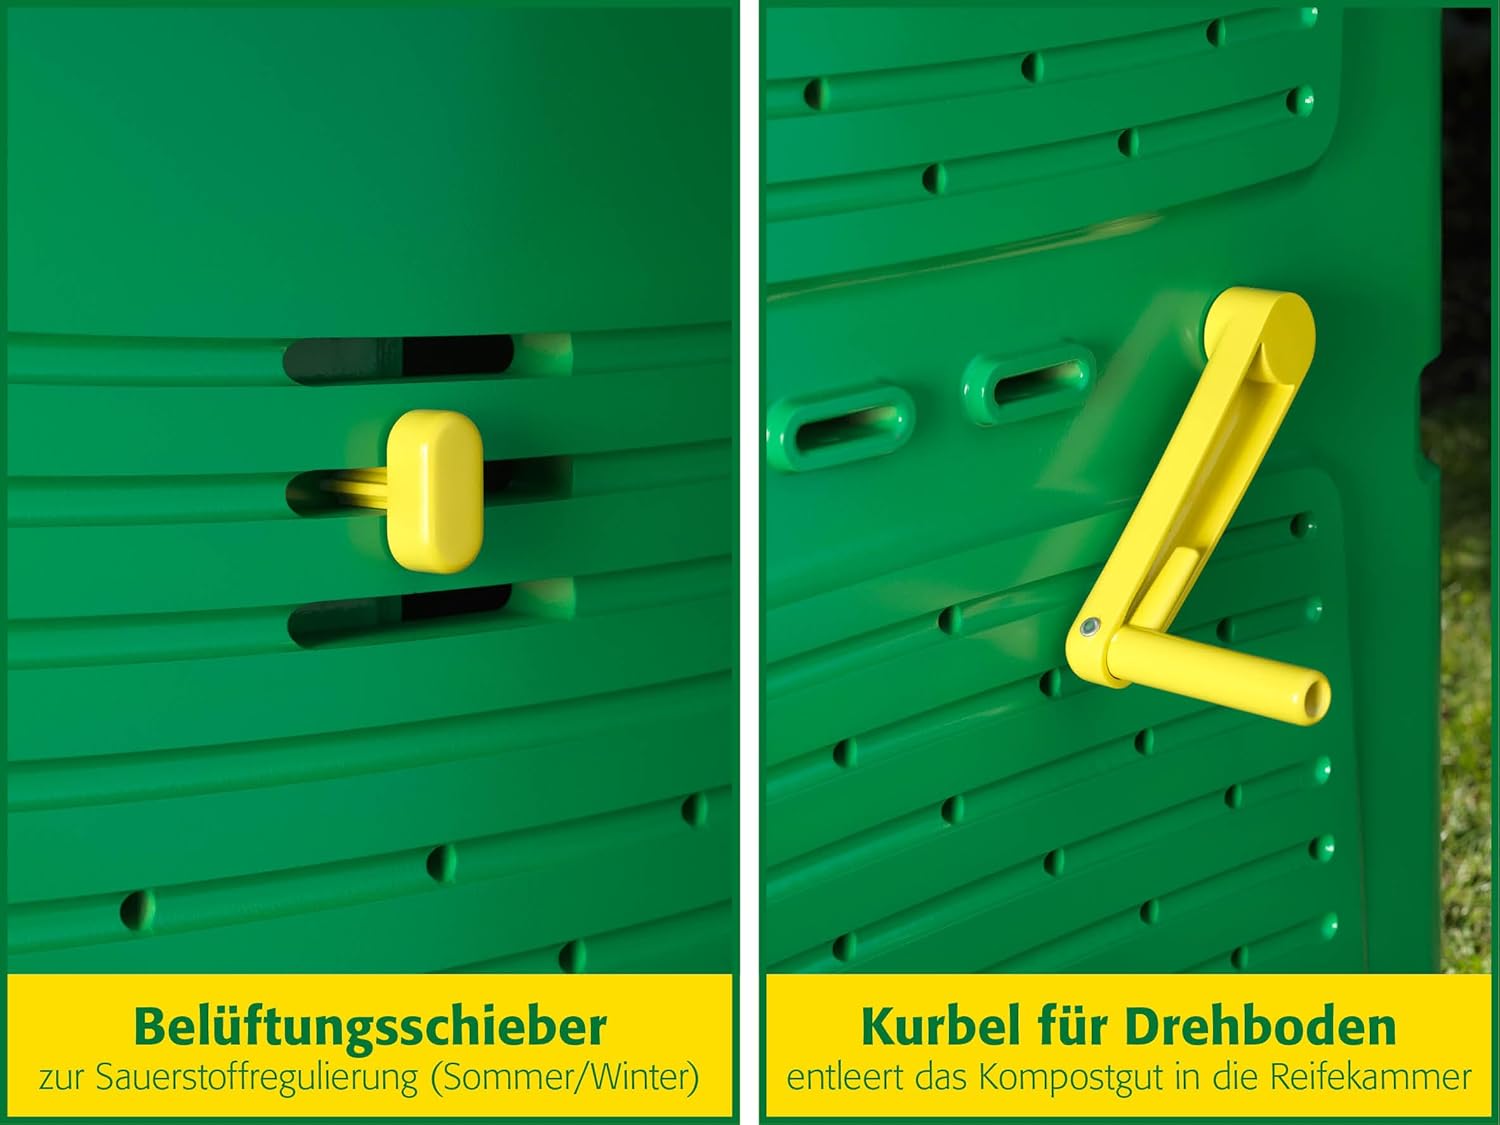
Image: The bottom maturation chamber containing finished compost and a cutaway view demonstrating the internal flow of material.
Adding Waste
Add a balanced mix of 'greens' (nitrogen-rich, e.g., food scraps, grass clippings) and 'browns' (carbon-rich, e.g., dry leaves, wood chips) to the top collection chamber. Avoid adding meat, dairy, oily foods, or diseased plants.
Turning and Mixing
To move waste from the collection chamber to the composting chamber, and to mix the contents, simply turn the crank handle located on the side of the composter. This action also helps aerate the material, speeding up decomposition.
Ventilasiebeheer
The composter features a ventilation slider to regulate oxygen supply, which is crucial for aerobic decomposition. Adjust the slider based on the season and moisture content:
- Somer: Increase ventilation to prevent overheating and maintain optimal moisture.
- Winter: Reduce ventilation to retain heat and moisture, slowing down but not stopping decomposition.

Image: Details of the ventilation slider for oxygen control and the crank handle for moving compost between chambers.
Onderhoud
Regular maintenance ensures optimal performance and longevity of your composter.
- Regular Turning: Use the crank handle frequently (e.g., once a week) to mix the contents and ensure good aeration. This prevents anaerobic conditions and speeds up composting.
- Vogbestuur: The compost should feel like a damp sponge. If too dry, add water; if too wet, add more 'brown' materials like dry leaves or shredded paper.
- Plaagbeheer: The airtight top chamber helps deter flies. Ensure the lid is always closed properly. Avoid adding materials that attract pests, such as meat or dairy.
- Skoonmaak: Periodically, especially when emptying the maturation chamber, you may wish to rinse the interior with water. Avoid harsh chemicals.
Probleemoplossing
Here are solutions to common composting issues:
- Bad Odor (Rotten smell):
Oorsaak: Too much nitrogen (greens), too wet, or lack of oxygen.
Oplossing: Add more 'brown' materials (e.g., dry leaves, shredded cardboard). Turn the crank handle more frequently to aerate. Adjust the ventilation slider to increase airflow.
- Compost is too Dry:
Oorsaak: Not enough moisture.
Oplossing: Add water, especially during dry periods. Mix in some 'green' materials like fresh grass clippings.
- Compost is too Wet/Slimey:
Oorsaak: Too much moisture or too many 'greens'.
Oplossing: Add more 'brown' materials to absorb excess moisture. Turn the crank handle to aerate. Ensure proper drainage at the base.
- Slow Decomposition:
Oorsaak: Lack of moisture, oxygen, or an imbalanced mix of materials.
Oplossing: Check moisture levels and add water if dry. Turn the composter regularly to introduce oxygen. Ensure a good balance of 'greens' and 'browns'.
- Pests (e.g., rodents):
Oorsaak: Attractants like meat, dairy, or oily foods; accessible openings.
Oplossing: Avoid adding prohibited materials. Ensure the lid and access doors are securely closed. The composter's design helps deter pests, but proper waste management is key.
Spesifikasies
Detailed specifications for the Juwel Aeroplus 6000 Composter:
| Handelsmerk | JUWEL |
| Modelnommer | Aeroplus 6000 |
| Materiaal | Plastiek |
| Kleur | Multi-colour (predominantly green) |
| Kapasiteit | 600 Liters (approximately 140 US gallons) |
| Produkafmetings (L x B x H) | 31" x 31" x 43" (79 cm x 79 cm x 110 cm) |
| Vorm | Vierkantig |
| Item gewig | 1 kilogram (2.2 pond) |
| Vervaardiger | Juwel |

Image: Dimensional diagram of the composter, highlighting its capacity and physical measurements.
Waarborg en Ondersteuning
The Juwel Aeroplus 6000 Composter is built to last and comes with comprehensive support.
- 5-jaar waarborg: The product is covered by a 5-year manufacturer's warranty against defects in materials and workmanship.
- 10-Year Spare Part Availability: Juwel guarantees the availability of spare parts for 10 years from the date of purchase, ensuring long-term usability and repairability.
For warranty claims, technical assistance, or to order spare parts, please contact Juwel customer support through their official webwebwerf of die kleinhandelaar waar die produk gekoop is.


