1. Inleiding
Thank you for choosing the CREWORKS 10L Ultrasonic Cleaner. This professional-grade unit is designed for efficient and thorough cleaning of various items using ultrasonic cavitation. This manual provides essential information for safe operation, maintenance, and troubleshooting to ensure optimal performance and longevity of your device. Please read these instructions carefully before first use and retain them for future reference.
2. Veiligheidsinstruksies
- Koppel die eenheid altyd aan 'n geaarde kragtoevoer.
- Do not operate the unit without liquid in the tank.
- Ensure the power cord is not damaged and avoid placing heavy objects on it.
- Keep the unit away from water splashes and do not immerse the main body in water.
- Moenie die kragprop met nat hande raak nie.
- Ontkoppel die eenheid voor skoonmaak of instandhouding.
- Hou buite bereik van kinders en troeteldiere.
- Use appropriate cleaning solutions. Avoid flammable, corrosive, or highly acidic/alkaline liquids.
- Do not operate the unit continuously for extended periods without allowing it to cool down.
- Verseker behoorlike ventilasie rondom die eenheid tydens werking.
3. Produk verbyview
The CREWORKS 10L Ultrasonic Cleaner features a robust 304 stainless steel tank and housing, designed for durability and resistance to corrosion. It incorporates a 240W ultrasonic transducer for powerful cleaning and a 300W heater for optimal temperature control. The intuitive analog control panel allows for precise adjustment of cleaning parameters.
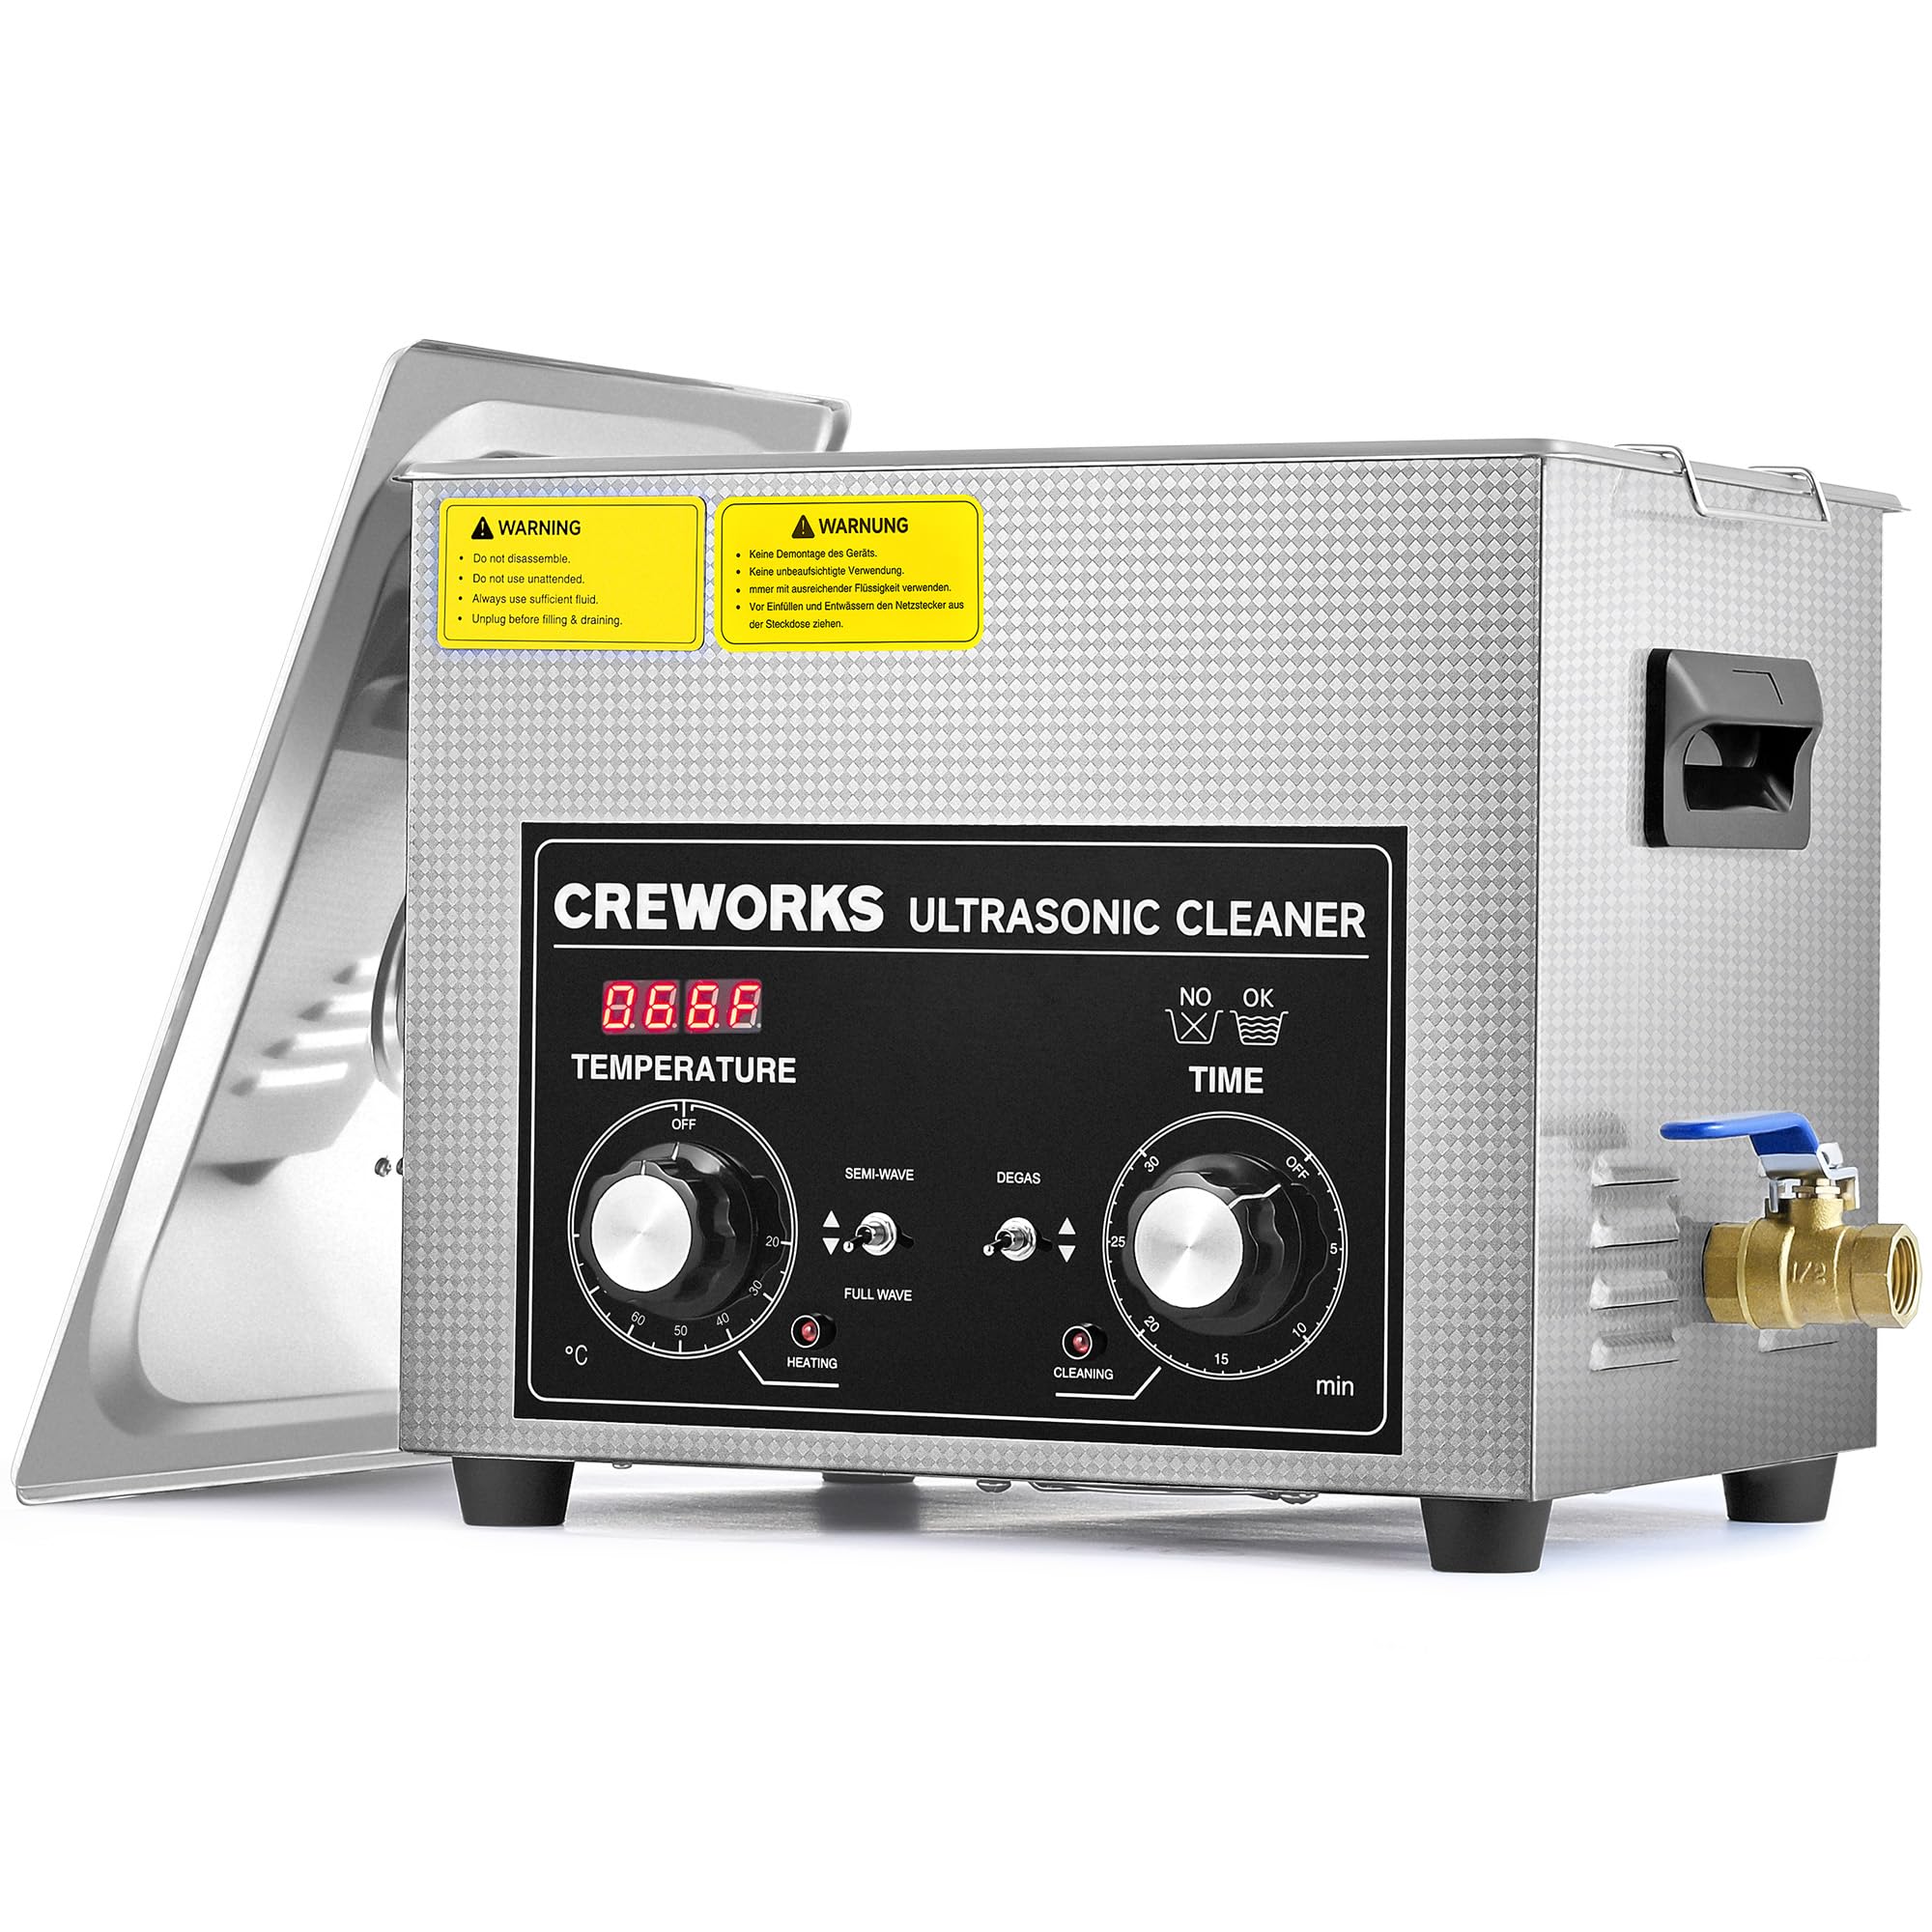
This image shows the CREWORKS 10L Ultrasonic Cleaner from the front, highlighting its stainless steel construction and the analog control panel with two rotary knobs and toggle switches.
Sleutelkomponente:
- Vlekvrye staal tenk: 10-liter capacity, made from high-quality 304 stainless steel.
- Deksel: Reinforced lid to reduce noise during operation.
- Beheerpaneel: Analog dials for temperature and timer, with toggle switches for special modes.
- Dreineringsklep: Convenient brass valve for easy liquid drainage.
- Geïntegreerde handvatsels: For easy and safe transport of the unit.
- Cleaning Basket: Removable stainless steel basket for holding items during cleaning.

A close-up shot of the control panel, clearly showing the temperature and timer dials, along with the power switch and mode selection buttons for Degas and Half-Wave (Delicate) cleaning.

This image shows the ergonomic integrated side handle for easy portability and the robust stainless steel basket designed to hold items during cleaning.
4. Opstelling
- Uitpak: Carefully remove the ultrasonic cleaner from its packaging. Inspect the unit for any signs of damage.
- Plasing: Place the unit on a stable, level, and dry surface. Ensure there is adequate ventilation around the cleaner.
- Vul die tenk: Maak die deksel oop en vul die vlekvrye staaltenk met 'n geskikte skoonmaakoplossing. Maak seker dat die vloeistofvlak tussen die MIN- en MAX-merkies is. Moenie oorvul nie.
- Aansluitkrag: Steek die kragkabel in 'n geaarde elektriese aansluiting.
- Laai items: Place the items to be cleaned into the stainless steel basket. Lower the basket into the tank, ensuring items are fully submerged but not touching the bottom of the tank directly.
5. Bedryfsinstruksies
Basiese werking:
- Krag aan: Draai die hoofskakelaar na die 'AAN'-posisie.
- Stel temperatuur: Rotate the 'TEMPERATURE' knob to set the desired cleaning temperature between 20°C and 80°C. The 300W heater will begin warming the solution. For faster heating, you may use pre-warmed water.
- Stel timer: Rotate the 'TIME' knob to set the desired cleaning duration, from 1 to 30 minutes.
- Begin skoonmaak: The ultrasonic cleaning will start automatically once the timer is set. The unit will stop when the timer counts down to zero.
Spesiale modusse:
- Degas Function: Activate the 'DEGAS' toggle switch. This function expels air bubbles from the cleaning liquid, maximizing cavitation effectiveness for deeper cleaning. It is recommended to run Degas for a few minutes before starting a cleaning cycle, especially with fresh solution.
- Delicate (Half-Wave) Mode: Activate the 'SEMI-WAVE' toggle switch. This mode modulates the ultrasonic power, providing a gentler cleaning action suitable for fragile items such as delicate jewelry, PCBs, or lenses, preventing potential damage.

An illustrative image demonstrating the Degas function, where air bubbles are expelled from the cleaning solution to enhance cavitation and cleaning efficiency.

This image visually represents the Delicate (Half-Wave) mode, indicating how ultrasonic power is modulated to provide a gentler cleaning action for sensitive items.
Na skoonmaak:
- When the cleaning cycle is complete, turn off the unit.
- Carefully lift the basket out of the tank.
- Rinse the cleaned items with clean water and dry them thoroughly.
- Dreineer die tenk: Place a suitable container under the drain valve. Open the drain valve to empty the cleaning solution. Close the valve once the tank is empty.

A visual comparison showing the effectiveness of the ultrasonic cleaner on various items, with 'Before' and 'After' images of dirty eyeglasses, a used razor blade, and a tarnished printed circuit board.
6. Onderhoud
- Maak die eenheid skoon: After each use, especially after draining, wipe the inside of the tank and the exterior of the unit with a soft, damp lap. Moenie skuurmiddels gebruik of die eenheid in water dompel nie.
- Mandjieversorging: Clean the stainless steel basket regularly to prevent residue buildup.
- Berging: Store the ultrasonic cleaner in a cool, dry place when not in use. Ensure the tank is empty and dry.
- Gereelde tjeks: Periodically inspect the power cord and plug for any damage. Ensure the drain valve operates smoothly.
7. Probleemoplossing
| Probleem | Moontlike oorsaak | Oplossing |
|---|---|---|
| Eenheid skakel nie aan nie. | Geen kragtoevoer nie; beskadigde kragkabel; foutiewe skakelaar. | Check power connection; inspect power cord; contact customer support if issues persist. |
| Swak skoonmaakresultate. | Incorrect cleaning solution; insufficient cleaning time; low temperature; too many items. | Use appropriate solution; increase time/temperature; reduce load; use Degas function. |
| Verwarmer werk nie. | Temperature knob not set; internal fault. | Ensure temperature is set above ambient; contact customer support. |
| Oormatige geraas. | Lid not closed properly; unit not on a stable surface; tank empty. | Ensure lid is closed; place on stable surface; ensure tank has liquid. |
8. Spesifikasies

A diagram showing the external dimensions of the ultrasonic cleaner (33x27x27.5 cm) and the internal dimensions of the tank (30x24x15 cm) and basket (28.3x21.5x12 cm).
| Kenmerk | Spesifikasie |
|---|---|
| Model | SX-DUC-M10L |
| Tenk kapasiteit | 10 liter |
| Ultrasoniese krag | 240 W |
| Verhitting Krag | 300 W |
| Temperatuurreeks | 20°C - 80°C |
| Timer instellings | 1 - 30 minute |
| Tenk materiaal | 304 vlekvrye staal |
| Algehele afmetings (L x B x H) | 33 x 27 x 27.5 cm |
| Tank Internal Dimensions (L x W x H) | 30 x 24 x 15 cm |
| Basket Dimensions (L x W x H) | 28.3 x 21.5 x 12 cm |
| Kleur | Swart |
9. Waarborg en Ondersteuning
CREWORKS products are manufactured to high-quality standards. For warranty information or technical support, please refer to the documentation included with your purchase or contact your retailer. Keep your purchase receipt as proof of purchase for any warranty claims.