Inleiding
The Mammotion LUBA mini 2 AWD 1500 is an advanced robotic lawn mower designed for efficient and autonomous lawn maintenance. Featuring 360° LiDAR and Dual-Camera AI Vision, it offers precise navigation and obstacle detection. This manual provides essential information for setting up, operating, and maintaining your LUBA mini 2 AWD 1500 to ensure optimal performance and longevity.
Sleutel kenmerke
- 360° LiDAR + Dual-Camera AI Vision: Provides comprehensive environmental awareness for enhanced obstacle detection and stable navigation. High-performance AI chip improves object recognition and path optimization.
- Dual Cutting Discs with Automatic Height Adjustment: Includes a main cutting disc and a dedicated edge cutting disc for clean edges. Cutting height is adjustable via the app from 0.8" to 2.6" to suit various grass types.
- AWD with 80% (38.6°) Climbing Ability: Equipped with two independent 88W motors, enabling it to climb steep slopes and navigate uneven terrain, curbs, and roots up to 45mm high.
- Multi-Zone Management & DropMow Mode: Manages up to 20 independent mowing zones for complex lawns. DropMow Mode allows for quick, one-time mowing tasks without prior mapping.
- Smart Battery Management: Features custom charge limits (e.g., 80%) to prolong battery life and Off-Peak Charging for energy cost savings.
- Enhanced Safety & Tracking: Combines physical bumpers, LiDAR, and AI vision for safe operation. Includes periodic location uploads and real-time tracking.
Opstel instruksies
Proper setup is crucial for the optimal performance of your Mammotion LUBA mini 2 AWD 1500. Follow these steps for initial installation and mapping.
1. Laaistasieplasing
Select a flat, level surface for the charging station. It can be placed on your lawn or an adjacent pathway. Secure the charging station to the ground using the provided ground screws.

Image: The charging station for the LUBA mini 2 AWD 1500, shown installed on a lawn next to a paved area. The station is black with a grey top, and the mower is docked for charging.
2. RTK Reference Station (if applicable)
If your model includes an RTK reference station, ensure it is installed in an open area with a clear view of the sky, or mounted on a wall free from obstacles. This station provides precise positioning data for the mower.

Image: Two diagrams illustrating RTK reference station installation. Method 1 shows installation in an open area on a lawn or sandy land. Method 2 shows mounting on a wall, free from obstacles.
3. Initial Power On and App Connection
Place the LUBA mini 2 AWD 1500 onto the charging station. It should automatically power on. Download the Mammotion app on your smartphone. Follow the in-app instructions to connect your mower via Bluetooth and then to your Wi-Fi network. Ensure your phone's network and Bluetooth are turned on.
Video: A user demonstrating the initial setup and app connection process for the LUBA Mini AWD Robotic Mower. The video shows the mower being placed on its charging station and the user interacting with the Mammotion app to connect and configure the device.
4. Firmware-opdatering
After connecting, check for any available firmware updates within the Mammotion app. It is recommended to keep your mower's firmware up-to-date for the best performance and access to new features.
Video: A user demonstrating the initial setup and app connection process for the LUBA Mini AWD Robotic Mower. The video shows the mower being placed on its charging station and the user interacting with the Mammotion app to connect and configure the device, including checking for firmware updates.
5. Mapping Your Lawn
The LUBA mini 2 AWD 1500 offers both manual and auto-mapping options. For optimal lawn coverage, maintain a distance of 1.5 meters between yourself and the robot when manually mapping. The robot will automatically walk along the perimeter using auto mapping. You can define up to 20 independent mowing zones.

Image: A screenshot from the Mammotion app showing two mapping methods: Manual Mapping (control the robot in a circular path) and Auto Mapping (robot automatically walks along the perimeter). The image also shows a visual representation of a lawn with defined boundaries.

Image: A visual representation of a large lawn divided into multiple mowing zones (Zone A, Zone B, Zone C) with the LUBA mini 2 AWD 1500 operating within one of them. The text highlights "Up to 20 Independent Mowing Zones".
Bedryfsinstruksies
Once set up, your LUBA mini 2 AWD 1500 is ready for autonomous mowing. Control and monitor its operations via the Mammotion app.
1. Mowing Modes
- Scheduled Mowing: Set schedules for regular mowing tasks for each defined zone.
- DropMow Mode: For quick, one-off tasks, simply place the mower in the desired area and press "Mow & Start". No prior mapping is saved for this mode.

Image: The LUBA mini 2 AWD 1500 is shown mowing a lawn, having just been unboxed. The text "DropMow Flexibility: Maps No More, Mows Right Away" is displayed, with a note that explored maps are not automatically saved for temporary tasks.
2. Intelligent Route Planning
The mower uses an intelligent coverage algorithm to optimize mowing paths, minimizing missed areas and overlaps. It can create various lawn patterns like parallel stripes, checkerboards, and diamond grids.
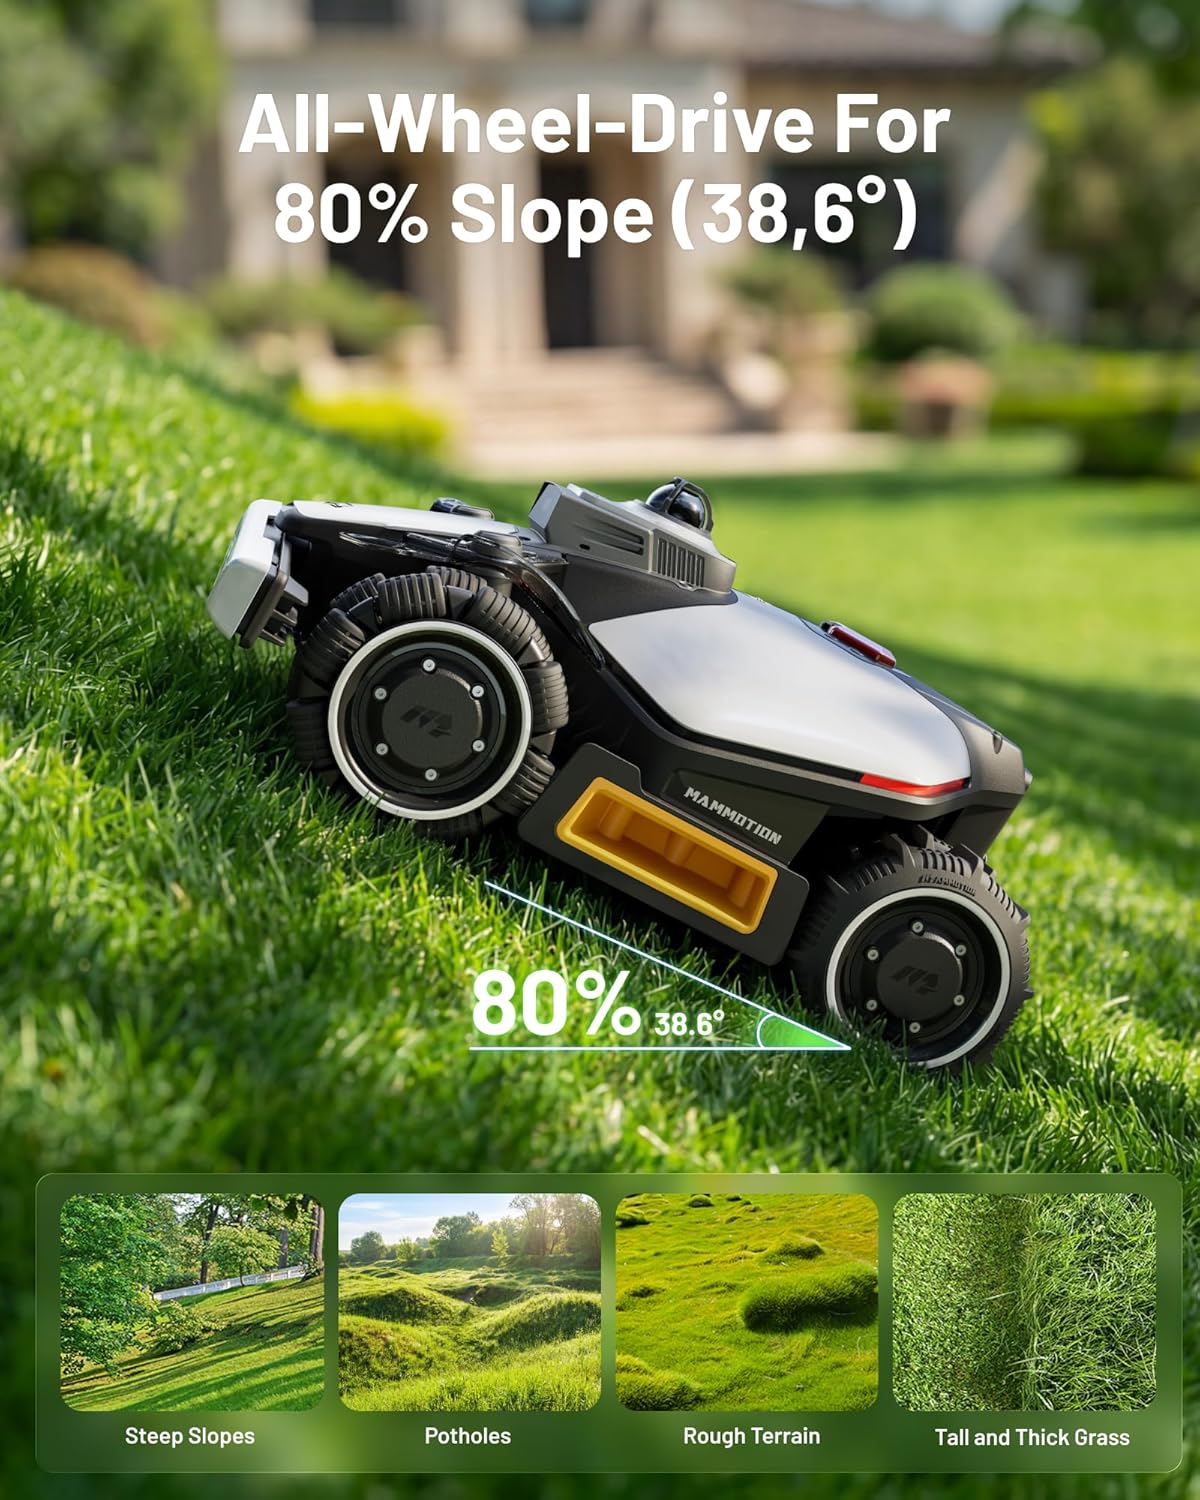
Image: The LUBA mini 2 AWD 1500 is shown mowing a large lawn in a systematic pattern, illustrating its intelligent route planning for complete coverage without misses or overlaps.
3. Vermyding van hindernisse
The 360° LiDAR and Dual-Camera AI Vision system allows the mower to detect and avoid over 200 different objects, ensuring safe operation around pets, toys, and garden features.
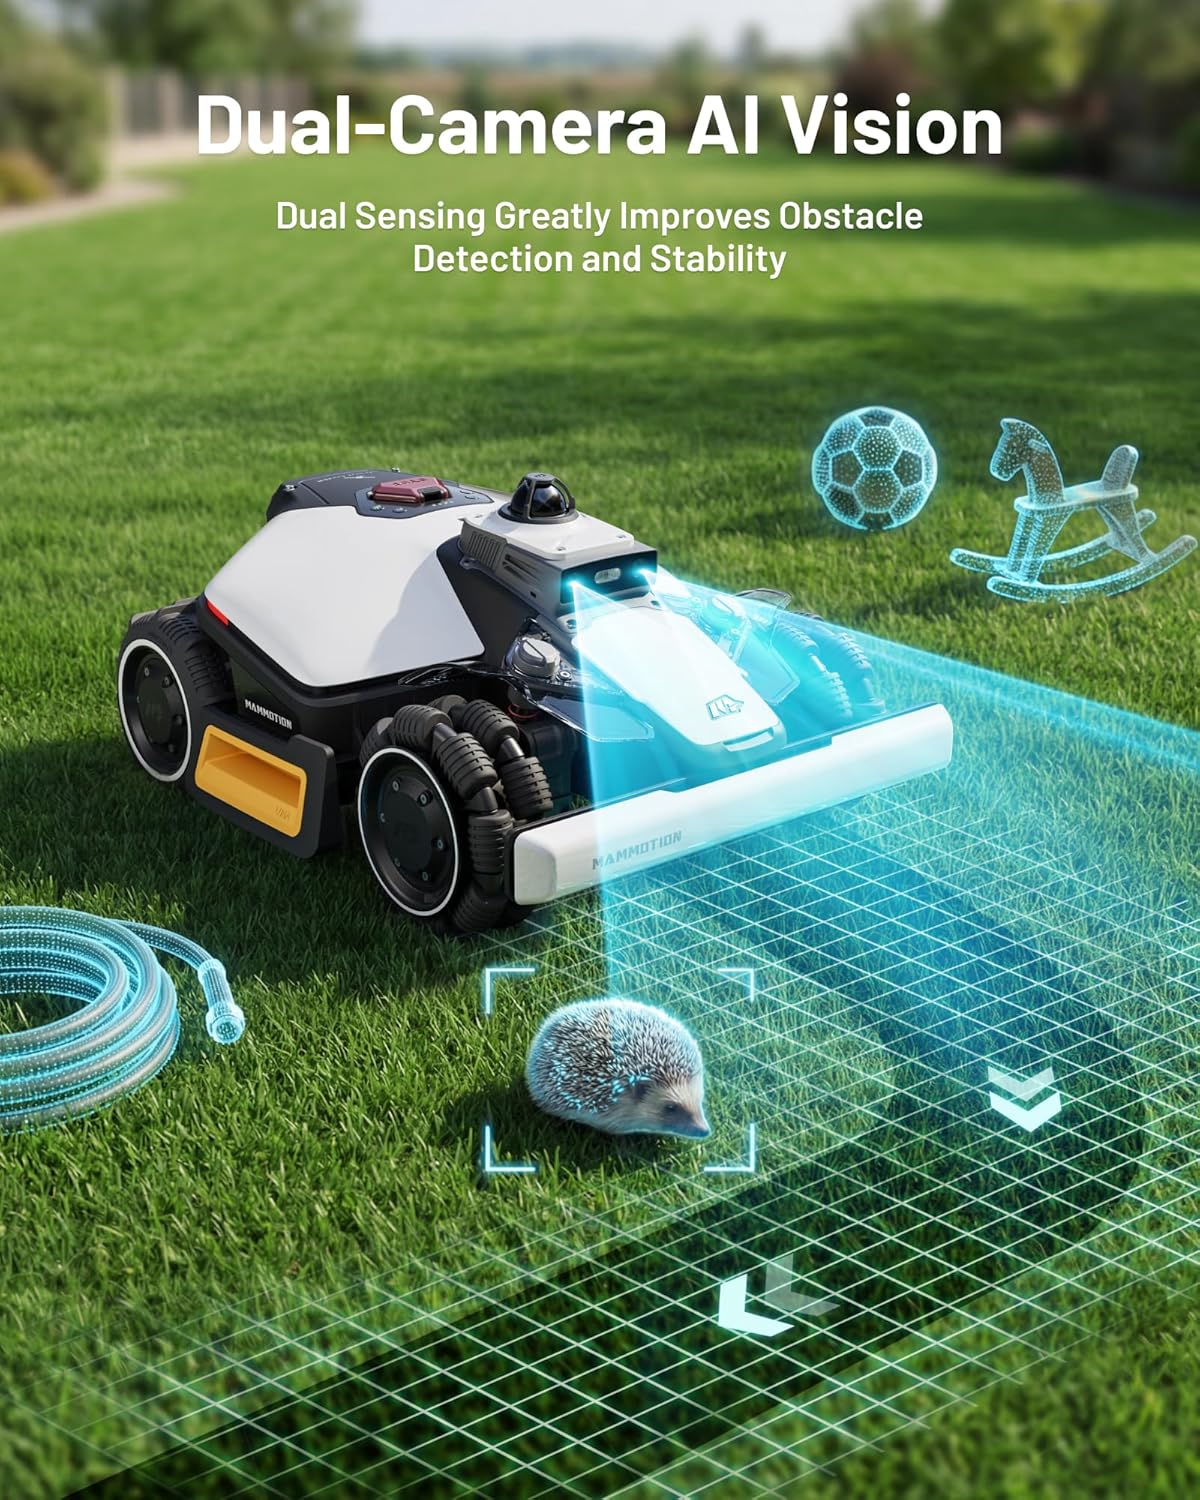
Image: The LUBA mini 2 AWD 1500 is shown on a lawn with a hedgehog in front of it, illustrating its dual-camera AI vision detecting obstacles. The text emphasizes improved obstacle detection and stability.
4. Smart Battery Management
Configure custom charge limits (e.g., 80%) to optimize battery health. The mower will only charge to 100% before a scheduled task. Utilize Off-Peak Charging to draw power during cheaper hours.

Image: The LUBA mini 2 AWD 1500 is shown charging next to a house wall, with graphics illustrating smart battery management features like control charge, off-peak charging, adaptive recharge, and low-temperature heating.
Onderhoud
Regular maintenance ensures the longevity and efficiency of your LUBA mini 2 AWD 1500.
1. Lemvervanging
The mower uses small, replaceable blades. Check them periodically for wear and replace as needed. Extra spare blades are included in the box.

Beeld: 'n Nabyskoot view of the underside of the LUBA mini 2 AWD 1500, showing its dual cutting discs with multiple small blades. The text highlights "Efficiently Covers 0.37 Acre Lawns" and mentions "Dual Cutting Discs".
2. Skoonmaak
Keep the mower clean, especially the cutting decks and sensors, to prevent buildup of grass and debris. The mower is IPX6 waterproof, allowing for easy cleaning with water.

Image: The LUBA mini 2 AWD 1500 is being sprayed with water from a hose, demonstrating its IPX6 waterproof rating for easy cleaning. The text "IPX6 Waterproof" is prominently displayed.
Probleemoplossing
If you encounter issues with your LUBA mini 2 AWD 1500, refer to these common troubleshooting tips.
1. Mower Stops Unexpectedly
- Obstacle Detected: Check for any obstacles in the mower's path. The AI vision system is designed to stop the mower if it detects an object.
- Boundary Issue: Ensure the mower is within its defined mowing zones. If it crosses a boundary, it may stop.
- Seinverlies: If operating in areas with poor GPS or RTK signal (e.g., under dense trees or near tall buildings), the mower may pause or stop.
2. Uneven Mowing or Missed Spots
- Blade toestand: Inspect the cutting blades for wear or damage. Replace dull blades for a cleaner cut.
- Snyhoogte: Adjust the cutting height via the app to suit the grass type and desired finish.
- Mapping Accuracy: Re-map the area if you notice consistent missed spots, ensuring the perimeter is accurately defined.
Spesifikasies
| Kenmerk | Detail |
|---|---|
| Handelsmerk | Mammosie |
| Modelnommer | LUBA mini 2 1500 garage |
| Kragbron | Battery aangedrewe |
| Sny breedte | 7.8 duim |
| Bedryfsmodus | Outomatiese |
| Produk afmetings | 23" D x 18" B x 11.4" H |
| Maksimum verstelbare snyhoogte | 2.6 duim |
| Minimum Verstelbare Snyhoogte | 0.8 duim |
| Batterylewe | 60 minute |
| Klim vermoë | 80% (38.6 °) |
| Mowing Area Coverage | Tot 0.37 Akker |
| Waterdigte gradering | IPX6 |
Veiligheidsinligting
- Always keep children and pets away from the mowing area when the robot is operating.
- Ensure the mowing area is clear of loose objects that could be thrown by the blades.
- Do not attempt to lift or service the mower while it is running. Use the emergency stop button if necessary.
- The mower features GPS tracking and anti-theft protection. The first person to set it up becomes the rightful owner, and unauthorized use is prevented.
Waarborg & Ondersteuning
Mammotion offers a 3-year warranty for the LUBA mini 2 AWD 1500. For any support needs, you can contact Mammotion via email, live chat, or phone. 24/7 lifetime customer support is available.

Image: A graphic displaying a shield with "3 year" written on it, symbolizing the warranty. Below it are icons for Email, Live Chat, and Call, indicating available customer support channels.