1. Inleiding
This manual provides detailed instructions for the installation, operation, and maintenance of your Uthfy 12000BTU 115V Mini Split AC/Heating System, Model HY12GWH115. This ETL-certified unit features a 1-ton high-performance inverter heat pump compressor, designed to provide efficient cooling and heating for spaces up to 750 sq. ft. Please read this manual thoroughly before installation and use to ensure proper function and safety.
2. Veiligheidsinligting
Belangrike veiligheidsinstruksies:
- Installation must be performed by qualified professionals to prevent electric shock, fire, or serious injury.
- Maak seker dat die kragtoevoer ooreenstem met die eenheid se spesifikasies (115V).
- Moenie probeer om die eenheid self te herstel of te wysig nie. Kontak gekwalifiseerde dienspersoneel.
- Hou kinders en troeteldiere weg van die eenheid tydens werking en onderhoud.
- Verseker behoorlike aarding om elektriese gevare te voorkom.
- Moenie luginlate of -uitlate blokkeer nie.
- Use only R32 refrigerant as specified.
3. Pakketinhoud
Your Uthfy Mini Split AC/Heating System is shipped in two separate boxes. Please verify all components are present before beginning installation.
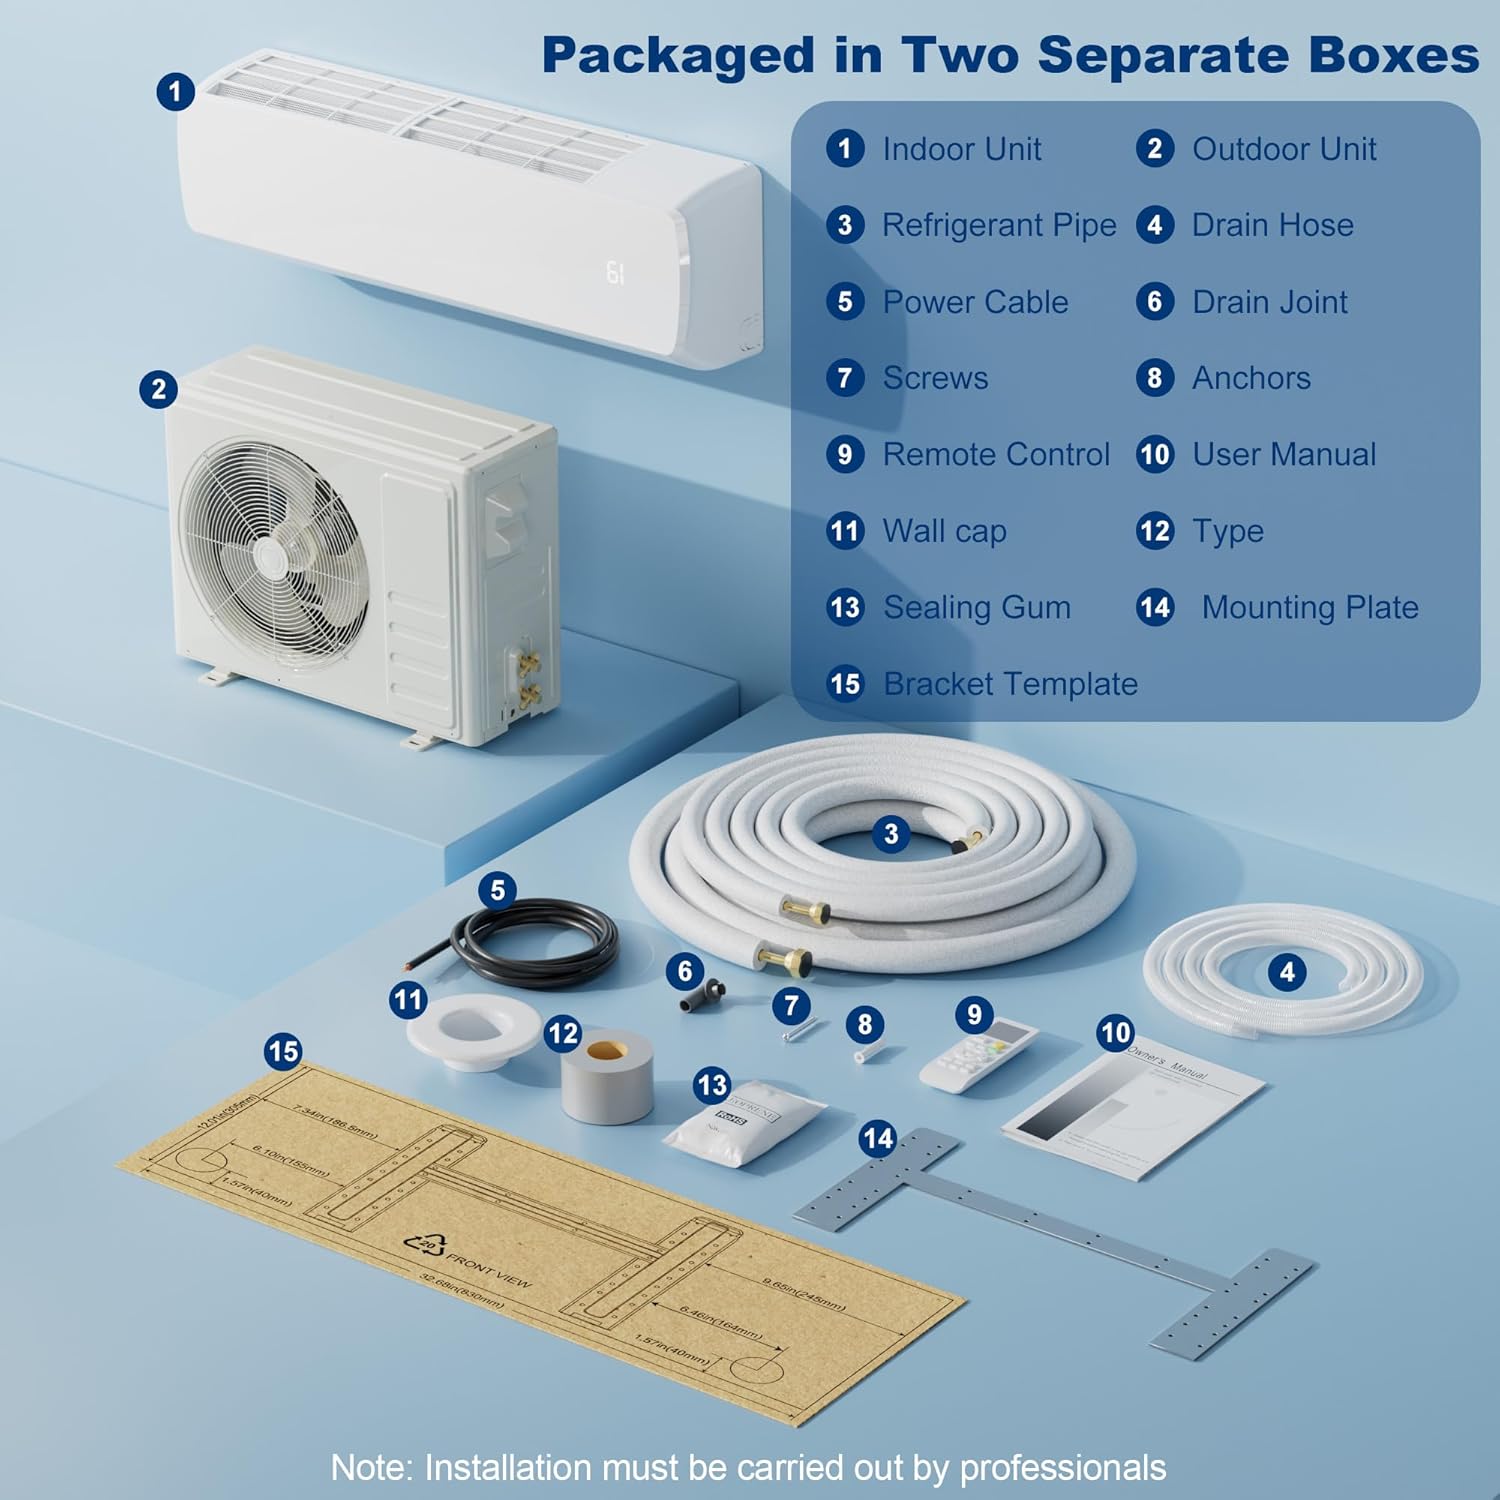
Figure 3.1: Included Components. The image displays the indoor unit, outdoor unit, refrigerant pipes, drain hose, power cable, drain joint, anchors, screws, remote control, user manual, wall cap, sealing gum, mounting plate, and bracket template.
Die pakket sluit gewoonlik in:
- Binne-eenheid
- Buitelug Eenheid
- Refrigerant Pipes (Pre-charged)
- Dreineer die slang
- Kragkabel
- Dreineer Joint
- Ankers en skroewe
- Afstandbeheer
- Gebruikershandleiding (hierdie dokument)
- Muurdop
- Seëlgom
- Montageplaat
- Hakiesjabloon
4. Produk verbyview
4.1 Sleutelkenmerke
- Energy-Efficient Inverter Technology: Dynamically adjusts power frequency to reduce energy consumption by approximately 25% compared to traditional units, maintaining stable temperatures.
- All-Season Comfort: Offers 7 versatile working modes (including Turbo, Mute, Sleep, ECO, Swing, Fan) and 4 fan speeds (Low, Mid, High, Auto) for year-round climate control.
- Ultra-stil werking: Operates at a low speed noise level of 25 dB, ensuring minimal disturbance.
- Eko-vriendelike koelmiddel: Pre-charged with R32 refrigerant, contributing to environmental sustainability.
- Slim funksies: Includes a 24-hour intelligent timer for scheduled operation and a dimmable display.
- Outo-skoonmaak: Features an automatic interior cleaning function to maintain air quality.

Figure 4.1: Performance overview showing quick cooling and heating capabilities for areas up to 750 sq.ft.

Figure 4.2: Illustrates the 4-in-One functionality, including cooling, heating, fan, and dry modes.
5. Installasie
Professional installation is strongly recommended for this mini split system. The following steps provide a general overview. Refer to the detailed instructions in the included user manual for specific guidance.
5.1 Binne-eenheid installasie
- Kies ligging: Choose a location on an interior wall that can support the unit's weight and allows for proper airflow. Ensure there is enough space around the unit for maintenance.
- Montageplaat installasie: Use the provided bracket template to mark drilling points on the wall. Drill holes and secure the mounting plate firmly to the wall using anchors and screws.
- Boor muurgat: Drill a hole (typically 2.5-3 inches in diameter) through the wall for the refrigerant lines, drain hose, and electrical cables to pass through to the outdoor unit.
- Koppel bedrading: Open the electrical cover on the indoor unit. Connect the power cable and communication wires to the designated terminals as shown in the wiring diagram. Ensure all connections are secure.
- Route Pipes and Cables: Route the refrigerant pipes, drain hose, and electrical cables through the wall hole.
- Monteer Binne-eenheid: Carefully lift the indoor unit and hook it onto the mounting plate. Ensure it is securely seated and level.
Video 5.1: This video demonstrates the process of connecting electrical wiring to the indoor unit, routing the pipes and cables, and mounting the indoor unit to the wall. It also shows the connection of the refrigerant lines.
5.2 Installasie van buite-eenheid
- Kies ligging: Choose a stable, level surface outdoors, away from direct sunlight and obstructions, with adequate clearance for airflow.
- Veilige Eenheid: Place the outdoor unit on a sturdy base (e.g., concrete pad or specialized mounting brackets). Secure it to prevent vibration and movement.
- Verbind koelmiddellyne: Connect the pre-charged refrigerant lines from the indoor unit to the corresponding valves on the outdoor unit. Ensure connections are tight to prevent leaks.
- Verbind elektriese bedrading: Open the electrical cover on the outdoor unit. Connect the communication wires and power supply wires to the designated terminals. Ensure proper grounding.
- Vakuum- en Lektoets: After all connections are made, a vacuum pump must be used to evacuate air and moisture from the refrigerant lines. Perform a leak test to ensure system integrity.
- Oop Kleppe: Once the system is vacuumed and leak-free, fully open the service valves on the outdoor unit to release the refrigerant into the system.
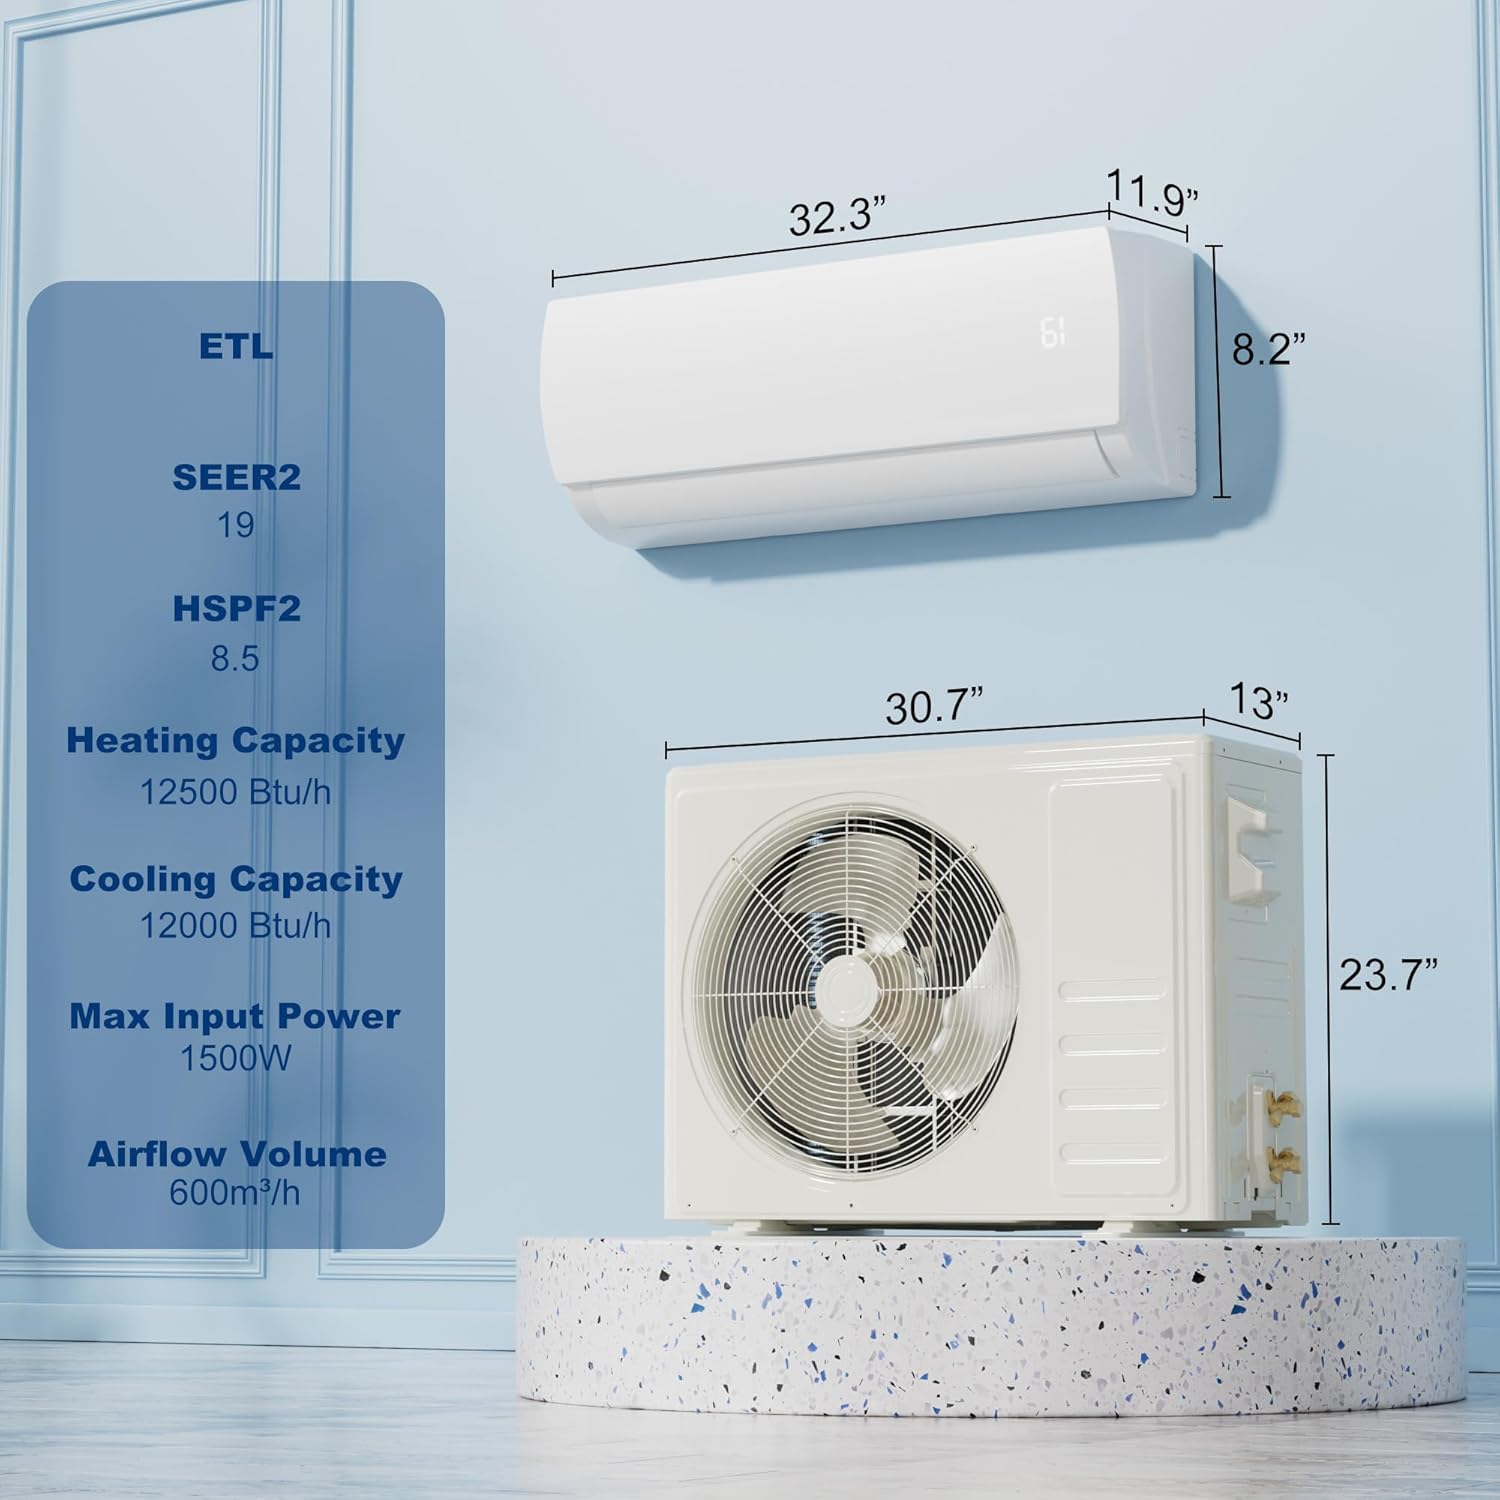
Figure 5.1: Dimensions of the indoor and outdoor units. Indoor unit: 32.3"D x 11.9"W x 8.2"H. Outdoor unit: 30.7"D x 13"W x 23.7"H.
6. Operasie
Your Uthfy Mini Split AC/Heating System can be controlled using the included remote control.
6.1 Afstandbeheerfunksies
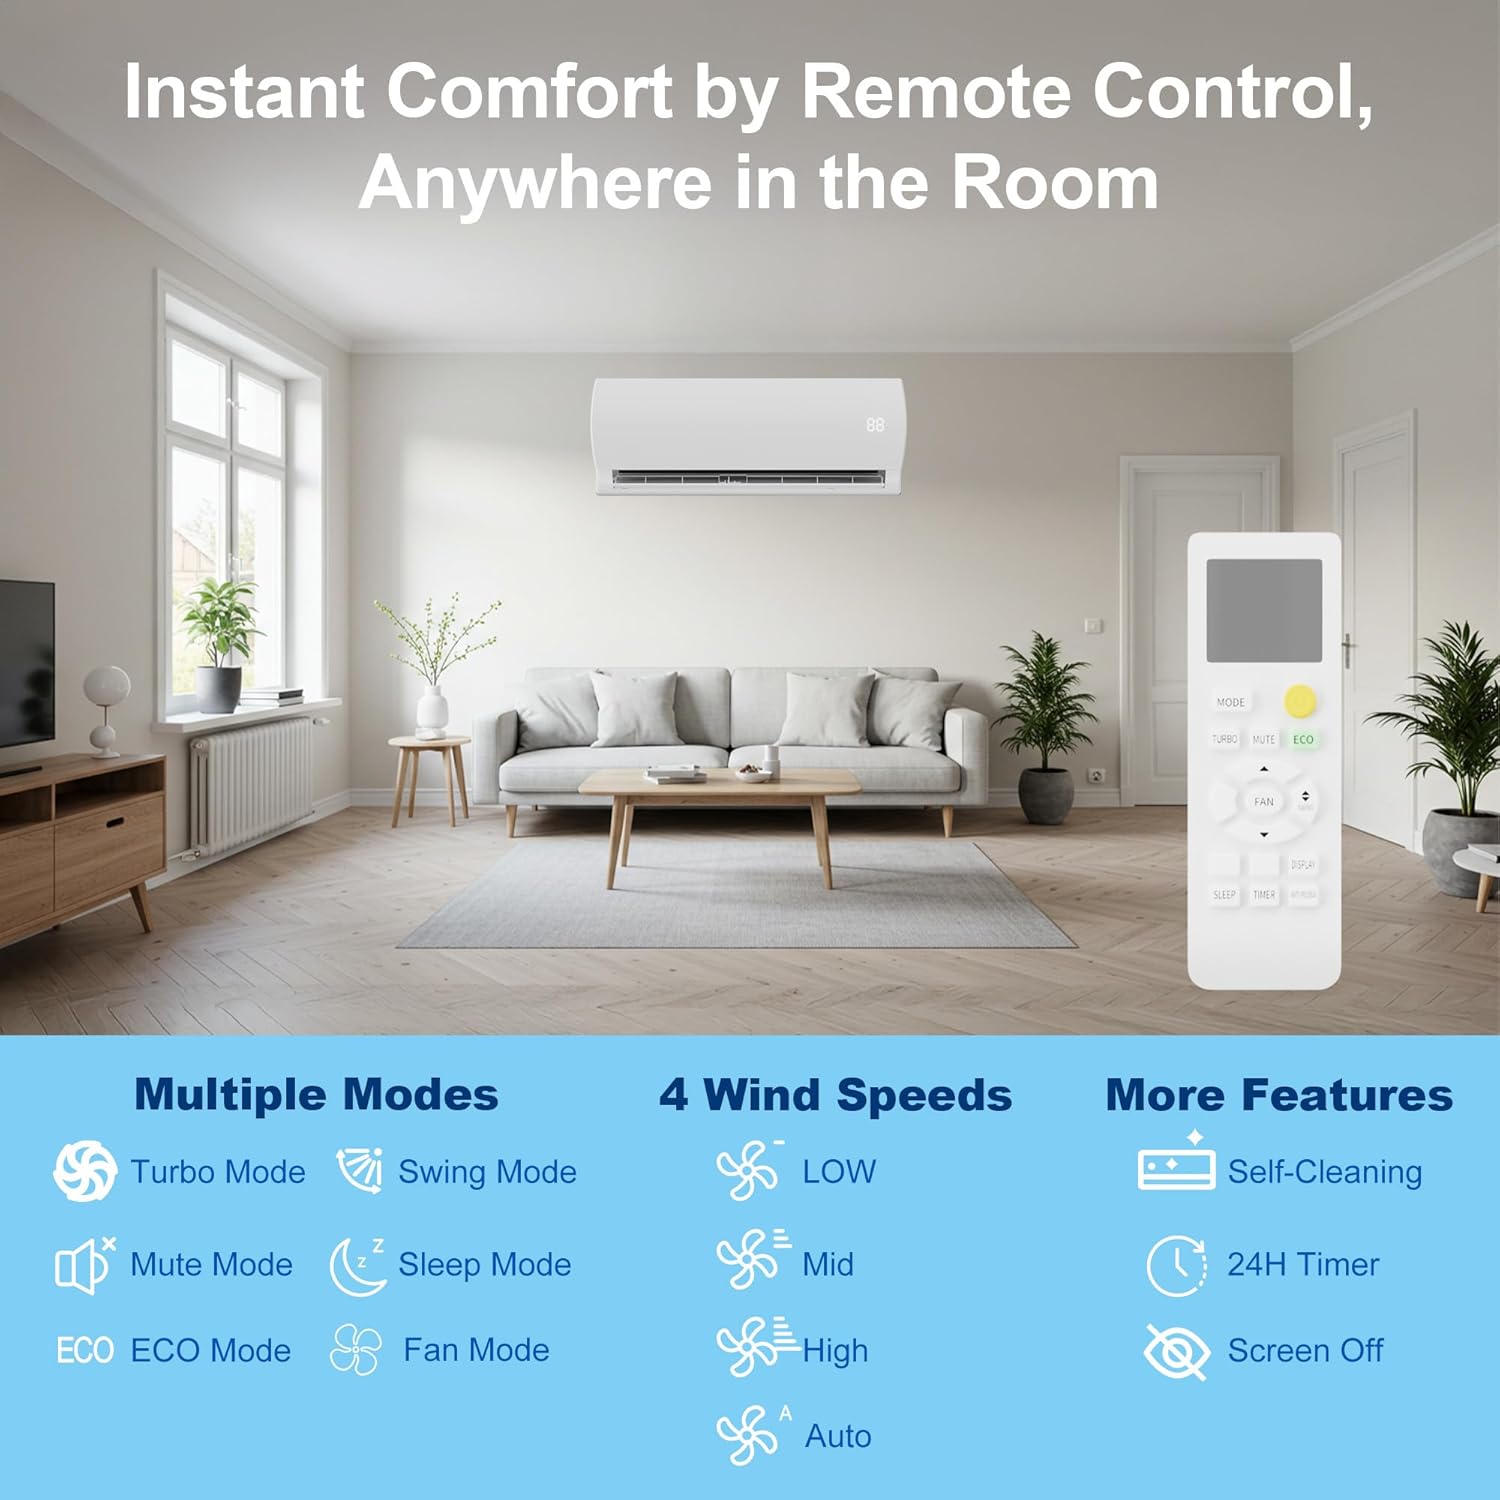
Figure 6.1: Remote control and available operating modes. The remote allows selection of Turbo Mode, Swing Mode, Mute Mode, Sleep Mode, ECO Mode, Fan Mode, and adjustment of fan speeds (Low, Mid, High, Auto). Additional features include Self-Cleaning, 24H Timer, and Screen Off.
Familiarize yourself with the remote control buttons and their corresponding functions:
- MODUS-knoppie: Blaai deur bedryfsmoduse: Verkoel, Verhit, Waaier, Droog, Outomaties.
- FAN-knoppie: Adjusts fan speed: Low, Mid, High, Auto.
- TEMP +/- Knoppies: Pas die verlangde temperatuurinstelling aan.
- SWING-knoppie: Beheer die vertikale lamelbeweging vir lugverspreiding.
- Slaap stelling: Optimaliseer temperatuur en waaierspoed vir gemaklike slaap en energiebesparing.
- ECO -modus: Provides energy-efficient operation by adjusting settings automatically.
- TURBO funksie: Activates maximum cooling or heating for rapid temperature change.
- TIMER-knoppie: Sets the 24-hour timer for automatic on/off operation.
- SCREEN OFF Button: Turns off the indoor unit's display for undisturbed rest.
6.2 Bedryfsmodusse
| Modus | Beskrywing |
|---|---|
| Koel modus | Verkoel die kamer tot die vasgestelde temperatuur. |
| Hitte-modus | Heats the room to the set temperature. |
| Waaiermodus | Sirkuleer lug sonder verkoeling of verhitting. |
| Droë modus | Ontvochtig die kamer. |
| Outo-modus | Kies outomaties verkoeling of verhitting gebaseer op kamertemperatuur. |
| Slaapmodus | Adjusts temperature and fan speed for quiet, comfortable sleep. |
| ECO-modus | Optimizes operation for maximum energy efficiency. |

Figure 6.2: Quiet operation in Sleep Mode, with noise levels as low as 25 dB.
7. Onderhoud
Gereelde onderhoud verseker optimale werkverrigting en lang lewensduur van u eenheid.
7.1 Filter Skoonmaak
The indoor unit features washable air filters. Clean them regularly (every 2-4 weeks, depending on usage) to maintain air quality and efficiency.
- Skakel die eenheid af en ontkoppel die krag.
- Maak die voorpaneel van die binne-eenheid oop.
- Verwyder die lugfilters.
- Wash filters with lukewarm water and mild detergent. Rinse thoroughly.
- Laat filters heeltemal droog word voordat hulle weer geïnstalleer word.
- Maak die voorpaneel toe.
7.2 Auto-Cleaning Function
This unit includes an auto-cleaning function to help prevent mold and bacteria buildup inside the indoor unit. Refer to your remote control instructions for activating this feature.
8. Probleemoplossing
Voordat u kliëntediens kontak, verwys asseblief na die volgende algemene probleme en oplossings:
| Probleem | Moontlike oorsaak | Oplossing |
|---|---|---|
| Eenheid begin nie | Geen krag, stroombreker het afgeskakel, afstandbeheerder se batterye is laag. | Kontroleer kragtoevoer, herstel stroombreker, vervang afstandbeheerbatterye. |
| Onvoldoende verkoeling/verhitting | Vuil lugfilters, geblokkeerde buite-eenheid, verkeerde modusinstelling, lae koelmiddel. | Clean filters, clear obstructions, select correct mode, contact professional for refrigerant check. |
| Ongewone geraas | Loose parts, fan obstruction, unit not level. | Check for loose components, remove obstructions, ensure unit is level. If noise persists, contact service. |
| Waterlekkasie van binnenshuise eenheid | Verstopte dreineringslang, onbehoorlike installasie. | Check and clear drain hose, ensure proper slope. If issue persists, professional inspection is needed. |
9. Spesifikasies
Detailed technical specifications for the Uthfy 12000BTU 115V Mini Split AC/Heating System (Model HY12GWH115).
| Kenmerk | Spesifikasie |
|---|---|
| Handelsmerk | Uthfy |
| Model Naam | HY12GWH115 |
| Kapasiteit | 1 Ton |
| Verkoeling Krag | 10 000 Britse Termiese Eenhede (BTU) |
| Verhittingskapasiteit | 12500 XNUMX BTU/h |
| Voltage | 115 Volt |
| SEER2-gradering | 19 |
| HSPF2-gradering | 8.5 |
| Noise Level (Low Speed) | 25 Desibel |
| Produk Afmetings (Binne-eenheid) | 32.28" D x 11.93" B x 8.23" H |
| Item gewig | 73.9 pond |
| Koelmiddel tipe | R32 (Pre-charged) |
| Installasie tipe | Gesplete stelsel |
| Ingesluit komponente | Installasie Kit |
10. Waarborg en Ondersteuning
Waarborg: This Uthfy Mini Split AC/Heating System comes with a 1-Year Manufacturer Warranty.
Kliëntediens: For technical assistance, troubleshooting beyond this manual, or warranty claims, please contact Uthfy customer support. Refer to the contact information provided in your product packaging or visit the official Uthfy webwebwerf.


