1. Belangrike veiligheidsinstruksies
Please read all instructions before using this sewing machine. This machine is intended for household use only.
DANGER - To reduce the risk of electric shock:
- ’n Toestel moet nooit sonder toesig gelaat word wanneer dit ingeprop is nie.
- Koppel hierdie toestel altyd onmiddellik na gebruik en voor skoonmaak uit die elektriese aansluiting.
- Ontkoppel altyd voor her-lamping. Vervang gloeilamp met dieselfde tipe gegradeerde 15 watt (110-120V area) of 15 watt (220-240V area).
WARNING - To reduce the risk of burns, fire, electric shock, or injury to persons:
- Moenie toelaat dat dit as speelding gebruik word nie. Noukeurige aandag is nodig wanneer hierdie toestel deur of naby kinders gebruik word.
- Gebruik hierdie toestel slegs vir sy beoogde gebruik soos beskryf in hierdie handleiding. Gebruik slegs aanhegsels wat deur die vervaardiger aanbeveel word soos vervat in hierdie handleiding.
- Moet nooit hierdie toestel gebruik as dit 'n beskadigde koord of prop het nie, as dit nie behoorlik werk nie, as dit geval of beskadig is, of in water geval het. Stuur die toestel terug na die naaste gemagtigde handelaar of dienssentrum vir ondersoek, herstel, elektriese of meganiese verstelling.
- Moet nooit die toestel gebruik met enige lugopeninge wat geblokkeer is nie. Hou ventilasie-openinge van die naaimasjien en voetbeheerder vry van ophoping van pluis, stof en los lap.
- Hou vingers weg van alle bewegende dele. Spesiale versigtigheid is nodig rondom die naaimasjiennaald.
- Gebruik altyd die regte naaldplaat. Die verkeerde plaat kan veroorsaak dat die naald breek.
- Moenie gebuigde naalde gebruik nie.
- Moenie stof trek of druk terwyl jy stik nie. Dit kan die naald afbuig en dit laat breek.
- Always unplug sewing machine off ("O") when making any adjustments in the needle area, such as threading needle, changing needle, threading bobbin, or changing presser foot, and the like.
- Trek die naaimasjien altyd uit die stopcontact wanneer u deksels verwyder, smeer of as u enige ander gebruikersversienings aanpas wat in die handleiding vermeld word.
- Moet nooit enige voorwerp in enige opening laat val of insteek nie.
- Moenie buite gebruik nie.
- Moenie werk waar aerosolsproeiprodukte gebruik word of waar suurstof toegedien word nie.
- To disconnect, turn all controls to the off ("O") position, then remove plug from outlet.
- Moenie die prop uittrek deur aan die koord te trek nie. Om die prop te ontkoppel, gryp die prop vas, nie die koord nie.
- Die klankdrukvlak onder normale bedryfstoestande is 75dB(A).
- Always turn off the machine or unplug when the machine is not operating properly.
- Moet nooit iets op die voetbeheerder plaas nie.
- If the supply cord to the foot controller is damaged, it must be replaced by the manufacturer or its service agent or a similar qualified person in order to avoid a hazard.
- Hierdie toestel is nie bedoel vir gebruik deur persone (insluitend kinders) met verminderde fisiese, sensoriese of geestelike vermoëns, of 'n gebrek aan ervaring en kennis nie, tensy hulle toesig of instruksies oor die gebruik van die toestel gegee is deur 'n persoon wat verantwoordelik is vir hul veiligheid.
- Kinders moet onder toesig wees om te verseker dat hulle nie met die toestel speel nie.
BEWAAR HIERDIE INSTRUKSIES
Image: Important Safety Instructions page from the Singer 2250 manual, detailing electrical and general safety warnings.
2. Opstelling
2.1 Bykomstighede
The Singer 2250 sewing machine comes with a set of standard accessories and supports various optional accessories for different sewing tasks.
- Standaard bykomstighede: All purpose foot, Button sewing foot, Zipper foot, Screwdriver, Seam ripper/brush, Pack of needles, Bobbin (3), Darning plate, Spool holder.
- Optional Accessories (not supplied with machine, available from SINGER® retailers): Edge/quilting guide, Zipper foot, Straight stitch foot, Overcasting foot, Hemmer foot, Blind hem foot, Satin stitch foot, Cording/embroidery foot, Second spool pin, Spool pin felt.
2.2 Die spoel opwind
- Place thread and corresponding spool holder onto the spool pin.
- Snap the thread into the thread guide.
- Wind the thread counterclockwise around the bobbin winder tension disc.
- Thread the bobbin as illustrated and place it on the spindle.
- Push the bobbin spindle to the right.
- Hold the thread end.
- Step on the foot control pedal to begin winding.
- Cut the thread once the bobbin is full.
- Push the bobbin spindle to the left and remove the wound bobbin.
Neem asseblief kennis: When the bobbin winder spindle is in the "bobbin winding" position, the machine will not sew and the hand wheel will not turn. To start sewing, push the bobbin winder spindle to the left (sewing position).

Image: Manual page illustrating standard and optional accessories, and a step-by-step guide for winding the bobbin.
2.3 Connecting to Power Source
Ensure the machine's power switch is in the "O" (off) position. Insert the machine plug into the electrical outlet. Always use a grounded outlet.
2.4 Raising the Presser Foot Lifter
The presser foot lifter is located at the back of the needle bar area. Lift it to raise the presser foot for placing fabric, and lower it to hold the fabric in place for sewing.
3. Operasie
3.1 Choosing Your Pattern
The Singer 2250 features a Pattern Selector Dial to choose various stitch patterns.
- Stitches indicated in black on the diagram correspond to the Pattern Selector Dial.
- For patterns indicated with the "S" color, turn the Pattern Selector Dial to "S", then use the Stitch Length Dial to adjust the desired stitch length.
- The Pattern Selector Dial can be turned in either direction.
3.2 Stitch Length Dial
The Stitch Length Dial controls the length of straight stitches and the density of zig-zag stitches.
- For Straight Stitching: Turn the Pattern Selector Dial to the straight stitch symbol. The stitch length increases as the dial approaches "4". Use longer stitches for heavier fabrics and thicker needles, shorter stitches for lighter fabrics and finer needles.
- For Zig-Zag Stitching: Turn the Pattern Selector Dial to "~~~ ". The density of zig-zag stitches increases as the setting of the stitch length dial approaches "0". Dense zig-zag stitches are known as satin stitches.

Image: Manual page detailing how to choose stitch patterns and adjust stitch length for various sewing applications.
3.3 Die masjien insny
Proper threading is crucial for smooth sewing. Follow these general steps:
- Place the spool of thread on the spool pin.
- Lei die draad deur die boonste draadgidse.
- Steek die draad deur die spanningsskyfies.
- Bring the thread up through the take-up lever.
- Guide the thread down through the needle bar thread guide.
- Ryg die naald van voor na agter.
- Raise the bobbin thread by turning the handwheel towards you, catching the bobbin thread with the needle thread.
- Pull both threads under the presser foot and towards the back.
3.4 Sewing on Buttons
To sew buttons using your Singer 2250:
- Installeer die stopplaat.
- Change the all-purpose foot to the button sewing tool.
- Position the fabric and button under the foot.
- Lower the button to the desired position and lower the foot.
- Set the Pattern Selector Dial on "---" and sew a few securing stitches.
- Select one of the two narrow zig-zag patterns (between 0.5 and 1.5) and sew through both holes of the button. Turn the handwheel to check needle clearance.
- Slowly sew the button with about 10 stitches.
- Select pattern "---" again and sew a few securing stitches.
- If a shank is required, place a darning needle on top of the button and sew.
- For buttons with 4 holes, sew through the front two holes first, then sew backwards and then sew through the back two holes.
3.5 Installing the Removable Extension Table
The removable extension table provides a larger work surface and also serves as an accessory box.
- Om te installeer: Hold the removable extension table horizontally and push it in the direction of the arrow until it clicks into place.
- Om te verwyder: Pull the extension table towards the left.
- The inside of the removable extension table can be used as an accessory box. To open, flip the cover down.
4. Onderhoud
4.1 Darning Plate
The darning plate is used for specific tasks like darning or free-hand embroidery.
- Installasie: Install the darning plate as illustrated in the manual.
- Verwydering: Vir normale naaldwerk, verwyder die stopplaat.
- For free-motion sewing, a darning/embroidery foot (optional accessory) is recommended.
4.2 Inserting & Changing Needles
Regularly change your needle, especially if sewing problems occur. Use SINGER® Brand Needles for best results.
- Turn the power switch to off ("O").
- Maak die naald losamp skroef.
- Insert the new needle with the flat side of the shaft facing the back, pushing it up as far as it will go.
- Draai die naald styf clamp skroef.
Aandag: Needles must be in perfect condition. Problems can occur with bent needles, damaged points, or blunt needles.
4.3 Changing the Bulb
To change the light bulb, ensure the machine is unplugged. Replace the bulb with the same type rated 15 watts (110-120V area) or 15 watts (220-240V area).
4.4 Skoonmaak
Regularly clean the lint and dust from the bobbin case area and feed dogs using the provided brush. Ensure the machine is unplugged before cleaning.
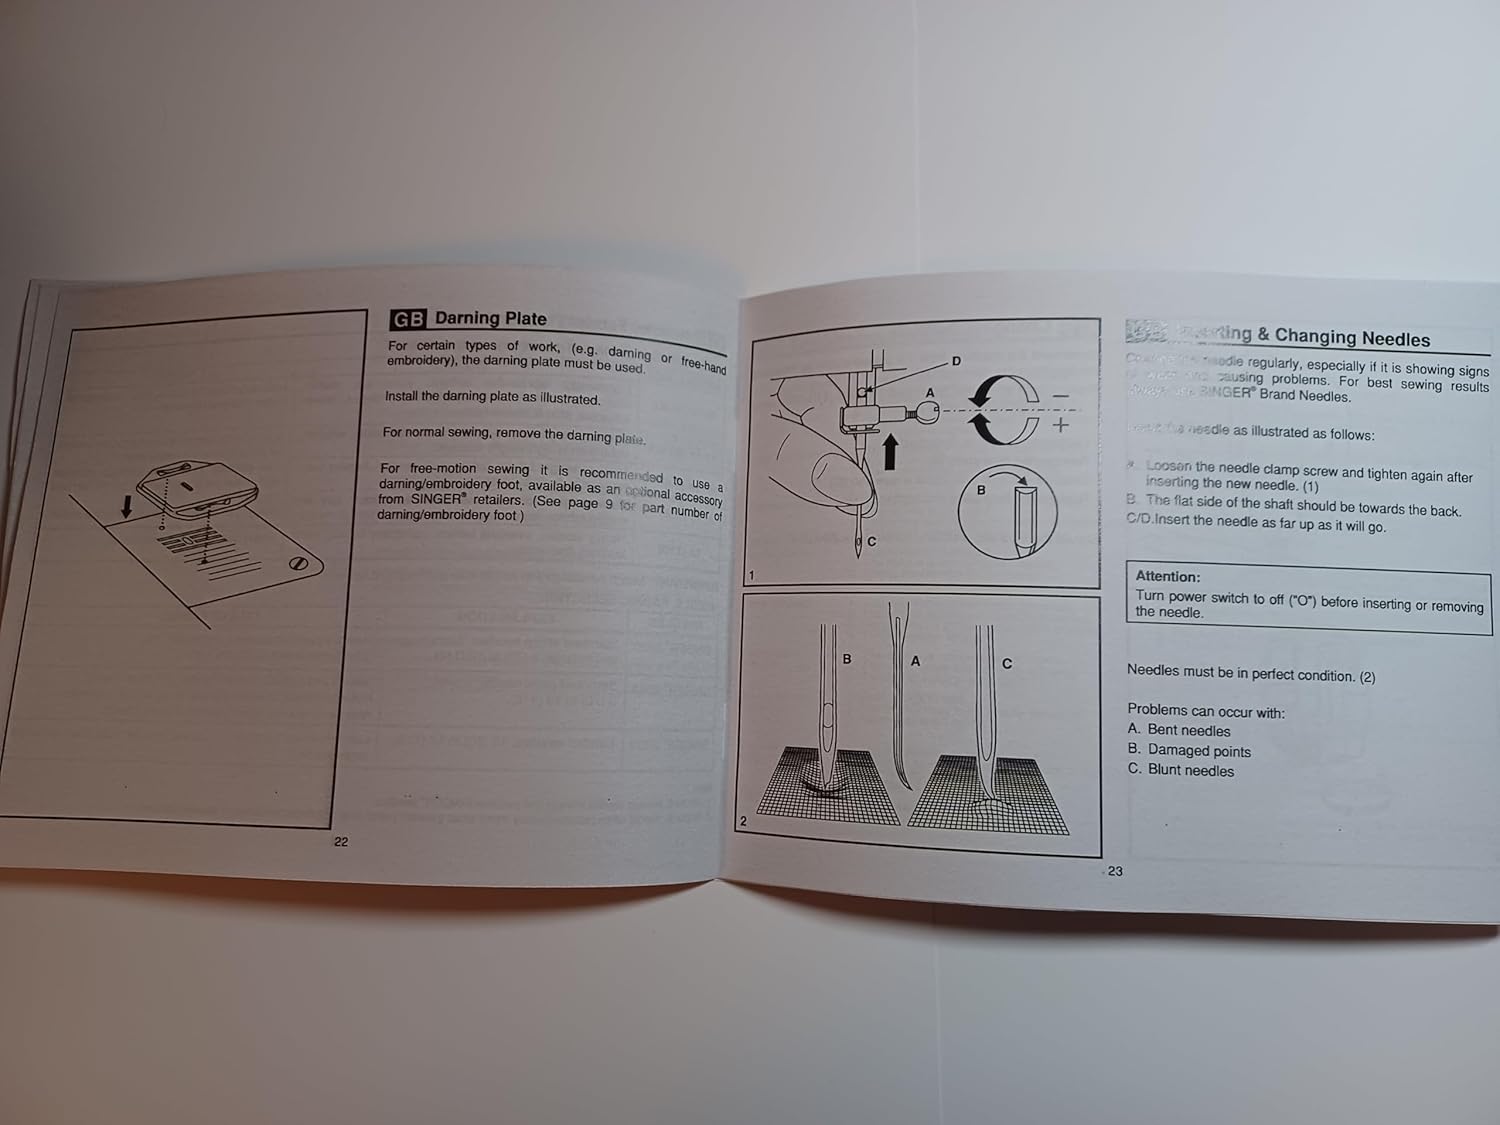
Image: Manual page illustrating procedures for sewing on buttons, installing the extension table, using the darning plate, and changing needles.
5. Probleemoplossing
If you encounter issues with your Singer 2250, refer to the following common problems and solutions:
- Oorgeslaande steke: Ensure the needle is inserted correctly, not bent, and is the appropriate size for the fabric and thread. Re-thread the machine.
- Draad breek: Check for correct threading, proper tension, a bent or blunt needle, or burrs on the needle plate or bobbin case.
- Stofplooiing: Adjust tension settings, use the correct needle size, or ensure the presser foot pressure is appropriate for the fabric.
- Machine Not Feeding Fabric: Check if the feed dogs are raised. Ensure the presser foot is lowered.
- Lawaaierige werking: Clean and lubricate the machine as per maintenance instructions. Check for loose parts or a bent needle.
For persistent problems, contact an authorized Singer service center.
6. Spesifikasies
| Produk afmetings | 8.5 x 5.5 x 0.1 duim |
| Item gewig | 3 onse |
| Modelnommer | SINGER 2250 Manual |
| Vervaardiger | TabSynth Design (for reproduction manual) |
| ASIN | B0G19M5M63 |
7. Waarborg en Ondersteuning
This instruction manual is a reproduction for the Singer 2250 Sewing Machine. For warranty information regarding your Singer 2250 sewing machine, please refer to the original documentation provided with your machine or contact Singer customer support directly.
For support related to the operation or maintenance of your Singer 2250, please consult this manual. If further assistance is needed, contact an authorized Singer service center or your local Singer dealer.


