Inleiding
This manual provides comprehensive instructions for the installation, operation, maintenance, and troubleshooting of the ASUS Prime H810M-E-CSM Intel H810 mATX Commercial CSM Motherboard. This motherboard is engineered for Intel Core Ultra (Series 2) processors, offering robust performance and essential features for commercial and AI PC applications.
Veiligheidsinligting
Neem altyd die volgende veiligheidsmaatreëls in ag tydens installasie en werking:
- Ontkoppel die kragkabel van die muursok voordat u enige komponente aanraak.
- Dra 'n antistatiese polsband om skade aan komponente deur elektrostatiese ontlading (ESD) te voorkom.
- Hanteer komponente aan hul kante om sensitiewe onderdele te vermy.
- Sorg vir behoorlike ventilasie binne jou rekenaarkas om oorverhitting te voorkom.
- Refer to the specific component manuals for additional safety guidelines.
Pakketinhoud
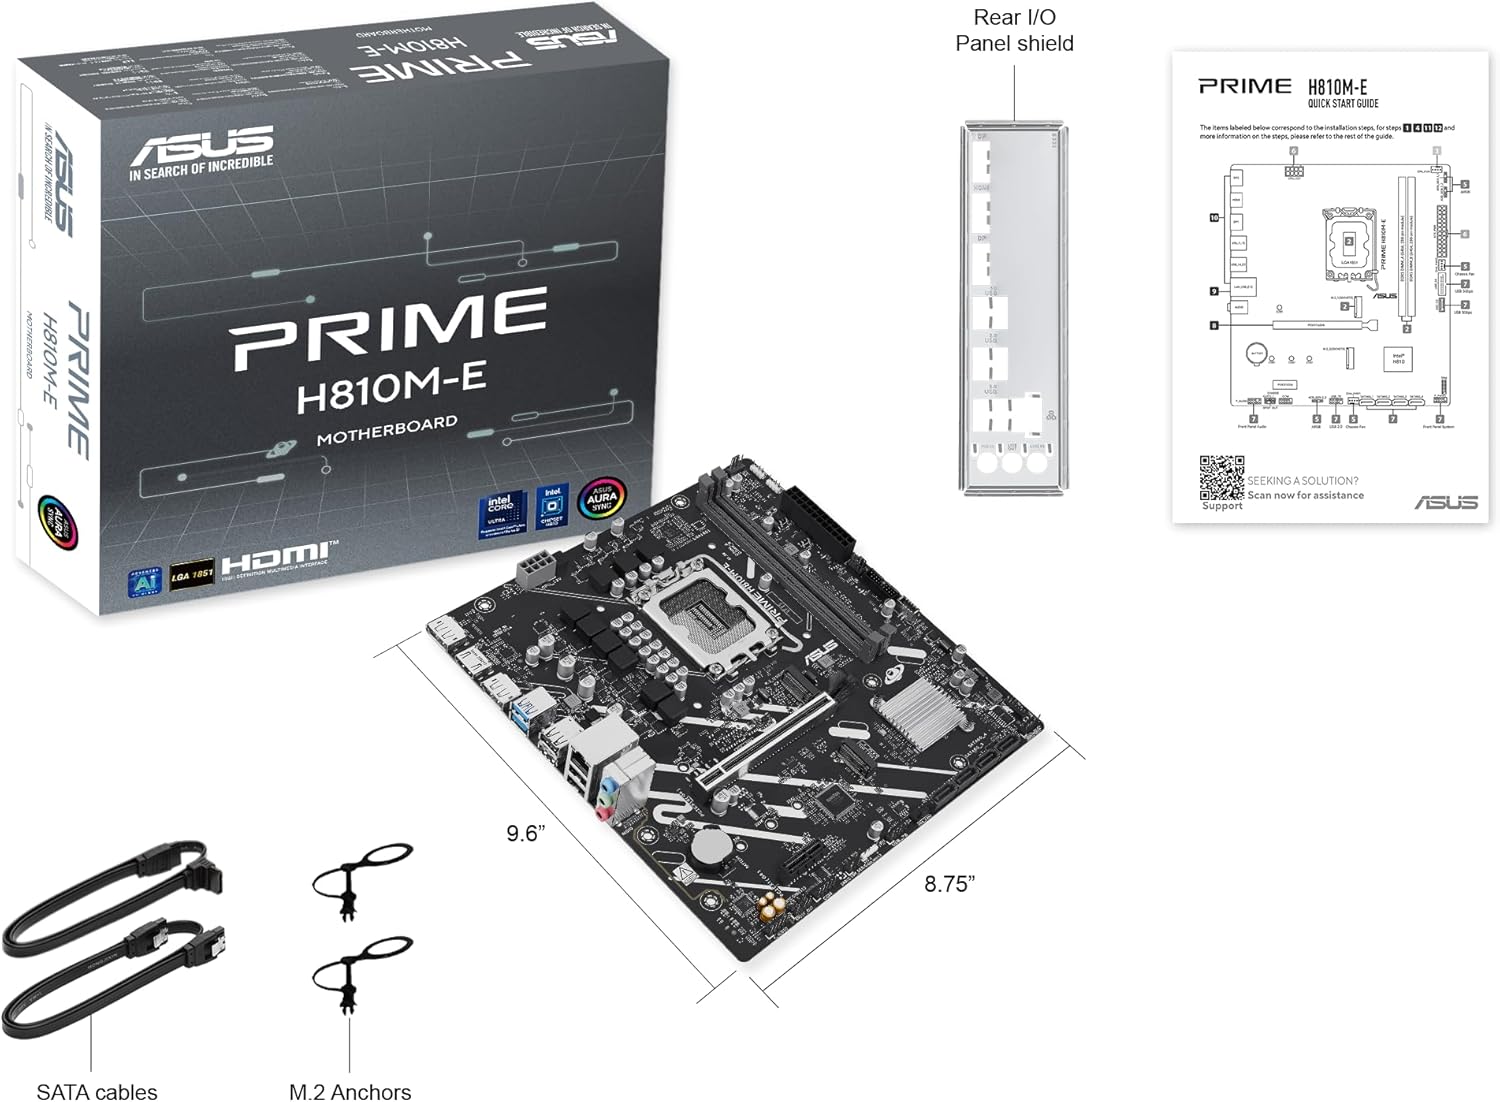
Verifieer dat alle items in jou moederbordpakket teenwoordig is:
- ASUS Prime H810M-E-CSM Motherboard
- SATA 6Gb/s Data Cables (2x)
- M.2 SSD Anchors (2x)
- Rear I/O Shield
- Gebruikershandleiding / Vinnige Begingids
Moederborduitleg
Maak jouself vertroud met die belangrikste komponente en verbindings op die moederbord.


Opstelling
1. SVE-installasie
This motherboard supports Intel Core Ultra (Series 2) processors with an LGA 1851 socket.
- Maak die hefboom van die SVE-sokkel oop en verwyder die beskermende dop.
- Carefully align the CPU with the socket, ensuring the notches on the CPU match the keys on the socket.
- Plaas die SVE versigtig in die sok sonder om krag toe te pas.
- Maak die sokhefboom toe om die SVE vas te maak.
- Installeer die SVE-verkoeler volgens die vervaardiger se instruksies.
2. Geheue (RAM) Installasie
The motherboard features two DDR5 DIMM slots, supporting up to 128GB of RAM.
- Maak die knippies aan beide kante van die DIMM-gleuf oop.
- Rig die geheuemodule met die gleuf en maak seker dat die kerf op die module ooreenstem met die sleutel in die gleuf.
- Druk stewig aan beide kante van die geheuemodule totdat die knippies in plek klik.
3. Storage Installation
The motherboard supports M.2 SSDs and SATA drives.
M.2 SSD installasie:
- Vind die M.2-gleuf op die moederbord.
- Plaas die M.2 SSD in die gleuf teen 'n hoek van 30 grade.
- Gently push down the SSD and secure it with the provided M.2 anchor or screw.

SATA-skyfinstallasie:
- Koppel die een kant van 'n SATA-datakabel aan 'n SATA-poort op die moederbord.
- Connect the other end of the SATA data cable to your storage drive (HDD/SSD).
- Connect a SATA power cable from your power supply unit (PSU) to the storage drive.
4. PCIe-kaartinstallasie
Install graphics cards or other expansion cards into the PCIe 4.0 slots.
- Open the retention clip at the end of the PCIe slot.
- Align the expansion card with the slot and press down firmly until it is seated and the clip snaps shut.
- Bevestig die kaart met 'n skroef aan die rekenaarkas.

5. Kragverbindings
Connect the power supply unit (PSU) cables to the motherboard.
- 24-pen ATX-kragkonnektor: Koppel die hoof 24-pen kragkabel van jou PSU aan die ooreenstemmende konnektor op die moederbord.
- 8-pen SVE-kragkonnektor (EATX12V): Connect the 8-pin CPU power cable from your PSU to the connector located near the CPU socket.
6. Voorpaneelverbindings
Connect your PC case's front panel cables (power button, reset button, USB ports, audio jacks, LED indicators) to the corresponding headers on the motherboard. Refer to the motherboard diagram for exact locations.
Bedryf
First Boot and BIOS/UEFI Setup
Nadat jy jou stelsel saamgestel het, koppel 'n monitor, sleutelbord en muis. Skakel die stelsel aan.
- Druk die Vee uit sleutel tydens opstart om die BIOS/UEFI-opstellingsprogram te betree.
- Konfigureer opstartvolgorde, stelseltyd en ander noodsaaklike instellings.
- Stoor veranderinge en verlaat die BIOS.

Driver and Operating System Installation
Install your preferred operating system (e.g., Windows 10/11) from a bootable USB drive or DVD. After OS installation, install the latest drivers for the motherboard chipset, LAN, audio, and any other integrated components from the ASUS support webwebwerf om optimale werkverrigting en stabiliteit te verseker.
Onderhoud
Skoonmaak
Regularly clean your PC to prevent dust buildup, which can lead to overheating and component failure. Use compressed air to remove dust from heatsinks, fans, and other components. Ensure the system is powered off and unplugged before cleaning.
BIOS-opdaterings
Kontroleer gereeld die ASUS-ondersteuning website for BIOS updates. BIOS updates can improve system stability, compatibility, and performance. Follow the instructions provided by ASUS carefully when performing a BIOS update to avoid system damage.
Probleemoplossing
Hierdie afdeling spreek algemene probleme aan wat jy mag teëkom.
- No Display / No Post:
- Maak seker dat alle kragkabels (24-pen ATX, 8-pen SVE) stewig gekoppel is.
- Reseat the RAM modules. Try booting with only one RAM stick.
- Verify the CPU is correctly seated and the CPU cooler is properly installed.
- Check that the graphics card is fully seated in its PCIe slot and has adequate power.
- If using integrated graphics, ensure your monitor is connected to the motherboard's video output (HDMI).
- Stelselonstabiliteit / Ineenstortings:
- Maak seker dat alle drywers op datum is.
- Check CPU and GPU temperatures using monitoring software.
- Voer geheuediagnostiese gereedskap uit om te kyk vir foutiewe RAM.
- Verify PSU wattage is voldoende vir alle komponente.
- Randapparatuur nie opgespoor nie:
- Probeer om die randapparatuur aan 'n ander poort te koppel.
- Installeer of werk drywers vir die randapparatuur op.
- Gaan BIOS-instellings na om seker te maak dat die poort geaktiveer is.
Spesifikasies
| Kenmerk | Spesifikasie |
|---|---|
| Handelsmerk | ASUS |
| Model Naam | PRIME H810M-E-CSM |
| CPU-sok | LGA 1851 |
| Versoenbare verwerkers | Intel Core Ultra-verwerkers (reeks 2) |
| Chipset Tipe | Intel H810 |
| RAM geheue tegnologie | DDR5 |
| Geheuegleuwe beskikbaar | 2 |
| Ram Memory Maximum Size | 128 GB |
| Grafiese kaart koppelvlak | PCI Express 4.0 |
| Total PCIe Ports | 2 |
| Total SATA Ports | 4 |
| Total M.2 Slots | 1 |
| Totale USB-poorte | 11 (verskeie tipes) |
| Total Number of HDMI Ports | 1 |
| Aantal Ethernet-poorte | 1 (1Gb LAN) |
| Tipe hoofkragaansluiting | 24-pen |
| Platform | Windows 10, Windows 11 |
| Itemafmetings L x B x H | 8.7 cm L x 9.6 cm B x 1.5 cm H |
| Item gewig | 1.1 pond |
Waarborg inligting
The ASUS Prime H810M-E-CSM Motherboard comes with a 3 jaar vervaardiger se waarborg. For detailed terms and conditions, please refer to the warranty card included in your package or visit the official ASUS support webwebwerf.
Ondersteuning
For further assistance, technical support, driver downloads, or BIOS updates, please visit the official ASUS support webwebwerf:
You can also find additional resources and FAQs on the ASUS product page for the Prime H810M-E-CSM.