1. Inleiding
This manual provides detailed instructions for the installation, operation, and maintenance of your darkFlash DS900 Air ATX Mid-Tower PC Gaming Case. Please read this manual thoroughly before beginning assembly to ensure proper setup and safe usage. The DS900 Air is designed to offer a clear view of your components with its 270° full-view tempered glass and provides excellent cooling capabilities for high-performance systems.

Figure 1.1: darkFlash DS900 Air ATX Mid-Tower PC Gaming Case with internal components and RGB lighting.
2. Veiligheidsinligting
Neem altyd die volgende veiligheidsmaatreëls in ag tydens installasie en werking:
- Disconnect the power supply from the wall outlet before installing or removing any components.
- Dra 'n antistatiese polsband om elektrostatiese ontlading (ESD) skade aan sensitiewe komponente te voorkom.
- Handle tempered glass panels with care. Avoid impacts or dropping them, as they can shatter.
- Hou klein onderdele en skroewe weg van kinders.
- Verseker behoorlike ventilasie rondom die kas om oorverhitting te voorkom.
- Do not attempt to modify the case structure, as this may void the warranty and pose safety risks.
3. Spesifikasies
| Kenmerk | Spesifikasie |
|---|---|
| Model Naam | DS900 Air |
| Soort saak | ATX Mid-Tower |
| Moederbord ondersteuning | ATX, Mikro ATX, Mini ITX |
| GPU Lengte Opruiming | Tot 425 mm |
| Hoogte-vryhoogte van die CPU-koeler | Tot 170 mm |
| PSU Type | ATX (Bottom-mounted) |
| Rybaaie | 2x 3.5" HDD or 2x 2.5" SSD, 2x 2.5" SSD |
| Uitbreidingsgleuwe | 7 PCIe-gleuwe |
| I/O-poorte | 1x USB-C, 1x USB 3.0, Audio (HD Audio) |
| Aanhangerondersteuning | Bottom: 3x 120mm; Top: 3x 120mm or 2x 140mm; Rear: 1x 120mm; Right Side: 2x 120mm |
| Radiator Ondersteuning | Top: Up to 360mm; Side: Up to 240mm |
| Materiaal | Staal, Gehard Glas |
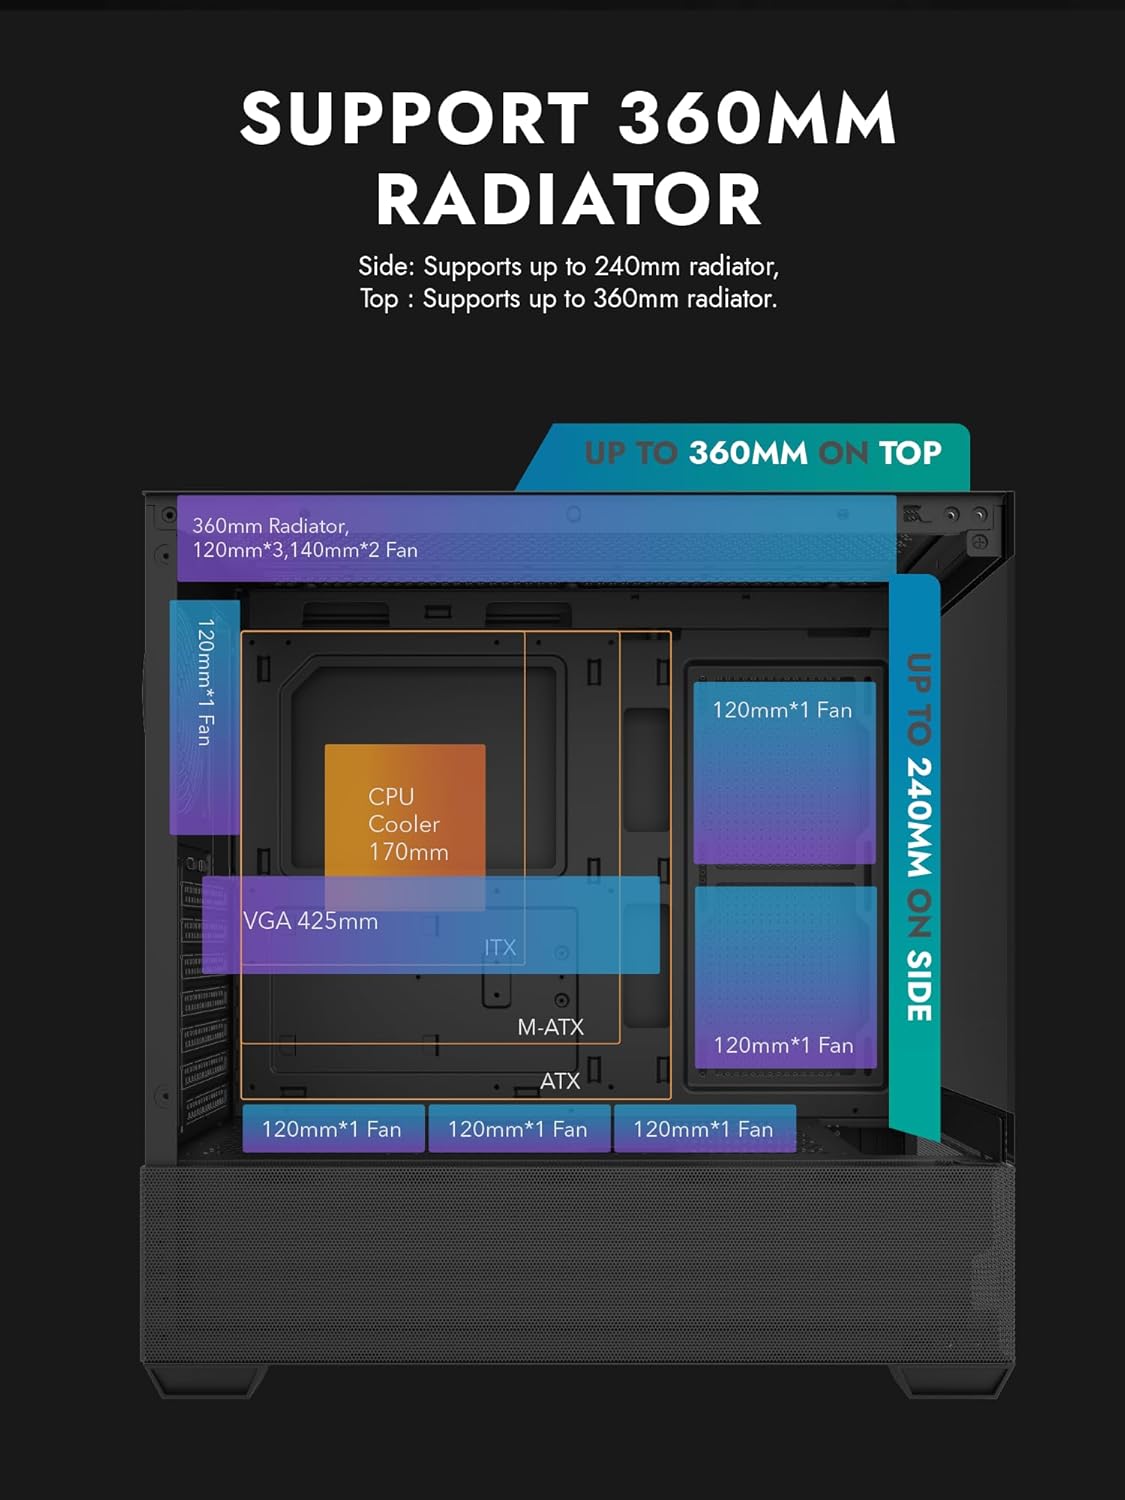
Figure 3.1: Radiator and fan support diagram for the DS900 Air case, illustrating maximum component dimensions.
4. Opstelling en installering
Follow these steps to assemble your PC components within the darkFlash DS900 Air case.
4.1. Voorbereiding van die Saak
- Verwyder sypanele: The DS900 Air features a tool-free clamshell side panel. Gently pull the top edge of the tempered glass side panel to unlatch it, then lift it off. Repeat for the other side panel if necessary.
- Toebehore boks: Locate the accessory box inside the case, which contains screws, cable ties, and other mounting hardware.
4.2. Moederbord Installasie
- Installeer die I/O-skerm in die agterste opening van die kas.
- Align your ATX, Micro-ATX, or Mini-ITX motherboard with the standoffs inside the case. Ensure the I/O ports align with the I/O shield.
- Bevestig die moederbord met die meegeleverde skroewe.
4.3. Installasie van die kragtoevoereenheid (PSU)
- The DS900 Air has a dedicated bottom PSU chamber. Slide your ATX power supply into the chamber from the rear of the case.
- Bevestig die PSU met skroewe van die agterkant van die kas.
- Route necessary power cables through the cutouts into the main compartment.
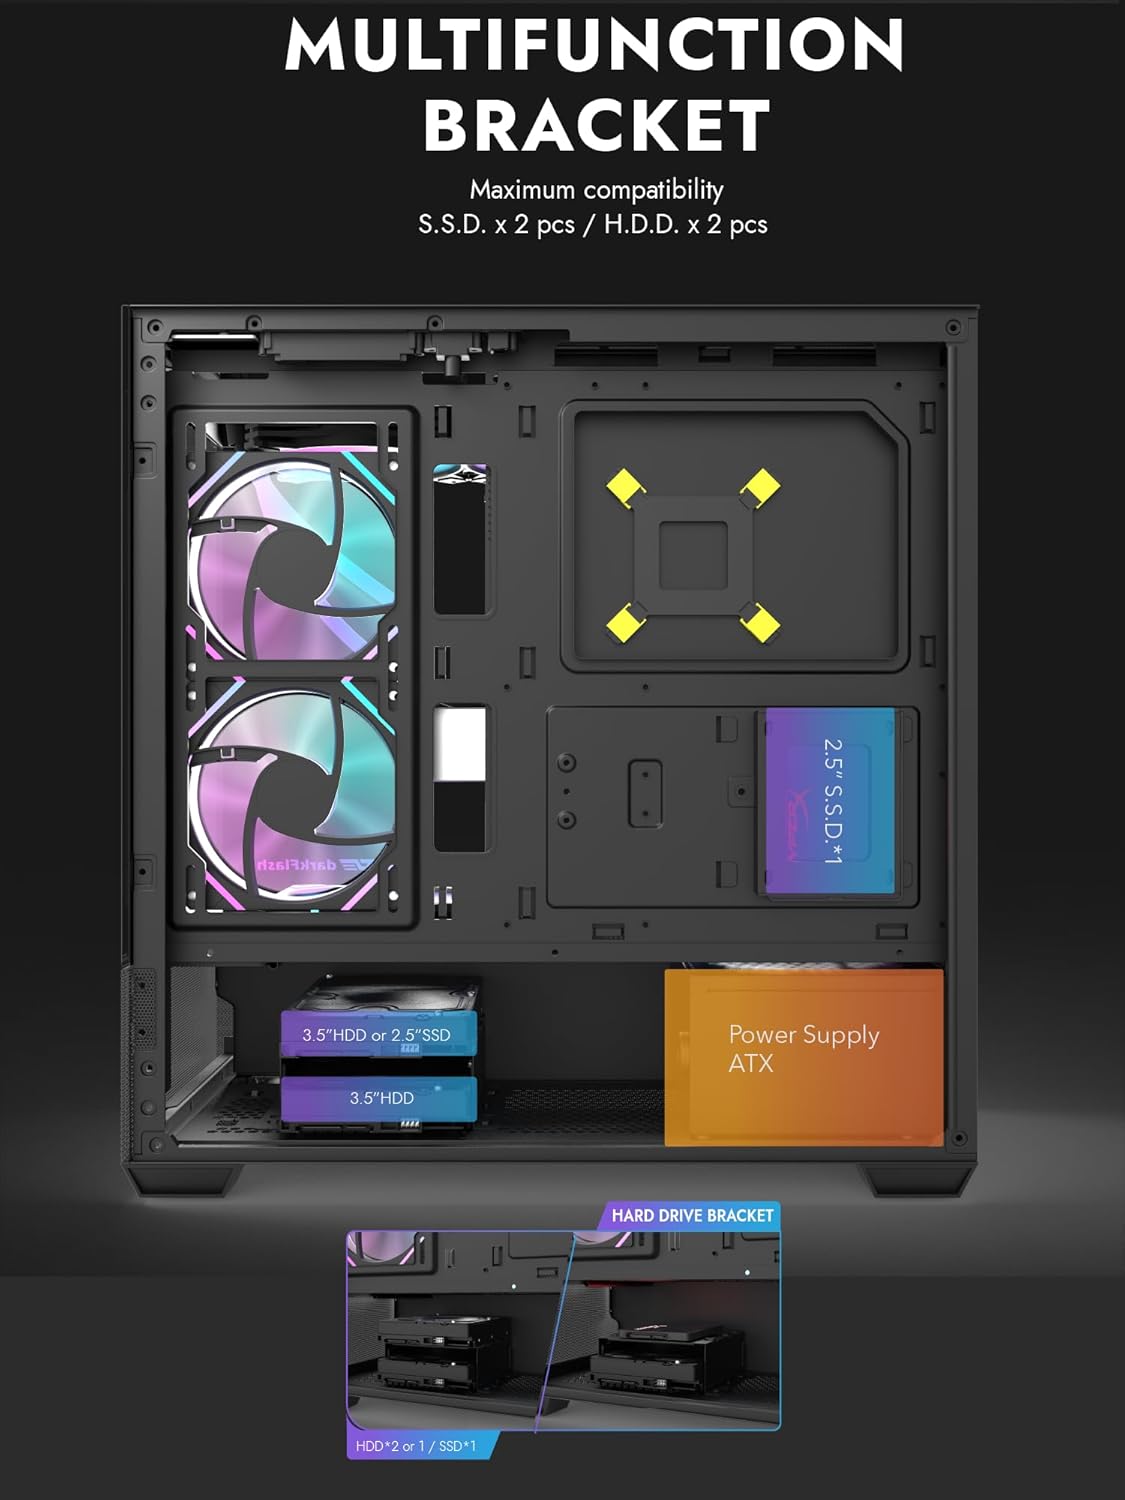
Figure 4.1: Internal layout showing the multifunction drive bracket and the bottom-mounted PSU chamber.
4.4. Installasie van bergingstoestel
The case supports up to two 3.5" HDDs or 2.5" SSDs in the hard drive bracket, and two additional 2.5" SSDs on the multifunction bracket.
- 3.5" HDD / 2.5" SSD: Install drives into the removable hard drive bracket located in the PSU chamber. Secure with screws.
- 2.5" SSD: Mount 2.5" SSDs onto the multifunction bracket located on the motherboard tray. Secure with screws.
4.5. Grafiese kaart (GPU) Installasie
- Verwyder die nodige PCIe-gleufdeksels van die agterkant van die kas.
- Insert your graphics card into the appropriate PCIe slot on the motherboard.
- Secure the graphics card with screws. The case supports GPUs up to 425mm in length.
4.6. Installasie van verkoelingstelsels (waaiers/verkoelers)
The DS900 Air offers extensive cooling options:
- Top: Supports up to 3x 120mm fans or 2x 140mm fans, or a 360mm radiator.
- Onder: Supports up to 3x 120mm fans.
- Agter: Supports 1x 120mm fan.
- Regterkant: Supports 2x 120mm fans or a 240mm radiator.
Install fans and radiators using the appropriate screws and mounting points. Ensure correct airflow direction for optimal cooling.

Figure 4.2: Fan support locations and quantities within the DS900 Air chassis.

Figure 4.3: Airflow diagram demonstrating optimal cooling paths through the case.
4.7. Connecting Front I/O Cables
Connect the front panel cables (USB-C, USB 3.0, HD Audio, Power, Reset, LED) to their corresponding headers on your motherboard. Refer to your motherboard manual for exact header locations.

Figure 4.4: Top-right I/O panel featuring USB-C and USB 3.0 ports.
4.8. Kabelbestuur
Utilize the cable routing cutouts and tie-down points behind the motherboard tray to manage cables. This improves airflow and aesthetics.
5. Bediening van u rekenaar
Once all components are installed and cables are connected, replace the side panels. Connect your monitor, keyboard, mouse, and power cable. Press the power button on the case to start your system. Ensure all fans are spinning and components are receiving power.
6. Onderhoud
Gereelde onderhoud help om optimale werkverrigting en lang lewensduur van jou rekenaarkomponente te verseker.
- Stof skoonmaak: Periodically clean dust filters and internal components using compressed air. The DS900 Air features mesh panels that help filter dust.
- Lugvloei: Ensure no obstructions block the intake or exhaust vents of the case.
- Kabelbestuur: Re-evaluate cable routing periodically to ensure no cables are interfering with fan blades or airflow.
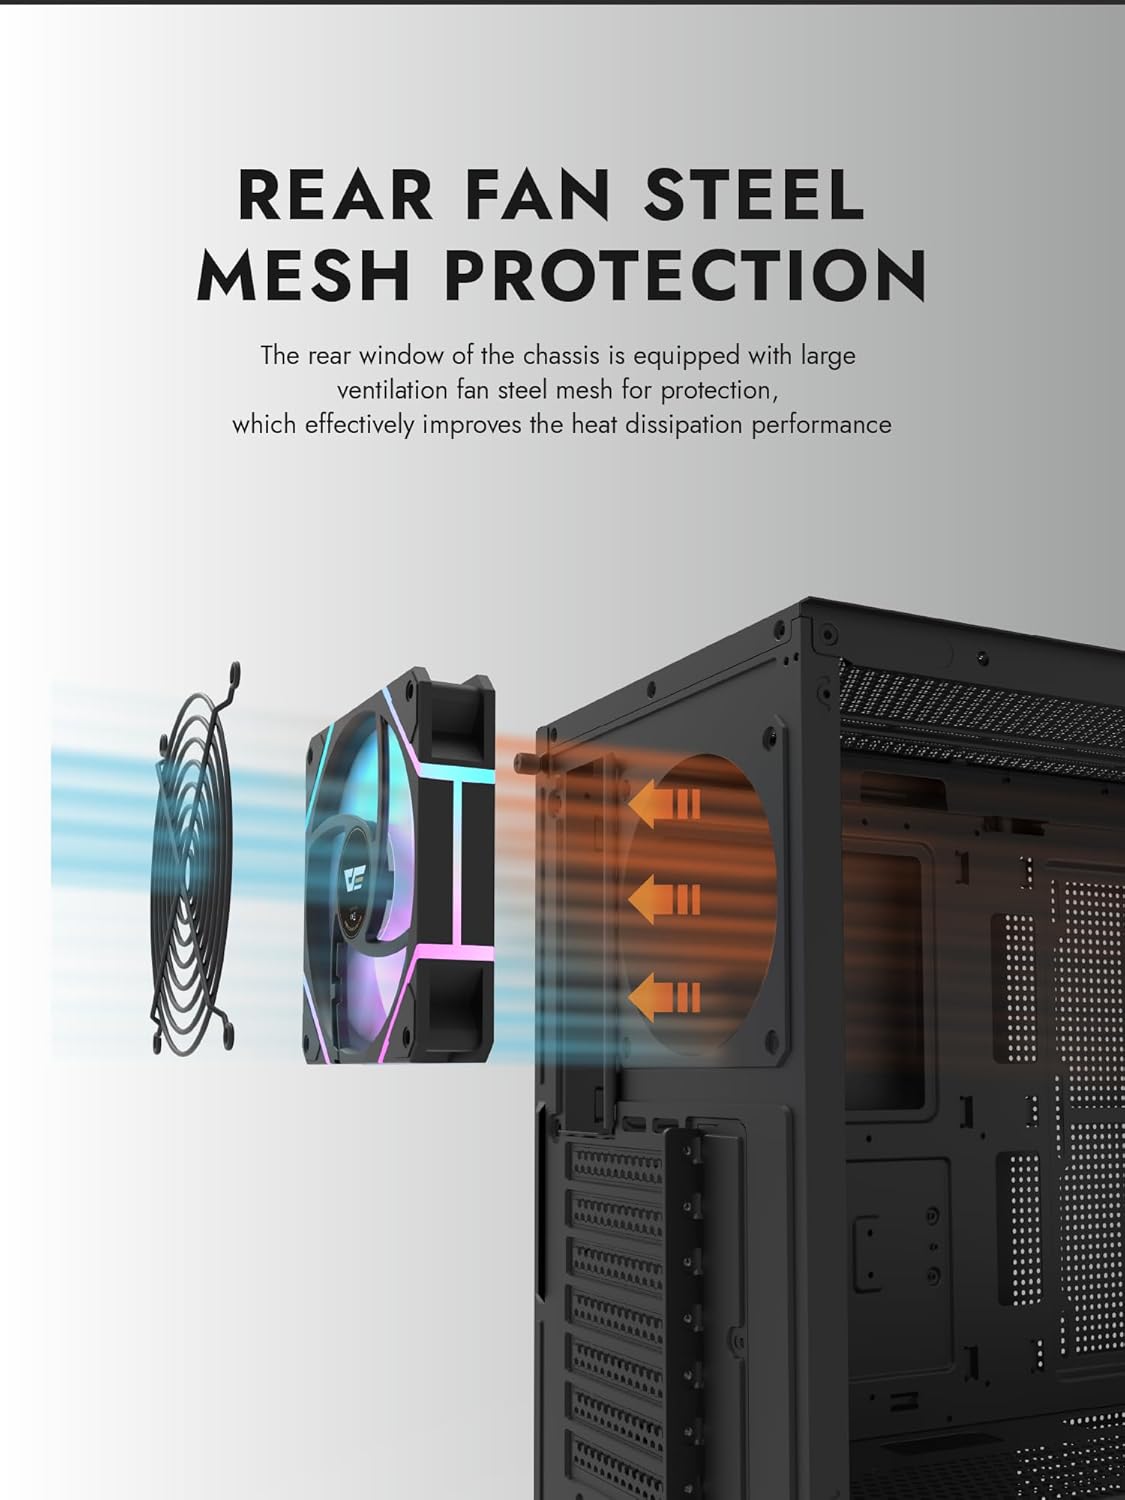
Figure 6.1: Rear fan steel mesh protection, designed to improve heat dissipation.
7. Probleemoplossing
As jy probleme met jou rekenaar ondervind, oorweeg die volgende algemene probleemoplossingstappe:
- Geen krag: Check all power connections, including the PSU to the wall, PSU to motherboard, and front panel power switch cable to the motherboard.
- Geen skerm: Ensure your monitor is connected to the graphics card (not the motherboard I/O unless using integrated graphics). Reseat the graphics card and RAM.
- Oorverhitting: Verify all fans are spinning correctly and are oriented for proper airflow. Check CPU cooler installation.
- Komponent nie opgespoor nie: Reseat the component (e.g., RAM, GPU, storage drive) and check its power and data connections.
8. Waarborg en Ondersteuning
darkFlash products are manufactured to high-quality standards. For warranty information or technical support, please refer to the official darkFlash webwebwerf of kontak jou kleinhandelaar. Bewaar jou bewys van aankoop vir waarborgeise.