YASM-825
Generic YASM-825 Mini Sewing Machine User Manual
Model: YASM-825 | Brand: Generic
Belangrike veiligheidsinstruksies
Please read all instructions carefully before using the sewing machine. Keep this manual for future reference.
- Always unplug the machine from the power outlet immediately after use and before cleaning, making any adjustments, or changing accessories.
- Do not operate the machine with a damaged cord or plug. If the machine is not working properly, has been dropped, damaged, or dropped into water, return it to the nearest authorized service dealer for examination, repair, electrical or mechanical adjustment.
- Moet nooit die masjien gebruik met enige lugopeninge wat geblokkeer is nie. Hou die ventilasieopeninge van die naaimasjien en voetpedaal vry van die ophoping van pluis, stof en los lap.
- Hou vingers weg van alle bewegende dele. Spesiale versigtigheid is nodig rondom die naaimasjiennaald.
- Gebruik altyd die regte naaldplaat. Die verkeerde plaat kan veroorsaak dat die naald breek.
- Moenie aan die materiaal trek of stoot terwyl jy stik nie. Dit kan die naald afbuig en veroorsaak dat dit breek.
- Use only accessories recommended by the manufacturer as contained in this manual.
- Hierdie toestel is nie bedoel vir gebruik deur persone (insluitend kinders) met verminderde fisiese, sensoriese of geestelike vermoëns, of 'n gebrek aan ervaring en kennis nie, tensy hulle toesig of instruksies oor die gebruik van die toestel gegee is deur 'n persoon wat verantwoordelik is vir hul veiligheid.
Produk verbyview en komponente
The Generic YASM-825 Mini Sewing Machine is a portable electric household sewing machine designed for various sewing tasks. It features 12 stitch applications, dual speed control, and a foot pedal for ease of use.
Ingesluit komponente:
- 1 x Mini Electric Household Sewing Machine
- 2 x Upper Thread Spools
- 2 x Lower Thread Bobbins
- 1 x Original Needle
- 1 x Buttonhole Presser Foot
- 1 x Naaldryger
- 1 x Voetpedaal
- 1 x Kragtoevoer
- 1 x Instruksiehandleiding (hierdie dokument)
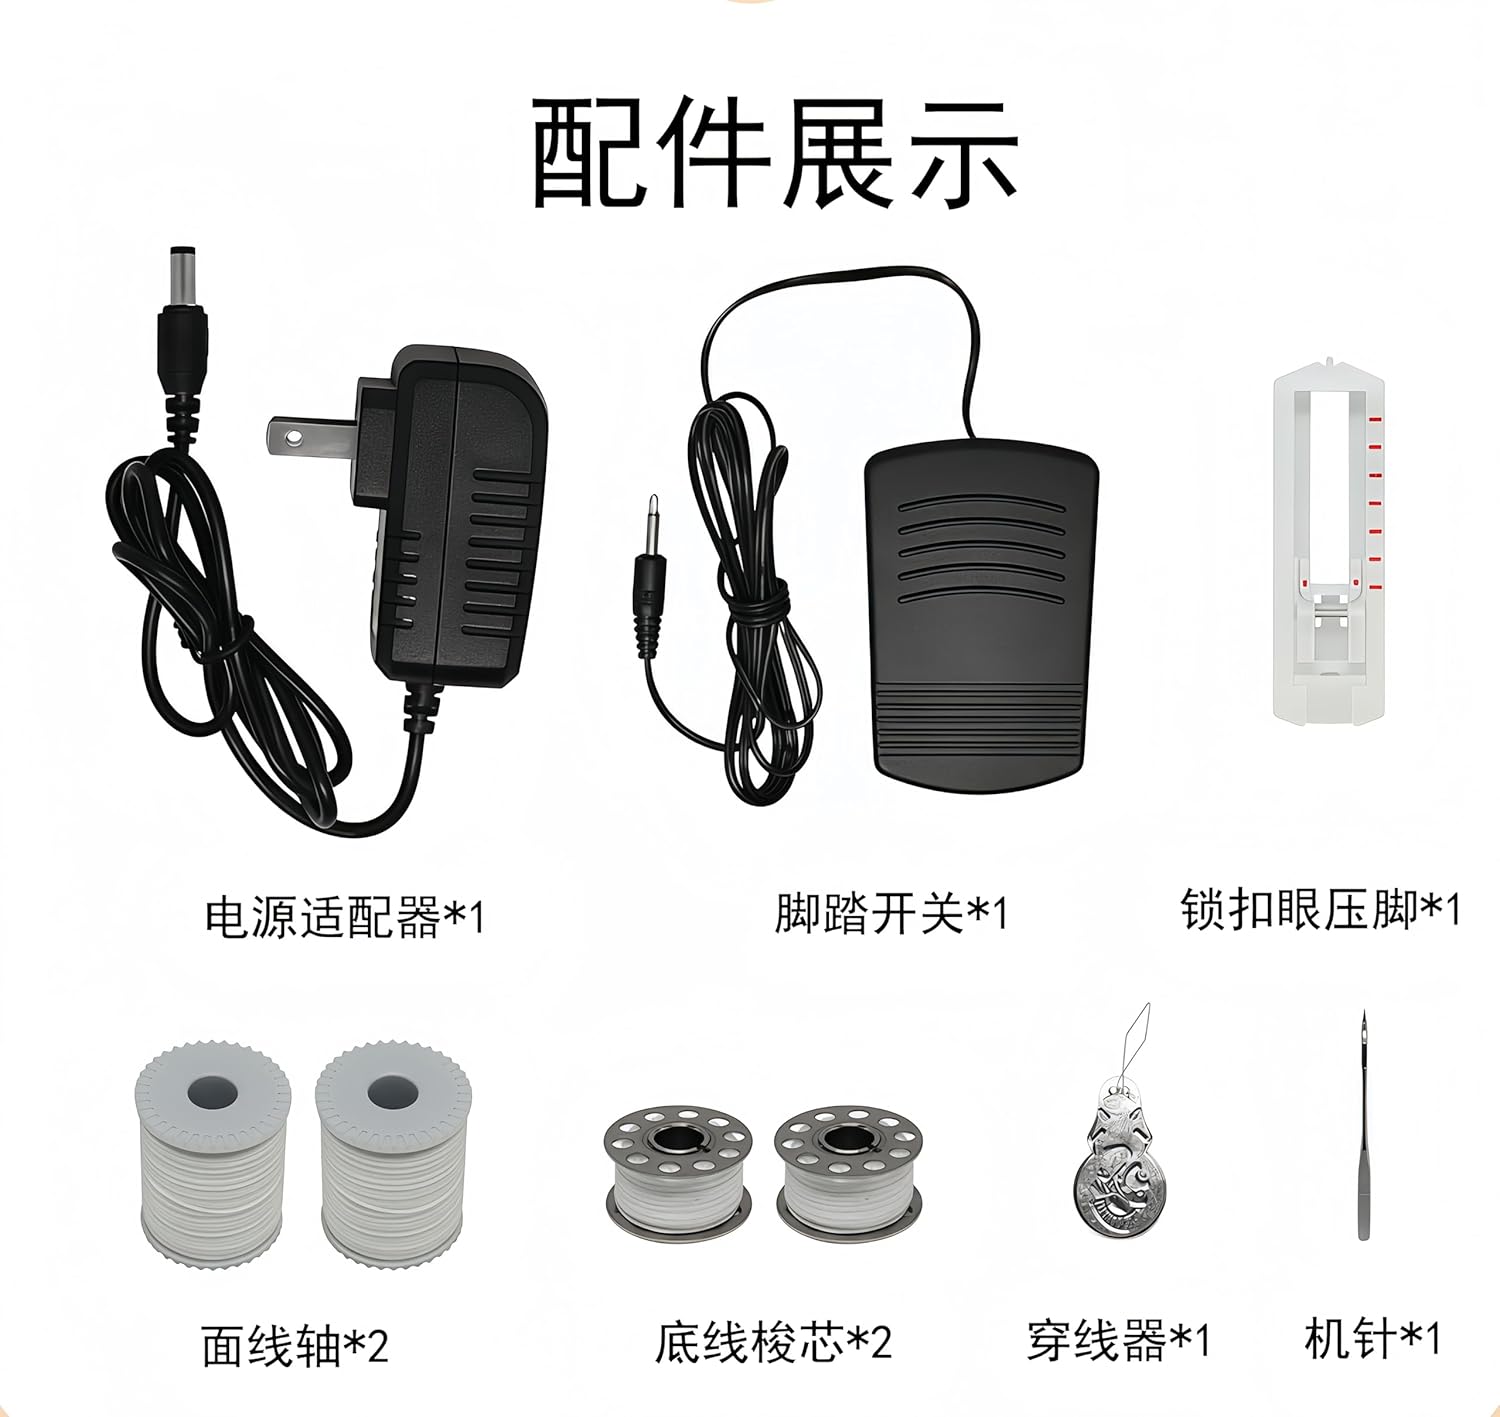
Figuur 1: Ingesluite Toebehore. This image displays the various accessories that come with the sewing machine, including the power adapter, foot pedal, buttonhole presser foot, upper thread spools, lower thread bobbins, needle threader, and an extra needle.
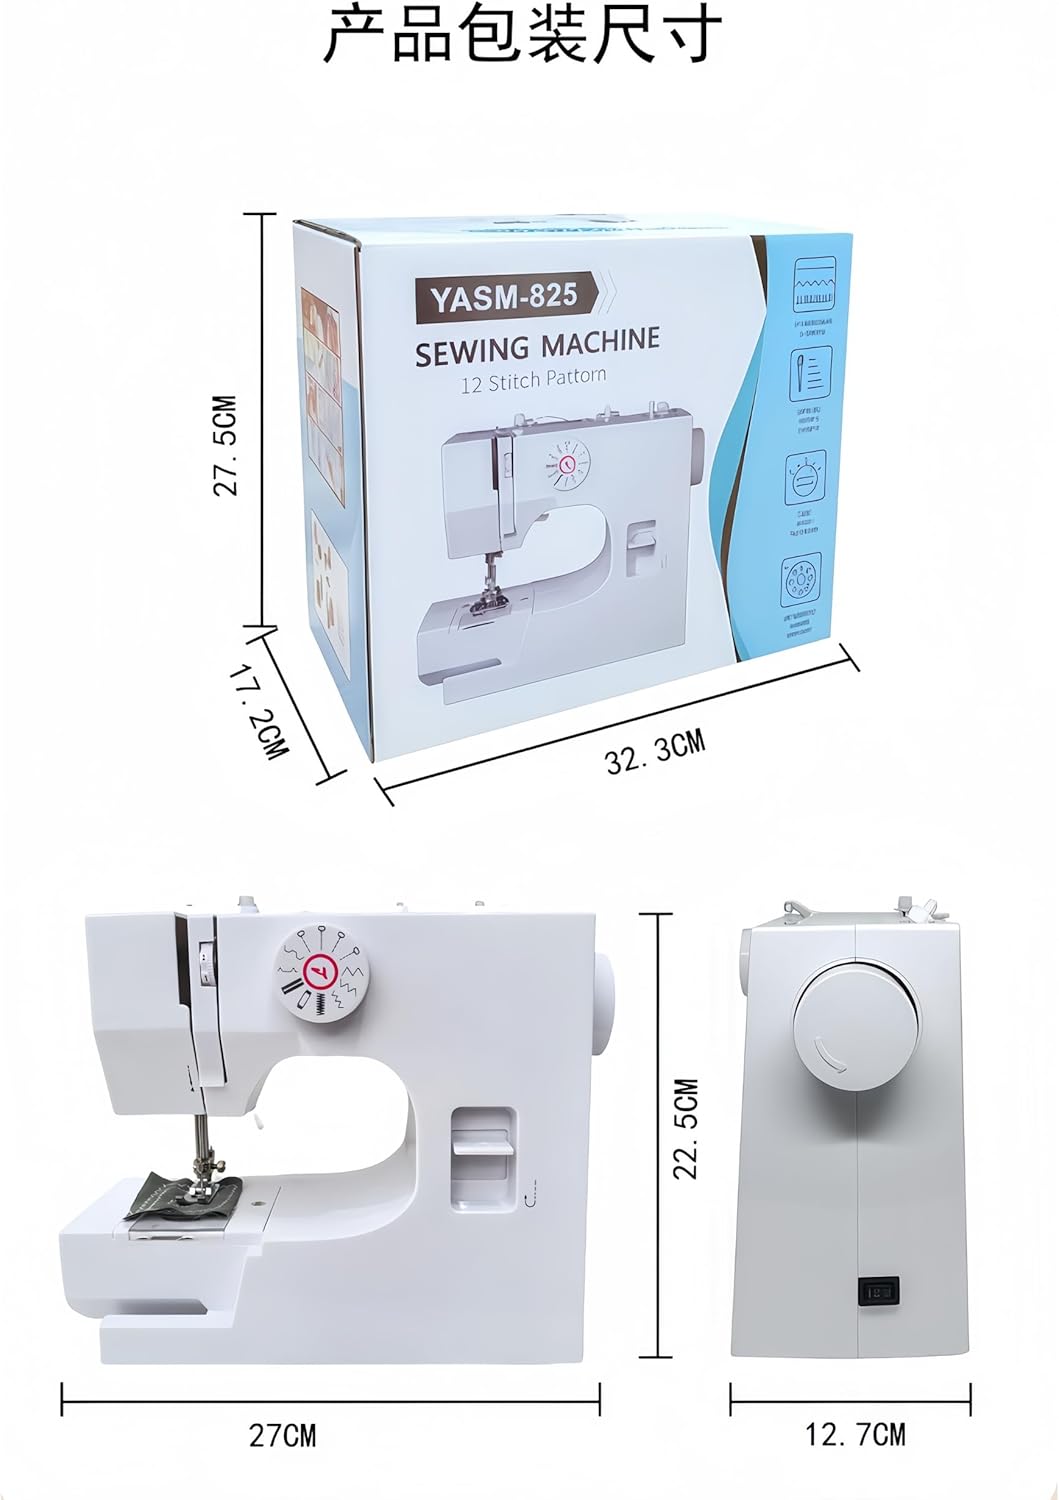
Figuur 2: Produkdimensies. This image illustrates the dimensions of the YASM-825 sewing machine itself (approximately 27cm width, 22.5cm height, 12.7cm depth) and its packaging (approximately 32.3cm width, 27.5cm height, 17.2cm depth).
Opstel instruksies
- Kragverbinding:
Connect the power adapter to the DC input jack on the sewing machine. Plug the adapter into a standard 110V electrical outlet.
- Voetpedaalverbinding:
Insert the foot pedal plug into the corresponding jack on the sewing machine. The foot pedal allows for hands-free speed control during sewing.
- Spoelwikkeling:
Place an empty bobbin onto the bobbin winder spindle. Guide the thread from the spool pin through the tension disc and around the bobbin. Press the foot pedal or use the hand switch to wind the thread evenly onto the bobbin. Stop when the bobbin is full and trim the thread.
- Die spoel insit:
Open the bobbin cover plate. Insert the wound bobbin into the bobbin case, ensuring the thread unwinds in the correct direction (usually counter-clockwise). Pull the thread through the tension spring and out of the bobbin case opening. Close the bobbin cover.
- Boonste draadwerk:
Raise the needle to its highest position using the handwheel. Place a spool of thread on the spool pin. Guide the thread through the various thread guides, tension disc, and take-up lever as indicated by the threading diagram on the machine. Finally, thread the needle from front to back using the provided needle threader or manually.
- Bringing Up the Bobbin Thread:
Hold the upper thread lightly. Turn the handwheel towards you to lower the needle into the needle plate and then raise it again. The upper thread will catch the bobbin thread, bringing it up through the needle plate opening. Pull both threads under the presser foot and towards the back of the machine.
Bedryfsinstruksies
Steekkeuse:
The machine offers 12 built-in stitch patterns. Rotate the stitch dial on the front of the machine to select the desired stitch (e.g., zigzag, straight stitches). Refer to the stitch guide on the machine for visual representation of each stitch.

Figure 3: 12 Stitch Applications. This image shows a fabric sample with various straight and curved stitches, demonstrating the 12 different stitch patterns available on the machine.
Spoedbeheer:
The machine features dual speed settings (low and high). Use the speed switch located on the machine body to adjust the sewing speed according to your comfort and project requirements. Beginners are advised to start with the low speed setting.
Voetpedaal werking:
Once the foot pedal is connected, press down on it to start sewing and release to stop. The foot pedal provides variable speed control, allowing for precise stitching. Alternatively, a hand switch can be used for continuous sewing at the selected speed.
Omgekeerde stikwerk:
To secure seams at the beginning and end of your sewing, use the reverse stitch function. Typically, a button or lever on the machine allows for temporary reverse sewing. Press and hold to sew backward, then release to resume forward sewing.
LED lig:
The built-in LED light illuminates the sewing area, providing better visibility, especially when working on intricate details or in dimly lit environments.
Automatic Thread Rewinding:
The machine includes an automatic thread rewinding feature for convenient bobbin preparation.
Using the Zipper Presser Foot:
The included zipper presser foot is designed for sewing zippers with ease. Attach it to the machine by raising the presser foot lever, removing the standard presser foot, and snapping the zipper foot into place.

Figure 4: Zipper Presser Foot. This close-up image shows the specialized presser foot designed for sewing zippers, allowing the needle to stitch close to the zipper teeth.
Handling Various Fabrics:
The YASM-825 is capable of sewing various fabric types, including leather, jeans, and cotton. It can handle multiple layers, such as up to 6 layers of denim, thanks to its powerful motor.

Figure 5: Multi-Layer Sewing. This image demonstrates the machine's capability to sew through multiple layers of thick fabric, specifically showing 6 layers of denim being stitched.
The machine is suitable for a range of projects, from daily sewing tasks to garment making, DIY fabric arts, curtain sewing, and pillow sewing.

Figure 6: Versatile Applications. This image showcases various sewing projects, including daily repairs, garment creation, DIY crafts, and home decor items like curtains and pillows, illustrating the machine's versatility.
Onderhoud
- Skoonmaak: Regularly clean the lint and dust from the bobbin area and feed dogs using a small brush. Unplug the machine before cleaning.
- Naaldvervanging: Replace the needle frequently, especially after sewing thick fabrics or if it becomes bent or dull. A damaged needle can cause skipped stitches or fabric damage. Ensure the flat side of the needle faces the back of the machine when inserting.
- Smering: This mini sewing machine is generally designed to be low-maintenance. Refer to the specific instructions provided with your machine for any lubrication requirements. Avoid over-oiling.
- Berging: When not in use, store the machine in a dry, clean place, preferably covered to protect it from dust.
Probleemoplossing
| Probleem | Moontlike oorsaak | Oplossing |
|---|---|---|
| Masjien begin nie | Power cord not plugged in; foot pedal not connected; power switch off. | Check power connections; ensure foot pedal is securely plugged in; turn on the power switch. |
| Steke oorgeslaan | Incorrect needle size/type; bent or dull needle; improper threading; incorrect tension. | Replace needle with correct type and size; re-thread the machine carefully; adjust tension settings. |
| Draadbreuk | Improper threading; tension too tight; poor quality thread; bent needle; burr on needle plate. | Re-thread machine; loosen tension; use good quality thread; replace needle; check for burrs. |
| Stof word nie gevoer nie | Presser foot not lowered; feed dogs clogged with lint; stitch length set to zero. | Lower the presser foot; clean feed dogs; adjust stitch length. |
| Bobbin thread tangling | Improper bobbin winding; incorrect bobbin insertion; upper thread tension too loose. | Rewind bobbin correctly; re-insert bobbin; tighten upper thread tension. |
Indien u probleme ondervind wat nie hier gelys word nie, of indien die probleem voortduur nadat u die oplossings probeer het, kontak asseblief kliëntediens.
Spesifikasies
| Kenmerk | Detail |
|---|---|
| Produk Naam | Mini Electric Household Sewing Machine |
| Modelnommer | YASM-825 |
| Handelsmerk | Generies |
| Materiaal | PP, Stainless Steel, Metal |
| Krag | 7.2 W |
| Voltage | 110 V |
| Operasie | Electric / Foot-operated |
| Naaldwerk spoed | 200 steke/minuut |
| Stitch Applications | 12 built-in stitches (e.g., zigzag, straight) |
| Applicable Thickness | 3-6 layers of denim |
| Produkafmetings (L x B x H) | 13.7"D x 6.7"B x 11.4"H (ongeveer 34.8cm x 17cm x 29cm) |
| Ingesluit kenmerke | Built-in LED light, Automatic thread rewinding, Dual speed, Reverse stitching |
Waarborg en Ondersteuning
This product is typically covered by a manufacturer's warranty. Please refer to the warranty card or documentation included with your purchase for specific terms, conditions, and duration. Keep your proof of purchase for warranty claims.
For technical support, troubleshooting assistance, or warranty inquiries, please contact the retailer or manufacturer directly. Contact information is usually provided on the product packaging or the seller's webwebwerf.
Ask a question about this manual
Ask about setup, troubleshooting, compatibility, parts, safety, or missing instructions. Manuals+ will review the question and use this page’s manual context to help answer it.