1. Inleiding
This manual provides detailed instructions for the installation, operation, and maintenance of your SOUNDKITS Bluetooth Retro Car Radio. Please read this manual thoroughly before using the product to ensure proper function and safety. This unit combines classic aesthetics with modern audio technology, offering Bluetooth connectivity, AM/FM radio, USB, and AUX input capabilities.
2. Veiligheidsinligting
Always prioritize safety during installation and operation. Improper installation can lead to electrical hazards or damage to your vehicle. Consult a professional if you are unsure about any installation steps. Do not operate the unit in a way that distracts you from driving. Keep the volume at a level that allows you to hear external traffic sounds.
3. Pakketinhoud
- Bluetooth Vintage Car Stereo Unit
- Mounting Kits & Wires
- Instruksie Handleiding
4. Produk verbyview
The SOUNDKITS Retro Car Radio features a classic design with modern functionality. It includes a high-resolution LCD display, rotary knobs for volume and settings, and push-buttons for various functions such as band selection, mode switching, and clock settings.

Beeld: Voorkant view of the SOUNDKITS Bluetooth Retro Car Radio, showing the display, rotary knobs, and control buttons.
5. Opstelling en Installasie
5.1 Dimensions and Compatibility
The unit is designed for a standard single DIN opening, with dimensions of 7.4 inches (L) x 3.8 inches (D) x 2 inches (H). This ensures compatibility with a wide range of classic vehicles.
5.2 Bedradingsdiagram
Refer to the following diagram for proper wiring connections. Ensure all connections are secure and correctly matched to avoid damage to the unit or vehicle electrical system.

Image: Detailed diagram illustrating the dimensions of the radio and the wiring harness connections for power, speakers, and auxiliary inputs.
5.3 Montering
Secure the unit into the single DIN dashboard opening using the provided mounting kit. Ensure the unit is firmly in place to prevent movement during vehicle operation.
6. Bedryfsinstruksies
6.1 Aan/Af en Volumebeheer
Press the left rotary knob to power the unit on or off. Rotate the left knob to adjust the volume level.
6.2 Moduskeuse
Press the 'MODE' button to cycle through available audio sources: FM, AM, Bluetooth, USB, and AUX. The current mode will be displayed on the LCD screen.
6.3 Bluetooth-konnektiwiteit
Om jou toestel via Bluetooth saam te bind:
- Select 'Bluetooth' mode using the 'MODE' button.
- Aktiveer Bluetooth op jou mobiele toestel en soek vir beskikbare toestelle.
- Select 'SOUNDKITS' from the list to pair.
- Sodra dit gekoppel is, kan jy oudio stroom en handvrye oproepe maak/ontvang.

Image: Illustration of Bluetooth connectivity, showing hands-free calling and wireless audio streaming capabilities.
6.4 AM/FM-radiowerking
Press the 'BAND' button to switch between FM1, FM2, FM3, AM1, and AM2 bands. Use the rotary knob on the right to manually tune frequencies or press 'AMS' for automatic station scanning and storage.

Image: Displaying AM/FM radio functionality with 30 station presets and automatic/manual search options.
6.5 USB and AUX Input
Connect a USB drive to the rear-mounted USB port or an audio device to one of the two auxiliary inputs. The unit supports MP3, WMA, and FLAC audio files.

Image: The car radio unit with connected USB and AUX cables, highlighting its digital multimedia playback capabilities.
6.6 Oudio-instellings
Press the left rotary knob briefly to access audio settings such as Bass, Treble, Balance, Fader, and EQ presets (Pop, Rock, Classic). Rotate the knob to adjust values. The unit also features a dedicated subwoofer output.
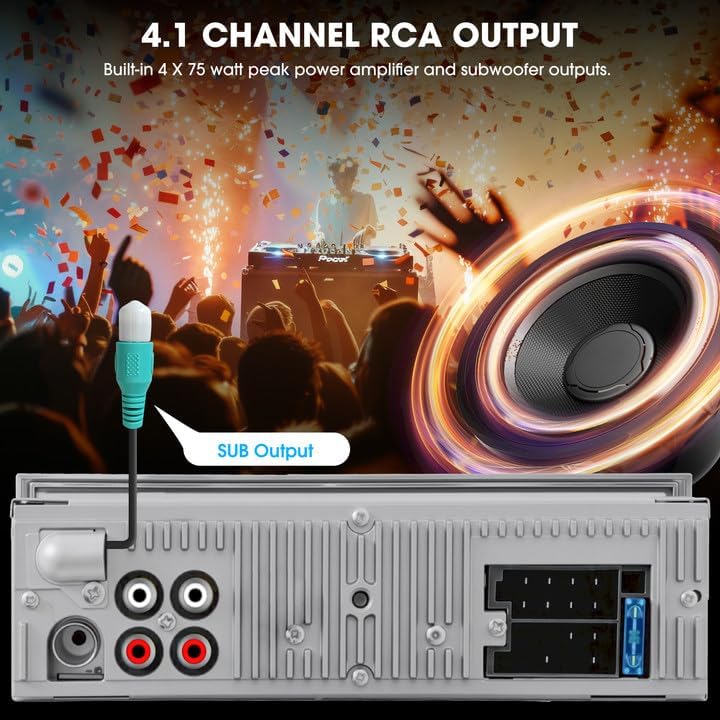
Beeld: Agter view of the radio showing the 4.1-channel RCA outputs, including a dedicated subwoofer output.
7. Onderhoud
To maintain the performance and appearance of your car radio, follow these guidelines:
- Skoonmaak: Gebruik 'n sagte, droë lap om die eenheid se oppervlak skoon te maak. Vermy skuurmiddels of oplosmiddels.
- Stofverwydering: Periodically clean dust from the display and buttons.
- Vermy vloeistowwe: Moenie die eenheid aan water of ander vloeistowwe blootstel nie.
8. Probleemoplossing
| Probleem | Moontlike oorsaak | Oplossing |
|---|---|---|
| Geen krag nie | Verkeerde bedrading; Deurgeblaasde sekering | Check power connections; Replace fuse if necessary |
| Geen klank nie | Incorrect speaker wiring; Volume too low; Mute activated | Verify speaker connections; Increase volume; Deactivate mute function |
| Bluetooth verbind nie | Bluetooth not enabled on device; Unit not in pairing mode | Ensure Bluetooth is on and unit is in Bluetooth mode; Re-attempt pairing |
| Swak radio-ontvangs | Antenna nie gekoppel nie; Swak seinarea | Check antenna connection; Try tuning in a different location |
9. Spesifikasies
- Produk afmetings: 3.8" D x 7.4" B x 2" H
- Item gewig: 1.2 pond
- Verbindingstegnologie: Hulp, Bluetooth, USB
- Kontroleurstipe: Handbeheer, drukknop
- Spesiale kenmerke: 4.1-Chn RCA Subwoofer Outputs 300W Peak Power, AM FM Radio with RDS, Bluetooth Calling Music Streaming, Retro-style Stereo Knob & Buttons Control Digital Display, USB AUX-IN Preset EQ
- Versoenbare toestelle: Amplifier, Smartphone, Speaker, Subwoofer
- Klankuitsetmodus: Stereo
- Surround Sound Channel-konfigurasie: 4.1
10. Waarborg en ondersteuning
For product support or inquiries, please refer to the contact information provided by your retailer or the manufacturer's official website. Information regarding extended protection plans may be available through your point of purchase.