Inleiding
This manual provides detailed instructions for the safe and efficient use of your Spider Farmer Auto-Cure Smart Jar. Please read this manual thoroughly before operating the device and retain it for future reference. The Smart Jar is designed for optimal preservation of various items by maintaining a controlled, low-oxygen environment and stable humidity levels.
Veiligheidsinligting
- Do not immerse the lid in water or any other liquid. The lid contains electronic components.
- Keep the device away from direct sunlight, high temperatures, and open flames.
- Maak seker dat die laaipoort droog is voordat u die tipe-C-laaikabel koppel.
- Hierdie produk is slegs bedoel vir huishoudelike gebruik.
- Hou buite bereik van kinders.
- Moenie probeer om die toestel self uitmekaar te haal of te herstel nie. Kontak kliëntediens vir bystand.
Pakketinhoud
Verifieer dat alle items in jou pakket teenwoordig is:
- 1x Vacuum Jar (2L Capacity)
- 1x Type-C Charging Cable (0.8m)
- 4x 62% Two-Way Humidity Packs
- 1x Gebruikershandleiding
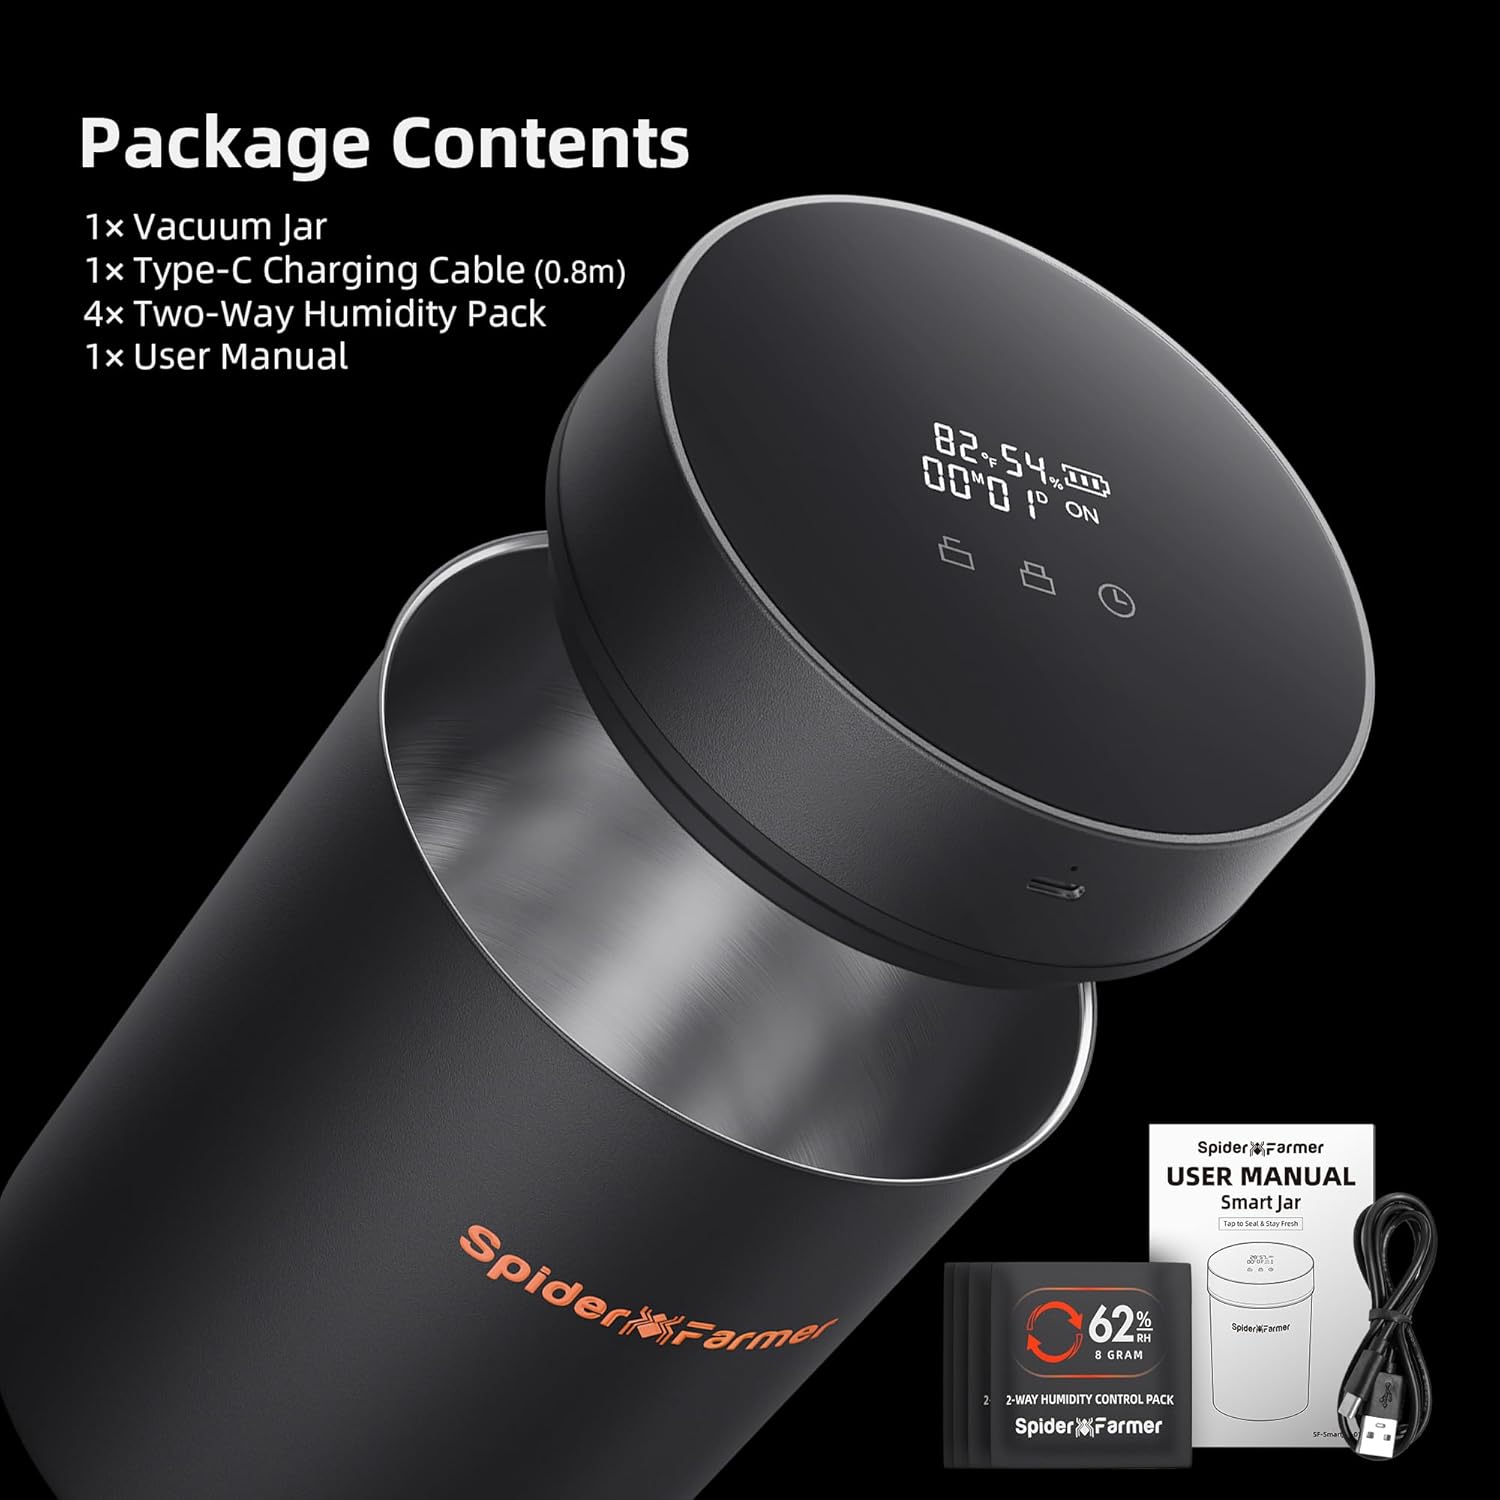
Figuur 1: Pakketinhoud
Produk verbyview
The Spider Farmer Auto-Cure Smart Jar features a robust design with intelligent controls for optimal storage.
Komponente:
- Jar Body: Made with a corrosion-resistant 304 stainless steel interior and a BPA-free ABS exterior.
- Smart Lid: Features an LED display, control buttons, and a Type-C charging port.
- Vacuum Seal System: Integrated into the lid to create a low-oxygen environment.
- Humidity Packs: 62% two-way humidity control packs to maintain stable internal humidity.

Figure 2: Jar Components and Materials
Smart Lid Display & Controls:
The LED screen on the lid provides real-time information and allows for easy control.

Figure 3: Smart Lid Controls and Display
- Temperatuur vertoon: Shows current internal temperature.
- Humiditeit vertoon: Shows current internal humidity percentage.
- Batteryvlak: Dui oorblywende batterylading aan.
- Bergingsduur: Tracks how many days items have been stored.
- Slot-ikoon: Initiates vacuum sealing.
- Unlock Icon: Releases vacuum seal.
- Time Icon: Toggles temperature units (°F/°C) and resets storage duration.
Opstelling
- Aanvanklike heffing: Before first use, fully charge the Smart Jar lid using the provided Type-C charging cable. A full charge can last up to 180 days (based on 1 use/day). The battery icon will flash while charging and disappear when fully charged.

Figure 4: Charging the Smart Jar
- Prepare Humidity Packs: Open the transparent outer packaging of the 62% two-way humidity control pack. Do not open the humidity pack itself. Place one pack inside the jar with your items. Each pack lasts up to 90 days.

Figure 5: Two-Way Humidity Control
- Prepare Items for Storage: Ensure items like herbs are thoroughly dried to remove excess surface and internal moisture before placing them in the jar. This prevents mold or bacterial growth. Target moisture for herbs should be approximately 10-12% for optimal preservation.
Bedryfsinstruksies
1. Power On/Off & Display Activation:
- Press and hold any button on the lid for 3 seconds to wake up the screen and power on the device.
- The display will show temperature, humidity, battery level, and storage duration.
2. Vacuum Sealing:
- Place your items into the jar, ensuring there is roughly 25% air space remaining to allow for proper air circulation and vacuum formation.
- Plaas die deksel stewig op die pot.
- Tik die Sluit icon on the lid to initiate the automatic vacuum sealing process. The built-in smart vacuum system will monitor internal air pressure and maintain a low-oxygen environment.

Figure 6: Filling the Jar for Optimal Sealing
3. Releasing the Vacuum Seal:
- To open the jar, press and hold the Ontsluit icon for 3 seconds to release the air. You will hear a hissing sound as air enters the jar.
- Once the air is released, you can remove the lid.
4. Vertoonfunksies:
- Temperatuur eenheid skakelaar: Tik die Tyd icon to switch between Fahrenheit (°F) and Celsius (°C) for temperature display.
- Reset Storage Timer: Druk en hou die Tyd icon for 3 seconds to reset the storage duration timer.
5. Curing Process:
The Smart Jar actively balances O2, CO2, and moisture to facilitate the curing process. The LED display will show the storage time while monitoring humidity and temperature.
- When the jar has reached the perfect humidity range (55-62%), a humidity indicator will display.
- When the jar has reached the perfect temperature range (16-21°C), a temperature indicator will display.

Figure 7: Usage Steps and Curing Indicators
Amptelike produkvideo's:
Video 1: How to Use the Spider Farmer Smart Curing Jar | Vacuum Seal. This video demonstrates the basic vacuum sealing and unsealing functions of the jar.
Video 2: How to Use the Spider Farmer Smart Curing Jar. This video provides a comprehensive guide to using the Smart Curing Jar for various storage needs.
Onderhoud
Skoonmaak:
- The jar body (stainless steel interior and ABS exterior) is dishwasher safe.
- The lid, containing electronic components, should only be wiped clean with a damp cloth. Do not submerge the lid in water.
- Maak seker dat alle dele heeltemal droog is voordat dit weer aanmekaargesit of gestoor word.
Humidity Pack Replacement:
- Each 62% two-way humidity pack lasts up to 90 days.
- Replace the humidity pack when it becomes hard or brittle, indicating it has absorbed its maximum moisture.
Probleemoplossing
| Probleem | Moontlike oorsaak | Oplossing |
|---|---|---|
| Jar not vacuum sealing properly. | Lid not seated correctly; debris on seal; low battery. | Ensure lid is aligned and pressed down firmly. Check and clean the silicone seal for any obstructions. Charge the device fully. |
| Vertoning skakel nie aan nie. | Low battery; device off. | Charge the device. Press and hold any button for 3 seconds to activate the display. |
| Humidity/Temperature readings seem inaccurate. | External factors; sensor obstruction. | Ensure the jar is not exposed to extreme ambient temperatures or direct heat sources. Verify nothing is blocking the internal sensors. |
| Cannot open the jar after vacuum sealing. | Vacuum seal still active. | Druk en hou die Ontsluit icon for 3 seconds to release the vacuum pressure before attempting to open. |
Spesifikasies
- Modelnommer: SF-SmartJar-VS
- Kapasiteit: 2 liter
- Produk afmetings: 12.6"L x 18.78"W x 19.69"H (Note: This seems to be package dimensions, actual jar dimensions are approx. 4.92" diameter x 6.69" height based on images)
- Item gewig: 1.72 pond
- Materiaal: 304 Stainless Steel (interior), ABS (exterior), Food Grade Silicone Seal
- Battery: 1 Nonstandard Lithium Ion Battery (included)
- Laai: Tipe C-USB
- Humiditeitsbeheer: 62% Two-Way Humidity Packs
- Skottelgoedwasser veilig: Jar body only (lid is not)
- Mikrogolfoond: Nee
Waarborg en Ondersteuning
For warranty information or technical support, please refer to the contact details provided with your purchase or visit the official Spider Farmer webwebwerf. Bewaar u aankoopbewys as bewys van aankoop.