1. Inleiding
This manual provides detailed instructions for the GUSGU G7 Wireless Gaming Controller. Please read this guide thoroughly to ensure proper setup, operation, and maintenance of your device. The GUSGU G7 controller offers advanced features such as an interactive screen, Hall Effect joysticks and triggers, programmable buttons, and broad compatibility across multiple platforms.
2. Produk verbyview
Familiarize yourself with the components and features of your GUSGU G7 Wireless Gaming Controller.

Figuur 2.1: Voorkant view of the GUSGU G7 Wireless Gaming Controller, showcasing its transparent red design and button layout.
2.1 Sleutelkenmerke
- Interactive Display Screen: For on-the-fly configuration of settings.
- Hall-effek-joysticks: Drift-free precision with adjustable dead zones.
- Hall Effect Dual-Stage Snellers: Customizable trigger travel for various game genres.
- Programmeerbare Terugknoppies: Four customizable buttons for macros and shortcuts.
- 6-As Girosensor: For motion control in supported games.
- Asimmetriese Vibrasiemotors: Four levels of haptic feedback.
- Multiple Connectivity Modes: Bluetooth 5.1, 2.4GHz wireless, and USB-C wired.
- Hoë stemkoers: 1000Hz for ultra-fast input in wired/2.4GHz modes.
- Lang batterylewe: 1000mAh battery providing up to 18 hours of gameplay.
3. Opstelling
3.1 Laai die beheerder
Before initial use, fully charge the controller. Connect the supplied USB-C cable to the controller's charging port and the other end to a compatible USB power source (e.g., PC, USB wall adapter). The interactive screen will indicate charging status. A full charge provides up to 18 hours of gameplay.
3.2 Initial Pairing and Connection
The GUSGU G7 supports three connection methods: Bluetooth, 2.4GHz wireless, and USB-C wired.
3.2.1 2.4GHz Wireless Connection (PC, Android TV)
- Insert the 2.4GHz USB receiver into an available USB port on your device (PC, Android TV).
- Turn on the controller by pressing the Home button.
- The controller will automatically attempt to connect to the receiver. The interactive screen will display connection status.
3.2.2 Bluetooth Connection (iOS, Android, Switch, PS4)
- Maak seker dat Bluetooth op jou toestel geaktiveer is.
- On the controller, press and hold the Home button until the interactive screen displays pairing mode.
- On your device, search for Bluetooth devices and select "GUSGU G7" from the list.
- Once paired, the interactive screen will confirm the connection.
3.2.3 USB-C Wired Connection (PC, Switch, PS4)
- Connect the USB-C cable from the controller to a USB port on your device.
- Die beheerder sal outomaties oorskakel na bedrade modus.
- For Switch and PS4, ensure the console's settings allow for wired controller communication.
4. Operasie
4.1 Using the Interactive Display Screen
The interactive screen allows for direct adjustment of controller settings without external software. Press the 'H' button for 3 seconds to enter the menu. Navigate using the D-pad and confirm selections with the 'A' button. Use 'B' to go back.
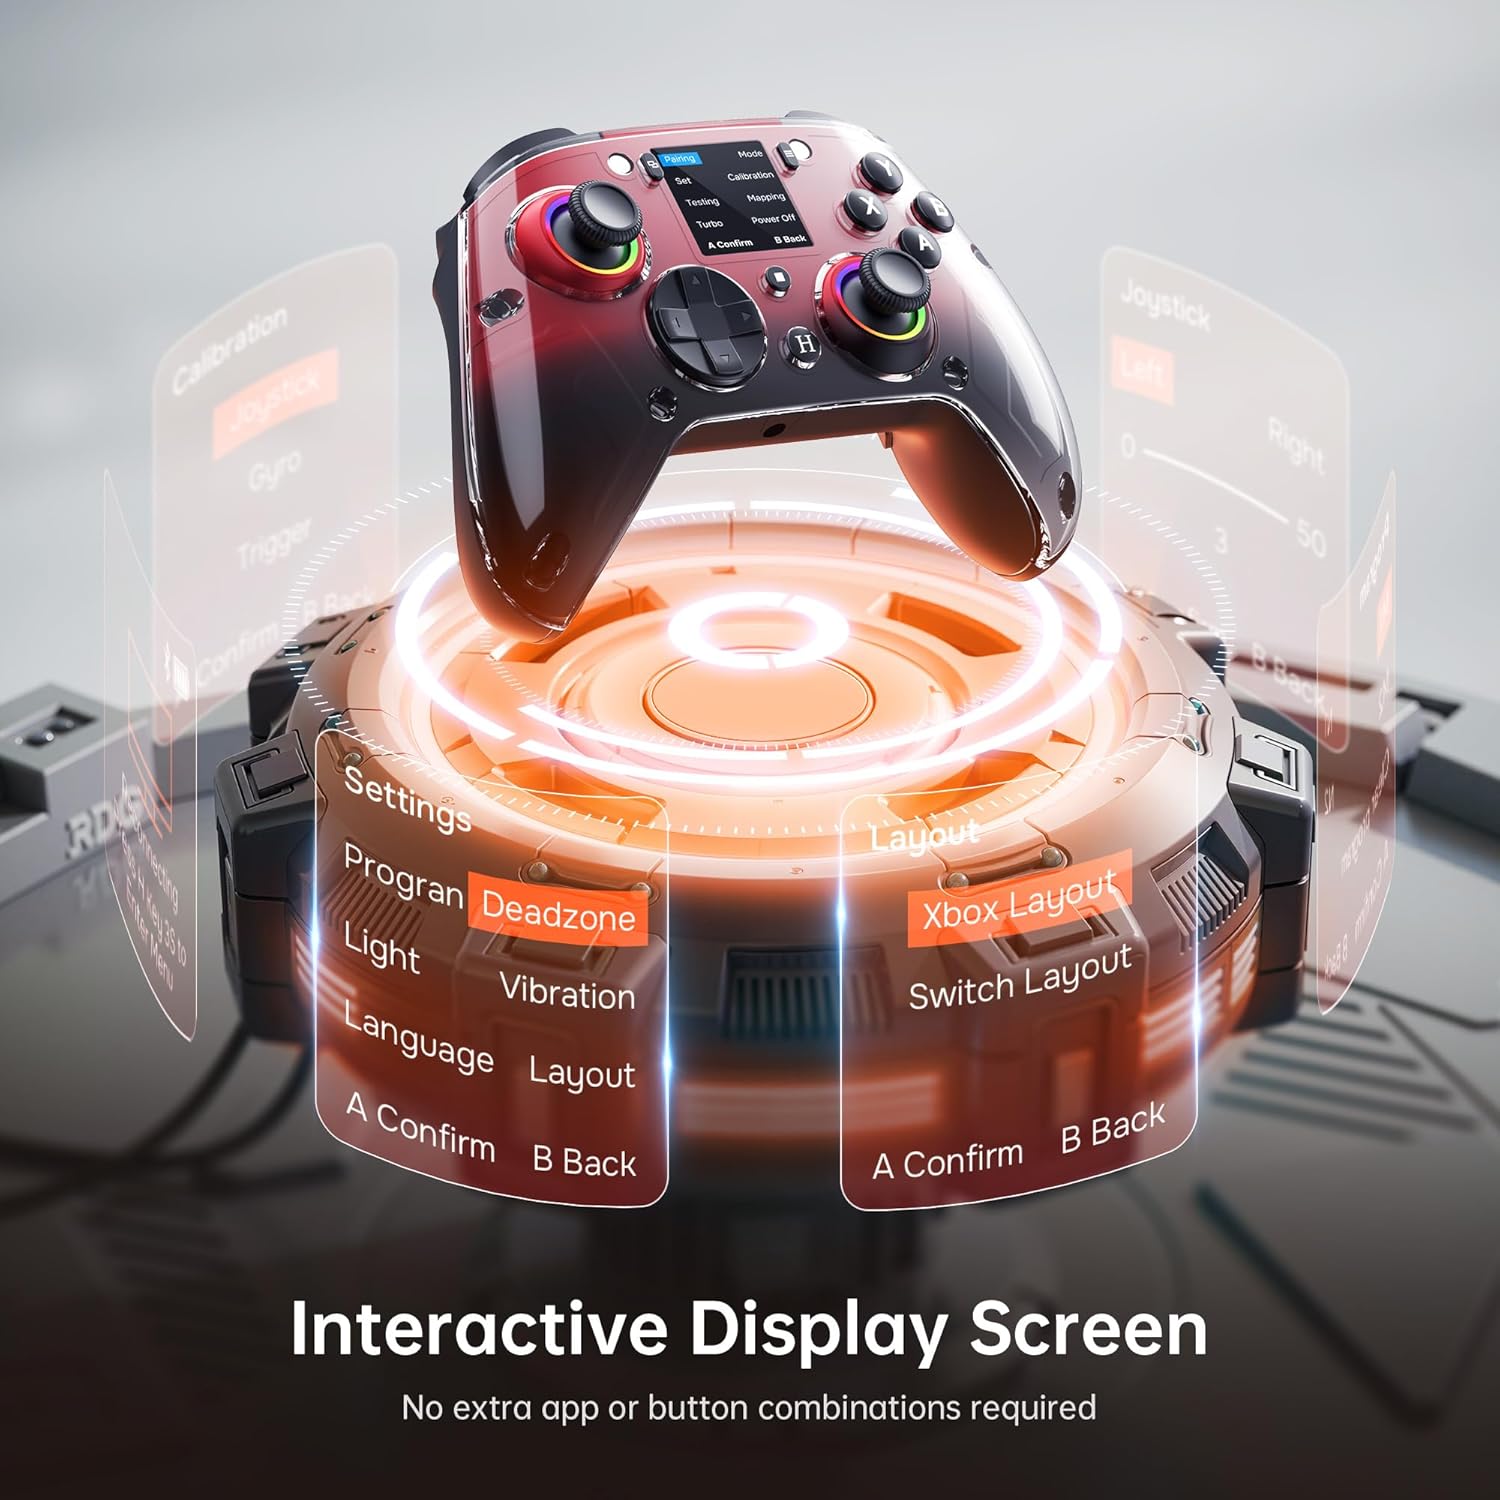
Figure 4.1: The interactive display screen allows for easy adjustment of settings like dead zones, vibration, and button layouts.
- Instellings: Adjust vibration intensity, joystick dead zones, trigger sensitivity, and lighting effects.
- Program: Configure the four programmable back buttons (M1, M2, N1, N2).
- Uitleg: Switch between Xbox and Switch button layouts.
- Kalibrasie: Calibrate joysticks, gyro, and triggers if needed.
4.2 Programmeerbare Terugknoppies
The GUSGU G7 features four programmable back buttons (M1, M2, N1, N2) located on the underside of the controller. These can be assigned to single button presses, sequences, or macros via the interactive screen's "Program" menu. This allows for quick execution of complex commands during gameplay.

Figure 4.2: The four programmable back buttons (M1, M2, N1, N2) on the rear of the controller, designed for custom macros and shortcuts.
4.3 Hall Effect Joysticks and Adjustable Dead Zones
The Hall Effect joysticks provide precise, drift-free control. Dead zones can be customized from 0% to 50% using the interactive screen to match your preference and game requirements. A smaller dead zone offers more immediate response, while a larger one can prevent unintended inputs.

Figure 4.3: Illustration of the Hall Effect joystick mechanism and the concept of adjustable dead zones for enhanced precision.
4.4 Hall Effect Dual-Stage Triggers
The triggers feature a dual-stage mechanism, allowing you to switch between short-pull for quick actions (e.g., shooting in FPS games) and full-pull for precise control (e.g., acceleration in racing games). This can be configured through the interactive screen.

Figure 4.4: Visual representation of the dual-stage trigger functionality, demonstrating its application in different gaming scenarios.
4.5 Motion Control (6-Axis Gyro Sensor)
The built-in 6-axis gyroscope provides precise motion sensing for games that support tilt or motion-based controls. This enhances immersion in titles requiring realistic steering, aiming, or flight mechanics.
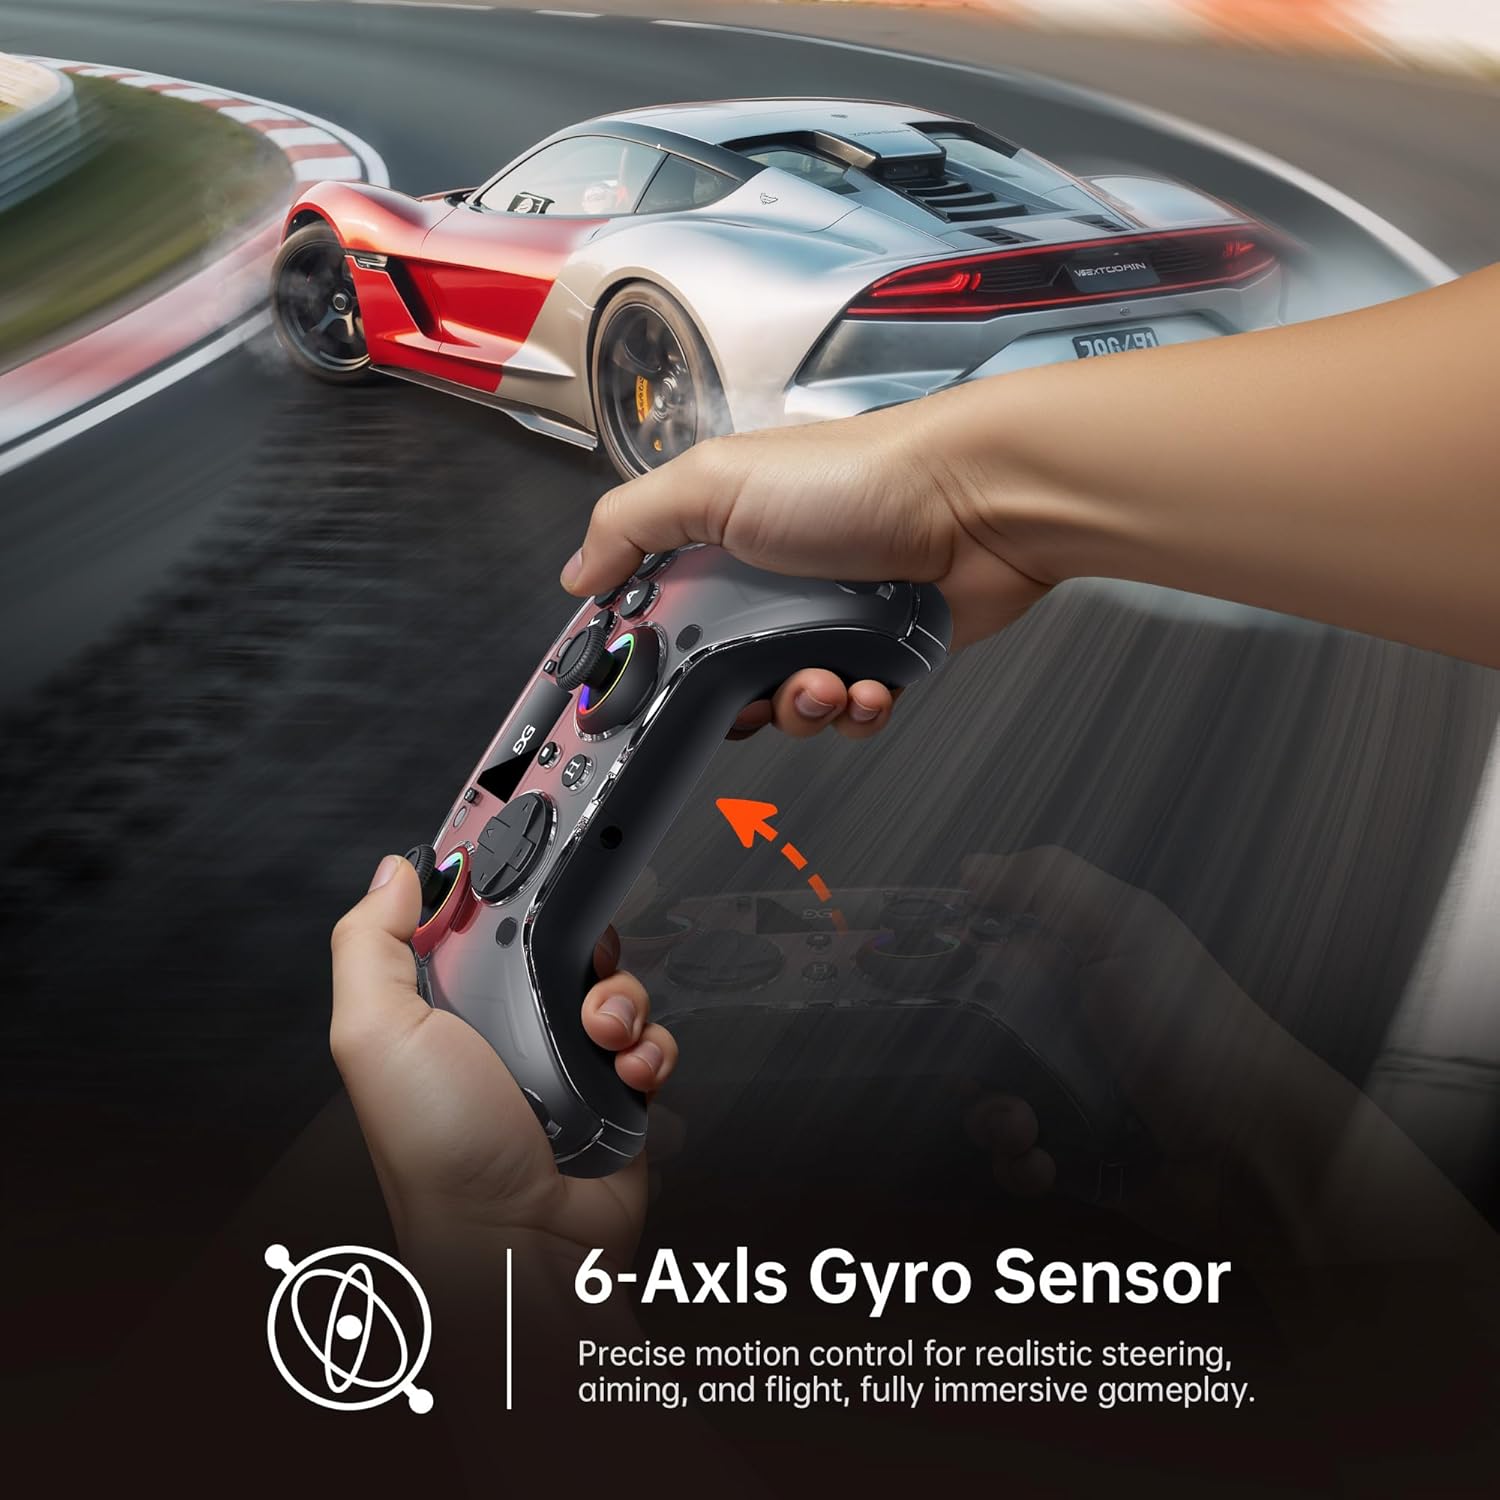
Figure 4.5: A user demonstrating motion control with the GUSGU G7 controller in a racing game, highlighting the 6-axis gyro sensor.
4.6 Vibrasieterugvoer
Dual asymmetric vibration motors provide four levels of haptic feedback, accurately replicating in-game events such as impacts, explosions, or engine rumble. Vibration intensity can be adjusted via the interactive screen.

Figuur 4.6: Intern view of the GUSGU G7 controller illustrating the asymmetric vibration motors and their four adjustable intensity levels.
4.7 Klankuitset
The 3.5mm headphone jack supports game audio output when the controller is connected via USB cable to a Nintendo Switch (Switch 1) or PlayStation 4. Audio output is not supported on other devices such as PC or mobile phones.
5. Verenigbaarheid
The GUSGU G7 Wireless Gaming Controller offers broad compatibility across various platforms:

Figure 5.1: The GUSGU G7 controller displayed with a list of compatible devices including PC, mobile, gaming consoles, and in-car systems.
- PC: Windows 10 and above (X-input, D-input modes).
- iOS: iOS 14.0 en hoër.
- Android: Android 9.0 en hoër.
- Nintendo Switch (NS): Supports Switch mode.
- PlayStation 4 (PS4): Supports PS4 mode.
- Tesla Arcade: Compatible with Tesla in-car gaming systems.
Note: The GUSGU G7 controller is currently not compatible with Xbox or PlayStation 5 consoles.
6. Onderhoud
To ensure the longevity and optimal performance of your GUSGU G7 controller, follow these maintenance guidelines:
- Skoonmaak: Use a soft, dry cloth to wipe the controller. For stubborn dirt, slightly dampMaak die lap met water skoon. Vermy die gebruik van harde chemikalieë of skuurmiddels.
- Berging: Bêre die beheerder op 'n koel, droë plek weg van direkte sonlig en uiterste temperature.
- Batterysorg: Avoid fully discharging the battery frequently. If storing for an extended period, charge the controller to approximately 50% to preserve battery health.
- Kabelbestuur: Do not excessively bend or pull the USB-C cable to prevent damage.
7. Probleemoplossing
If you encounter issues with your GUSGU G7 controller, refer to the following common solutions:
| Probleem | Oplossing |
|---|---|
| Die beheerder skakel nie aan nie. | Ensure the controller is charged. Connect it to a power source using the USB-C cable. |
| Controller does not connect wirelessly. |
|
| Joystick-drywing of onakkurate invoer. |
|
| Programmable buttons not working. | Verify the button assignments in the "Program" menu on the interactive screen. Ensure they are correctly configured. |
| No audio from 3.5mm jack. | Ensure the controller is connected via USB-C to a Nintendo Switch (Switch 1) or PlayStation 4. Audio is not supported on PC or mobile devices. Check device audio settings. |
8. Spesifikasies
| Kenmerk | Detail |
|---|---|
| Modelnommer | GUSGU G7 |
| Konnektiwiteit | Bluetooth 5.1, 2.4GHz draadloos, USB-C bedraad |
| Stemmingskoers | 1000Hz (Wired/2.4GHz), 250Hz (Bluetooth) |
| Joysticks | Hall Effect, Adjustable Dead Zones (0-50%) |
| Snellers | Hall Effect, Dual-Stage with Adjustable Travel |
| Programmeerbare knoppies | 4 Back Buttons (M1, M2, N1, N2) |
| Bewegingsensor | 6-as gyroskoop |
| Vibrasie | Dual Asymmetric Motors, 4 Levels Adjustable |
| Battery kapasiteit | 1000mAh |
| Batterylewe | Tot 18 uur |
| Klankaansluiting | 3.5mm (Switch 1, PS4 via USB only) |
| Verenigbaarheid | PC (Win 10+), iOS (14.0+), Android (9.0+), NS, PS4, Tesla Arcade |
| Afmetings | 7.72 x 5.16 x 2.83 duim |
| Gewig | 16 onse |
9. Waarborg en Ondersteuning
GUSGU is committed to providing quality products and customer satisfaction. While specific warranty details are not provided in this manual, GUSGU offers lifetime customer support for its products.
For further assistance, technical support, or warranty inquiries, please visit the official GUSGU webwebwerf of kontak hul kliëntediensafdeling deur die kleinhandelaar waar die produk gekoop is.
U kan ook die GUSGU Store on Amazon vir meer inligting en ondersteuningsbronne.