Voktta A38IDCE0130-003
Voktta USB Rechargeable Soldering Iron Instruction Manual
Model: A38IDCE0130-003
1. Veiligheidsinligting
Please read all safety instructions carefully before using the Voktta USB Rechargeable Soldering Iron. Failure to follow these instructions may result in electric shock, fire, or serious injury.
- Hoë temperature: The soldering iron tip reaches very high temperatures (up to 450°C / 842°F). Avoid direct contact with the tip to prevent burns.
- Ventilasie: Gebruik die soldeerbout in 'n goed geventileerde area om die inaseming van dampe wat tydens soldeerwerk geproduseer word, te vermy.
- Oogbeskerming: Always wear safety glasses to protect your eyes from solder splashes or fumes.
- Hou weg van kinders: This product is not a toy. Keep it out of reach of children and unauthorized persons.
- Proper Stand Usage: Always place the hot soldering iron in its designated stand when not in use to prevent accidental contact or damage to surfaces.
- Skakel af: Disconnect the power and allow the iron to cool completely before cleaning, storing, or changing tips.
- Vlambare materiale: Hou vlambare materiale weg van die soldeerarea.
- Batteryveiligheid: Do not expose the battery to extreme temperatures or disassemble it. Use only the provided charging cable.
2. Produk verbyview
The Voktta USB Rechargeable Soldering Iron is a portable and versatile tool designed for various electronic repair and DIY projects. It features an adjustable temperature range, quick heating, and a built-in battery for cordless operation.
Sleutel kenmerke:
- Verstelbare temperatuur: Temperature range of 200-450°C (392-842°F), switchable between Celsius and Fahrenheit.
- Vinnige verhitting: Heats up in approximately 10 seconds and reaches maximum temperature in about 30 seconds.
- LCD-skerm: High-resolution screen displays current temperature status.
- Koordlose werking: Built-in 800 mAh battery provides approximately 30 minutes of continuous use after a 1.5-hour charge via USB-C.
- Ergonomiese ontwerp: Features a non-slip, heat-resistant handle for comfortable and safe use.
- Ceramic Heating Core: Ensures stable and efficient heating.
Pakketinhoud:
- USB Electric Soldering Iron x 1
- Soldering Tip x 3 (various types)
- Rosin x 1
- Soldering Iron Holder (with sponge) x 1
- USB Tipe-C-laaikabel x 1
- Soldering Wire x 1
- Toolbox x 1
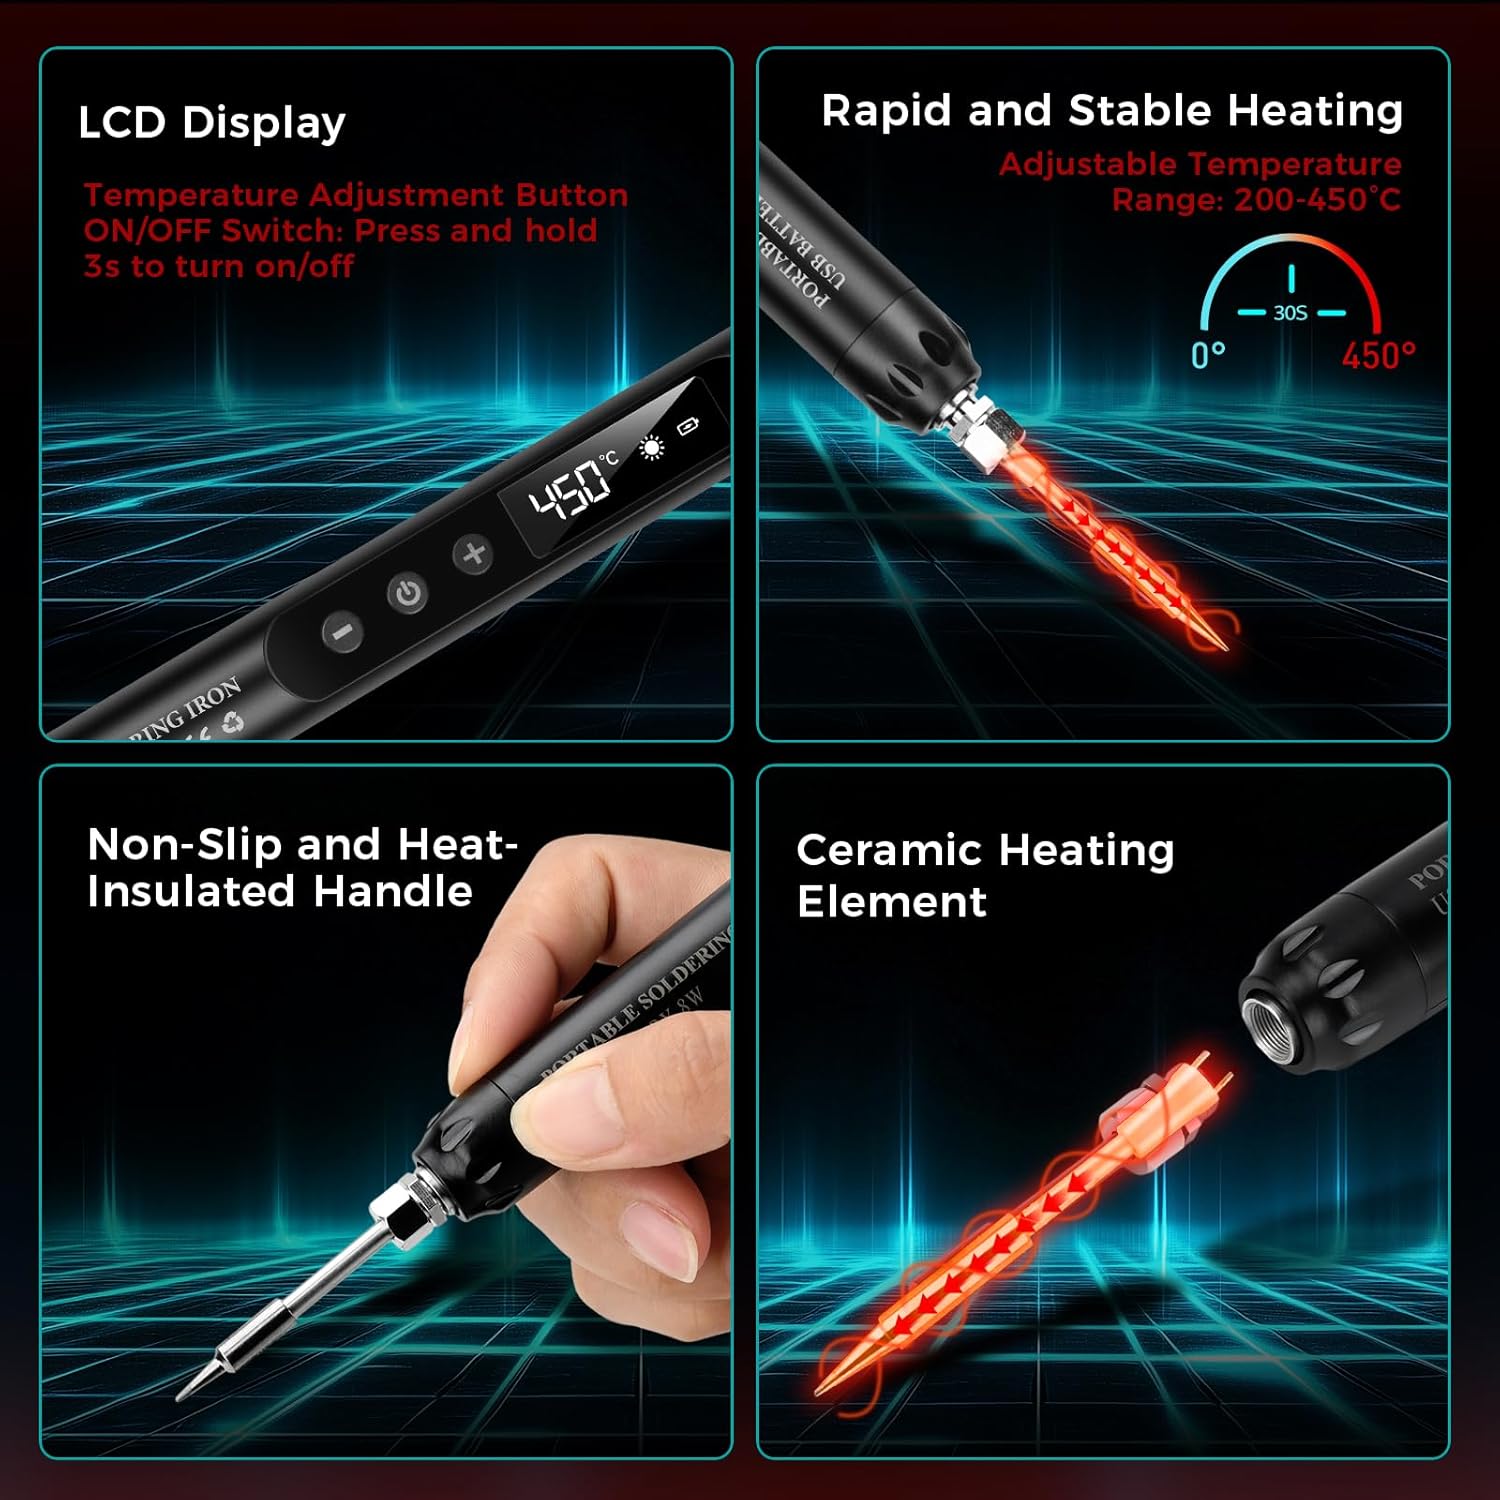
Beeld: Oorview of the soldering iron's key features including the LCD display, rapid heating, non-slip handle, and ceramic heating element.

Beeld: Bvamples of common applications for the soldering iron, such as repairing circuit boards, jewelry, and other small electronic components.
3. Opstelling
3.1 Aanvanklike laai
Before first use, fully charge the soldering iron. Connect the provided USB Type-C charging cable to the soldering iron's charging port and to a compatible USB power source (e.g., wall adapter, computer USB port, power bank).
- A rooi lig indicates that the device is charging.
- A groen lig dui aan dat die battery ten volle gelaai is.
- Charging typically takes about 1.5 hours.

Image: The soldering iron connected to a USB power source, illustrating the charging indicator lights (red for charging, green for fully charged).
3.2 Attaching a Soldering Tip
Ensure the soldering iron is cool and powered off before changing tips. Carefully screw the desired soldering tip onto the heating element. Do not overtighten.
3.3 Preparing the Work Area
- Ensure your workspace is clean, well-lit, and well-ventilated.
- Place the soldering iron stand on a stable, heat-resistant surface.
- Moisten the sponge in the soldering iron holder with a small amount of water. This sponge is used for cleaning the tip.
- Have your solder wire, rosin, and components ready.
4. Bedryfsinstruksies
4.1 Aan-/afskakel
To power on the soldering iron, press and hold the power button for approximately 3 seconds until the LCD screen illuminates. To power off, press and hold the power button again for 3 seconds.
4.2 Aanpassing van temperatuur
Once powered on, use the '+' and '-' buttons to adjust the desired temperature. The temperature range is 200-450°C (392-842°F). The LCD screen will display the current temperature.

Image: The soldering iron's LCD screen displaying the temperature and controls for adjustment and unit conversion.
4.3 Skakel Temperatuureenhede
The soldering iron supports both Celsius (°C) and Fahrenheit (°F). Refer to the product's specific instructions or button labels for switching between these units, typically by a short press of a dedicated button or a combination of temperature adjustment buttons.
4.4 Soldeerproses
Volg hierdie stappe vir effektiewe soldeerwerk:
- Moisten the Sponge: Ensure the cleaning sponge is damp.
- Krag aan: Turn on the soldering iron and set the desired temperature. Allow it to heat up.
- Apply Rosin Flux: If necessary, apply a small amount of rosin flux to the components or PCB pads to improve solder flow.
- Heat the Joint: Touch the hot soldering iron tip to both the component lead and the PCB pad simultaneously. Heat them for a few seconds.
- Dien soldeer toe: While heating, touch the solder wire to the heated joint (not directly to the iron tip). The solder should melt and flow smoothly around the joint.
- Verwyder soldeer en yster: Once enough solder has flowed, remove the solder wire first, then remove the soldering iron. Allow the joint to cool naturally without disturbance.
- Maak die wenk skoon: Wipe the hot soldering iron tip on the moist sponge to remove excess solder and oxidation.
- Skakel af: When finished, turn off the soldering iron and place it securely in its stand to cool.

Image: A step-by-step visual guide demonstrating the proper soldering technique.
5. Onderhoud
5.1 Cleaning the Soldering Tip
Regular cleaning of the soldering tip is crucial for optimal performance and longevity. Wipe the hot tip on a moist sponge frequently during use to remove excess solder and oxidation. For stubborn residue, use a brass wire cleaner (not included) or specialized tip cleaner.
5.2 Replacing Soldering Tips
Ensure the iron is cool and unplugged. Unscrew the old tip and screw in a new one. Only use compatible replacement tips.
5.3 Batteryversorging en -berging
- Avoid fully discharging the battery frequently. Recharge when the battery indicator is low.
- Store the soldering iron in a cool, dry place when not in use, preferably in its toolbox.
- If storing for extended periods, charge the battery to about 50% to prolong its lifespan.
6. Probleemoplossing
- Yster nie verhit nie:
- Check if the iron is powered on (LCD screen should be lit).
- Maak seker dat die battery gelaai is. Koppel aan 'n kragbron en kyk na die laai-aanwyser.
- Verify the soldering tip is securely attached.
- Solder Not Melting or Poor Joints:
- Verhoog die ingestelde temperatuur.
- Clean the soldering tip thoroughly; a dirty tip cannot transfer heat effectively.
- Ensure you are heating both the component lead and the pad, not just the solder.
- Use fresh solder wire.
- Battery laai nie:
- Check the USB Type-C cable for damage and ensure it's properly connected.
- Try a different USB power source or wall adapter.
7. Spesifikasies
| Modelnommer | A38IDCE0130-003 |
| Kragbron | Battery aangedrewe |
| Wattage | 8 watt |
| Verstelbare temperatuur | 200-450°C (392-842°F) |
| Battery kapasiteit | 800 mAh (ingebou) |
| Laai tyd | Ongeveer. 1.5 uur |
| Bedryfstyd | Approx. 30 minutes (continuous) |
| Verhitting Tyd | 10 seconds to heat, 30 seconds to max temperature |
| Hanteer Materiaal | Plastiek, rubber |
| Item gewig | 210 gram |
| Pakket afmetings | 24 x 9.4 x 3.7 cm |
8. Waarborg en Ondersteuning
This Voktta product is covered by a standard manufacturer's warranty against defects in materials and workmanship. Please refer to your purchase documentation for specific warranty terms and duration.
For technical support, warranty claims, or replacement parts, please contact the retailer or manufacturer directly. Keep your proof of purchase for warranty validation.