1. Inleiding
This manual provides essential information for setting up, operating, maintaining, and troubleshooting your NIMO 15.6-inch FHD Business Laptop. Please read this guide thoroughly to ensure optimal performance and longevity of your device. Keep this manual for future reference.
2. Wat is in die boks
Verifieer dat alle items in die verpakking teenwoordig is:
- 1 x Nimo N154 Laptop
- 1 x Type-C 65W PD Fast Charger
- 1 x Gebruikershandleiding (hierdie dokument)
- Windows 11 Home (pre-installed)
3. Produk verbyview
Familiarize yourself with the components and ports of your NIMO laptop.
Beeld: Voorkant view of the NIMO 15.6-inch FHD Business Laptop, showcasing die skerm en sleutelbord.
3.1. Poorts en verbindings
The NIMO N154 laptop features a variety of ports for connecting peripherals and external devices.

Image: Diagram illustrating the various ports on the left and right sides of the NIMO laptop, including USB, HDMI, Type-C, and audio jack.
- Linkerkant:
- Kensington Lock: For securing your laptop.
- Headphone Combo Jack: For audio output and microphone input.
- USB 3.0 Port (x2): For high-speed data transfer.
- USB 2.0 Port (x1): For connecting standard USB devices.
- Micro SD Card Reader: For expanding storage or transferring files van geheue kaarte.
- Regterkant:
- Type-C Port (Charge Only): For connecting the 65W PD charger.
- USB 3.0 Port (x1): For high-speed data transfer.
- HDMI Port: For connecting to external displays.
- Type-C Port (Multifunction): Supports data transfer and display output.
- Charge LED Indicator: Shows charging status.
4. Opstelling
4.1. Aanvanklike aanskakeling en laai
- Pak uit: Verwyder die skootrekenaar en alle bykomstighede versigtig uit die verpakking.
- Koppel krag: Plug the 65W Type-C PD Fast Charger into a power outlet and then connect the Type-C connector to the designated "Charge Only" Type-C port on the laptop.
- Laai battery: Allow the laptop to charge for at least 30 minutes before initial use, or until the charge LED indicates a full charge.
- Krag aan: Open the laptop lid and press the power button, typically located on the top right of the keyboard or side.

Image: The 65W Type-C PD Fast Charger, illustrating its compact design and universal compatibility.
4.2. Windows 11-opstelling
Follow the on-screen instructions to complete the Windows 11 initial setup:
- Kies jou streek en sleutelborduitleg.
- Koppel aan 'n Wi-Fi-netwerk.
- Meld aan met jou Microsoft-rekening of skep 'n nuwe een.
- Stel 'n PIN op vir vinnige aanmelding.
- Review and accept privacy settings.
5. Bedryfsinstruksies
5.1. Vingerafdrukleser
The integrated fingerprint sensor allows for secure and quick login without passwords.
- Opstelling: Navigate to Windows Settings > Accounts > Sign-in options > Fingerprint recognition (Windows Hello).
- Registreer vingerafdruk: Volg die aanwysings op die skerm om jou vingerafdruk te registreer. Jy sal dalk jou vinger verskeie kere vanuit verskillende hoeke moet skandeer.
- Gebruik: To log in, simply place your registered finger on the fingerprint sensor when prompted.

Image: Close-up of the laptop's touchpad area showing the fingerprint reader, and a separate image of the webcam with a privacy shield.
5.2. Backlit Keyboard
The backlit keyboard enhances visibility in low-light conditions.
- Toggle Backlight: Use the dedicated function key (often Fn + Fx, where Fx is a key with a keyboard backlight icon) to cycle through backlight brightness levels or turn it off. Refer to your keyboard for the specific key combination.
5.3. Webcam Privacy Shield
The laptop includes a physical webcam privacy shield for enhanced security.
- Aktiveer/Deaktiveer: Slide the physical switch located next to the webkamera om die kameralens te bedek of te ontbloot.
5.4. Koppeling van eksterne skerms
You can extend your workspace by connecting an external monitor or projector.
- Koppel kabel: Use an HDMI cable to connect your external display to the laptop's HDMI port, or a compatible Type-C to DisplayPort/HDMI adapter for the multifunction Type-C port.
- Configure Display: Druk Windows-sleutel + P to open the Project menu. Select your preferred display mode (e.g., Duplicate, Extend, Second screen only).
6. Onderhoud
6.1. Maak jou skootrekenaar skoon
- Skerm: Gebruik 'n sagte, pluisvrye lap liggies dampmet water of 'n skermreiniger afgespoel. Moenie vloeistof direk op die skerm spuit nie.
- Sleutelbord en Onderstel: Gebruik 'n sagte, droë lap. Vir hardnekkige vuiligheid, 'n effens droë lap.amp 'n Lap met 'n sagte seepoplossing kan gebruik word, en verseker dat geen vloeistof in die openinge binnedring nie.
- Poorte: Gebruik saamgeperste lug om stof versigtig uit poorte te verwyder.
6.2. Batteryversorging
- Vermy om die battery gereeld heeltemal te ontlaai.
- Bêre die skootrekenaar op 'n koel, droë plek indien dit nie vir lang tye gebruik word nie.
- Moenie die skootrekenaar aan uiterste temperature blootstel nie.
6.3. Sagteware-opdaterings
- Regularly check for and install Windows updates to ensure system stability and security. Go to Settings > Windows Update.
- Hou toesteldrywers opgedateer vir optimale werkverrigting.
7. Probleemoplossing
Hierdie afdeling spreek algemene probleme aan wat jy mag teëkom.
7.1. Skootrekenaar skakel nie aan nie
- Maak seker dat die laaier stewig aan beide die skootrekenaar en 'n werkende kragpunt gekoppel is.
- Verifieer dat die kragaansluiting funksioneel is deur 'n ander toestel in te prop.
- Allow the laptop to charge for at least 30 minutes if the battery is completely drained.
- Try a hard reset by holding the power button for 15-20 seconds.
7.2. Display Issues (No Image, Flickering)
- If an external monitor is connected, disconnect it to see if the laptop's screen works.
- Adjust screen brightness using the function keys (e.g., Fn + F5/F6).
- Herbegin die skootrekenaar.
- If connected to an external display, ensure the cable is properly seated and try a different cable or port.
7.3. Wi-Fi-verbindingsprobleme
- Ensure Wi-Fi is enabled in Windows Settings > Network & Internet > Wi-Fi.
- Herbegin jou router en modem.
- Vergeet die netwerk en koppel weer aan.
- Dateer jou Wi-Fi-drywers op.
7.4. Stadige Prestasie
- Maak onnodige toepassings wat in die agtergrond loop toe.
- Gaan Taakbestuurder (Ctrl+Shift+Esc) na vir prosesse wat hoë SVE-, RAM- of skyfgebruik verbruik.
- Maak seker dat daar genoeg vrye spasie op jou SSD is.
- Voer 'n skyfopruiming en defragmentasie uit (vir HDD, alhoewel dit 'n SSD is).
- Skandeer vir wanware of virusse.
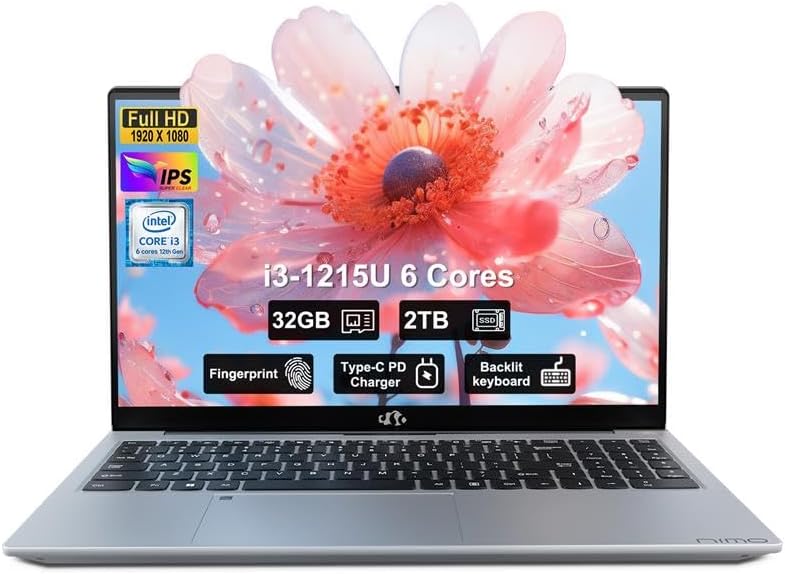
8. Spesifikasies
Detailed technical specifications for the NIMO N154 Laptop.

Image: Diagram illustrating the Intel Core i3-1215U processor with details on cores, threads, power consumption, and Turbo Boost frequency.

Image: Visual representation of 32GB DDR4 RAM and 2TB PCIe 4.0 SSD, highlighting dual RAM channel capability.
| Kenmerk | Spesifikasie |
|---|---|
| Model Naam | NIMO N154 |
| Skerm grootte | 15.6 duim |
| Skermresolusie | 1920 x 1080 Pixels (FHD IPS) |
| Verwerker | Intel Core i3-1215U (6-core, 8-thread, up to 4.4GHz) |
| RAM | 32 GB DDR4 (3200 MHz) |
| Berging | 2 TB PCIe SSD |
| Grafiese medeverwerker | Geïntegreerde Intel-grafika |
| Bedryfstelsel | Windows 11 Tuis |
| Draadlose tipe | 802.11a/b/g/n/ac (Wi-Fi 6) |
| USB-poorte | 2x USB 3.0, 1x USB 2.0, 2x Type-C (1x Charge Only, 1x Multifunction) |
| HDMI-poort | 1x HDMI 2.1 |
| Spesiale kenmerke | Backlit Keyboard, Fingerprint Reader, HD Audio, Memory Card Slot, Numeric Keypad, Webcam Privacy Shield |
| Batterylewe (gemiddeld) | 5 ure |
| Item gewig | 3.8 pond |
| Produkafmetings (LxBxH) | 14.07 x 8.98 x 0.76 duim |
| Kleur | Silwer |
9. Waarborg en Ondersteuning
Nimo Direct Inc. is committed to customer satisfaction.
- Vervaardiger se waarborg: Your NIMO laptop is covered by a comprehensive 2-Year Manufacturer's Warranty. This warranty covers defects in materials and workmanship under normal use.
- Terugsendingsbeleid: We offer 90-Day Hassle-Free Returns. If you are not satisfied with your purchase, you may return it within 90 days of receipt.
- Kliëntediens: Our dedicated US support team is available to provide swift issue resolution or immediate replacements. For assistance, please refer to the contact information provided on the NIMO official webwebwerf of u aankoopdokumentasie.

Image: Illustration of NIMO's after-sales support, including partial US assembly, 90-day free returns, 2-year after-sales support, and 24/7 customer service.