1. Inleiding
This manual provides instructions for the safe and effective operation of the Landtek MILA48500 Digital Illuminance Lux Light Meter Datalogger. This device is designed for measuring illuminance (brightness) in various environments, offering a wide measurement range, data logging capabilities, and Bluetooth connectivity for real-time monitoring.
Lees asseblief hierdie handleiding deeglik deur voordat u die toestel gebruik om behoorlike funksionaliteit te verseker en skade te voorkom.
2. Veiligheidsinligting
- Moenie probeer om die toestel oop te maak of te wysig nie. Verwys alle diens na gekwalifiseerde personeel.
- Hou die toestel weg van water, vog en uiterste temperature.
- Verwyder batterye as die toestel nie vir 'n lang tydperk gebruik gaan word om lekkasie te voorkom.
- Gooi batterye en die toestel weg volgens plaaslike regulasies.
- Avoid pointing the light sensor directly at extremely bright light sources for prolonged periods, as this may affect sensor longevity.
3. Pakketinhoud
Verifieer dat alle items teenwoordig is tydens uitpak:
- Digital Illuminance Lux Light Meter Datalogger (MILA48500)
- Drasak
- Engelse instruksiehandleiding
- 2 x 1.5V AAA Batteries (pre-installed or included separately)

Figuur 3.1: The Landtek MILA48500 Lux Meter package contents, showing the meter, a black protective pouch, and the instruction manual.
4. Toestel oorview
Familiarize yourself with the components of the Landtek MILA48500 Lux Meter:

Figuur 4.1: Voor en agter view of the Landtek MILA48500 Lux Meter with labeled components. Key parts include the light sensor, LCD screen, various function buttons (MAX/MIN, HOLD, UNIT, Power), and the battery compartment.
- Ligsensor: Detects ambient light.
- LCD skerm: Displays measurement readings, units, and status indicators. Features a backlight for low-light conditions.
- MAX/MIN-knoppie: Wissel tussen maksimum en minimum aangetekende waardes.
- HOU knoppie: Freezes the current reading on the display. Also activates Bluetooth when pressed for 2 seconds.
- EENHEID-knoppie: Switches between LUX and FC measurement units. Also activates the backlight when pressed for 2 seconds.
- Kragknoppie: Skakel die toestel aan of af.
- Battery kompartement: Located on the rear, houses two AAA batteries.
5. Opstelling
5.1 Battery installasie
- Vind die batteryklepdeksel aan die agterkant van die toestel.
- Skuif of knip die deksel los om dit oop te maak.
- Plaas twee 1.5V AAA-batterye in en maak seker dat die polariteit (+/-) korrek is soos aangedui in die kompartement.
- Plaas die batterykompartement se deksel veilig terug.
5.2 Aan-/afskakel
- Om aan te skakel: Druk die Kragknoppie (). The LCD screen will illuminate.
- Om af te skakel: Druk die Kragknoppie again. The device also features an automatic power-off function to conserve battery life.
6. Bedryfsinstruksies
6.1 Basiese Meting
After powering on, the device will immediately begin measuring illuminance. Point the light sensor towards the light source or area you wish to measure.
6.2 Unit Selection (LUX / FC)
Druk die UNIT -knoppie to toggle between LUX (lux) and FC (foot-candle) measurement units. The selected unit will be displayed on the LCD screen.

Figuur 6.1: The meter's display showing measurements in FC (left) and LUX (right) units.
6.3 Data Vashou Funksie
Druk die HOLD-knoppie briefly to freeze the current reading on the display. Press it again to release the hold and resume live measurement.
6.4 MAX / MIN Display
Druk die MAX/MIN-knoppie to cycle through the maximum, minimum, and current readings recorded since the device was powered on or the function was reset. The display will indicate 'MAX' or 'MIN' accordingly.
6.5 Agtergrondbeligtingsfunksie
Druk en hou die UNIT -knoppie for approximately 2 seconds to turn the LCD backlight on or off.
6.6 Measurement Range Multipliers
The meter automatically adjusts its measurement range. When 'X10' or 'X100' appears on the display, the displayed reading must be multiplied by that factor to obtain the actual illuminance value.
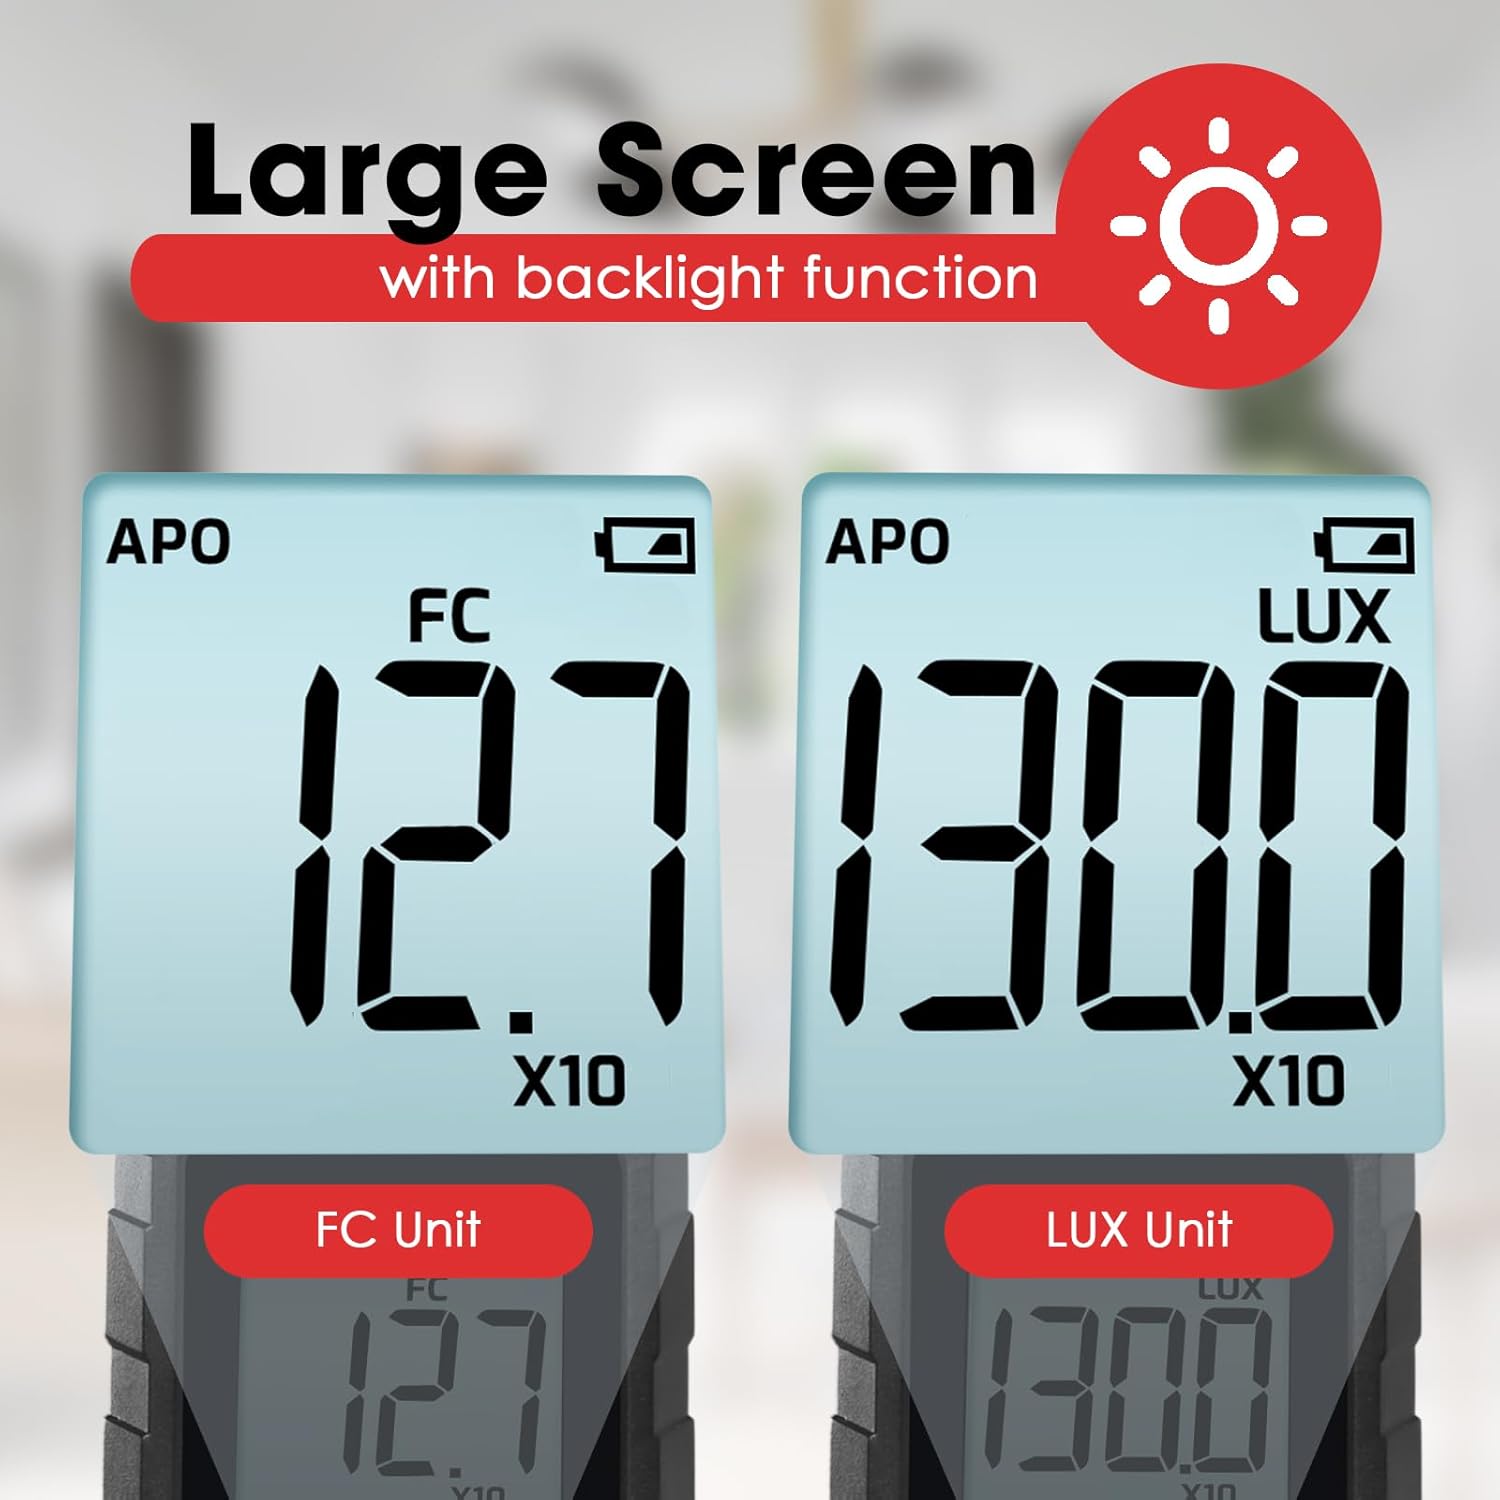
Figuur 6.2: Explanation of how to interpret readings when 'X10' or 'X100' multipliers are active on the display.
- If 'X10' is displayed, multiply the reading by 10. For example, a display of 16.47 with 'X10' means 164.7 LUX.
- If 'X100' is displayed, multiply the reading by 100. For example, a display of 16.47 with 'X100' means 1647 LUX.
6.7 Bluetooth Connectivity and Data Logging
The device supports Bluetooth connectivity for real-time monitoring and data logging via a compatible smartphone application.
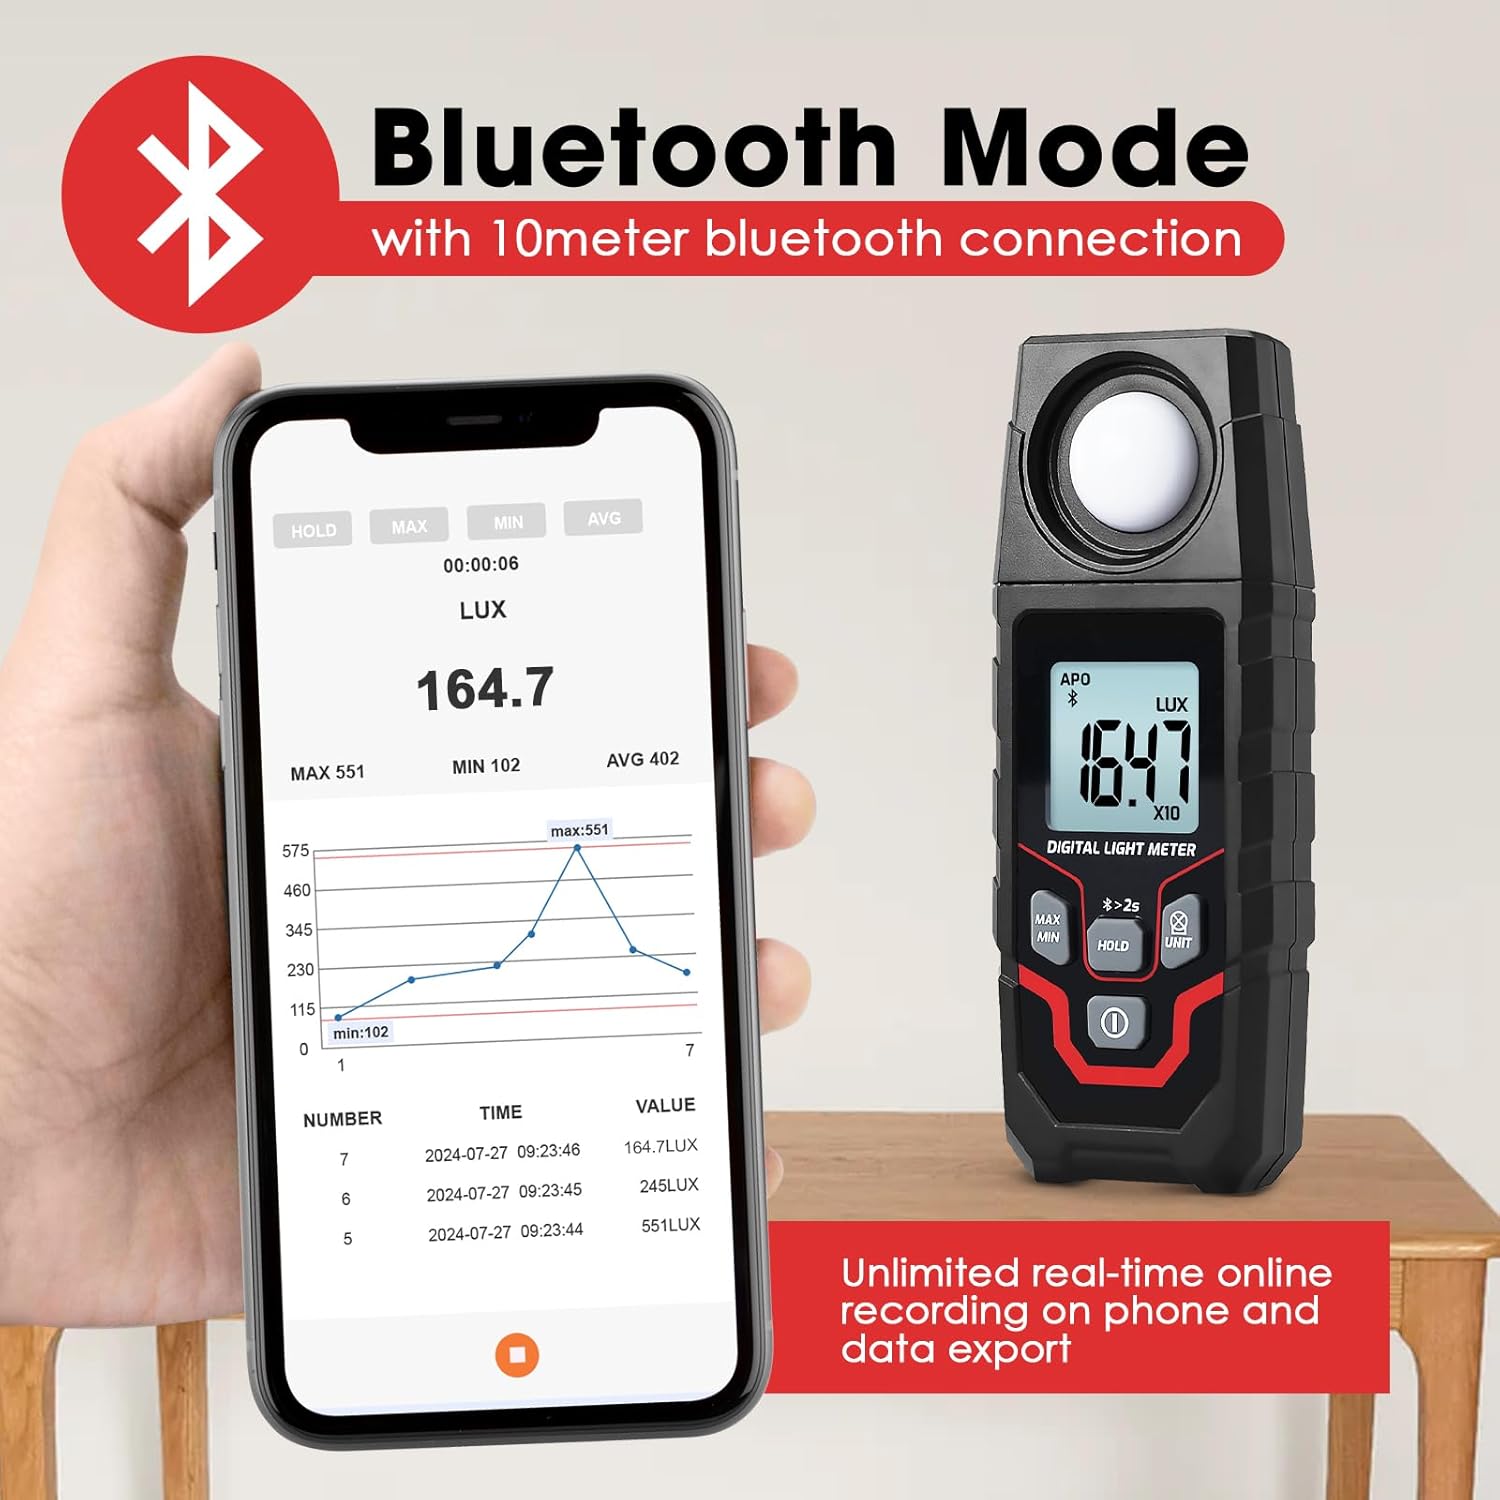
Figuur 6.3: The Lux Meter connected to a smartphone via Bluetooth, displaying real-time data and a historical graph.
- Aktiveer Bluetooth: Druk en hou die HOLD-knoppie for approximately 2 seconds. A Bluetooth icon will appear on the meter's display.
- Laai die app af: Download the official Landtek application from your smartphone's app store.
- Koppel: Open the app on your smartphone and follow the instructions to pair with the MILA48500 device. The Bluetooth range is up to 10 meters.
- Datalogging: The app allows for unlimited real-time online recording and data export. The meter can also store up to 2000 groups of data for offline recording, which can be downloaded to the app later.
7. Onderhoud
- Skoonmaak: Use a soft, dry cloth to clean the device. Do not use abrasive cleaners or solvents. Ensure the light sensor is kept clean and free of dust.
- Berging: Store the device in a cool, dry place, away from direct sunlight and extreme temperatures. If storing for an extended period, remove the batteries.
- Battery vervanging: Vervang batterye wanneer die lae battery-aanwyser op die skerm verskyn om akkurate lesings te verseker.
8. Probleemoplossing
| Probleem | Moontlike oorsaak | Oplossing |
|---|---|---|
| Toestel skakel nie aan nie. | Dooie of verkeerd geïnstalleerde batterye. | Kontroleer die polariteit van die batterye. Vervang met nuwe AAA-batterye. |
| Onakkurate lesings. | Dirty light sensor; low battery; incorrect unit/multiplier interpretation. | Clean the light sensor. Replace batteries. Ensure correct interpretation of LUX/FC units and X10/X100 multipliers. |
| Bluetooth-verbinding misluk. | Bluetooth not activated on meter; app issue; out of range. | Press and hold HOLD button for 2s to activate Bluetooth. Restart app/phone. Ensure meter is within 10m of phone. |
| Die skerm is dof of flikker. | Lae battery. | Vervang batterye. |
9. Spesifikasies
| Kenmerk | Spesifikasie |
|---|---|
| Meetmetode | Integrale tipe |
| Reeks | 0.1~200000 LUX / 0.01~20000 FC |
| Measuring Levels (LUX) | 200/2,000/20,000/200,000 |
| Measuring Levels (FC) | 20/200/2,000/20,000 |
| Akkuraatheid | ±(4% + 10 digits) (calibrated under standard incandescent lamp 2856°K) |
| Resolution (LUX) | <200: 0.1; ≥200: 1 |
| Resolution (FC) | <20: 0.01; 20≤FC<200: 0.1; ≥200: 1 |
| Vertoon | 4-digit LCD, max 1999 |
| Skerm grootte | 34 x 31 mm |
| Ligsensor | Silikon fotodiode met filter |
| Sampling Koers | Ongeveer. 2 keer per sekonde |
| Incident Angle | 120° |
| Repeatability Deviation | ±2% |
| Spektrale reeks | 400~700nm |
| Bluetooth-reeks | Up to 10 meters proximity |
| Bedryfsvoorwaardes | -10~50°C, maksimum 80% RH, binnenshuise hoogte <2000m |
| Bergingsvoorwaardes | -10~50°C, max 70% RH (with battery removed) |
| Kragtoevoer | 2 x 1.5V AAA-batterye |
| Afmetings | 150 x 56 x 28 mm |
| Gewig | Approx. 150g (excluding batteries) |

Figuur 9.1: Physical dimensions and weight of the Landtek MILA48500 Lux Meter.
10. Waarborg en Ondersteuning
This product is covered by a manufacturer's warranty. Please refer to the warranty card included in your package or contact Landtek customer support for detailed warranty terms and conditions.
For technical assistance, troubleshooting, or service inquiries, please contact your local distributor or the manufacturer directly. Contact information can typically be found on the manufacturer's webwebwerf of op die produkverpakking.


