Phenyx Pro PTU-71-1H1B
Phenyx Pro PTU-71-1H1B Draadlose Mikrofoonstelsel Gebruikershandleiding
Brand: Phenyx Pro | Model: PTU-71-1H1B
Inleiding
This manual provides detailed instructions for the setup, operation, and maintenance of your Phenyx Pro PTU-71-1H1B Wireless Microphone System. This dual UHF cordless microphone system offers reliable audio transmission for various applications, including singing, speech, and video conferencing. It features selectable frequencies, auto-scan functionality, and versatile transmitter options to ensure clear and consistent sound quality.
Wat is in die boks
- 1 x dual wireless metal receiver
- 1 x handheld microphone wireless
- 1 x UHF bodypack wireless
- 1 x lapel lavalier microphone
- 1 x headset microphone
- 1 x 1/4” oudiokabel
- 1 x kragadapter
- 1 x 6.5 mm tot 3.5 mm adapter
- 4 x AA battery
- 2 x antenna
- 1 x gebruikershandleiding
- 1 x anti-rol ring
- 4 x rubber voete
Opstel instruksies
1. Ontvanger Opstelling
Place the dual wireless metal receiver on a stable surface. Ensure adequate ventilation around the unit. Attach the two antennas to the ANT A and ANT B ports on the rear panel of the receiver. Connect the power adapter to the DC input port and plug it into a power outlet. Connect the 1/4" audio cable from the MIX OUT port on the receiver to your audio mixer, amplifier, or powered speaker. For individual channel outputs, use XLR cables (not included) to connect the BALANCED A and BALANCED B outputs to your audio equipment.

Prent: Front panel of the Phenyx Pro PTU-71 receiver, showing the power button, volume controls, LCD display, IR window, and set/up/down buttons.

Prent: Rear panel of the Phenyx Pro PTU-71 receiver, illustrating the antenna connections, balanced XLR outputs, mix out, and power input.
2. Handheld Microphone Setup
Unscrew the bottom part of the handheld microphone. Insert two AA batteries, ensuring correct polarity. Screw the bottom part back on. The microphone features an ON/MUTE/OFF switch and a real-time battery indicator on its display.

Prent: Gedetailleerd view of the Phenyx Pro handheld microphone, highlighting the battery compartment, ON/MUTE/OFF switch, and real-time battery indicator.
3. Bodypack Transmitter Setup
Open the battery compartment of the UHF bodypack transmitter. Insert two AA batteries, observing correct polarity. Close the compartment. Connect either the lapel lavalier microphone or the headset microphone to the 3-pin mini XLR jack on the bodypack. The bodypack also features a low battery indicator and an ON/MUTE/OFF switch.
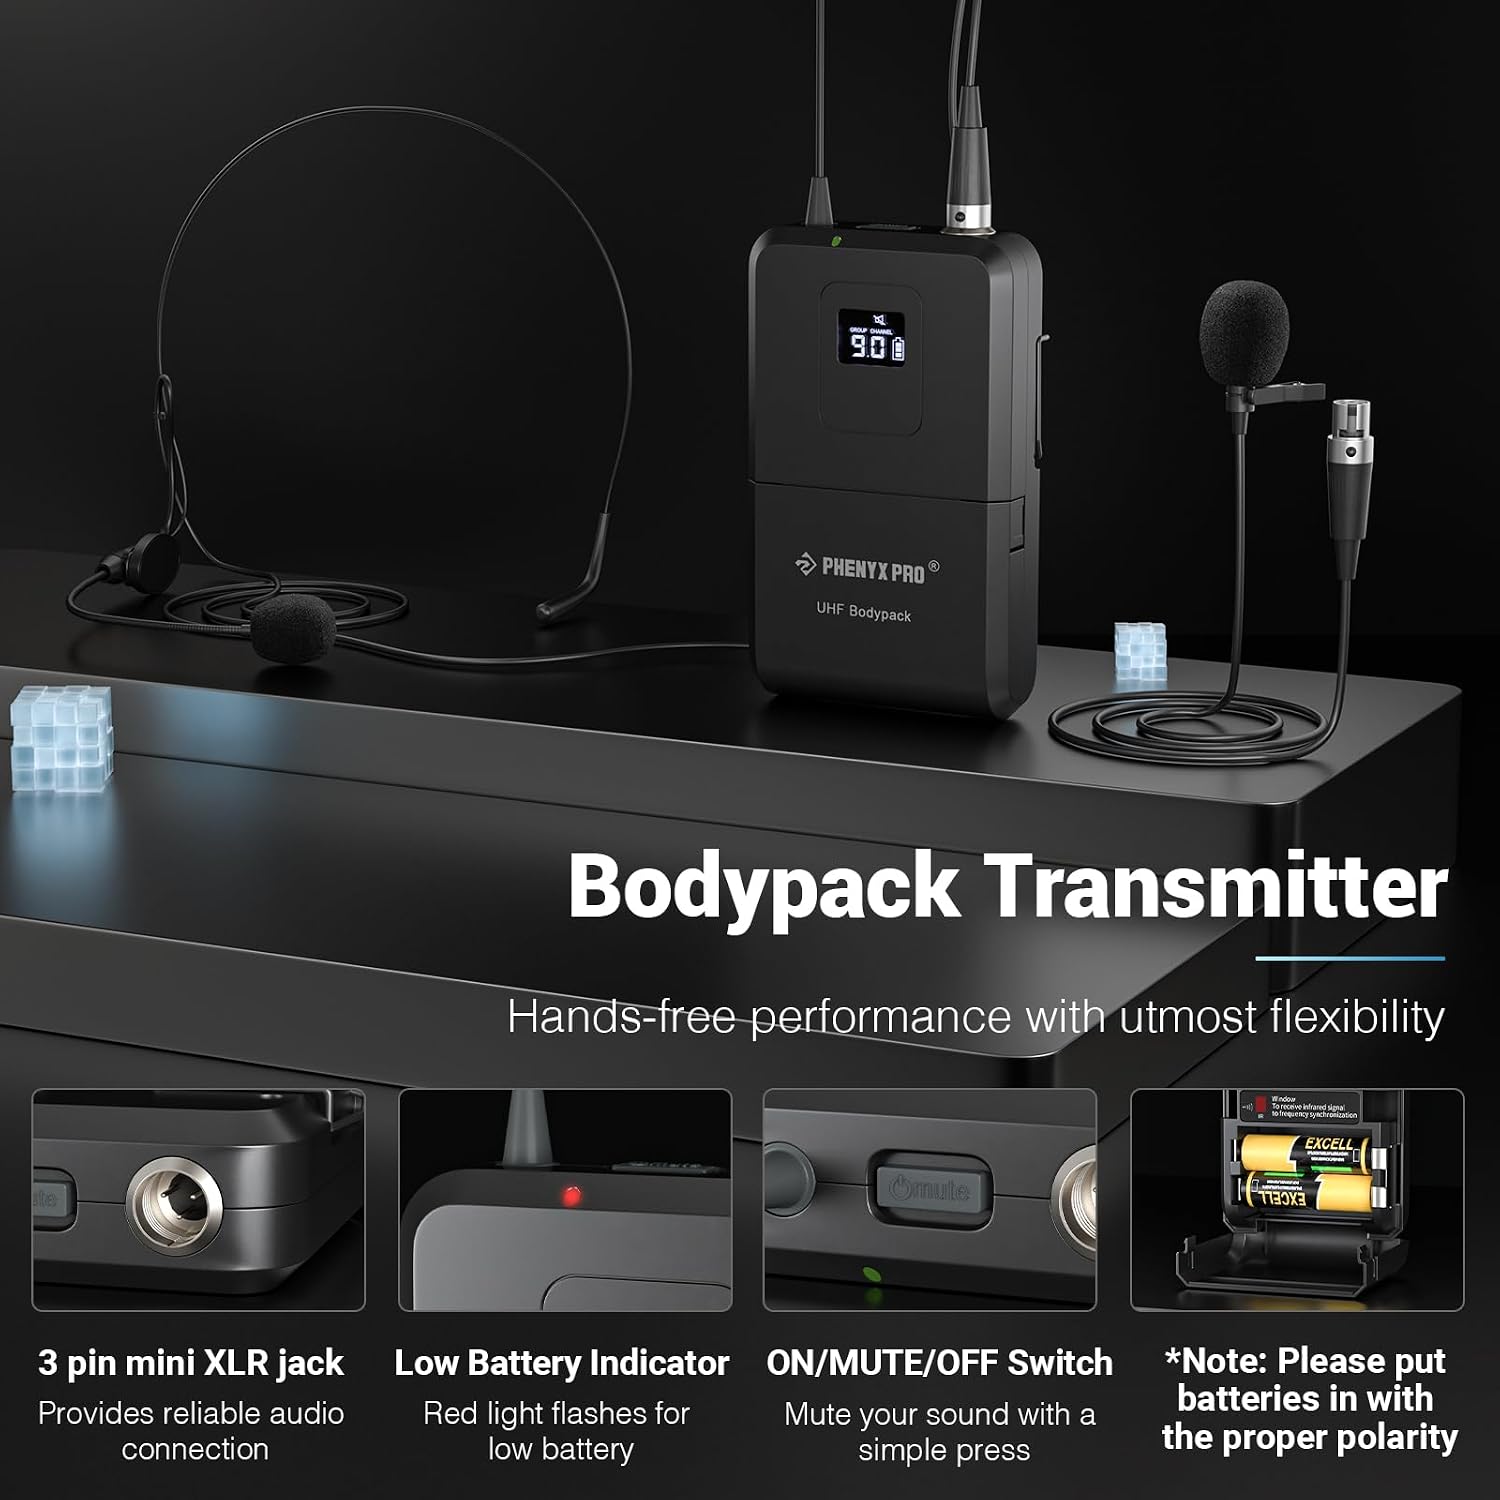
Prent: Close-up of the Phenyx Pro bodypack transmitter, showing the 3-pin mini XLR jack, low battery indicator, and ON/MUTE/OFF switch.
4. 4-Channel TRS Snake Cable Setup (PCBL-QR4IN1-3)
The included 4-Channel TRS Snake Cable (PCBL-QR4IN1-3) is designed for multiple connections. Connect the individual color-coded 1/4" TRS jacks to the corresponding inputs on your audio mixer or interface. This cable features high-quality oxygen-free copper for sound transmission and spiral shielding for noise reduction.

Prent: verbyview of the 4-Channel TRS Snake Cable, illustrating its multi-connection design and various lengths.
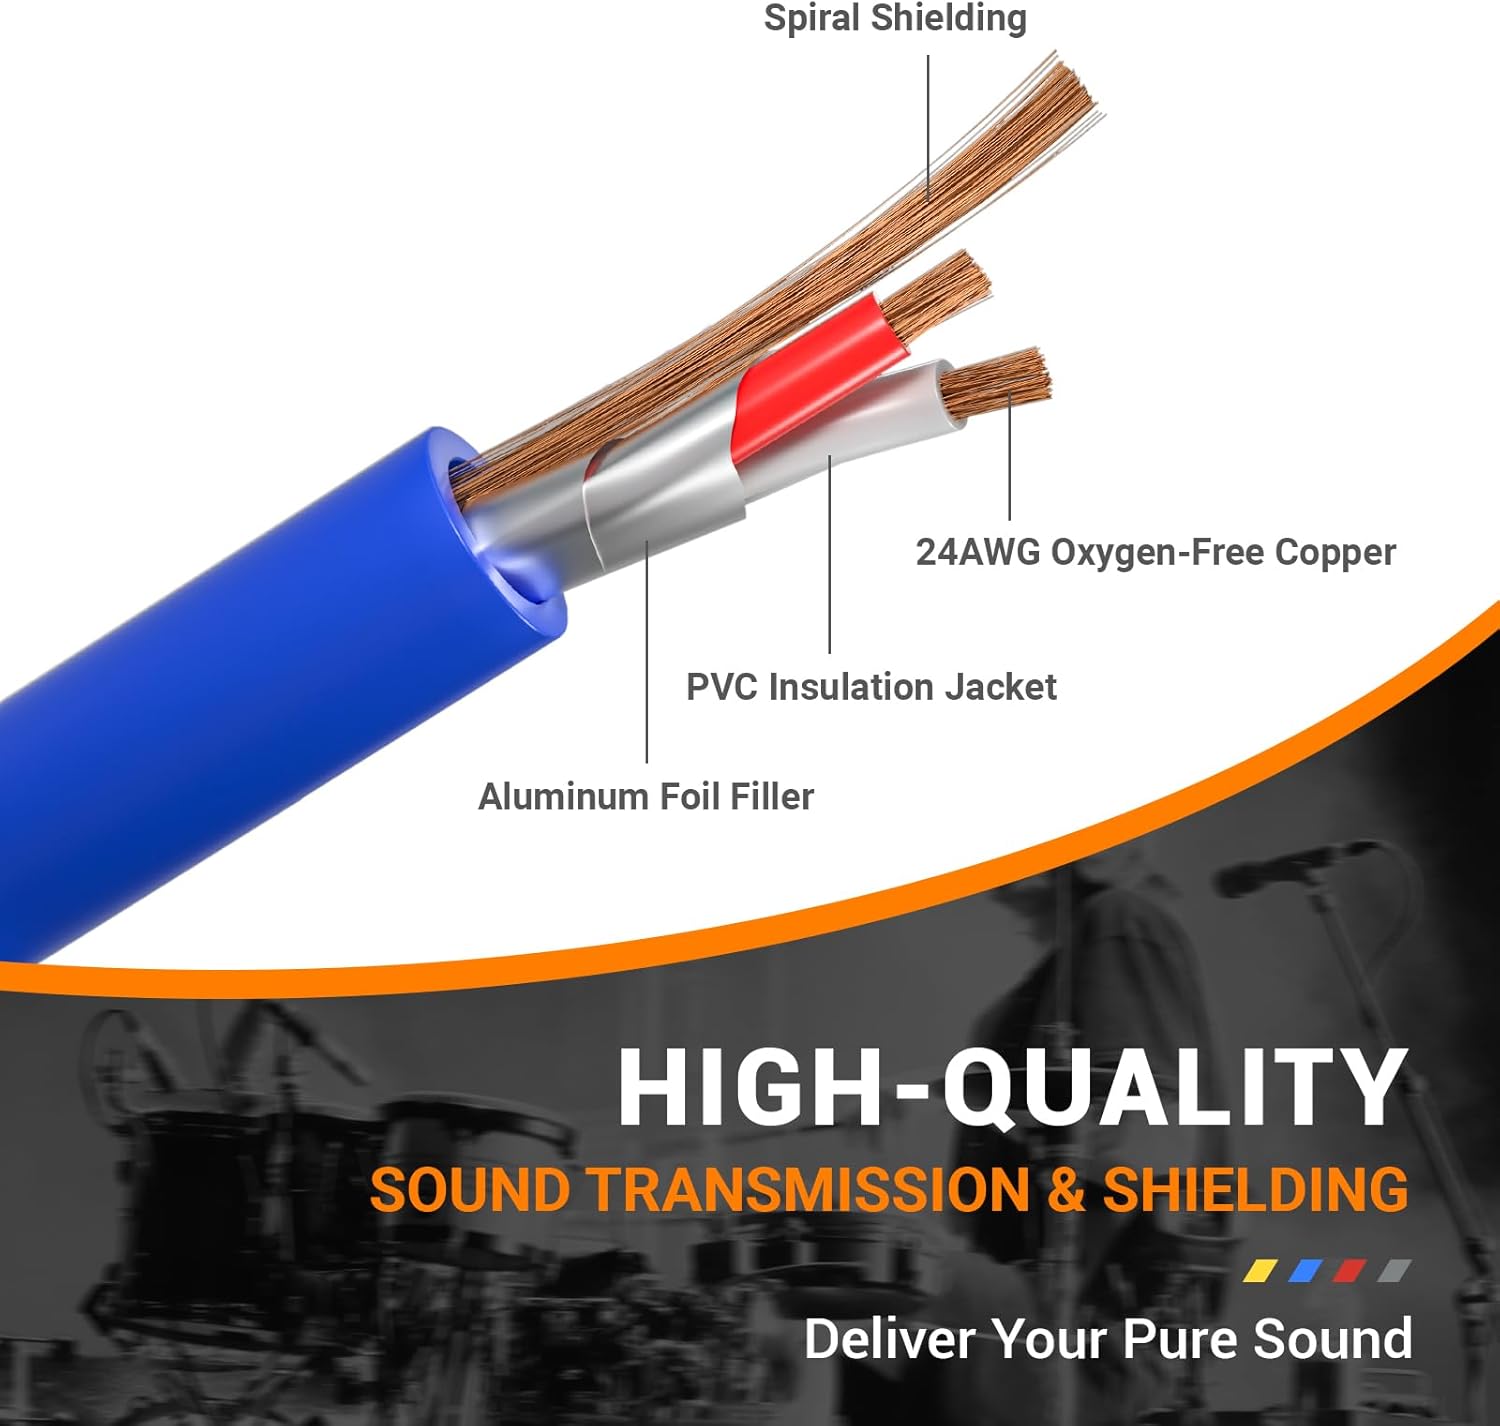
Prent: Cross-section diagram of the TRS Snake Cable, detailing its spiral shielding, 24AWG Oxygen-Free Copper, PVC insulation, and aluminum foil filler.

Prent: Close-up of the color-coded and sliding number identification on the TRS Snake Cable for easy matching and management.
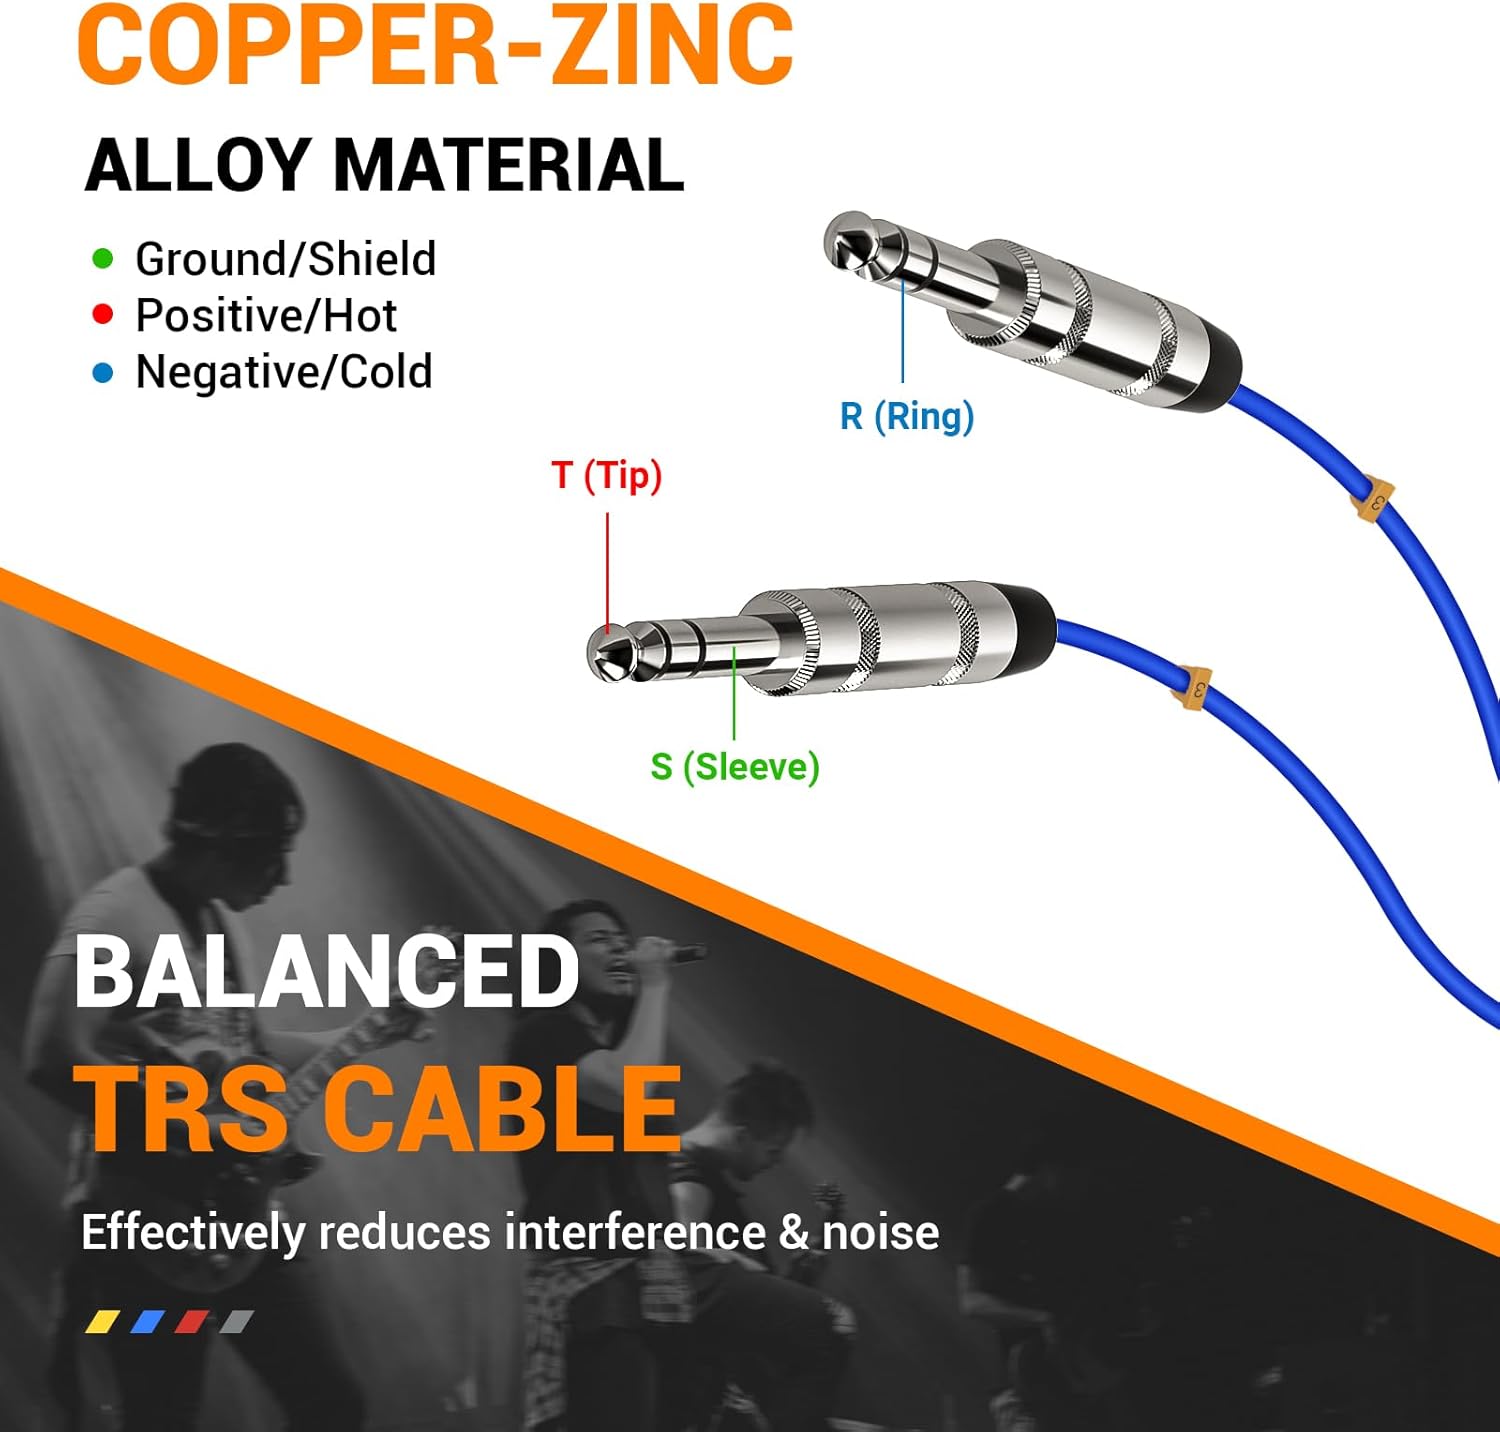
Prent: Diagram explaining the copper-zinc alloy material and balanced TRS cable structure (Tip, Ring, Sleeve) for effective interference and noise reduction.
5. Aanvanklike Sinchronisasie
Turn on the receiver. The system features an Auto Scan function to rapidly identify the least-interference frequency. Press the 'SET' button on the receiver to initiate auto-scan. Once a clear frequency is found, align the IR window of the handheld microphone or bodypack transmitter with the IR window on the receiver for quick synchronization. The system also has a lock function to prevent accidental frequency changes.
Prent: Receiver display showing Auto Scan and Lock Function features, along with Memory Switch and Multiset Operation capabilities.
Video: This video provides a setup guide for a similar UHF dual-channel wireless microphone system (PTU-52-2B), demonstrating the process of connecting components and synchronizing transmitters with the receiver. While the model number differs, the general setup steps are applicable.
Video: A quick setup video for the Phenyx Pro PTU-52-2B system, illustrating the basic steps to get the wireless microphones operational. This can serve as a visual aid for the PTU-71-1H1B setup.
Bedryfsinstruksies
1. Skakel aan/af
To power on the receiver, press the 'POWER' button on the front panel. To power on the handheld microphone or bodypack transmitter, slide the ON/MUTE/OFF switch to the 'ON' position. To power off, slide the switch to 'OFF'.
2. Volumebeheer
Adjust the individual volume levels for each channel (VOL A, VOL B) using the rotary knobs on the front panel of the receiver. For the handheld microphone and bodypack transmitter, volume adjustments can be made using the '+' and '-' buttons located near the display.
3. Demp funksie
To mute the handheld microphone or bodypack transmitter, briefly press the power button. The display will show a mute indicator. Press the power button again to unmute.
4. Frekwensie-aanpassing
The system offers 2x100 selectable UHF frequencies. Use the 'SET' button and the up/down arrows on the receiver to manually select frequencies if needed. For transmitters, use the 'SET' button to cycle through available frequencies and then synchronize with the receiver via IR.
Onderhoud
Regularly check battery levels and replace AA batteries as needed to ensure uninterrupted performance. Clean the microphones and receiver with a soft, dry cloth. Avoid using harsh chemicals or abrasive materials. Store the system in a dry, cool place away from direct sunlight and extreme temperatures.
Probleemoplossing
1. Geen klank nie
- Ensure all components (receiver, transmitters, audio cables) are properly connected and powered on.
- Check battery levels on transmitters and replace if low.
- Verify that the transmitters are not muted.
- Confirm that the receiver and transmitters are synchronized to the same frequency.
- Check the volume levels on both the transmitters and the receiver.
2. Interference/Poor Sound Quality
- Perform an auto-scan on the receiver to find a clear frequency.
- Ensure the antennas on the receiver are fully extended and positioned for optimal reception.
- Keep the receiver away from other electronic devices that may cause interference.
- Ensure the operating distance is within the specified 290-328 ft line of sight.
3. Lae battery aanwyser
- Replace the AA batteries in the handheld microphone or bodypack transmitter immediately.
Spesifikasies
- Aanbevole gebruike: Singing, Speech, Video Conference
- Handelsmerk: Phenyx Pro
- Verbindingstegnologie: Infrared, UHF
- Connector Tipe: 1/4" TRS
- Versoenbare toestelle: Persoonlike rekenaar
- Polêre patroon: Eenrigting
- Mikrofoonvormfaktor: Handheld, Headset, Lavalier
- Kragbron: Battery aangedrewe
- Aantal kanale: 16
Waarborg en Ondersteuning
For warranty information, technical support, or service inquiries, please refer to the contact details provided in the included user manual or visit the official Phenyx Pro webwebwerf. Bewaar u aankoopbewys as bewys van aankoop vir waarborgeise.
Ask a question about this manual
Ask about setup, troubleshooting, compatibility, parts, safety, or missing instructions. Manuals+ will review the question and use this page’s manual context to help answer it.