SUVCON M02
SUVCON M02 4K Dash Cam User Manual
Model: M02
Inleiding
Thank you for choosing the SUVCON M02 4K Dash Cam. This manual provides detailed instructions for the installation, operation, and maintenance of your dash cam. Please read this manual thoroughly before using the product to ensure proper functionality and safety.
Belangrike veiligheidsinligting
- Moenie die paneelbordkamera gebruik terwyl jy bestuur nie. Pas instellings slegs aan wanneer die voertuig veilig geparkeer is.
- Maak seker dat die paneelbordkamera stewig gemonteer is en nie die bestuurder se view of lugsak ontplooiing.
- Use only the original power cable provided to prevent damage to the device or vehicle.
- Avoid exposing the dash cam to extreme temperatures, direct sunlight for prolonged periods, or excessive moisture.
- Do not attempt to disassemble or repair the dash cam yourself. Contact customer support for assistance.
- Format the memory card regularly to ensure optimal performance and prevent data corruption.
Pakketinhoud
Kontroleer asseblief die pakket vir die volgende items:
- SUVCON M02 4K Dash Cam (Front Camera)
- Rear Camera (if included in your package)
- Car Charger with Power Cable
- Suigbeker-berg
- Kabelklemme
- Gebruikershandleiding
- 32GB MicroSD Card (if included in your package)
Produk verbyview
Familiarize yourself with the components of your SUVCON M02 Dash Cam.
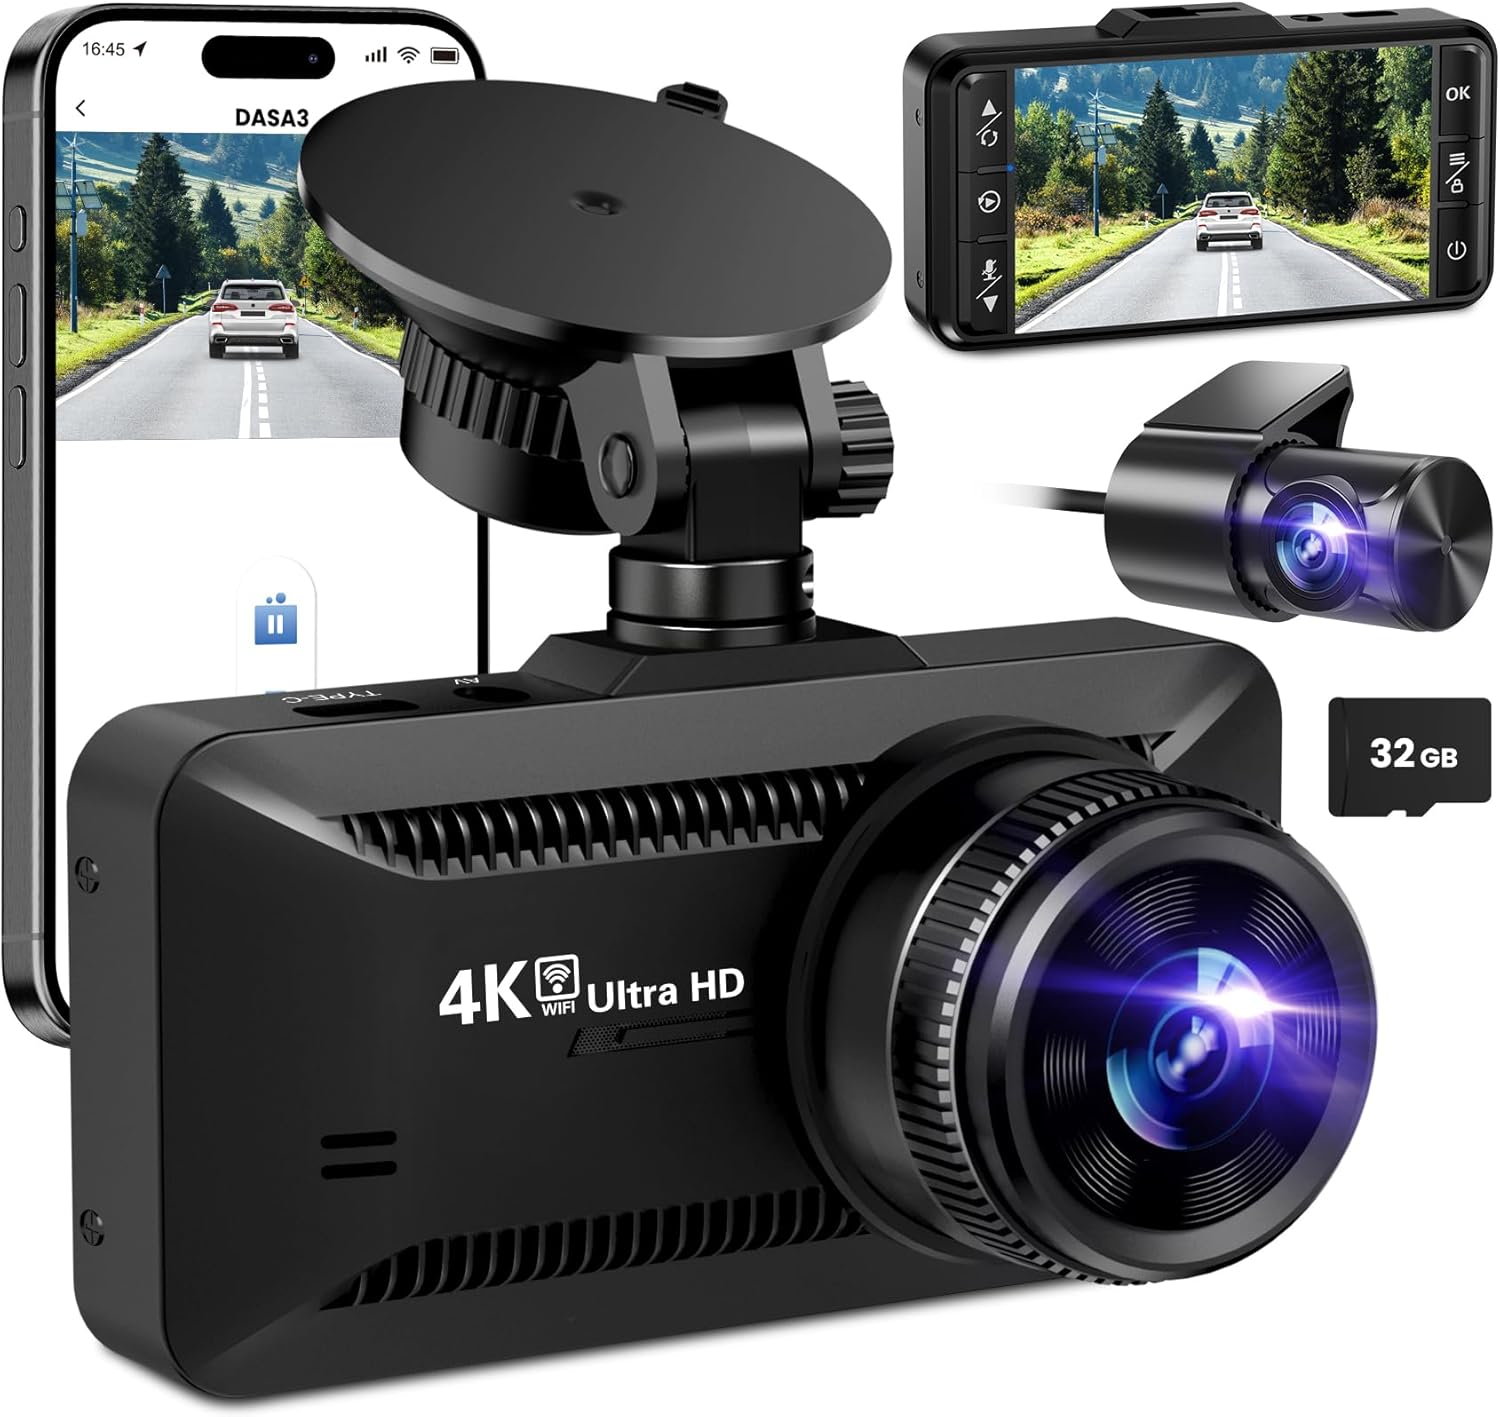
Prent: The SUVCON M02 4K Dash Cam is shown with its main front camera unit, a separate rear camera, a smartphone displaying the dash cam's app interface, and a 32GB microSD card. The main unit features a prominent lens, a display screen on the back (not fully visible in this angle), and a suction cup mount. The rear camera is compact with its own lens. The smartphone screen shows a live view from the dash cam, indicating Wi-Fi connectivity.
Voorkamera-eenheid
- Lens: Captures 4K video.
- Vertoon skerm: Vir viewin lewende footage, terugspeel en kieslysnavigasie.
- Beheerknoppies: Power, Menu, Up, Down, OK.
- MicroSD -kaartgleuf: Vir die invoeging van 'n geheuekaart.
- USB Power Port (Type-C): For connecting the car charger.
- Agterkamerapoort: For connecting the rear camera cable.
- Luidspreker/mikrofoon: Vir klankopname en -terugspeel.
Agterkamera-eenheid
- Lens: Captures rear view video.
- Kabel: Connects to the main dash cam unit.
Opstelling en installasie
1. Plaas die MicroSD-kaart
- Maak seker dat die paneelbordkamera afgeskakel is.
- Vind die MicroSD-kaartgleuf aan die kant van die paneelbordkamera.
- Insert the MicroSD card with the gold contacts facing the back of the dash cam until it clicks into place.
- Om te verwyder, druk die kaart versigtig in totdat dit klik, en laat dit dan los.
Let wel: A Class 10 or higher MicroSD card (up to 128GB recommended) is required. Format the card in the dash cam's settings before first use.
2. Monteer die Dash Cam
- Maak die voorruitarea skoon waar jy die paneelbordkamera wil monteer.
- Heg die suigdopbevestiging aan die paneelbordkamera vas.
- Druk die suigdop stewig teen die voorruit, verkieslik agter die agterkantview mirror, and flip the lever to secure it.
- Adjust the angle of the dash cam lens to ensure it captures the road ahead clearly, avoiding obstruction from the hood or dashboard.
3. Aansluitkrag
- Connect the small end of the car charger cable to the USB Type-C port on the dash cam.
- Plug the larger end of the car charger into your vehicle's 12V power outlet (cigarette lighter socket).
- Route the power cable neatly along the edge of the windshield and dashboard using the provided cable clips to avoid obstructing your view.
4. Installing the Rear Camera (Optional)
- Connect the rear camera cable to the dedicated rear camera port on the main dash cam unit.
- Route the cable from the front unit to the rear of the vehicle, typically along the headliner and side panels.
- Mount the rear camera on the rear windshield using its adhesive or screws, ensuring a clear view van die pad agter.
- Connect the red wire of the rear camera cable to the vehicle's reverse light positive wire if you wish to enable parking assist lines when reversing.
Bedryfsinstruksies
Krag aan/af
- Outomatiese: The dash cam will automatically power on and begin recording when connected to power and the vehicle engine starts. It will power off automatically when the engine is turned off.
- handleiding: Press and hold the Power button to manually turn the dash cam on or off.
Opname Modes
- Loop opname: The dash cam records video in continuous loops (e.g., 1, 3, or 5 minutes). When the memory card is full, the oldest unlocked files sal oorskryf word.
- G-Sensor (Noodopname): Die ingeboude G-sensor bespeur skielike impakte of botsings. Wanneer dit geaktiveer word, word die huidige videosegment outomaties gesluit en gestoor om te verhoed dat dit deur lusopname oorskryf word.
- Parkeermonitor: With a hardwire kit (sold separately) or continuous power, the dash cam can monitor your vehicle while parked. If a vibration or impact is detected, it will automatically record a short video.
Spyskaartnavigasie
Use the control buttons on the dash cam to navigate the menu:
- Kieslys-knoppie: Press to enter the settings menu. Press again to switch between video settings, system settings, and playback mode.
- Op/af knoppies: Navigeer deur menu-opsies.
- OK knoppie: Confirm selection or start/stop recording in recording mode.
Wi-Fi-konnektiwiteit en toepassinggebruik
The SUVCON M02 features Wi-Fi connectivity for easy access to recordings and settings via a smartphone app.
- Download the recommended app (e.g., "DASA3" or similar, check packaging for exact app name) from your smartphone's app store.
- On the dash cam, enable Wi-Fi from the system settings. The dash cam's Wi-Fi SSID and password will be displayed on the screen.
- Gaan op jou slimfoon na Wi-Fi-instellings en koppel aan die paneelbordkamera se Wi-Fi-netwerk met die verskafde wagwoord.
- Open the app. You can now view leef footage, download recorded videos, change settings, and format the SD card directly from your phone.
Afspeel
- Op Dashcam: In recording mode, press the Menu button twice to enter playback mode. Use Up/Down buttons to select files and OK to play.
- Via App: Connect your smartphone via Wi-Fi and use the app's playback feature to view en laai video's af.
- Op rekenaar: Remove the MicroSD card from the dash cam and insert it into a computer's card reader. Videos can be played using standard media players.
Onderhoud
Die Dash Cam skoonmaak
- Use a soft, dry cloth to clean the dash cam body.
- Vir die lens, gebruik 'n lensskoonmaakdoek en gespesialiseerde lensskoonmaakoplossing om skrape te voorkom.
- Moenie skuur skoonmaakmiddels of oplosmiddels gebruik nie.
MicroSD Card Formatting
It is recommended to format the MicroSD card every 2-4 weeks to maintain optimal recording performance and prevent data corruption. This can be done through the dash cam's menu settings or via the smartphone app.
Firmware-opdaterings
Periodically check the SUVCON official website for available firmware updates. Firmware updates can improve performance, add new features, or fix bugs. Follow the instructions provided with the firmware file versigtig.
Probleemoplossing
| Probleem | Moontlike Oplossing |
|---|---|
| Dashcam skakel nie aan nie. |
|
| Dashcam hou op met opneem of vries. |
|
| Video footage is vaag of onduidelik. |
|
| Wi-Fi-verbindingsprobleme. |
|
Spesifikasies
| Kenmerk | Detail |
|---|---|
| Model | M02 |
| Handelsmerk | SUVCON |
| Video-opname-resolusie | 4K (Front), 1080P (Rear, if applicable) |
| Spesiale kenmerke | G-Sensor, Loop Recording, Parking Monitor, Wi-Fi Connectivity |
| Verbindingstegnologie | Wi-Fi |
| Montage tipe | Dashboard Mount (Suction Cup) |
| Berging | MicroSD Card (Class 10 or higher, up to 128GB recommended) |
| Kragbron | Car Charger (12V) |
| Produk afmetings | 2.54 x 2.54 x 2.54 cm (ongeveer, volgens produkdata) |
Waarborg en kliëntediens
For warranty information, technical support, or any inquiries regarding your SUVCON M02 Dash Cam, please refer to the warranty card included in your package or visit the official SUVCON webwebwerf. Hou asseblief u modelnommer (M02) en aankoopbesonderhede gereed wanneer u ondersteuning kontak.
Webwebwerf: www.suvcon.com (Bvample URL, please refer to actual product documentation)
E-pos: support@suvcon.com (Bvample Email, please refer to actual product documentation)