MechMaxx Farming HD Backup 1080P Camera System
MechMaxx Farming HD Backup 1080P Camera System User Manual
Model: Farming HD Backup 1080P Camera System
Handelsmerk: MechMaxx
1. Inleiding
This manual provides detailed instructions for the installation, operation, and maintenance of your MechMaxx Farming HD Backup 1080P Camera System. This system is designed to enhance visibility and safety for agricultural and heavy-duty commercial vehicles, offering a high-resolution 1080P camera and a 7-inch LCD monitor. Please read this manual thoroughly before using the product to ensure proper function and longevity.
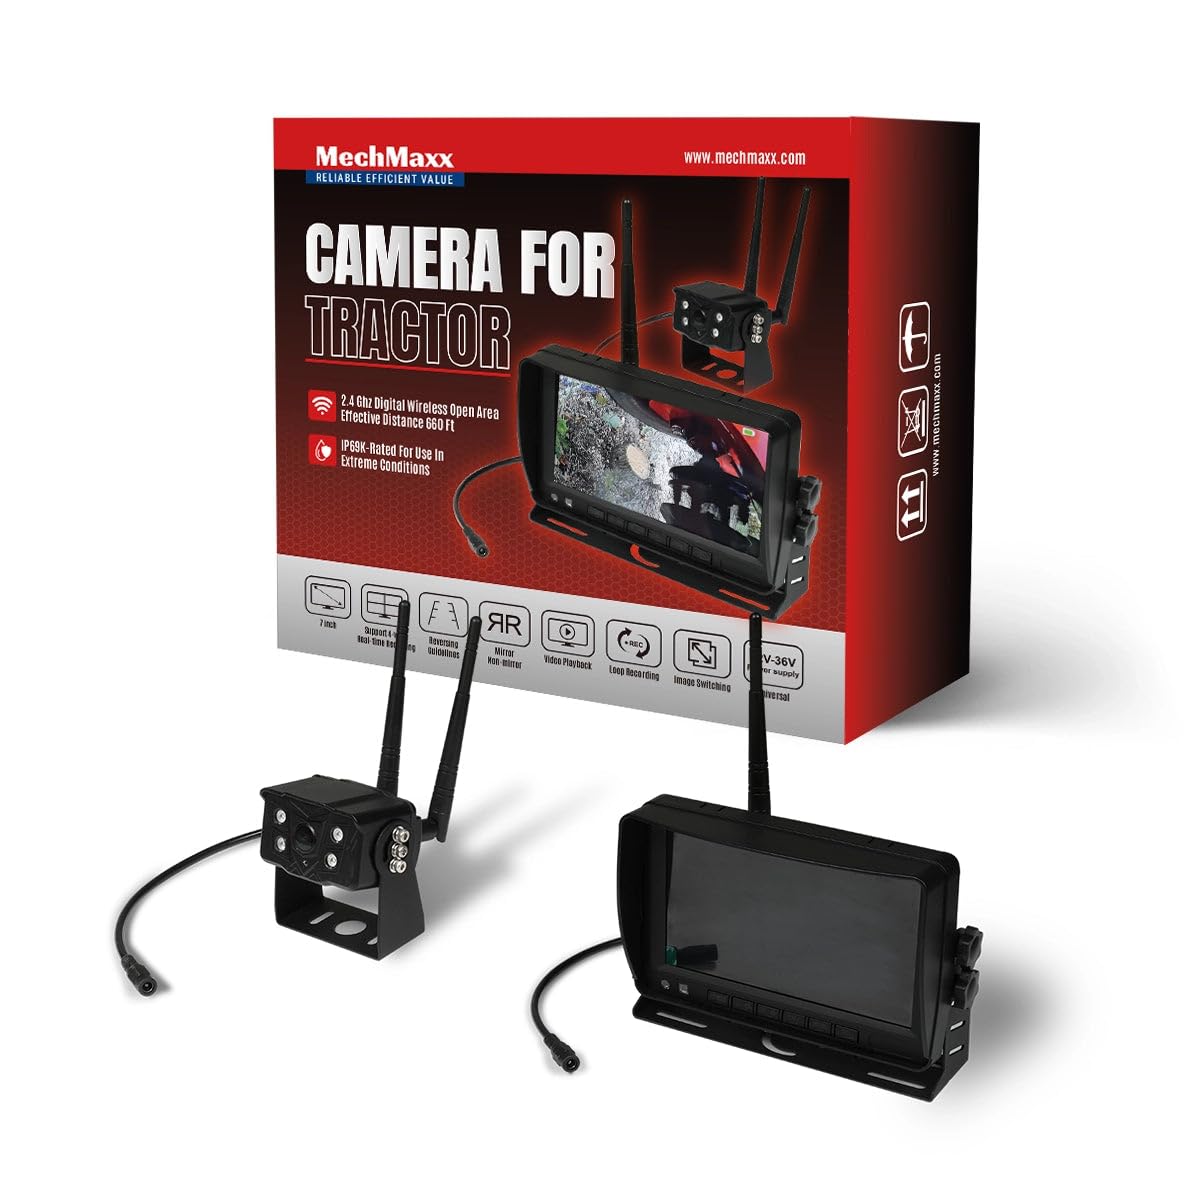
Figure 1: MechMaxx Farming HD Backup 1080P Camera System
2. Pakketinhoud
Verifieer dat al die items wat hieronder gelys word, in jou pakket ingesluit is:
- 7-duim HD LCD-monitor
- 1080P HD Camera Unit with IR Lights
- Power Cable for Monitor (Cigarette Lighter Adapter)
- Power Cable for Camera (Direct Battery Connection)
- Antennas for Wireless Transmission
- Montagebeugel vir monitor
- Mounting Hardware (Screws, wrench)
- Afstandbeheer
- Gebruikershandleiding

Figuur 2: Pakketinhoud
3. Opstelling en Installasie
The MechMaxx camera system is designed for straightforward installation. Follow these steps for optimal performance.
3.1 Camera Unit Installation
- Montering: Securely attach the camera unit to the rear or desired location on your vehicle using the provided mounting hardware. Ensure a clear line of sight for the camera.
- Antenna verbinding: Screw the antennas firmly onto the designated ports on the camera unit.
- Kragverbinding: Connect the camera's power cable to a 12-36V DC power source. This can be directly to the vehicle's battery or an ignition-switched power source.
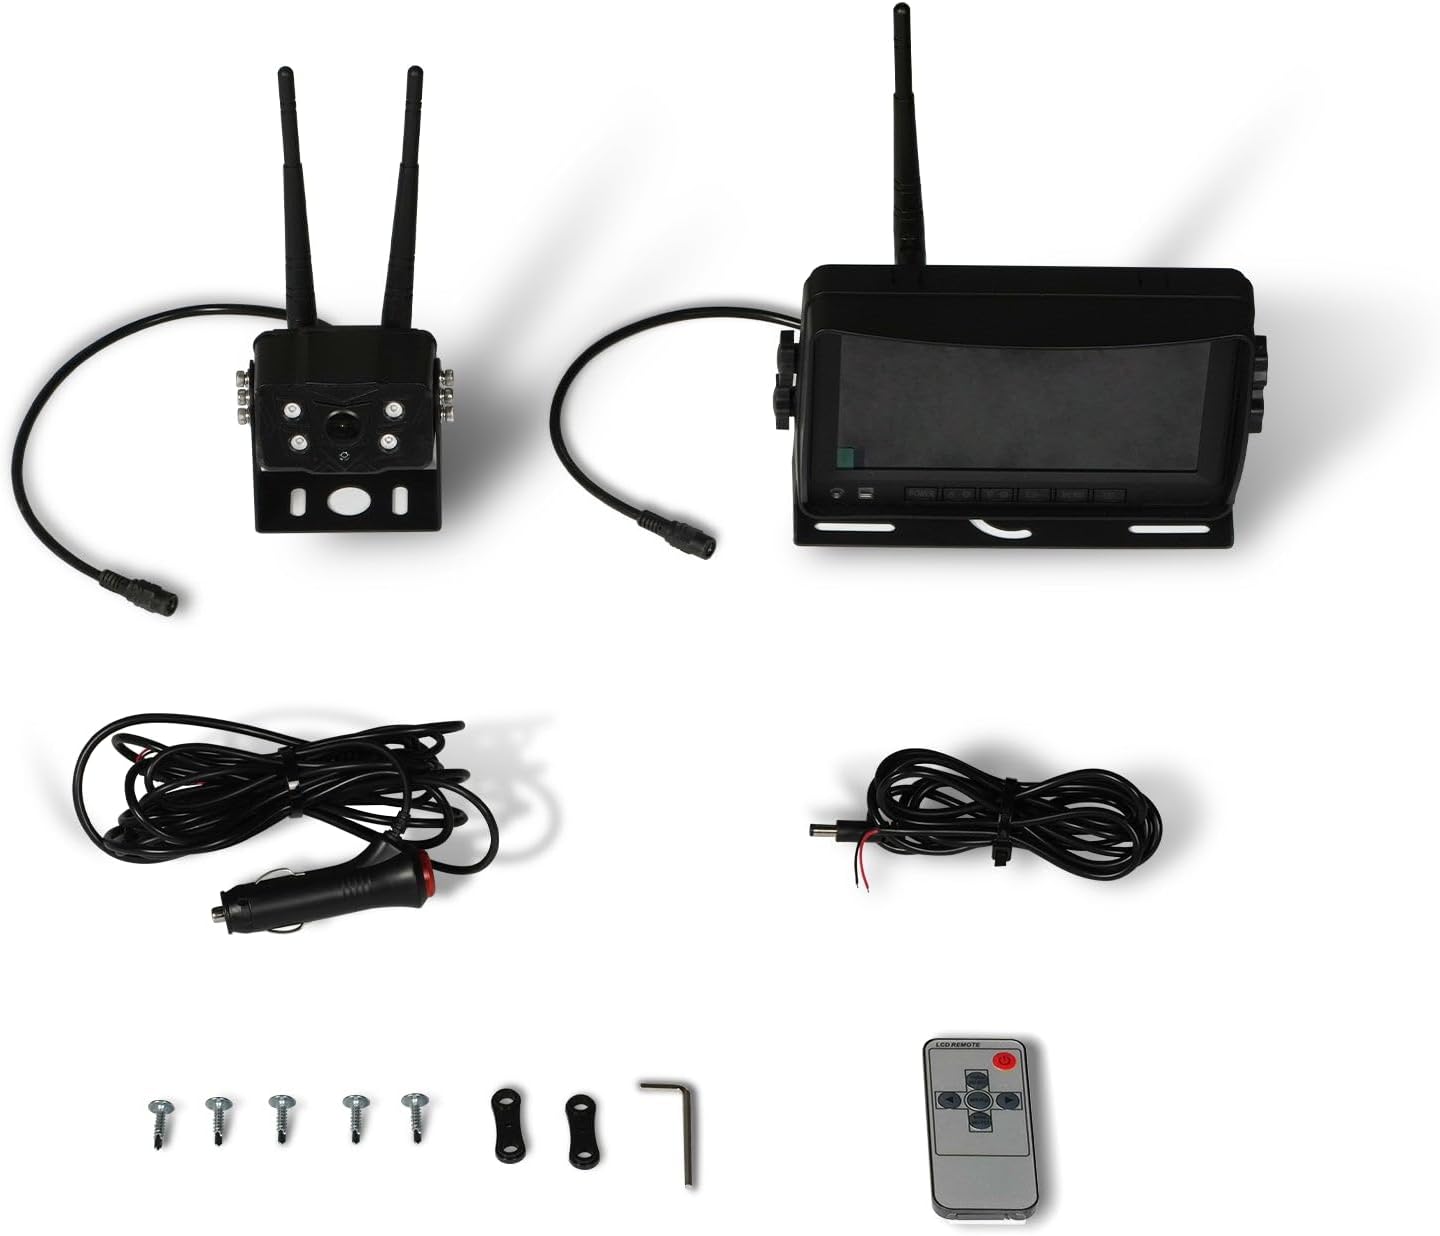
Figure 3: Camera Unit with Antennas

Figure 4: Camera Unit Detail
3.2 Monitor installasie
- Montering: Attach the 7-inch LCD monitor to your dashboard or windshield using the provided suction cup or surface mount bracket. Adjust the angle for optimal viewing.
- Kragverbinding: Connect the monitor's power cable to your vehicle's cigarette lighter socket. The monitor will power on/off with the vehicle's ignition.

Figure 5: 7-inch LCD Monitor
3.3 Bedradingsdiagram
The system offers a simple 1-step installation for power. The monitor can be powered via a cigarette lighter, and the camera can be wired directly to the vehicle's battery or an ignition-controlled fuse.

Figure 6: Simplified Wiring Diagram
4. Bedryfsinstruksies
Once installed, the system is ready for use. The monitor will automatically display the camera feed when powered on.
4.1 Basiese werking
- Krag aan/af: The system powers on automatically with the vehicle's ignition. You can also use the power button on the monitor or remote control.
- Viewmodusse: The 7-inch LCD provides a clear, full-color display. The camera offers a wide 120-degree field of view.
- Nagvisie: The camera features strong IR lights for enhanced visibility in low-light conditions.
4.2 Monitor kontroles
The monitor includes buttons for various settings and adjustments. Refer to the on-screen menu for detailed options.
- Menu (M): Toegang tot die stelselinstellings.
- OK: Bevestig keuses.
- CH (kanaal): Switch between multiple cameras if additional units are connected (not included in standard package).
- +/-: Adjust brightness, contrast, or navigate menu options.
5. Onderhoud
To ensure the longevity and optimal performance of your camera system, follow these maintenance guidelines:
- Skoonmaak: Maak die kameralens en monitorskerm gereeld skoon met 'n sagte, damp cloth. Avoid abrasive cleaners that may scratch surfaces.
- Kabel inspeksie: Periodically check all cables and connections for wear, damage, or loose fittings. Secure any loose connections.
- Omgewingsbeskerming: While the camera is heavy-duty and designed for outdoor use, extreme weather conditions may affect performance. Ensure proper mounting to prevent vibration damage.
6. Probleemoplossing
If you encounter issues with your MechMaxx camera system, refer to the following common problems and solutions:
| Probleem | Moontlike oorsaak | Oplossing |
|---|---|---|
| Geen beeld op monitor nie | Loose power connection; Camera/monitor not powered; Interference | Check all power connections; Ensure vehicle ignition is on; Reduce distance between camera and monitor or check for obstructions. |
| Swak beeldkwaliteit | Dirty lens; Low light conditions; Signal interference | Clean camera lens; Ensure IR lights are active in low light; Check for strong signal interference sources. |
| Monitor skakel nie aan nie | No power from cigarette lighter; Faulty power cable | Check vehicle's cigarette lighter fuse; Test power cable with another device if possible. |
If the problem persists after attempting these solutions, please contact MechMaxx customer support.
7. Spesifikasies
Key technical specifications for the MechMaxx Farming HD Backup 1080P Camera System:
| Kenmerk | Detail |
|---|---|
| Skerm grootte | 7 duim |
| Vertoon tegnologie | LCD |
| Optiese sensortegnologie | CMOS |
| Lens tipe | Wye hoek |
| Veld van View | 120 grade |
| Connector Tipe | AHD |
| Installasie tipe | Oppervlakmontering |
| Versoenbare toestelle | Monitor |
| Item gewig | 12 pond |
| Kleur | Swart |

Figure 7: Additional Specifications
8. Waarborg en ondersteuning
For warranty information, technical support, or service inquiries, please refer to the contact details provided with your product packaging or visit the official MechMaxx webwebwerf. Bewaar u aankoopbewys as bewys van aankoop vir waarborgeise.