1. Inleiding
Thank you for choosing the Relaxweex Mini Digital Camera Keychain. This compact and portable camera is designed for capturing moments in 1080p resolution, featuring a built-in flash and a user-friendly interface. This manual provides essential information for setting up, operating, and maintaining your device to ensure optimal performance.
2. Produk verbyview
2.1 Pakketinhoud
- 1 x Mini Digital Camera Keychain
- 1 x laaibasis
- 1 x 16GB TF Card (pre-installed or separate)
- 1 x USB-laaikabel
- 1 x Keychain Accessory
- 1 x Armband
2.2 Kamerakomponente
Maak jouself vertroud met die kamera se fisiese komponente:

Image: The Relaxweex Mini Digital Camera Keychain shown with its charging base, USB cable, 16GB TF card, keychain accessory, and wristband.
- Lens: Main camera lens for capturing images and videos.
- Flash Light: Verskaf beligting vir lae ligtoestande.
- Vertoon skerm: 1.44-inch color screen for live view, afspeel en spyskaartnavigasie.
- Kragknoppie: Skakel die kamera aan/af.
- Modusknoppie: Switches between photo and video modes.
- Sluiter/opname knoppie: Begin foto- of video-opname.
- Navigasieknoppies (+/-): Used for menu navigation, zooming, and filter selection.
- Geheuekaartgleuf: For inserting the TF (MicroSD) card.
- USB-C-poort: Vir laai en data-oordrag.
- Keychain/Lanyard Loop: Attachment point for accessories.

Beeld: 'n Gedetailleerde view of the camera's side, highlighting the action buttons for mode switching and filter selection, and the 1.44-inch screen.
3. Opstelling
3.1 Plaas die geheue kaart
The camera requires a TF (MicroSD) card for storing photos and videos. A 16GB card is included.
- Vind die geheuekaartgleuf aan die kant van die kamera.
- Insert the TF card with the printed side facing up, gently pushing until it clicks into place. Ensure it is fully seated.
- To eject, gently press the card inward until it springs out.

Image: A close-up showing a 16GB memory card being inserted into the camera's designated slot, with an arrow indicating the correct direction.
3.2 Laai die battery
Before first use, fully charge the camera's built-in battery.
- Connect the charging base to the camera's USB-C port.
- Connect the USB charging cable to the charging base and a power source (e.g., computer USB port, USB wall adapter).
- The charging indicator light will show the charging status. A full charge provides approximately 600 minutes of operation.

Image: The camera is shown connected to its charging base, which is then connected via a USB cable to a power source, illustrating the charging process.
3.3 Bevestiging van bykomstighede
Attach the keychain or wristband for convenient carrying and to prevent loss.
- Thread the keychain or wristband loop through the designated attachment point on the camera.
- Secure the accessory as needed.

Image: A hand is shown attaching a keychain accessory to the camera's loop, demonstrating how to secure it for portability.
4. Bedryfsinstruksies
4.1 Krag aan/af
- Om aan te skakel, hou die Kragknoppie totdat die skerm oplig.
- Druk en hou die. In om uit te skakel Kragknoppie weer totdat die skerm afskakel.
4.2 Fotomodus
- Maak seker dat die kamera aangeskakel is.
- Druk die Mode-knoppie to switch to photo mode (indicated by a camera icon on the screen).
- Raam jou skoot met behulp van die skerm.
- Druk die Ontspanknop om 'n foto te neem.
- To apply filters, use the Navigation Buttons (+/-) to cycle through available options (e.g., Cool Color, Warm Color, Black & White, Retro, Fresh).
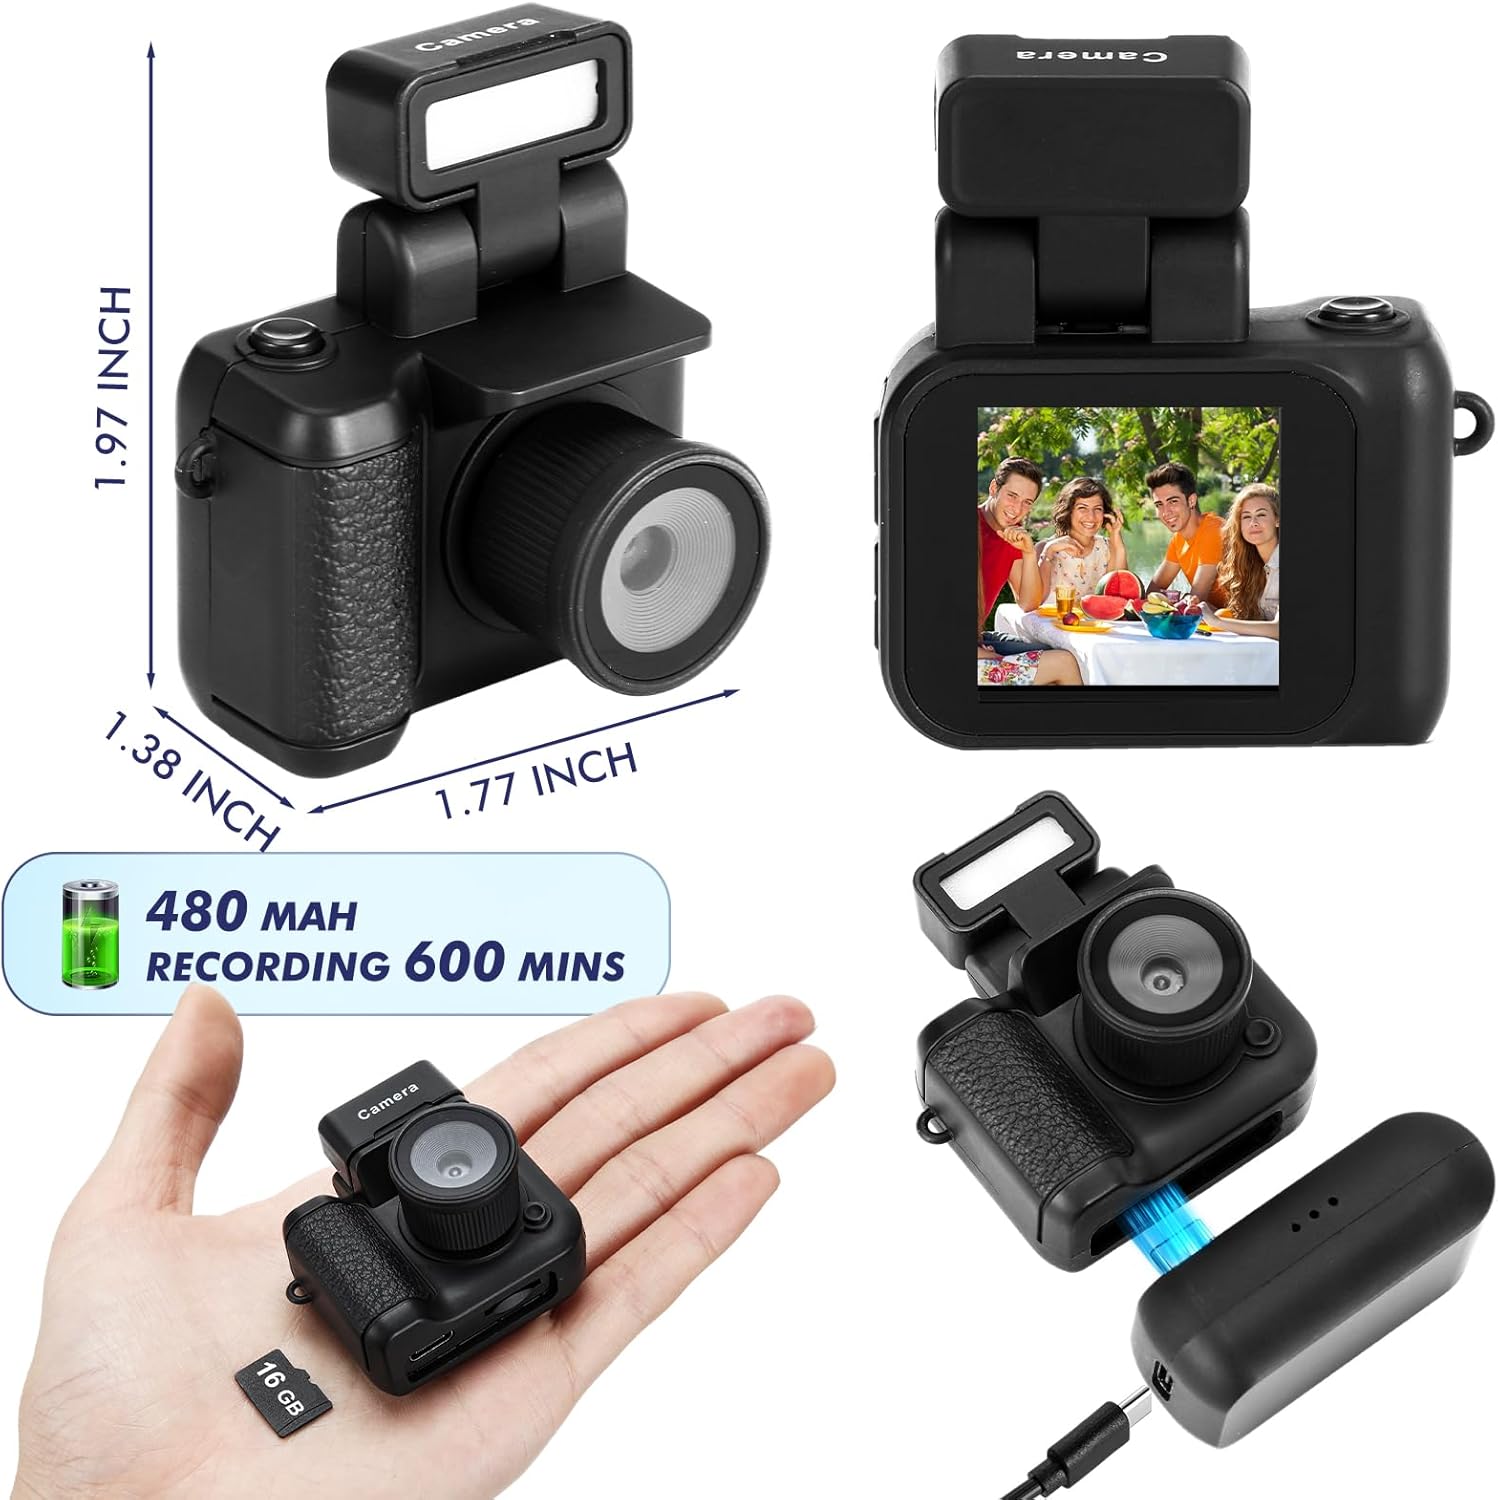
Image: The camera's screen displays different photo filters such as Original Image, Cool Color, Warm Color, Black & White, Retro, and Fresh, demonstrating the creative options available.
4.3 Videomodus
- Maak seker dat die kamera aangeskakel is.
- Druk die Mode-knoppie to switch to video mode (indicated by a video camera icon on the screen).
- Druk die Opneem-knoppie to start recording. A red indicator or timer will appear on the screen.
- Druk die Opneem-knoppie weer om op te hou opneem.
Video: This video demonstrates the various features and usage scenarios of the Relaxweex Mini Digital Camera, including switching between photo and video modes, applying filters, and attaching accessories.
4.4 Flash Function
The camera features a built-in flash for improved visibility in dark environments.
- The flash component can be installed or removed as needed.
- When installed, the flash can be activated to provide continuous light or to flash during photo capture. Refer to the on-screen menu for flash settings (On/Fill).
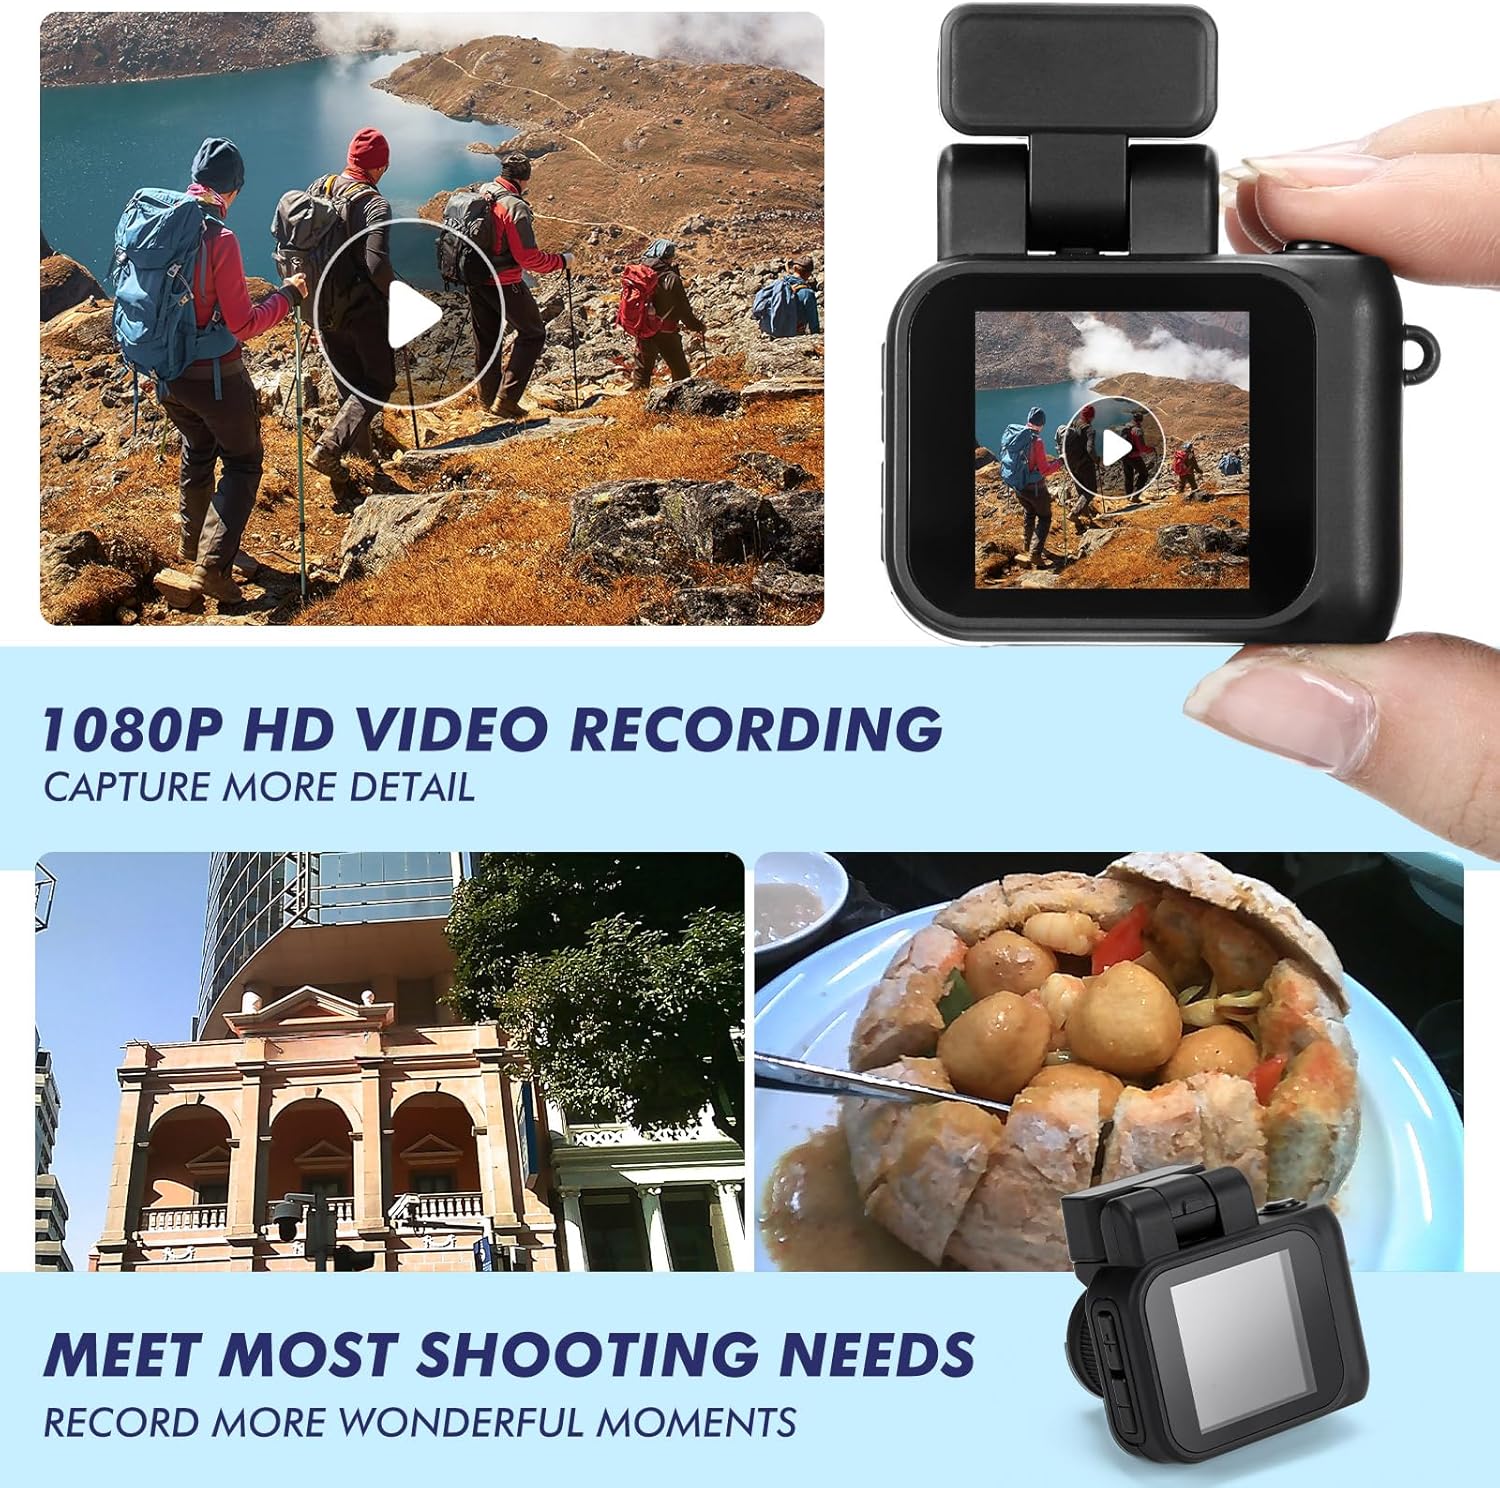
Image: Two images show a person on a bicycle, one with the flash off (Close Flash Effect) and one with the flash on (Open Flash Effect), illustrating the illumination provided by the camera's flash.
4.5 Viewfoto's en video's
Jy kan weerview your captured content directly on the camera's screen.
- In either photo or video mode, use the Navigation Buttons (+/-) to scroll through your saved files.
- Druk die Ontspan/Opname-knoppie to play a video or view a photo in full screen.
5. Memory Card Management
5.1 Oordrag Files na 'n rekenaar
To access your photos and videos, connect the camera to a computer:
- Skakel die kamera af.
- Koppel die kamera aan jou rekenaar met die meegeleverde USB-kabel.
- Die kamera sal as 'n verwyderbare skyfaandrywer op jou rekenaar verskyn.
- Maak die skyf oop om toegang te verkry en jou te kopieer files.
5.2 Formatting the Memory Card
Formatting the memory card will erase all data. Back up important files voordat u verder gaan.
- Navigate to the camera's settings menu (usually accessible by holding the Mode button or a specific combination).
- Select the 'Format Card' option.
- Confirm your selection to format the card.
6. Onderhoud
- Skoonmaak: Use a soft, dry cloth to clean the camera body. For the lens and screen, use a specialized lens cleaning cloth. Avoid abrasive materials or harsh chemicals.
- Berging: Bêre die kamera op 'n koel, droë plek weg van direkte sonlig en uiterste temperature.
- Batterysorg: For long-term storage, charge the battery to about 50% to prolong its lifespan.
7. Probleemoplossing
| Probleem | Moontlike oorsaak | Oplossing |
|---|---|---|
| Kamera skakel nie aan nie. | Lae battery. | Charge the camera fully using the provided USB cable and charging base. |
| Geheuekaartfout. | Kaart nie korrek ingesit nie of beskadig. | Reinsert the TF card. If the issue persists, try formatting the card (after backing up data) or using a different TF card. |
| Swak beeld-/videokwaliteit. | Low light, dirty lens, or incorrect settings. | Ensure adequate lighting. Clean the lens. Check if flash is enabled in low light. |
| Charging base feels loose. | Minor manufacturing variation. | Ensure the camera is securely seated in the charging base and the USB cable is firmly connected. Handle with care during charging. |
| TF card difficult to insert/remove. | Misalignment or tight slot. | Ensure correct orientation. Apply gentle, even pressure. Do not force the card. If it's consistently difficult, contact support. |
8. Spesifikasies
| Kenmerk | Detail |
|---|---|
| Model Naam | HAT0879 |
| Video-resolusie | 1080p |
| Fotosensorresolusie | 2.1 MP |
| Skerm grootte | 1.44 inches (approx. 1 Centimeter) |
| Battery Tipe | Built-in Lithium Ion |
| Battery Gemiddelde Lewe | Up to 600 minutes (recording) |
| Geheue berging kapasiteit | 16 GB (TF Card included) |
| Ondersteun File Formaat | JPEG (photos), MP4 (videos) |
| Verbindingstegnologie | USB |
| Spesiale kenmerke | Flash Function, Long Life Battery, Color Screen |
| Afmetings (ongeveer) | 1.97 x 1.77 x 1.38 duim |
9. Waarborg en Ondersteuning
For warranty information or technical support, please refer to the product packaging or contact Relaxweex customer service through the retailer where the product was purchased. Keep your purchase receipt for warranty claims.