1. Inleiding
This user manual provides detailed instructions for the installation, operation, and maintenance of your BoyKeep D112-10 Light Bulb Security Camera. Please read this manual thoroughly before using the product to ensure proper functionality and safety.

Figure 1.1.1: BoyKeep D112-10 Light Bulb Security Camera (10-pack). This image displays the product as a bundle of ten light bulb-shaped security cameras.
2. Produk verbyview
2.1. Pakketinhoud
The package for the BoyKeep D112-10 Light Bulb Security Camera (10-pack) includes:
- 10 x BoyKeep D112-10 Light Bulb Security Camera bodies
- Gebruikershandleiding (hierdie dokument)
2.2. Sleutel kenmerke
- 1080P High-Resolution Video: Provides clear and detailed images.
- Kleur Nag Visie: Verbeterde sigbaarheid in lae ligtoestande.
- 24/7 Real-time Motion Alerts: Notifies your device upon motion detection.
- Tweerigtingpraatjies: Ingeboude mikrofoon en luidspreker vir kommunikasie.
- One-Touch Connection: Simplifies pairing with your device.
- Multi-toestel Viewing & Deling: Monitor multiple cameras and share access.
- Cloud & Memory Card Storage: Flexible recording options (memory card not included).
- 360° Pan & 95° Kantel: Wide area coverage with remote control.
- Maklike installasie: Designed for standard E27 light sockets.
2.3. Kamerakomponente

Figure 2.3.1: Camera Component Diagram. This image illustrates the various parts of the BoyKeep D112-10 camera, including the E27 light socket base, enhanced WiFi module, microphone, 4 array LEDs, HD lens, 4 white LEDs, light sensor, memory card slot, and reset button. Dimensions are also shown: 6 cm (2.35 in) width and 15 cm (5.9 in) height.
3. Opstelling
3.1. Installasie
The BoyKeep D112-10 camera is designed for easy installation into a standard E27 light bulb socket.
- Skakel af: Ensure the power to the light socket is turned off before installation to prevent electrical shock.
- Skroef in: Carefully screw the camera into a standard E27 light socket until it is securely fastened.
- Krag aan: Restore power to the light socket. The camera will power on and initiate its startup sequence.
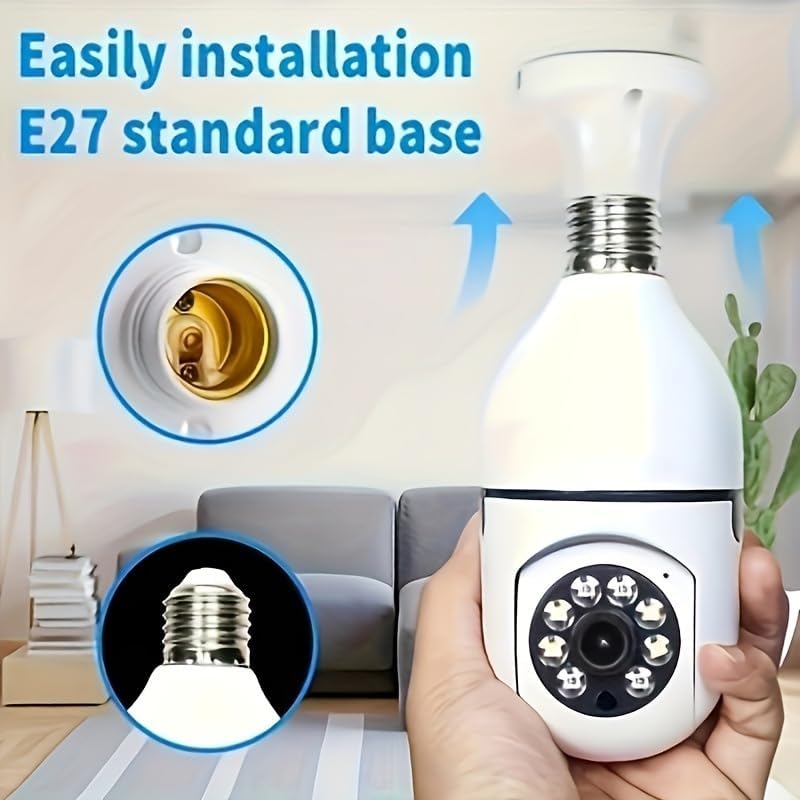
Figuur 3.1.1: Maklike installasie. This image demonstrates the simple process of screwing the camera into a standard E27 light bulb socket for quick setup.
3.2. App-aflaai en -verbinding
To operate the camera, you need to download the dedicated mobile application.
- Laai die app af: Soek vir the "BoyKeep" app (or specified app name in product packaging) on your smartphone's app store (Google Play Store for Android or Apple App Store for iOS).
- Registreer/Teken aan: Maak die toepassing oop en volg die instruksies op die skerm om 'n nuwe rekening te registreer of aan te meld as jy reeds een het.
- Voeg toestel by: In the app, select "Add Device" or the '+' icon. Choose the camera type (e.g., "Smart Camera" or "Light Bulb Camera").
- Koppel aan Wi-Fi: Ensure your smartphone is connected to a 2.4GHz Wi-Fi network. The camera only supports 2.4GHz Wi-Fi. Follow the app's instructions to connect the camera to your Wi-Fi network. This usually involves scanning a QR code generated by the app with the camera, or entering Wi-Fi credentials.
- Voltooiing: Once connected, the camera will appear in your device list within the app.
Let wel: Ensure your Wi-Fi router supports 2.4GHz and that your phone is connected to the 2.4GHz band during setup. 5GHz networks are not supported by this device.
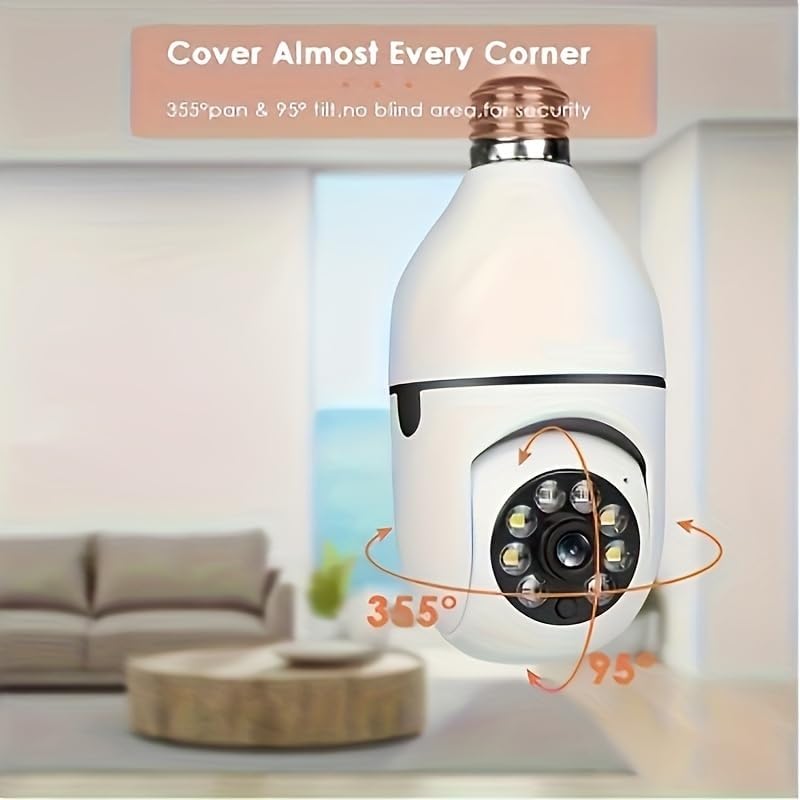
Figure 3.2.1: Wi-Fi Connection and Two-Way Talk. This diagram illustrates how the camera connects to a 2.4GHz Wi-Fi network and enables two-way communication between the camera and a smartphone or computer via the internet, allowing for interactions like speaking to a delivery person.
4. Bedryfsinstruksies
4.1. Leef View en Terugspeel
- Leef View: Open the app and select the camera from your device list to view die lewendige voer.
- Terugspeel: Toegang opgeneem footage by selecting the "Playback" option within the camera's interface in the app. You can navigate through the timeline to view spesifieke gebeurtenisse.
4.2. Pan- en kantelbeheer
The camera offers 360° horizontal pan and 95° vertical tilt capabilities.
- Beheer: In die lewendige view interface of the app, use the directional controls (usually a joystick or arrow icons) to remotely adjust the camera's viewing hoek.
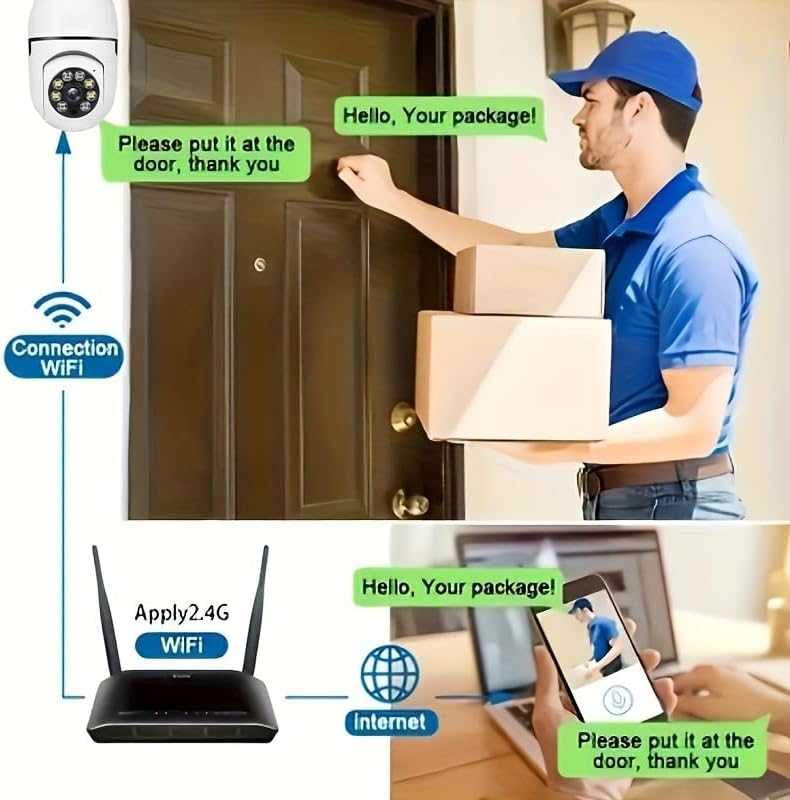
Figure 4.2.1: Pan and Tilt Coverage. This image demonstrates the camera's ability to cover almost every corner with its 355° pan and 95° tilt functions, eliminating blind spots for comprehensive security.
4.3. Bewegingsopsporing en waarskuwings
- Aktiveer/Deaktiveer: Navigeer na die kamera-instellings in die toepassing om bewegingsopsporing te aktiveer of deaktiveer.
- Sensitiwiteit: Pas die sensitiwiteitsvlak van bewegingsopsporing aan om vals alarms te verminder.
- Waarskuwings: When motion is detected, the camera will send push notifications to your smartphone. Recorded events will be stored in the cloud (if subscribed) or on the inserted memory card.
4.4. Tweerigting-klank
- Aktiveer: In die lewendige view, tap the microphone icon to speak through the camera's speaker. Tap it again to mute.
- Luister: The camera's microphone is active during live view, allowing you to hear audio from the camera's vicinity.
- Een-aanraking oproep: If available, press the physical one-touch call button on the camera (if present) to initiate a call to your linked smartphone.
4.5. Nagvisiemodusse
The camera supports both infrared and full-color night vision.
- Outomatiese modus: The camera automatically switches between day and night vision based on ambient light.
- Infrarooi Nagvisie: Verskaf duidelike swart-en-wit beelde in algehele duisternis.
- Volkleur Nagvisie: Utilizes built-in white LEDs to provide color images in low light, similar to daytime viewing. This mode can be activated manually or set to trigger upon motion detection.

Figure 4.5.1: Smart Dual Light LED Night Vision. This image compares the visual output of infrared night vision (top, black and white) and full-color night vision (bottom, color) provided by the camera's smart dual light LEDs, showcasing improved visibility in low-light conditions.
4.6. Bergingsopsies
- Memory Card (MicroSD): Insert a compatible MicroSD card (up to 128GB, Class 10 or higher recommended, not included) into the camera's memory card slot for local storage of recordings. The camera supports 24/7 continuous recording to the memory card.
- Wolkberging: The camera offers cloud storage services (e.g., a 30-day trial may be included). Refer to the app for subscription details and management.
5. Onderhoud
- Skoonmaak: Gebruik 'n sagte, droë lap om die kameralens en -behuizing skoon te maak. Moenie vloeibare skoonmaakmiddels of skuurmiddels gebruik nie.
- Firmware -opdaterings: Regularly check the app for firmware updates. Keeping the firmware updated ensures optimal performance and security.
- Netwerkstabiliteit: Ensure your Wi-Fi network is stable and strong in the camera's location for uninterrupted operation.
- Omgewingstoestande: The camera is designed for indoor use. Avoid exposing it to extreme temperatures, direct sunlight, or high humidity.
6. Probleemoplossing
| Probleem | Moontlike oorsaak | Oplossing |
|---|---|---|
| Kamera skakel nie aan nie. | No power to the light socket; camera not screwed in properly. | Ensure the light socket has power. Re-screw the camera firmly into the socket. |
| Kan nie aan Wi-Fi koppel nie. | Incorrect Wi-Fi password; connecting to 5GHz network; weak Wi-Fi signal. | Verify Wi-Fi password. Ensure you are connecting to a 2.4GHz network. Move camera closer to router or use a Wi-Fi extender. Reset camera and try again. |
| Bewegingswaarskuwings nie ontvang nie. | Motion detection disabled; app notifications turned off; low sensitivity. | Enable motion detection in app settings. Check phone's notification settings for the app. Increase motion detection sensitivity. |
| Swak video kwaliteit. | Weak Wi-Fi signal; dirty lens. | Improve Wi-Fi signal strength. Clean the camera lens with a soft, dry cloth. |
| Tweerigting-klank werk nie. | Microphone/speaker muted in app; network issues. | Check audio settings in the app. Ensure stable network connection. |
7. Spesifikasies
| Kenmerk | Detail |
|---|---|
| Model Naam | D112-10 |
| Video-resolusie | 1080P |
| Konnektiwiteit | 2.4GHz Wi-Fi (IEEE 802.11b/g/n) |
| Kragbron | Corded Electric (E27 Light Socket) |
| Pan/kantel-reeks | 355° Horisontaal, 95° Vertikaal |
| Nagvisie | Infrared & Full-Color Night Vision |
| Bergingsopsies | MicroSD Card (up to 128GB, not included), Cloud Storage |
| Oudio | Two-Way Talk (Built-in Mic & Speaker) |
| Binne/buiteluggebruik | Binneshuise |
| Dimensions (Camera Body) | Approx. 6 cm (2.35 in) diameter, 15 cm (5.9 in) height |
| Ingesluit komponente | Kamera liggaam |
8. Waarborginligting
BoyKeep products are manufactured to the highest quality standards. This product comes with a standard manufacturer's warranty. Please refer to the product packaging or the official BoyKeep website for specific warranty terms and conditions, including duration and coverage details.
9. Kliëntediens
For technical support, troubleshooting assistance, or any inquiries regarding your BoyKeep D112-10 Light Bulb Security Camera, please contact our customer support team:
- Aanlyn ondersteuning: Visit the official BoyKeep store on Amazon: BoyKeep Store
- E-pos ondersteuning: Refer to the contact information provided in your product packaging or on the BoyKeep webwebwerf.
When contacting support, please have your product model number (D112-10) and purchase details ready.