Inleiding
This manual provides instructions for the safe and efficient operation of your Fyrome 6-Layer Food Dehydrator. This appliance is designed for dehydrating various foods such as fruits, vegetables, meats, and herbs, as well as for preparing pet treats. Please read this manual thoroughly before first use and retain it for future reference.

Beeld: Voorkant view of the Fyrome 6-Layer Food Dehydrator, showcasing its design and digital control panel.
Belangrike veiligheidsinstruksies
Wanneer elektriese toestelle gebruik word, moet basiese veiligheidsmaatreëls altyd gevolg word om die risiko van brand, elektriese skok en/of besering aan persone te verminder, insluitend die volgende:
- Lees alle instruksies voordat u die toestel gebruik.
- Moenie aan warm oppervlaktes raak nie. Gebruik handvatsels of knoppe.
- Om teen elektriese skok te beskerm, moenie koord, proppe of toestel in water of ander vloeistof dompel nie.
- Noukeurige toesig is nodig wanneer enige toestel deur of naby kinders gebruik word.
- Trek uit die stopcontact wanneer dit nie gebruik word nie en voor skoonmaak. Laat afkoel voor jy dele aan- of afhaal.
- Moenie enige toestel gebruik met 'n beskadigde koord of prop of nadat die toestel wanfunksioneer of op enige manier beskadig is nie.
- Die gebruik van bykomstighede wat nie deur die toestelvervaardiger aanbeveel word nie, kan beserings veroorsaak.
- Moenie buite gebruik nie.
- Moenie dat koord oor die rand van tafel of toonbank hang, of aan warm oppervlaktes raak nie.
- Moenie op of naby 'n warm gas- of elektriese brander, of in 'n verhitte oond plaas nie.
- Koppel altyd eers die prop aan die toestel, en steek dan die koord in die muursok. Om te ontkoppel, draai enige beheer na "af" en verwyder dan die prop uit die muursok.
- Moenie die toestel vir ander as die bedoeling gebruik nie.
- Maak seker dat die toestel op 'n stabiele, hittebestande oppervlak geplaas word.
- Do not block the heat dissipation holes during operation.
Onderdele lys
The Fyrome Food Dehydrator includes the following components:
- 1 x Dehydrator Base Unit with Control Panel
- 6 x Removable Drying Trays (PP and PS material)
- 1 x Boonste deksel
- 1 x netsnoer
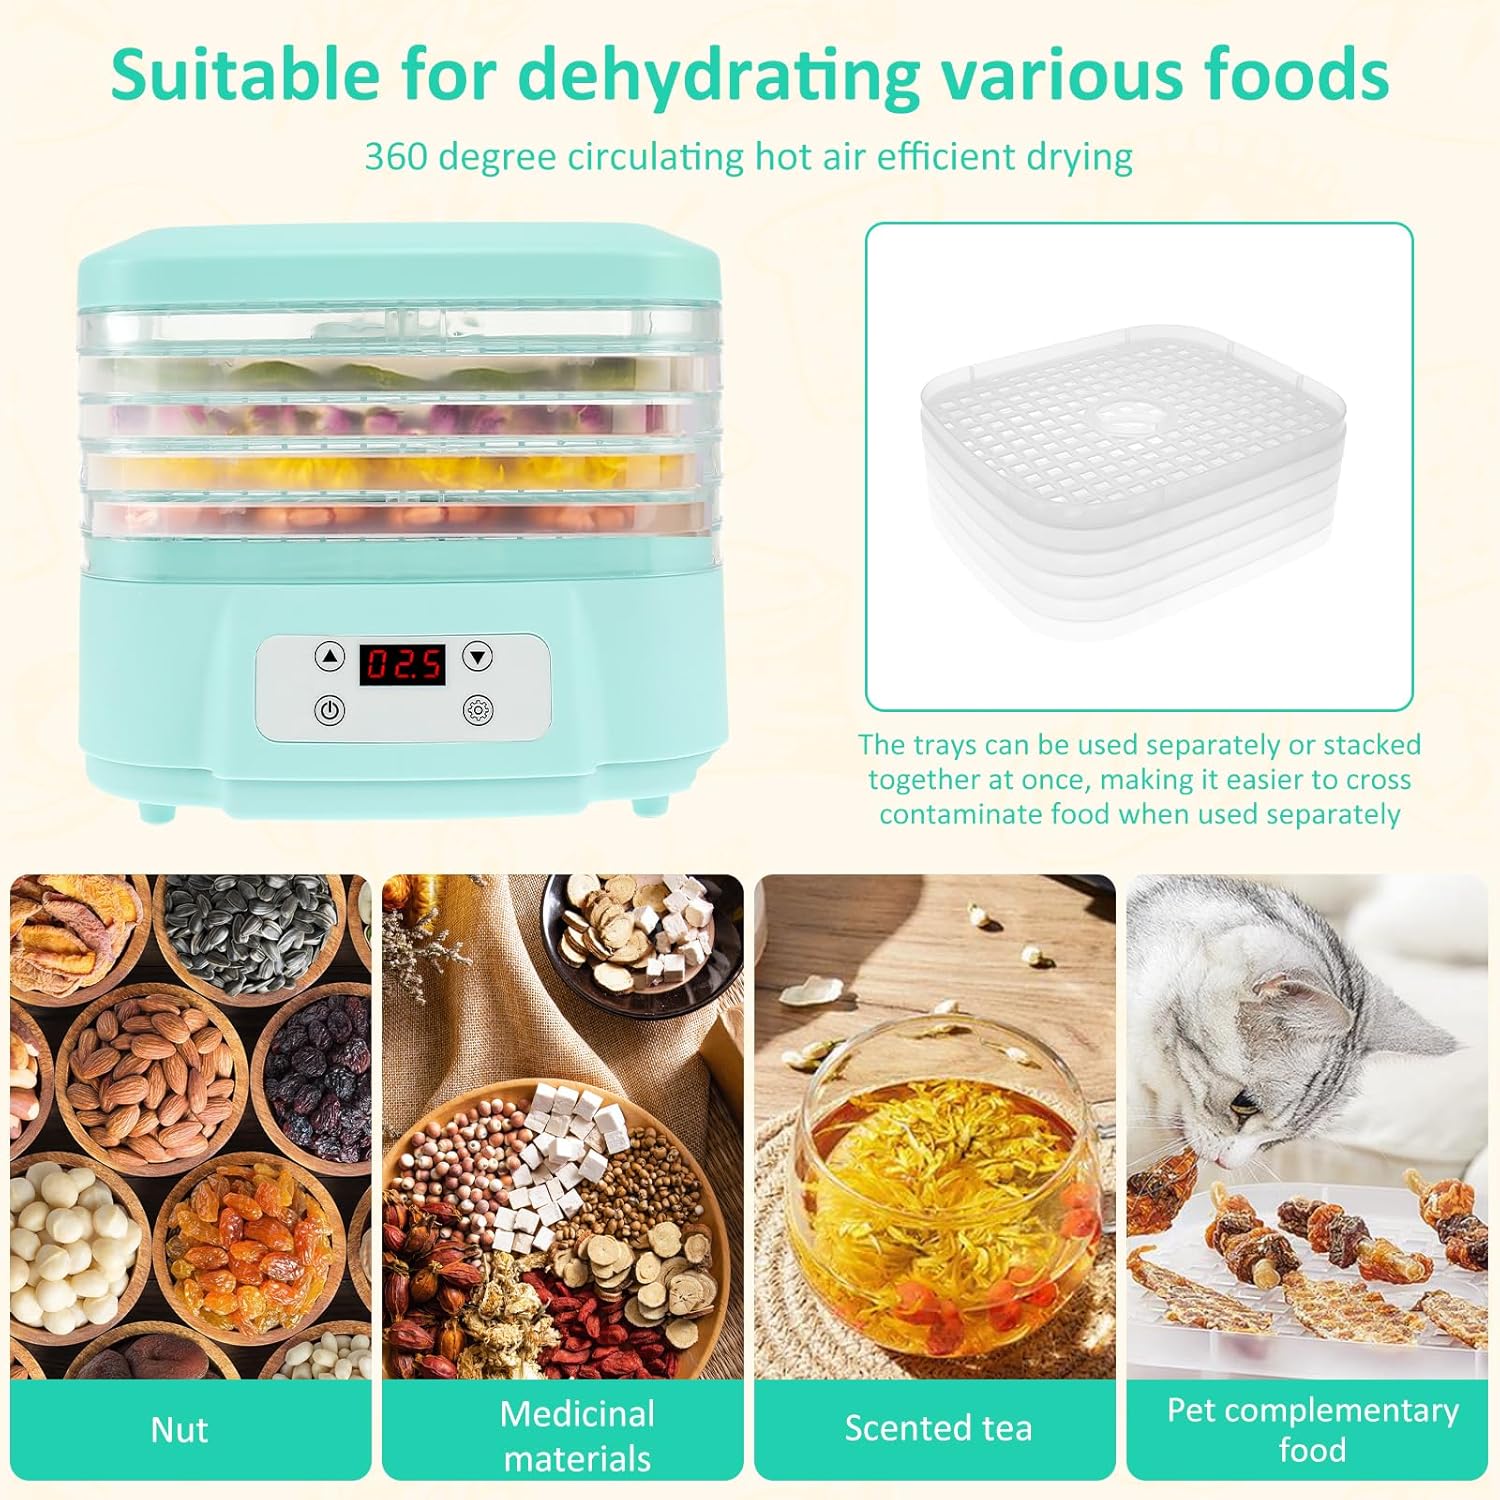
Image: The dehydrator unit with its six removable trays displayed, highlighting the stackable design.
Opstelling
- Pak uit: Verwyder alle komponente versigtig uit die verpakking.
- Skoon: Before first use, wash the drying trays and lid in warm, soapy water. Rinse thoroughly and dry completely. Wipe the base unit with a damp lap. Moenie die basiseenheid in water dompel nie.
- Stel saam: Place the base unit on a stable, flat, and heat-resistant surface. Stack the desired number of drying trays onto the base unit. Ensure the trays are properly aligned. Place the lid on top of the uppermost tray.
- Koppel krag: Steek die kragkabel in 'n standaard 110V-elektriese uitlaat.

Image: The dehydrator unit with its attached power cord, ready for connection to an electrical outlet.
Bedryfsinstruksies
Follow these steps to dehydrate your food:
- Berei kos voor: Wash, peel, and slice your ingredients evenly. For best results, ensure slices are uniform in thickness.
- Laai laaie: Arrange the prepared food in a single layer on the drying trays. Do not overlap food items to allow for proper airflow.
- Set Temperature and Timer:
- Press the power button to turn on the dehydrator.
- Use the temperature control buttons (up/down arrows) to set the desired drying temperature between 35°C and 80°C.
- Use the timer control buttons to set the drying duration from 1 to 24 hours.
- Begin Dehidrasie: The dehydrator will begin operating once the settings are confirmed. The 360° rotating hot air technology ensures even heat distribution for uniform drying.
- Monitor and Check: Periodically check the food's dryness. Drying times vary based on food type, thickness, and moisture content.
- Voltooi: Once the desired dryness is achieved, turn off the dehydrator and unplug it. Allow the food to cool completely before storing.

Image: A visual guide illustrating the three main steps of using the dehydrator: preparing ingredients, setting controls, and the final dried product.
Recommended Drying Temperatures and Times
The following are general guidelines. Adjust as needed based on your specific ingredients and desired dryness.
- Dried Fruits: 60-70°C
- Dried Vegetables: 50-60°C
- Dried Meats (Jerky): 70-80°C
- Floral Teas: 55-60°C
- Medicinal Herbs: 35-40°C
- Neute: 60-70°C
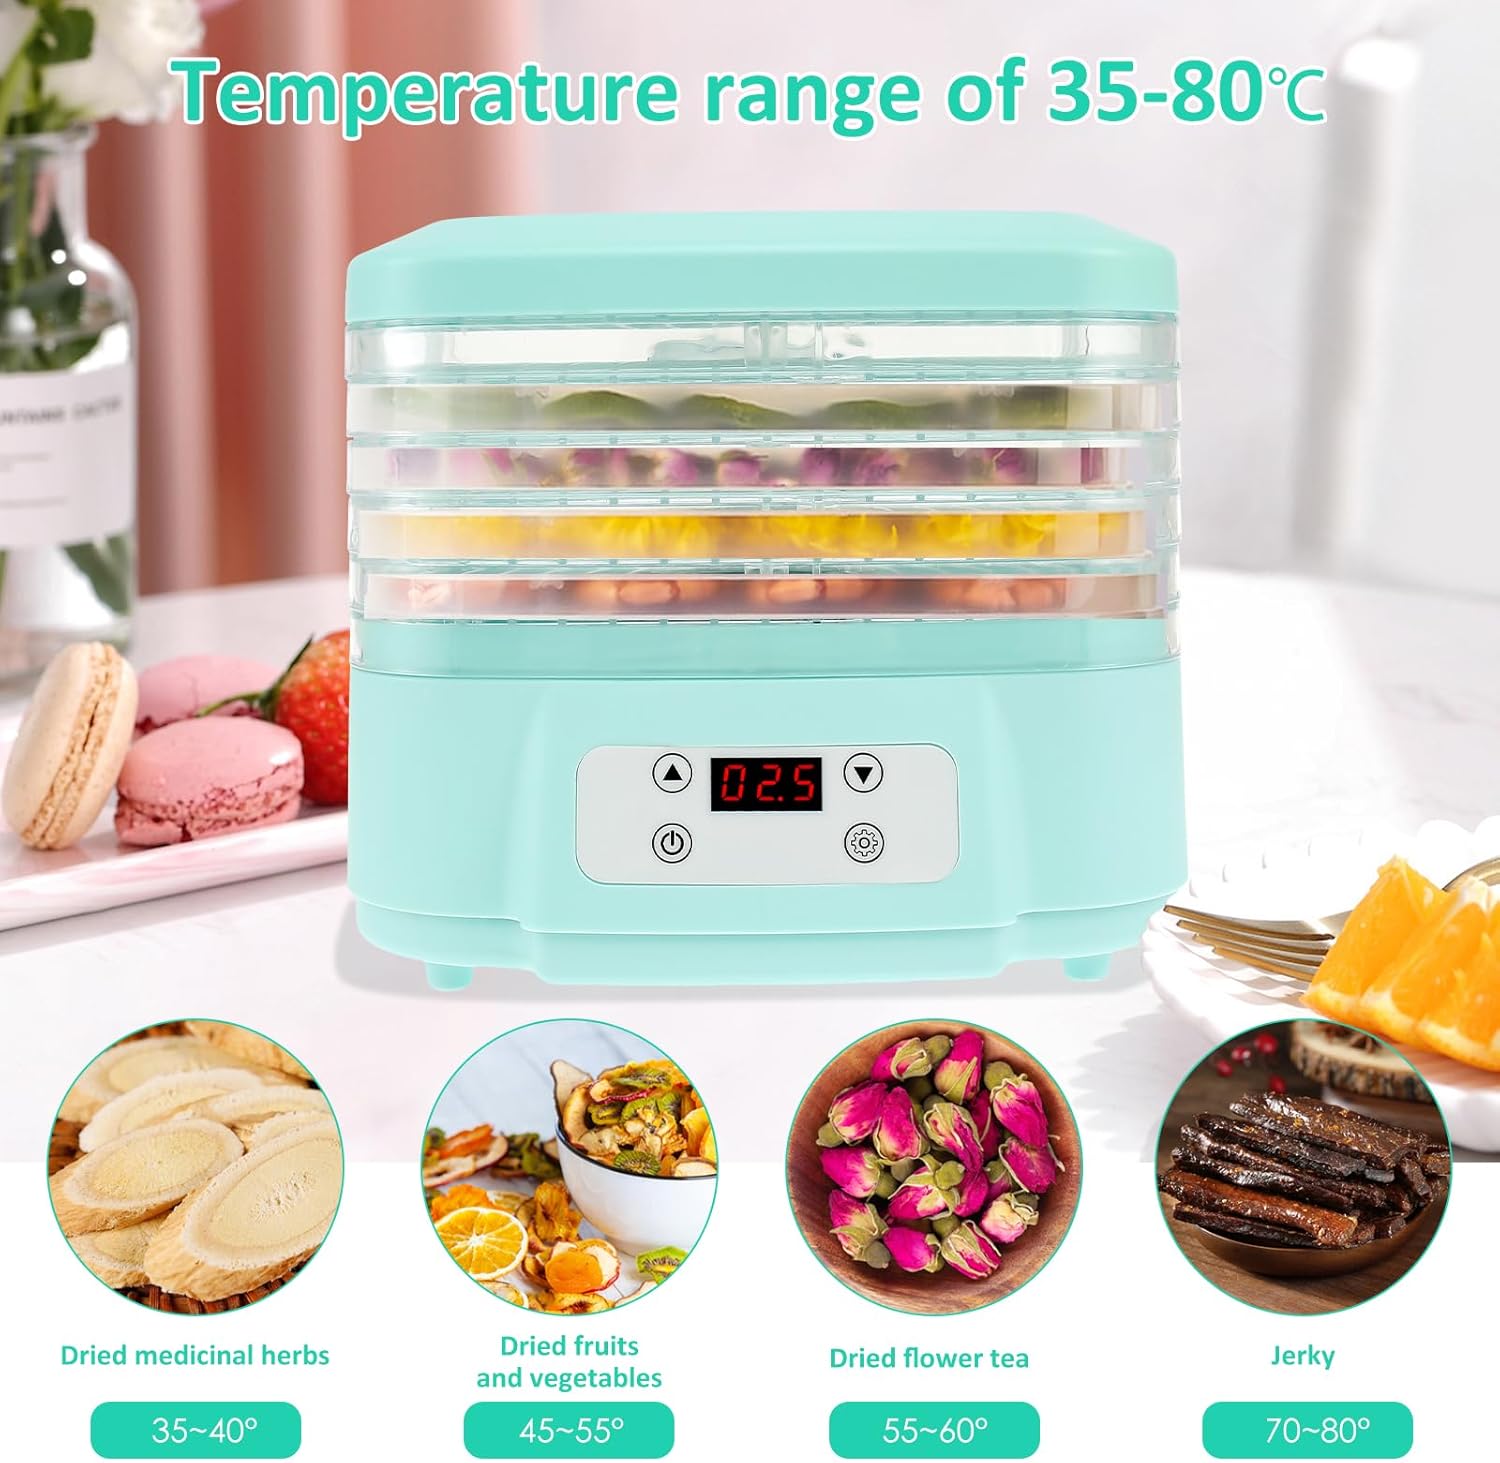
Image: The dehydrator's temperature range (35-80°C) is highlighted, along with visual examples and recommended drying temperatures for various food types.

Image: Diagram showing the 360-degree rotating hot air technology within the dehydrator, ensuring even heat distribution.
Onderhoud en Skoonmaak
Gereelde skoonmaak en onderhoud sal die lang lewensduur en optimale werkverrigting van u dehidrator verseker.
- Ontkoppel: Ontkoppel altyd die ontwateringsmasjien van die kragtoevoer en laat dit heeltemal afkoel voordat jy dit skoonmaak.
- Maak bakke en deksel skoon: The drying trays and lid can be washed in warm, soapy water. Rinse thoroughly and dry completely. These parts are not dishwasher safe.
- Maak die basiseenheid skoon: Vee die buitekant van die basiseenheid af met advertensiemateriaal.amp cloth. For stubborn stains, use a mild detergent. Do not immerse the base unit in water or any other liquid.
- Berging: Berg die dehidrator op 'n skoon, droë plek wanneer dit nie gebruik word nie.
The heat dissipation holes at the base should be kept clear of obstructions to maintain optimal conditions and prevent overheating.
Probleemoplossing
| Probleem | Moontlike oorsaak | Oplossing |
|---|---|---|
| Die ontwateringsmasjien skakel nie aan nie. | Not plugged in; power outlet malfunction; damaged power cord. | Ensure the power cord is securely plugged into a working outlet. Check the power cord for damage. |
| Kos droog nie eweredig nie. | Food slices are too thick or uneven; trays overloaded; insufficient airflow. | Ensure food is sliced uniformly. Do not overload trays; arrange food in a single layer. Rotate trays during the drying process if necessary. |
| Dehydrator is too noisy. | Normal operating sound; unit not on a flat surface. | Ensure the unit is on a stable, flat surface. If noise is excessive or unusual, contact customer support. |
| Droging neem te lank. | Temperature set too low; food too moist or thick; high humidity in environment. | Increase the temperature setting. Ensure food is prepared correctly. Consider drying in a less humid environment. |
Spesifikasies
| Handelsmerk | Fyrome |
| Modelnommer | 1 |
| Materiaal | Food Grade PP, PS |
| Aantal skinkborde | 6 |
| Voltage | 110 V |
| Krag | 200 W |
| Temperatuurreeks | 35°C tot 80°C |
| Tydsberekening | 1 tot 24 uur |
| Afmetings (L x B x H) | 25.3 cm x 24 cm x 22 cm (9.96 duim x 9.45 duim x 8.66 duim) |
| Roostergrootte | Ongeveer 28 cm x 20 cm |
| Item gewig | 4.09 pond |
| Skottelgoedwasser veilig | No (Trays and Lid) |

Image: Diagram illustrating the physical dimensions of the dehydrator unit.
Waarborg en Ondersteuning
Specific warranty information is not provided in the product details. For warranty claims, technical support, or any inquiries regarding your Fyrome Food Dehydrator, please contact the seller or manufacturer directly through your purchase platform.
Please refer to your purchase documentation for contact details or visit the official Fyrome webwebwerf indien beskikbaar.