1. Inleiding
The Linsoul Kiwi Ears Aether In-Ear Monitors (IEMs) are engineered for high-fidelity audio reproduction, catering to professional musicians, audiophiles, and gamers. These IEMs feature a large 15.3mm planar magnetic driver designed to deliver exceptional sound quality with a wide soundstage and precise imaging.
The Aether's design focuses on tonal integrity, providing a natural and accurate sound profile. Its robust construction and detachable cable system ensure durability and customization options for an enhanced listening experience.
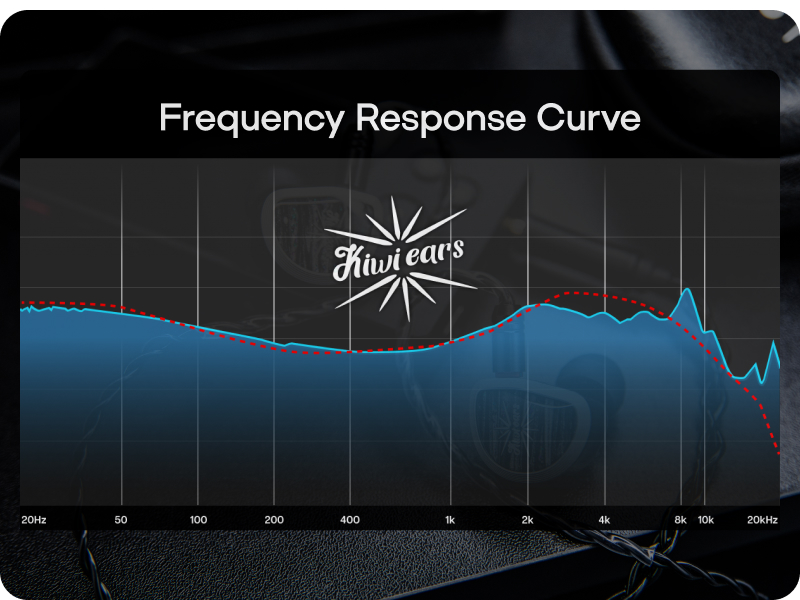
Image 1: Linsoul Kiwi Ears Aether In-Ear Monitors.
2. Wat is in die boks
Your Kiwi Ears Aether package includes the following items:
- Kiwi Ears Aether IEMs (1 pair)
- Detachable 2-pin 0.78mm Cable
- Assorted Silicone Eartips (multiple sizes)
- Beskermende dratas
- Gebruikershandleiding

Image 2: Package contents of the Kiwi Ears Aether IEMs.
3. Opstelgids
3.1. Die kabel aanheg
- Identify the left (L) and right (R) IEM units and cable connectors. The cable connectors are typically marked.
- Align the 2-pin connector on the cable with the corresponding receptacle on the IEM unit. Ensure the pins are correctly oriented.
- Gently push the connector straight into the IEM until it is securely seated. Do not force the connection.
- Repeat for the other IEM unit.

Image 3: Detachable 2-pin cable and 3.5mm jack.
3.2. Selecting and Installing Eartips
Proper eartip selection is crucial for sound quality and comfort. Experiment with the included silicone eartips to find the best fit for your ears.
- Choose an eartip size that creates a good seal in your ear canal without causing discomfort. A good seal is essential for optimal bass response and passive noise isolation.
- Gently push the chosen eartip onto the nozzle of the IEM until it is firmly attached.
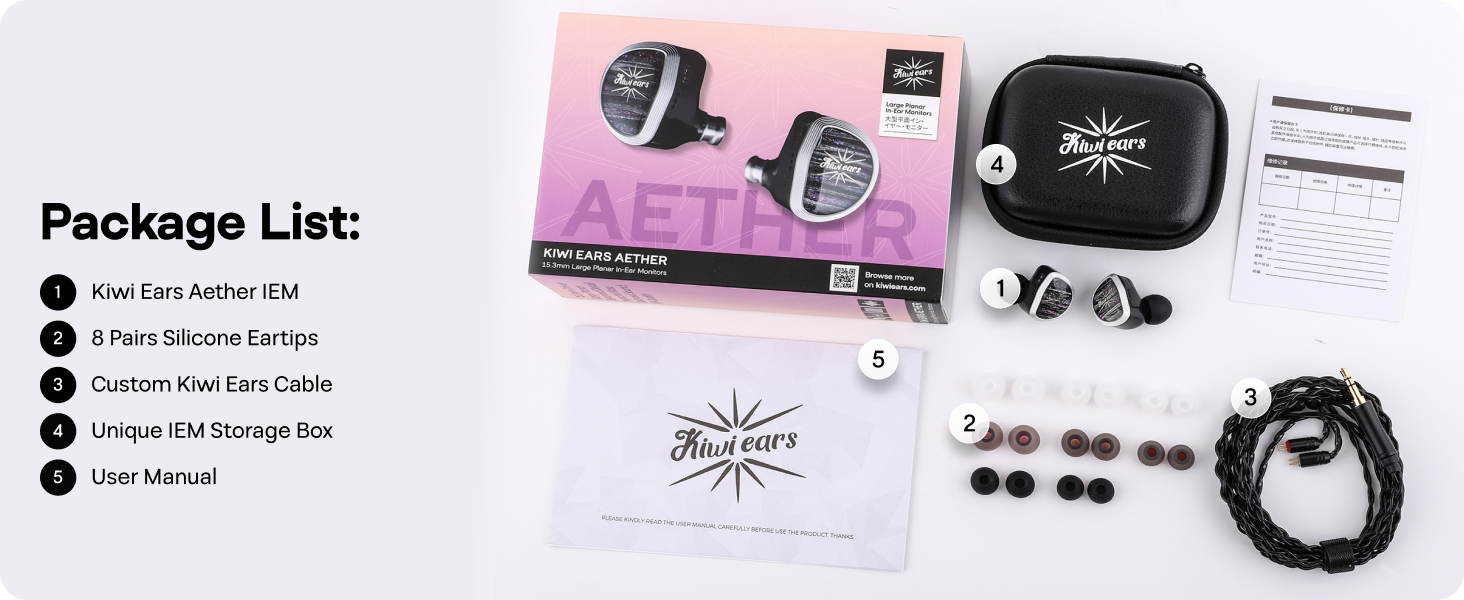
Image 4: Assorted silicone eartips for optimal fit.
3.3. Dra van die IEM's
- Insert the IEMs into your ear canals, ensuring a snug and comfortable fit. The cable is designed to be worn over the ear for stability and reduced microphonics.
- Adjust the cable around your ear for a secure fit.
4. Bedryfsinstruksies
4.1. Verbinding met 'n oudiobron
Connect the 3.5mm jack of the IEM cable to the headphone output of your audio device (e.g., smartphone, digital audio player, computer, gaming console).

Image 5: Kiwi Ears Aether adapting to multiple devices.
4.2. Volumebeheer
Adjust the volume directly from your connected audio source. Start with a low volume and gradually increase it to a comfortable listening level to prevent hearing damage.
4.3. Optimal Listening Experience
The Kiwi Ears Aether IEMs are designed to provide a detailed and immersive sound experience across various applications, including music listening, gaming, and professional monitoring.
Video 1: Oorview of the Kiwi Ears Aether In-Ear Monitor, showcasing die ontwerp en kenmerke daarvan.
Video 2: Detailed look at the 15.3mm large planar driver and its sound characteristics.
Video 3: Showcase of the Linsoul Kiwi Ears Aether's balanced tonality and precision.
5. Onderhoud
5.1. Cleaning the IEMs and Eartips
- Maak die oordoppe gereeld skoon met 'n sagte, damp cloth. For deeper cleaning, remove the eartips and wash them with mild soap and water, then rinse thoroughly and allow them to dry completely before reattaching.
- Wipe the body of the IEMs with a dry, soft cloth to remove any dust or debris. Avoid using harsh chemicals or abrasive materials.
- Use a small brush or cleaning tool to gently clear any earwax or debris from the nozzle mesh.
5.2. Kabelversorging
- Vermy skerp buigings of oormatige trek aan die kabel, veral naby die verbindings.
- Rol die kabel losweg op wanneer dit gebêre word om te verhoed dat dit verstrengel raak en beskadig word.
5.3. Berging
When not in use, store your Kiwi Ears Aether IEMs in the provided protective carrying case to prevent damage from impacts, dust, and moisture.
6. Probleemoplossing
| Probleem | Moontlike oorsaak | Oplossing |
|---|---|---|
| Geen klank of intermitterende klank nie | Loose cable connection, incorrect audio source selection, low volume on device. | Ensure cable connectors are fully seated. Check audio source output and volume settings. Test with another audio device. |
| Swak klankgehalte (bv. gebrek aan bas, dowwe klank) | Improper eartip fit, earwax blockage, damaged cable. | Try different eartip sizes to achieve a proper seal. Clean IEM nozzles. Inspect cable for damage; replace if necessary. |
| IEMs fall out easily or are uncomfortable | Verkeerde oordopjegrootte, onbehoorlike drategniek. | Experiment with different eartip sizes. Ensure IEMs are inserted correctly with the cable worn over the ear. |
7. Spesifikasies
| Kenmerk | Detail |
|---|---|
| Tipe bestuurder | 15.3mm Planar Magnetic Driver |
| Impedansie | 14 ohm |
| Sensitiwiteit | 105 dB |
| Frekwensiereeks | 20Hz-20KHz |
| Konnektiwiteit | Wired (0.78mm 2-pin detachable cable) |
| Oorplasing | In Oor |
| Geraasbeheer | Passiewe ruisonderdrukking |
Image 6: Frequency Response Curve.
8. Waarborg en Ondersteuning
8.1. Waarborginligting
The Linsoul Kiwi Ears Aether In-Ear Monitors come with a 1-year limited warranty from the date of purchase. This warranty covers manufacturing defects. Please retain your proof of purchase for warranty claims.
8.2. Kliëntediens
For technical assistance, warranty claims, or general inquiries, please contact Linsoul customer support through their official webwebwerf of die kleinhandelaar waar jy die produk gekoop het.