AIKVSXER OJ-M715-B
AIKVSXER Photocell Sensor with Receptacle Base User Manual
Dusk to Dawn Light Control Switch for Outdoor Lighting
1. Inleiding
Thank you for choosing the AIKVSXER Photocell Sensor with Receptacle Base. This device is designed to automate your outdoor lighting, providing energy efficiency and convenience by turning lights on at dusk and off at dawn. This manual provides detailed instructions for installation, operation, and maintenance to ensure optimal performance and longevity of your product.
2. Produk verbyview
The AIKVSXER Photocell Sensor is a photoelectric switch that detects ambient light levels. When light levels drop below a certain threshold (dusk), it activates the connected lighting. When light levels rise above another threshold (dawn), it deactivates the lighting. The included receptacle base provides a secure and easy-to-install connection point for the sensor.

Prentbeskrywing: A blue AIKVSXER photocell sensor is shown above its black receptacle base. The sensor has a clear window for light detection and three metal prongs for connection. The base has corresponding slots and wires extending from its bottom.
Sleutel kenmerke:
- Outomatiese werking: Turns lights on at dusk and off at dawn.
- IP66 Waterdigte Gradering: Ensures durability and protection against water and dust in outdoor environments.
- Spanningsbeskerming: Safeguards connected lamps from lightning and power surges.
- Tydvertragingsfunksie: Prevents false triggers from transient light sources like car headlights or lightning.
- Maklike installasie: Twist-lock design for quick and hassle-free setup.
- Gesertifiseerde kwaliteit: UL, CE, and RoHS certified for safety and performance.
3. Pakketinhoud
Verifieer dat alle komponente in jou pakket teenwoordig is:
- 1 x Photocell Sensor
- 1 x Receptacle Base
4. Spesifikasies
Photocell Sensor (Model: OJ-M715-B)
| Eienskap | Waarde |
|---|---|
| Model | OJ-M715-B |
| Toepaslike Voltage | 105-305VAC |
| Verwante Voltage | AC 120-277V |
| Related Frequency | 50/60Hz |
| Related Loading | 1000W wolfraam, 1800VA ballas |
| On-off Levels | 6LUX-15LUX On, 50LUX Off |
| Waterdig | IP66 |
| Gebruik omgewingstemperatuur | -40°F ~ +158°F |
| Verwante humiditeit | 99% |
| Kragverbruik | 1.5VA |
| Algehele grootte | 3.3 x 2 duim |
| Gewig ongeveer | 3.84 ons |
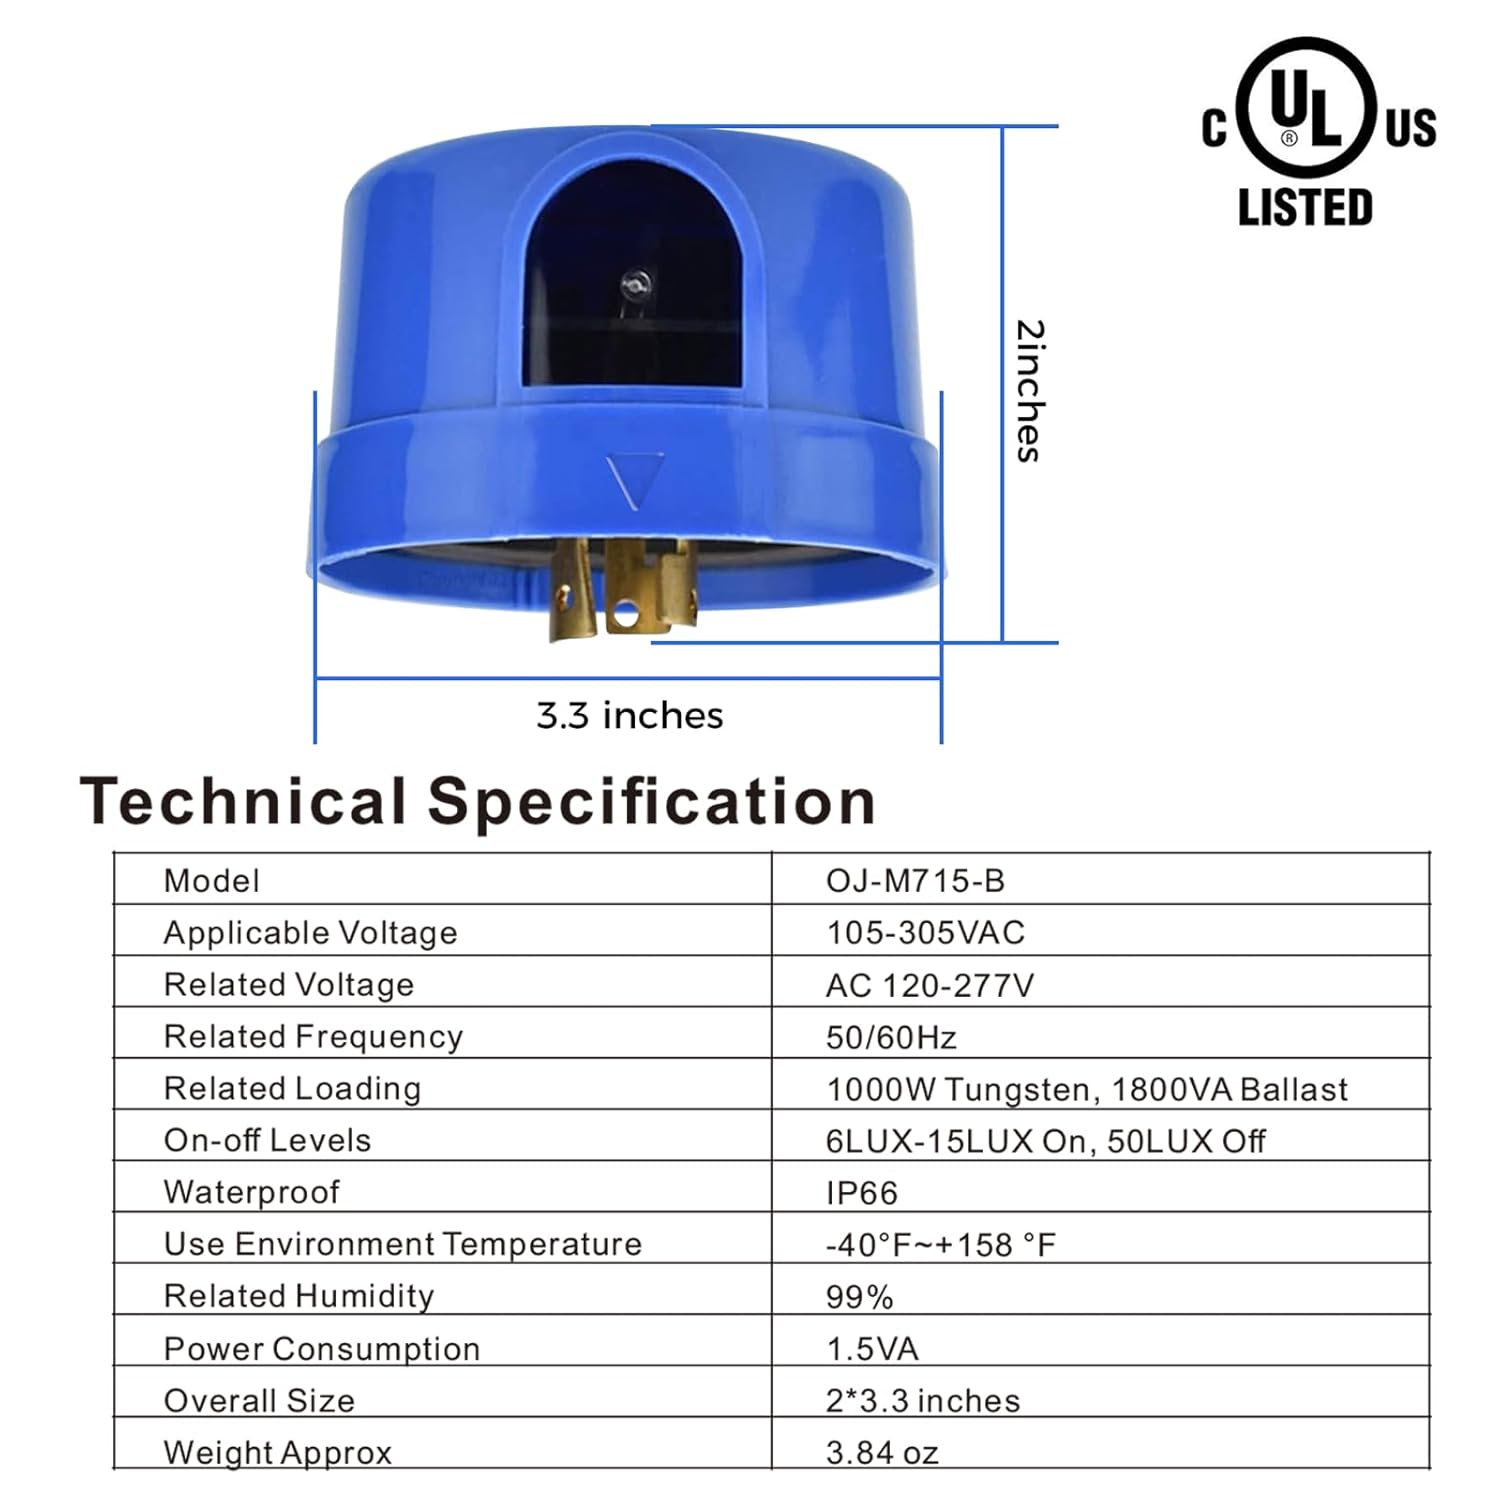
Prentbeskrywing: A diagram showing the dimensions (3.3 inches width, 2 inches height) and detailed technical specifications of the blue photocell sensor, including voltage, frequency, loading, IP rating, and operating temperature.
Receptacle Base (Model: OJ-M713-B-3P)
| Eienskap | Waarde |
|---|---|
| Model | OJ-M713-B-3P |
| Gegradeerde huidige (Amperes) | 7A |
| Gegradeerde Voltage (volt) | 480Vac |
| Bedryfsfrekwensie | 50/60Hz |
| Waterdigte klassifikasie | IP66 |
| Omgewingstemperatuur | -40°F tot +158°F |
| Overall Dimensions (Dia. x H) | 1.5" x 2.5" inches |
| Netto gewig | 3.3 ons |

Prentbeskrywing: A diagram showing the dimensions (2.5 inches width, 1.5 inches height) and detailed technical specifications of the black receptacle base, including rated current, voltage, frequency, IP rating, and operating temperature.
5. Installasie
Belangrik: Before beginning installation, ensure the power supply to the lighting fixture is turned off at the circuit breaker to prevent electrical shock.
Bedradingsinstruksies:
The receptacle base typically has three wires for connection:
- Black Wire (LI/BLACK): Connect to the input Line (L) terminal.
- Red Wire (LO/Red): Connect to the output Load (L) terminal of your lighting fixture.
- White Wire (N/White): Connect to the Shared input and output Neutral (N) terminal.
| Draadspesifikasies | Draad lengte | Beëindig behandeling | Load Applications |
|---|---|---|---|
| UL 1015 18AWG | LI/BLACK: 150±10MM LO/Red: 150±10mm N/White: 150±10mm | Gestroop Wir 8±1mm Verblik 8±1mmm | LI Input L terminal LO Output L terminal N Shared input and output |

Prentbeskrywing: A diagram illustrating the wiring connections for the receptacle base. Black wire connects to the neutral line, white wire to the line, and red wire to the load. A table provides detailed wire specifications including type, length, and end treatment.
Mounting the Receptacle Base:
- Securely mount the receptacle base to your outdoor lighting fixture or a suitable junction box. Ensure it is positioned where the photocell sensor will have an unobstructed view of the sky and ambient light.
- Connect the wires from the receptacle base to your lighting circuit according to the wiring diagram above. Use appropriate wire connectors and ensure all connections are secure and insulated.
Installing the Photocell Sensor:
- Align the prongs of the photocell sensor with the corresponding slots in the receptacle base.
- Gently push the photocell sensor into the receptacle base.
- Twist the photocell sensor clockwise to lock it securely into place. You should feel a click or resistance indicating it is properly seated.

Prentbeskrywing: A step-by-step visual guide showing how to install the photocell sensor. Step 1 illustrates plugging the sensor into the receptacle base, and Step 2 shows twisting the sensor clockwise to lock it into the base, which is attached to a light fixture.
Once installed, restore power to the lighting fixture. The sensor will begin its operation cycle.
6. Operasie
The AIKVSXER Photocell Sensor operates automatically based on ambient light levels:
- Skemer: As natural light diminishes at dusk, the sensor will detect the decrease in illumination. After a brief time delay (to prevent false triggers from temporary shadows or light flashes), the sensor will activate the connected lighting.
- Dagbreek: As natural light increases at dawn, the sensor will detect the rise in illumination. After a brief time delay, the sensor will deactivate the connected lighting.

Prentbeskrywing: A split image illustrating the 'Turn OFF' and 'Turn ON' states of outdoor streetlights. The left side shows lights off during the day, and the right side shows lights on at night, with a photocell sensor visible on a light fixture, demonstrating dusk-to-dawn functionality.
7. Aansoeke
This photocell sensor is suitable for a wide range of outdoor and commercial lighting applications, including but not limited to:
- Parkeerterreinbeligting
- Straatbeligting
- Skuurbeligting
- Padbeligting
- Outdoor Area Lighting
- Factory and Industrial Lighting

Prentbeskrywing: A collage of four images demonstrating various applications for the photocell sensor: a parking lot at night, a barn with an outdoor light, streetlights illuminating a residential road, and pathway lights in a garden.
8. Onderhoud
The AIKVSXER Photocell Sensor is designed for minimal maintenance. However, periodic checks can help ensure its continued optimal performance:
- Clean the Sensor Window: Periodically inspect the clear window on the photocell sensor for dirt, dust, or debris. Gently wipe it clean with a soft, damp cloth. A dirty sensor window can impair light detection and affect performance.
- Kyk vir obstruksies: Ensure that no new obstructions (e.g., growing tree branches, new structures) are blocking the sensor's view of ambient light.
- Inspekteer verbindings: Annually, or if issues arise, inspect the electrical connections at the receptacle base to ensure they remain secure and free from corrosion.
- Waterdigte integriteit: The product has an IP66 rating. While highly waterproof, avoid direct high-pressure water jets on the sensor.

Prentbeskrywing: A visual representation of the IP66 waterproof rating, showing the blue photocell sensor and black receptacle base being splashed with water, indicating their resistance to water ingress.
9. Probleemoplossing
If you experience issues with your AIKVSXER Photocell Sensor, refer to the following common problems and solutions:
| Probleem | Moontlike oorsaak | Oplossing |
|---|---|---|
| Ligte bly gedurende die dag aan. | Sensor window is dirty or obstructed. | Maak die sensorvenster skoon. Verwyder enige obstruksies. |
| Ligte gaan nie aan met skemer nie. | Insufficient light reaching the sensor (e.g., under an overhang). Foutiewe bedradingsverbinding. Sensorfout. | Relocate the sensor or fixture to an area with direct ambient light. Check all wiring connections for security and proper insulation. Test with a known working sensor or replace the sensor. |
| Lights flicker or cycle on/off rapidly. | Intermittent light source (e.g., passing car headlights, nearby motion lights) triggering the sensor. Sensor is receiving reflected light. | Ensure the sensor is not exposed to transient light sources. Adjust sensor position if possible. Check for reflective surfaces near the sensor. |
| Sensor does not fit into receptacle base. | Incorrect alignment or debris in slots. | Ensure prongs are aligned with slots. Check for and remove any debris. Apply gentle pressure and twist clockwise. |
10. Waarborg en Ondersteuning
AIKVSXER products are manufactured with high-quality standards. This product is UL, CE, and RoHS certified, ensuring reliable performance and user safety.
For specific warranty details or technical support, please refer to the product packaging or contact AIKVSXER customer service directly. Keep your purchase receipt for warranty claims.
- Kliëntediens: Refer to the contact information provided with your purchase or on the official AIKVSXER webwebwerf.
- Waarborgtydperk: Please check your product documentation for the exact warranty duration.
Ask a question about this manual
Ask about setup, troubleshooting, compatibility, parts, safety, or missing instructions. Manuals+ will review the question and use this page’s manual context to help answer it.