
1. Inleiding
This manual provides detailed instructions for the PRODIGY AutoCode Talking Blood Glucose Meter Starter Kit, Model 10500. Please read this manual thoroughly before using the device to ensure safe and accurate operation. This kit is designed to assist individuals in monitoring their blood glucose levels.
Kit Inhoud
- PRODIGY AutoCode Blood Glucose Talking Meter
- PRODIGY No Coding Blood Glucose Test Strips (2 vials of 50ct, total 100ct)
- PRODIGY Adjustable Depth Lancing Device
- PRODIGY Twist Top Lancets 28G (10ct)
- Dratas
- Vinnige Verwysingsgids
- Eienaar se handleiding (hierdie dokument)
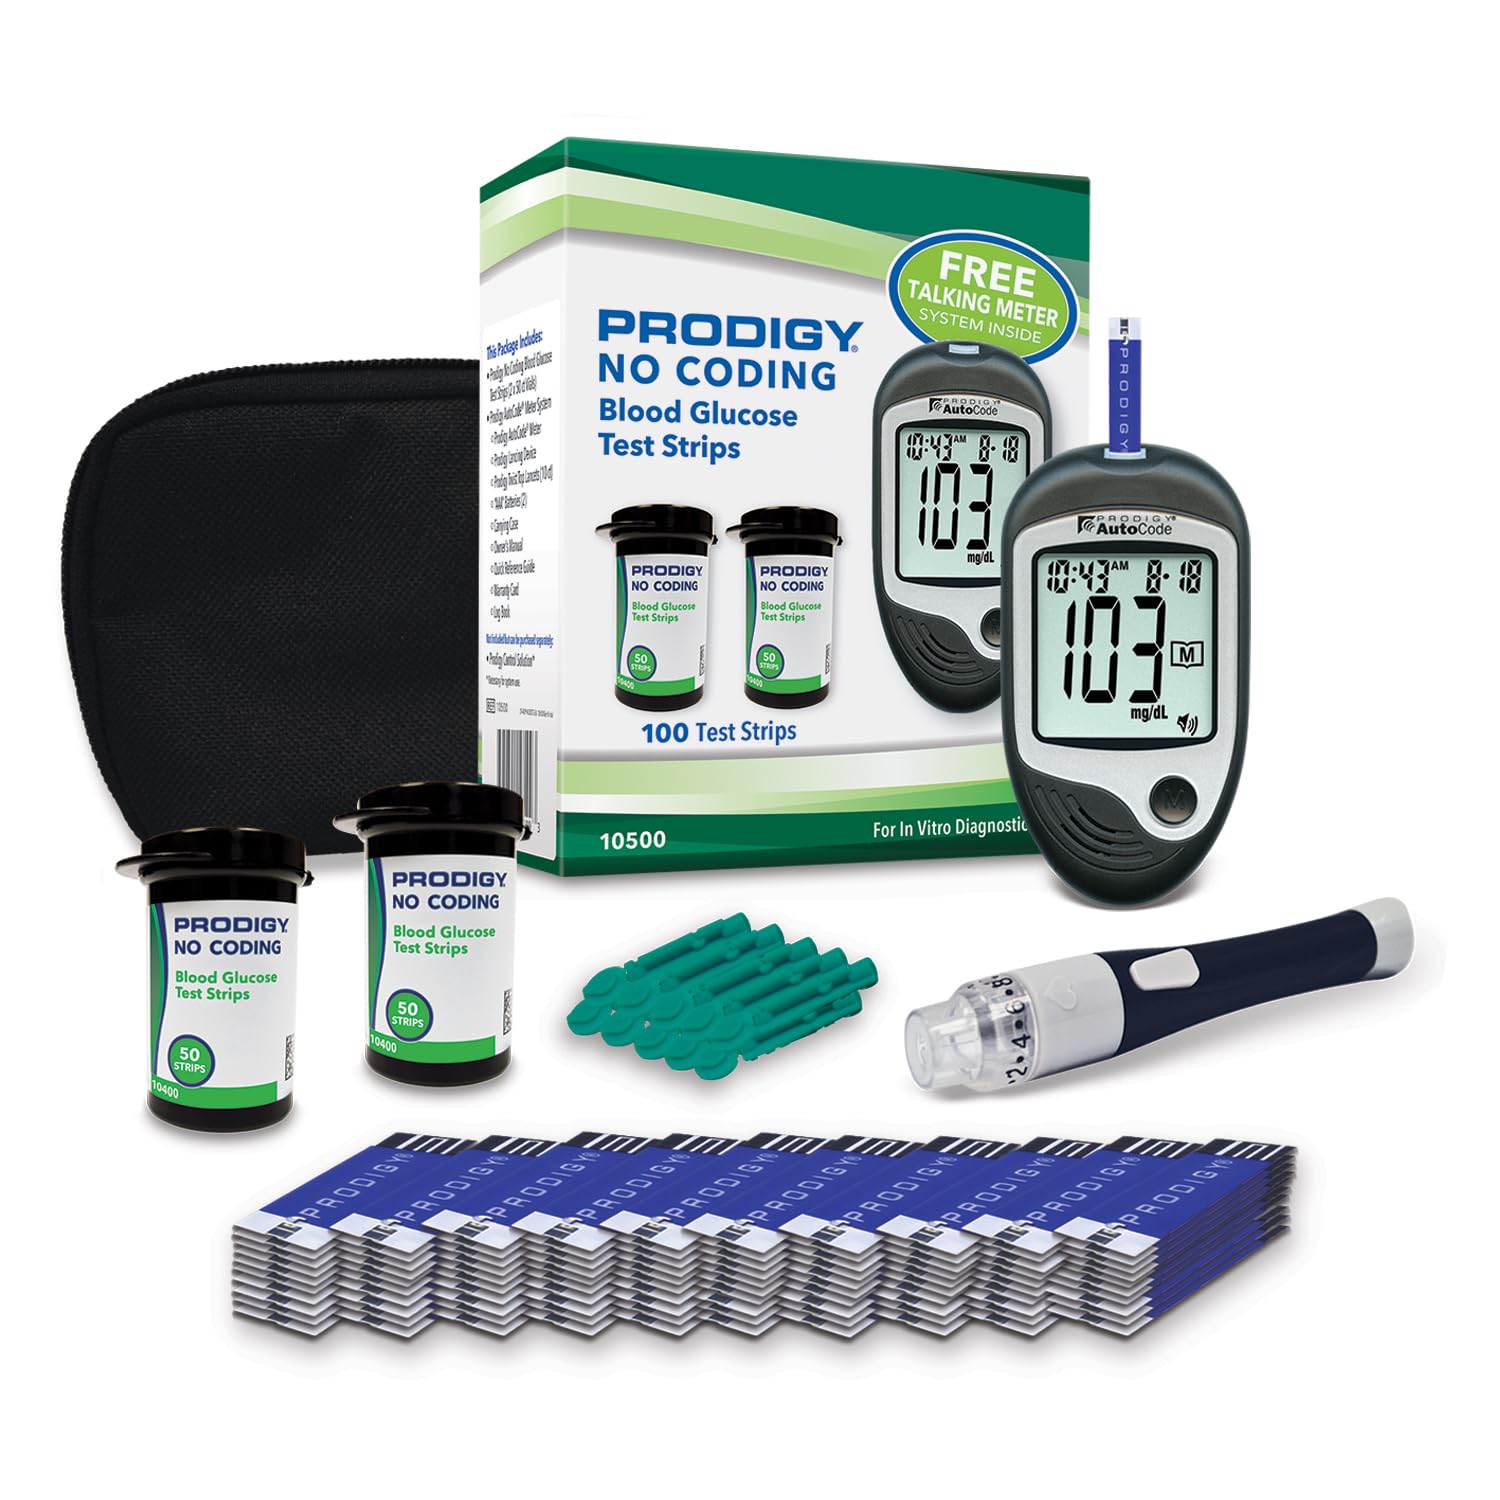
Image 1.1: Complete PRODIGY AutoCode Talking Blood Glucose Meter Starter Kit.

Image 1.2: Labeled components of the PRODIGY AutoCode Starter Kit, including the meter, test strips, lancing device, lancets, and carrying pouch.
2. Meter kenmerke
The PRODIGY AutoCode Talking Meter is designed for ease of use and accessibility. It features a large, easy-to-read screen and provides spoken results in four languages.
- Test Strip Port: Indentation makes it easy to locate for strip insertion.
- Tyd en Datum: Wys huidige tyd en datum.
- Toetsuitslag: Results are displayed in a large, easy-to-read size.
- Geheue-knoppie: One-button operation to access memory recall mode.
- Spreker: Provides clear voice prompts and results in English, Spanish, French, or Arabic. Adjustable volume is available.
- USB-poort: Standard USB cable compatible for uploading test results to a computer.
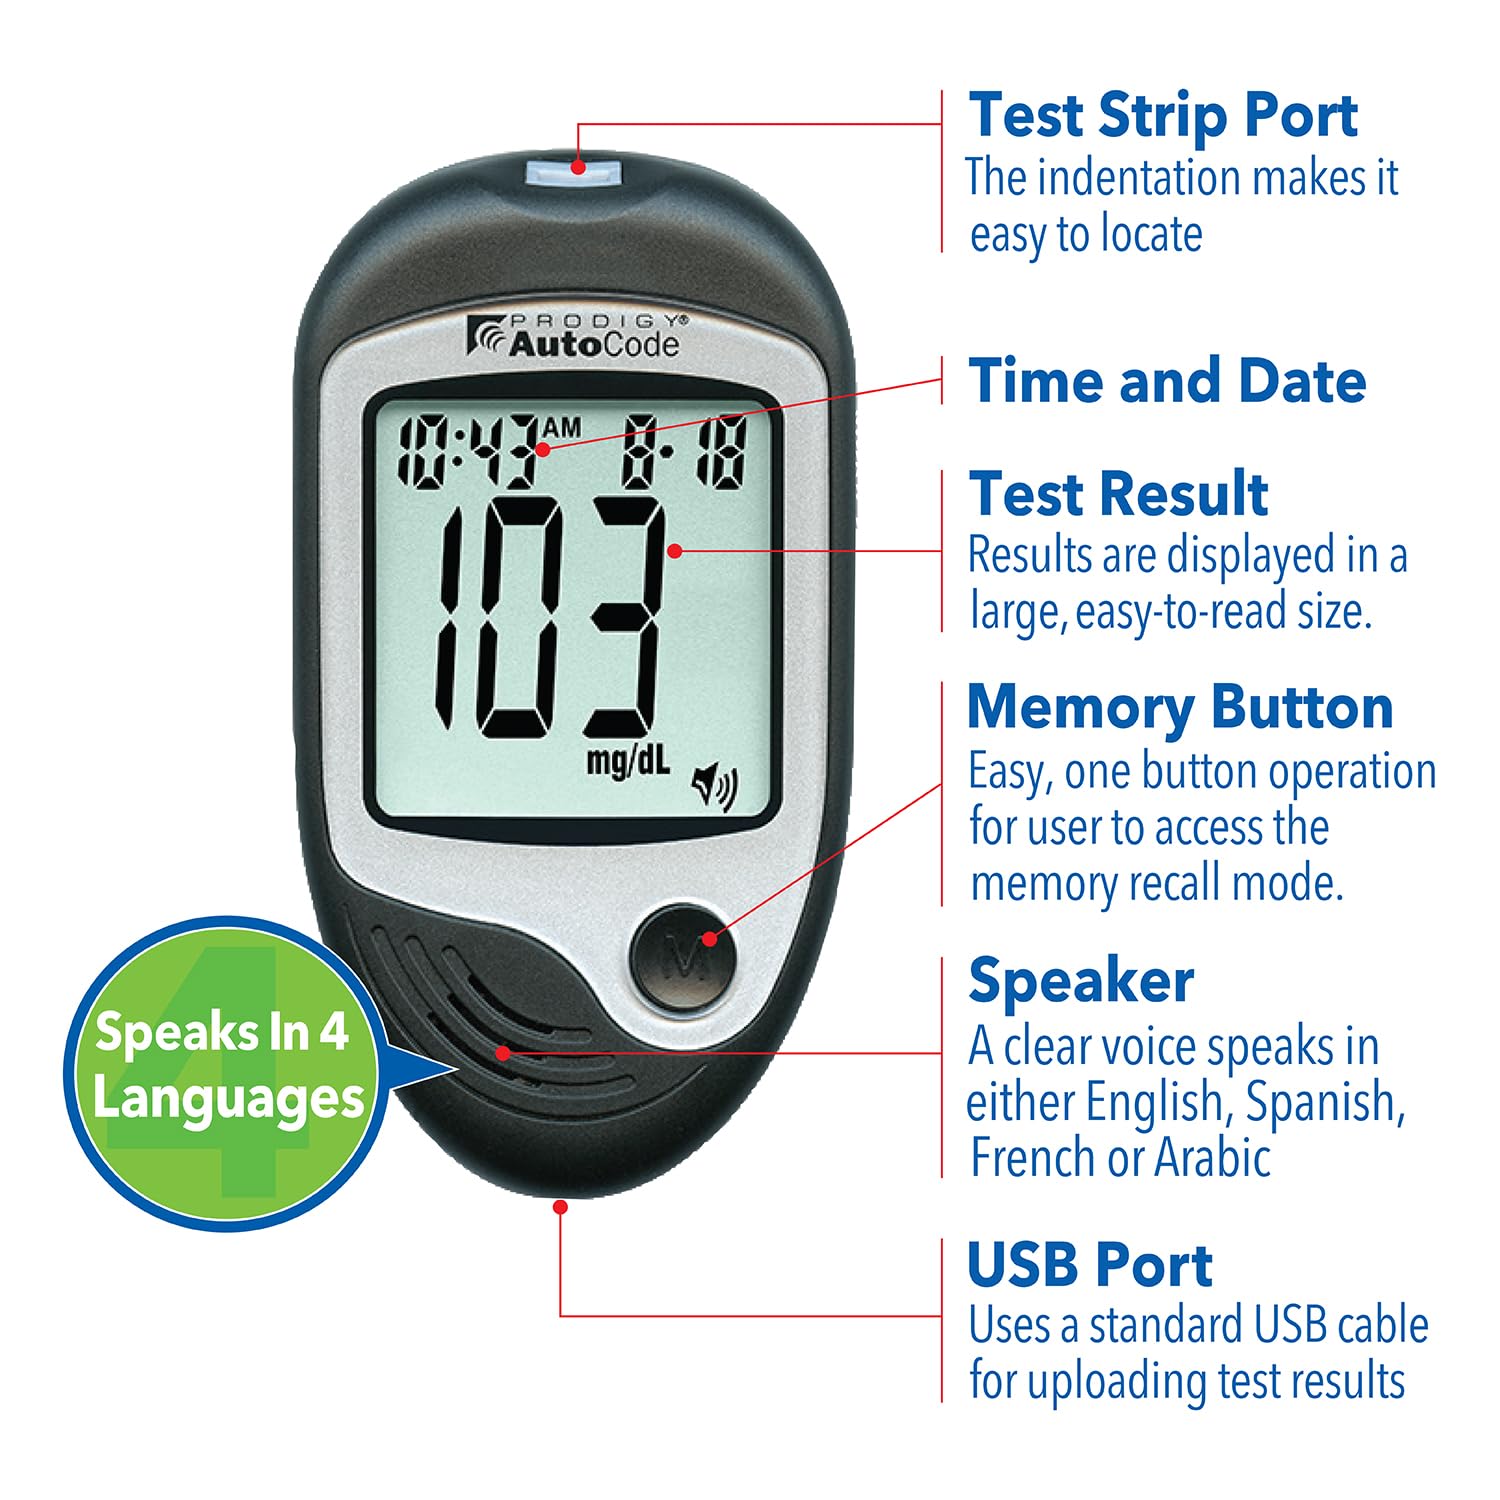
Beeld 2.1: Gedetailleerd view of the PRODIGY AutoCode Meter highlighting its key features and components.
3. Aanvanklike Opstelling
3.1 Battery installasie
The PRODIGY AutoCode meter operates on two AAA batteries. Ensure batteries are inserted correctly according to the polarity indicators in the battery compartment. No charging is required.
3.2 Setting Up the Lancing Device
- Verwyder die prikapparaatdop.
- Insert a new, sterile lancet into the lancet holder.
- Draai die beskermende dop van die lanset af.
- Vervang die lanseringsapparaat se doppie.
- Adjust the penetration depth by rotating the cap. Start with a shallower setting and adjust as needed for a sufficient blood sample.
- Pull back the cocking mechanism until it clicks, indicating it is ready for use.
3.3 Inserting a Test Strip
The meter automatically powers on when a test strip is inserted. No coding is required for PRODIGY No Coding Test Strips.
4. Operating Instructions: Performing a Blood Glucose Test
Follow these steps to perform a blood glucose test:
- Berei die meter voor: Insert a PRODIGY No Coding Test Strip into the test strip port of the meter. The meter will automatically turn on.
- Verkry bloed Sample: Gebruik die lanseertoestel om 'n klein bloed s te verkryample, typically from a fingertip.
- Dien Blood S toeample: Raak die punt van die toetsstrook aan die bloed sample. The blood will be automatically drawn into the test strip.
- Lees Resultate: The meter will display and speak your blood glucose result in just 7 seconds.

Image 4.1: Visual guide for the 3-step blood glucose testing process: 1. Insert test strip, 2. Apply blood sample, 3. View resultate.
4.1 Understanding Your Results
Results are displayed on the large screen and spoken aloud for convenience. Consult your healthcare professional to understand what your blood glucose readings mean for your individual health plan.
4.2 Taalinstellings
The meter can speak in English, Spanish, French, and Arabic. Refer to the Quick Reference Guide or the full Owner's Manual (available online) for instructions on how to change the language setting and adjust volume.
4.3 Geheue funksie
The meter stores previous test results. Press the memory button to recall past readings. This feature helps track blood glucose trends over time.
5. Test Strips and Compatibility
5.1 PRODIGY No Coding Test Strips
PRODIGY No Coding Test Strips require only a tiny blood sample and automatically draw the blood into the strip. The 3-lead strip technology ensures accuracy and helps minimize test strip waste. These strips are approved for alternate site testing (AST).

Image 5.1: PRODIGY No Coding Blood Glucose Test Strips packaging and individual strips.
5.2 Meter Compatibility
PRODIGY No Coding Test Strips are designed to work exclusively with PRODIGY AutoCode, PRODIGY Pocket, and PRODIGY Voice meters. Do not use these test strips with other brands of glucose meters.

Image 5.2: Illustration showing that one type of PRODIGY No Coding Test Strip is compatible with PRODIGY AutoCode, PRODIGY Pocket, and PRODIGY Voice meters.
6. Onderhoud en berging
6.1 Cleaning the Meter
Vee die buitekant van die meter af met 'n sagte, damp cloth. Do not immerse the meter in water or use harsh cleaning agents. Ensure the meter is dry before storage.
6.2 Storing Your Supplies
Store the meter, test strips, and lancets in the provided carrying case in a cool, dry place, away from direct sunlight and extreme temperatures. Keep test strip vials tightly closed after each use. Refer to the test strip packaging for specific storage conditions and expiration dates.
7. Probleemoplossing
7.1 Algemene Vrae
- Can I use PRODIGY No Coding Test Strips with another brand of glucose meter?
No, always use PRODIGY No Coding Test Strips with PRODIGY AutoCode, PRODIGY Pocket, and PRODIGY Voice meters. - Wat is AST?
Alternate Site Testing (AST) means you can use parts of the body other than your fingertips to check your blood glucose levels. The system allows you to test from the palm, forearm, upper arm, calf, or thigh, with equivalent results to fingertip testing. - Are Prodigy products FSA & HSA eligible?
Yes, Prodigy diabetes testing supplies are FSA & HSA eligible.
7.2 Error Messages and Inaccurate Readings
If you encounter an error message or suspect an inaccurate reading, refer to the full Owner's Manual for a comprehensive troubleshooting guide. Common causes include insufficient blood sample, expired test strips, or improper storage. Ensure your hands are clean and dry before testing.
8. Spesifikasies
| Kenmerk | Detail |
|---|---|
| Item Modelnommer | 10500 |
| Battery sel samestelling | Alkaline (2x AAA) |
| Spesiale kenmerke | Easy to Use, Instant Result, Quick Testing, Self Test, Talking Function (4 languages) |
| Result Time | 7 sekondes |
| Test Strip Type | PRODIGY No Coding Blood Glucose Test Strips |
| Vervaardiger | OK Bio-Technology Co., Ltd. |
| UPC | 384840105003 |
9. Waarborg en Ondersteuning
For any questions regarding your PRODIGY AutoCode Talking Blood Glucose Meter Starter Kit, please contact Prodigy Diabetes Care directly. The Owner's Manual and setup video are available online for quick, hassle-free setup and additional information.
To ensure product integrity and quality, it is recommended to purchase PRODIGY products from authorized sellers. Look for products sold by "Prodigy Diabetes Care" when purchasing online.

Image 9.1: Information on ensuring product integrity by purchasing from Prodigy Diabetes Care.