1. Inleiding
This manual provides comprehensive instructions for the installation, operation, and maintenance of your Vimar 02912.G Wi-Fi Thermostat. This device allows for local and remote control of your heating and air conditioning systems, ensuring optimal comfort and energy efficiency. Please read this manual thoroughly before installation and use to ensure safe and correct operation.
2. Veiligheidsinligting
WAARSKUWING: Electrical installation should only be performed by qualified personnel. Disconnect power at the main circuit breaker before installing or servicing the thermostat to prevent electrical shock and equipment damage.
- Ensure the power supply is disconnected before any wiring work.
- Volg alle plaaslike elektriese kodes en regulasies.
- Do not expose the thermostat to water or extreme humidity.
- Moenie probeer om die toestel self te herstel of te wysig nie. Kontak gekwalifiseerde dienspersoneel.
3. Pakketinhoud
Verifieer dat jou pakket die volgende items bevat:
- Vimar 02912.G Wi-Fi Thermostat
- Monteer skroewe en muurankers
- Instructiehandleiding (hierdie dokument)
4. Produk verbyview
The Vimar 02912.G is a sophisticated Wi-Fi thermostat designed for precise control of your home's climate. It features an intuitive interface and smart connectivity for enhanced user experience.
Sleutel kenmerke:
- Intuitive and minimal user interface with a modern design, featuring a visible animated LED matrix display and side status visualizations.
- Front rocker adjustment for tactile mechanical feedback.
- Configuration and control via the Vimar View App, including an energy section for monitoring thermostat operating time.
- Supports multi-zone or multi-dwelling management.
- Customizable input for alarm signaling via Push notifications.
- Integrates with Amazon Alexa, Google Assistant, and IFTTT protocols.

Figure 4.1: A clear front view of the Vimar 02912.G Wi-Fi Thermostat, showcasing its sleek black design and illuminated digital temperature display. Up and down arrows are visible for manual temperature adjustment.

Figure 4.2: An angled front view of the Vimar 02912.G Wi-Fi Thermostat, highlighting its minimalist design and the clear digital temperature reading.
5. Opstelling
5.1 Installasie
The Vimar 02912.G thermostat is designed for wall-mounted installation. Ensure the installation location is away from direct sunlight, drafts, or heat sources that could affect temperature readings. The device requires a 100-240 V~ 50/60 Hz power supply.
- Ontkoppel krag: Before starting, turn off power to your HVAC system at the main circuit breaker.
- Monteerplaat: Secure the thermostat's mounting plate to the wall using the provided screws and anchors. Ensure it is level.
- Bedrading: Connect the electrical wires to the appropriate terminals on the thermostat. The device has 1 digital input and 1 relay output 5(2) A 240 V~. Refer to the wiring diagram for specific connections.
- Heg termostaat aan: Once wired, carefully attach the thermostat unit to the mounting plate.
- Herstel krag: Skakel die krag weer aan by die stroombreker.

Figuur 5.1: 'n Ontplofte view diagram detailing the wall-mounting process and wiring connections for the Vimar 02912.G Wi-Fi Thermostat, providing visual guidance for installation.

Figure 5.2: A diagram illustrating the process of mounting the Vimar Wi-Fi Thermostat onto a wall, including screw placement and cable routing.

Figure 5.3: A diagram demonstrating how to install the Vimar Wi-Fi Thermostat into a standard electrical wall box, securing it with screws.

Figure 5.4: A diagram illustrating the installation of the Vimar Wi-Fi Thermostat into a round electrical wall box, showing the mounting plate and screw positions.
5.2 Toepassingsverbinding
To unlock the full potential of your Vimar 02912.G thermostat, connect it to the Vimar View Toep.
- Laai die app af: Download the "Vimar View" app from your smartphone's app store (iOS or Android).
- Skep rekening: Maak die toepassing oop en volg die instruksies op die skerm om 'n rekening te skep of aan te meld.
- Voeg toestel by: Select the option to add a new device. The thermostat uses standard Bluetooth wireless technology for initial configuration.
- Koppel aan Wi-Fi: Follow the app's prompts to connect your thermostat to your home Wi-Fi network. This enables remote control and smart features.
6. Bedryfsinstruksies
6.1 Basiese werking
The thermostat features an intuitive LED matrix display and front rocker controls for direct temperature adjustments.
- Temperatuuraanpassing: Use the up and down arrows on the front of the thermostat to manually increase or decrease the set temperature. The LED display will show the current setpoint.
- Moduskeuse: The thermostat supports ON/OFF and PID modes for heating and air conditioning. Mode selection is typically managed via the Vimar View Toep.
6.2 Vimar View Toepassingsgebruik
Die Vimar View App provides advanced control and monitoring capabilities for your thermostat.
- Afstandbeheer: Adjust temperature settings, change operating modes, and schedule programs from anywhere using your smartphone.
- Skeduleer: Create custom heating and cooling schedules to match your daily routine and save energy.
- Energiemonitering: The app's energy section provides insights into your thermostat's operating time, helping you understand and optimize energy consumption.
- Multi-Zone/Multi-Dwelling Management: Control multiple Vimar thermostats in different rooms or even different properties from a single app interface.
- Alarmkennisgewings: Configure customizable inputs for alarm signaling, receiving push notifications for important events.
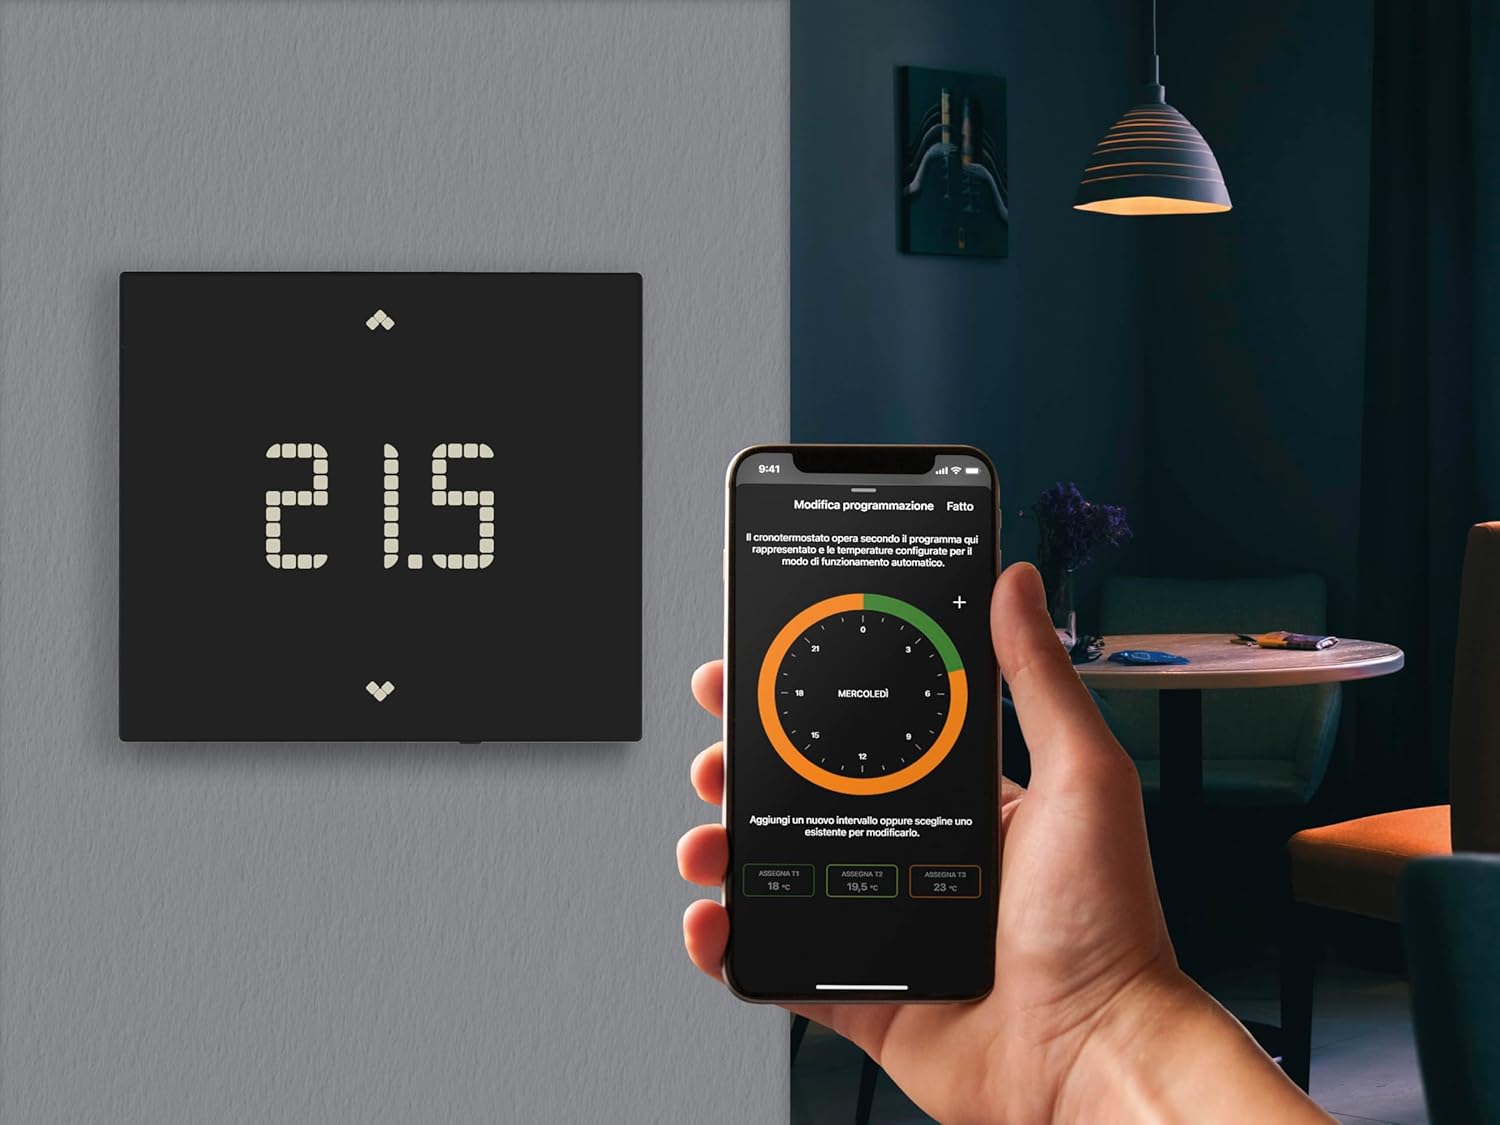
Figure 6.1: The Vimar 02912.G Wi-Fi Thermostat displayed alongside a user interacting with the Vimar View mobile application on a smartphone, illustrating remote control capabilities.

Figure 6.2: A smartphone screen displaying the Vimar View application, which allows users to manage and schedule climate settings remotely.
6.3 Stemassistent-integrasie
The Vimar 02912.G thermostat can be integrated with popular voice assistants for convenient hands-free control.
- Amazon Alexa: Link your Vimar View account to Alexa through the Alexa app to control your thermostat with voice commands (e.g., "Alexa, set the thermostat to 22 degrees").
- Google Assistent: Connect your Vimar View account to Google Assistant via the Google Home app for voice control (e.g., "Hey Google, turn up the heat").
- IFTTT: Utilize IFTTT (If This Then That) to create custom automations and integrate your thermostat with other smart devices and services.

Figuur 6.3: 'n Beeldvertoningasing the Vimar View App's compatibility with popular voice assistants like Amazon Alexa and Google Assistant, as well as IFTTT for enhanced smart home integration.
7. Onderhoud
The Vimar 02912.G Wi-Fi Thermostat requires minimal maintenance.
- Skoonmaak: Gently wipe the thermostat's surface with a soft, dry cloth. Do not use abrasive cleaners, solvents, or chemical sprays, as these can damage the finish and internal components.
- Sagteware-opdaterings: Ensure your Vimar View App is always updated to the latest version to receive new features and performance improvements for your thermostat.
8. Probleemoplossing
If you encounter issues with your Vimar 02912.G thermostat, refer to the following common problems and solutions:
| Probleem | Moontlike oorsaak | Oplossing |
|---|---|---|
| Termostaatskerm is leeg. | Geen kragtoevoer. | Check the circuit breaker for your HVAC system. Ensure wiring is correct. |
| Cannot connect to Wi-Fi or App. | Incorrect Wi-Fi password, weak signal, or Bluetooth pairing issue. | Verify Wi-Fi password. Move router closer or use a Wi-Fi extender. Ensure Bluetooth is enabled on your phone during initial setup. Restart thermostat and phone. |
| Heating/Cooling not responding. | Incorrect mode selected, wiring issue, or HVAC system problem. | Check the thermostat mode (heating/cooling). Verify wiring connections. Consult an HVAC professional if the system itself is not functioning. |
| Onakkurate temperatuurlesing. | Thermostat exposed to drafts, direct sunlight, or heat sources. | Ensure the thermostat is installed in an optimal location, away from external influences. |
If the problem persists after attempting these solutions, please contact Vimar customer support.
9. Spesifikasies
| Kenmerk | Detail |
|---|---|
| Handelsmerk | VIMAR |
| Modelnommer | 02912.G |
| Kleur | Swart |
| Produkafmetings (L x B x H) | 2.11 x 11.8 x 10.6 cm |
| Gewig | 235 gram |
| Voltage | 100-240 V~ (AC) |
| Frekwensie | 50/60 Hz |
| Verbindingstegnologie | Wi-Fi, Bluetooth |
| Tipe temperatuurbeheer | Smart / Remote |
| Tipe beheerder | Button or Manual Control |
| Spesiale kenmerke | Remote control via app, integration with Alexa and Google voice assistants, customizable input for alarm signaling via Push notification. |
| Temperature Control Class (ON/OFF) | Class I (1% contribution) |
| Temperature Control Class (PID) | Class IV (2% contribution) |
| Uitset | 1 relay output 5(2) A 240 V~ |
| Invoer | 1 digitale insette |
| Agterlig | Wit LED |
| Installasie tipe | Oppervlak gemonteer |
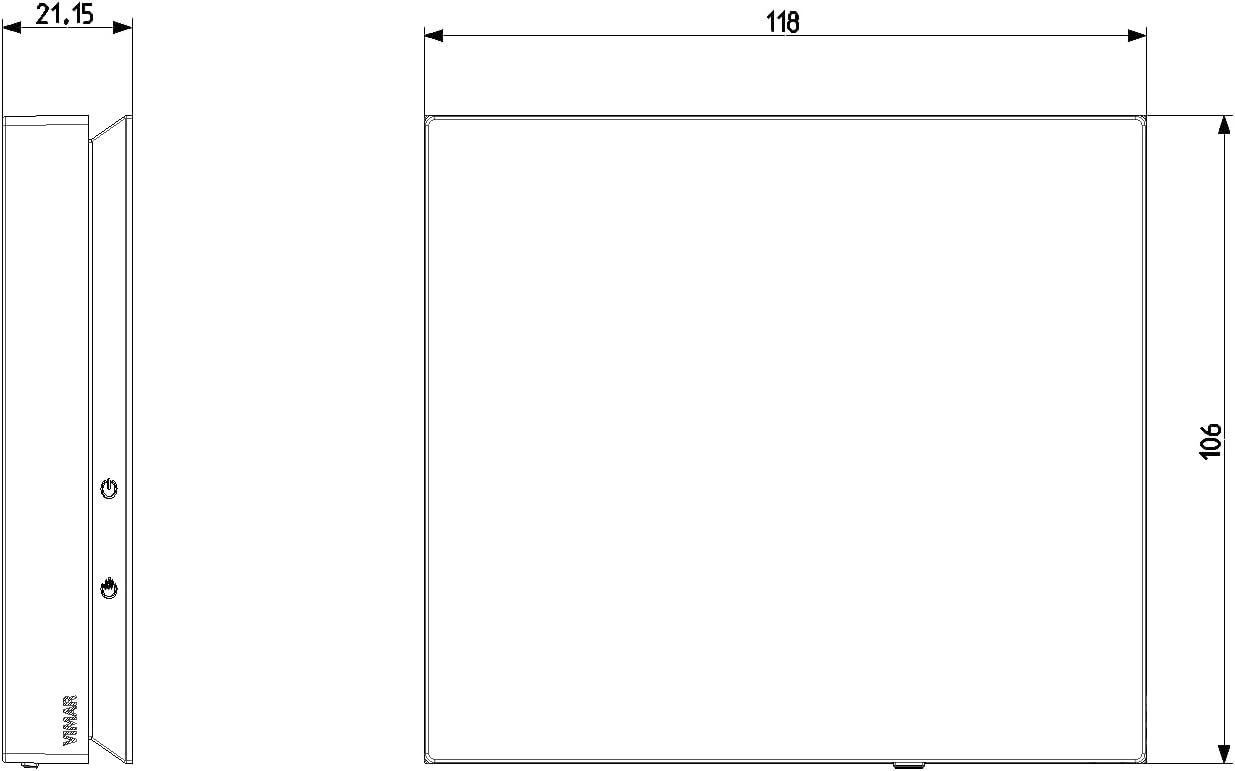
Figure 9.1: Technical drawing illustrating the side and front dimensions of the Vimar 02912.G Wi-Fi Thermostat, crucial for installation planning.
10. Waarborg en Ondersteuning
For warranty information and technical support, please refer to the official Vimar website or contact their customer service directly. Information regarding spare parts availability is currently unavailable.
You can find additional information and support resources by visiting the Vimar webwebwerf:

Figure 10.1: An image displaying various international product certifications for Vimar devices, along with a QR code linking to Vimar's official support and information page.