1. Inleiding
This manual provides detailed instructions for the safe and effective operation of your GOYOJO Digital Tesla Meter, model GT129A. This high-precision handheld device is designed for accurate measurement of magnetic field strength and automatic detection of magnetic pole polarity (N/S poles). It features a wide measurement range, multiple measurement modes, automatic range switching, unit conversion, a backlight display, and an automatic power-off function for extended battery life. Please read this manual thoroughly before use and keep it for future reference.
2. Pakketinhoud
Verifieer dat al die items wat hieronder gelys word in u pakket ingesluit is. Indien enige items ontbreek of beskadig is, kontak asseblief kliëntediens.
- Hoofeenheid x1
- Magnetic probe x1
- Storage case x1
- Skroewedraaier x1
- 9V battery x1
- Instruction manual (Japanese compatible) x1

Figuur 2.1: Inhoud van die produkpakket.
3. Onderdele Beskrywing
Familiarize yourself with the different parts of the Tesla Meter:

Figuur 3.1: oorview of the Tesla Meter's components.
- Battery kompartement: Located at the top rear of the device.
- Hall Probe Connection Port: Connects the external Hall probe to the main unit.
- LCD-skerm: Shows measurement values, units, battery status, and mode indicators.
- Hall sensor: The tip of the probe used to detect magnetic fields.
- PEAK-knoppie: Toggles between Peak mode and Real-time mode.
- NUL-knoppie: Performs one-touch zero setting.
- AAN/UIT-knoppie: Skakel die toestel aan of af.
- LIG knoppie: Skakel die skerm se agtergrond aan of af.
- EENHEID-knoppie: Wissel tussen mT (millitesla) en Gs (Gauss) eenhede.
4. Opstelling
4.1 Battery installasie
The device requires one 9V battery (included). To install the battery:
- Vind die batteryklepdeksel aan die agterkant van die toestel.
- Gebruik die meegeleverde skroewedraaier om die batterykompartement oop te maak.
- Plaas die 9V-battery in en maak seker dat die polariteit korrek is.
- Maak die batterykompartement se deksel toe en maak dit met die skroef vas.
Video 4.1: This video demonstrates the battery installation process for a similar Tesla meter. Note that due to transportation policies, batteries may not be pre-installed in the package.
4.2 Sondeverbinding
Connect the Hall probe to the main unit before operation.
- Align the connector of the Hall probe with the Hall Probe Connection Port on the main unit.
- Gently push and twist the connector to secure the probe.

Figure 4.2: Connecting the high-precision radial Hall probe.
5. Bedryfsinstruksies
5.1 Krag AAN/AF
Druk en hou die AAN/AF button to turn the device on or off. The device features an automatic power-off function after 5 minutes of inactivity to conserve battery life.
5.2 Agtergrondbeligtingsfunksie
Druk die LIG button to toggle the display backlight on or off. This improves readability in low-light conditions.

Figure 5.1: Backlight function for enhanced visibility.
5.3 Measurement Modes (Peak/Real-time)
Die toestel bied twee meetmodusse:
- Piekmodus: Captures and displays the maximum magnetic field strength detected. Press the PUIK button once to enter this mode.
- Regstreekse modus: Monitors and displays instantaneous changes in magnetic field strength. Press the PUIK button again to switch to this mode.
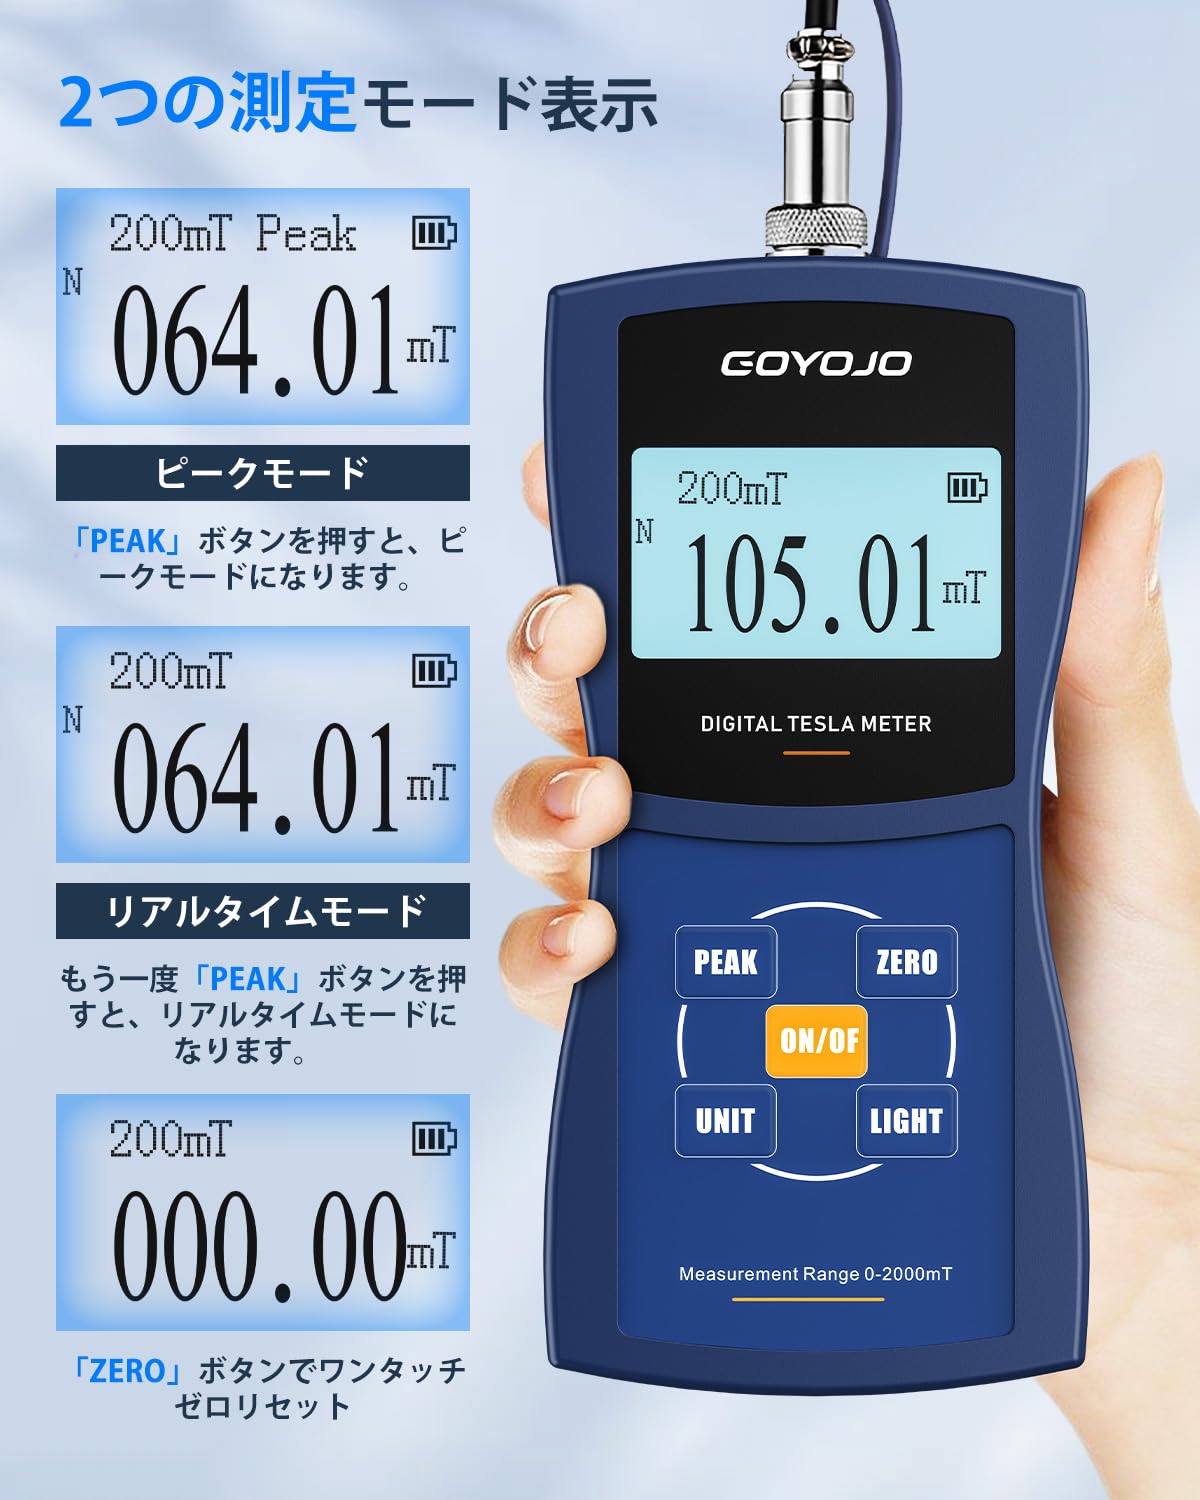
Figure 5.2: Switching between Peak and Real-time measurement modes.
5.4 One-Touch Zero Setting
To ensure accurate measurements, perform a zero setting before use. Simply press the NUL button to reset the display to 000.00.
5.5 Unit Switching (mT/Gs)
Druk die EENHEID button to easily switch between millitesla (mT) and Gauss (Gs) units. (1 mT = 10 Gs).
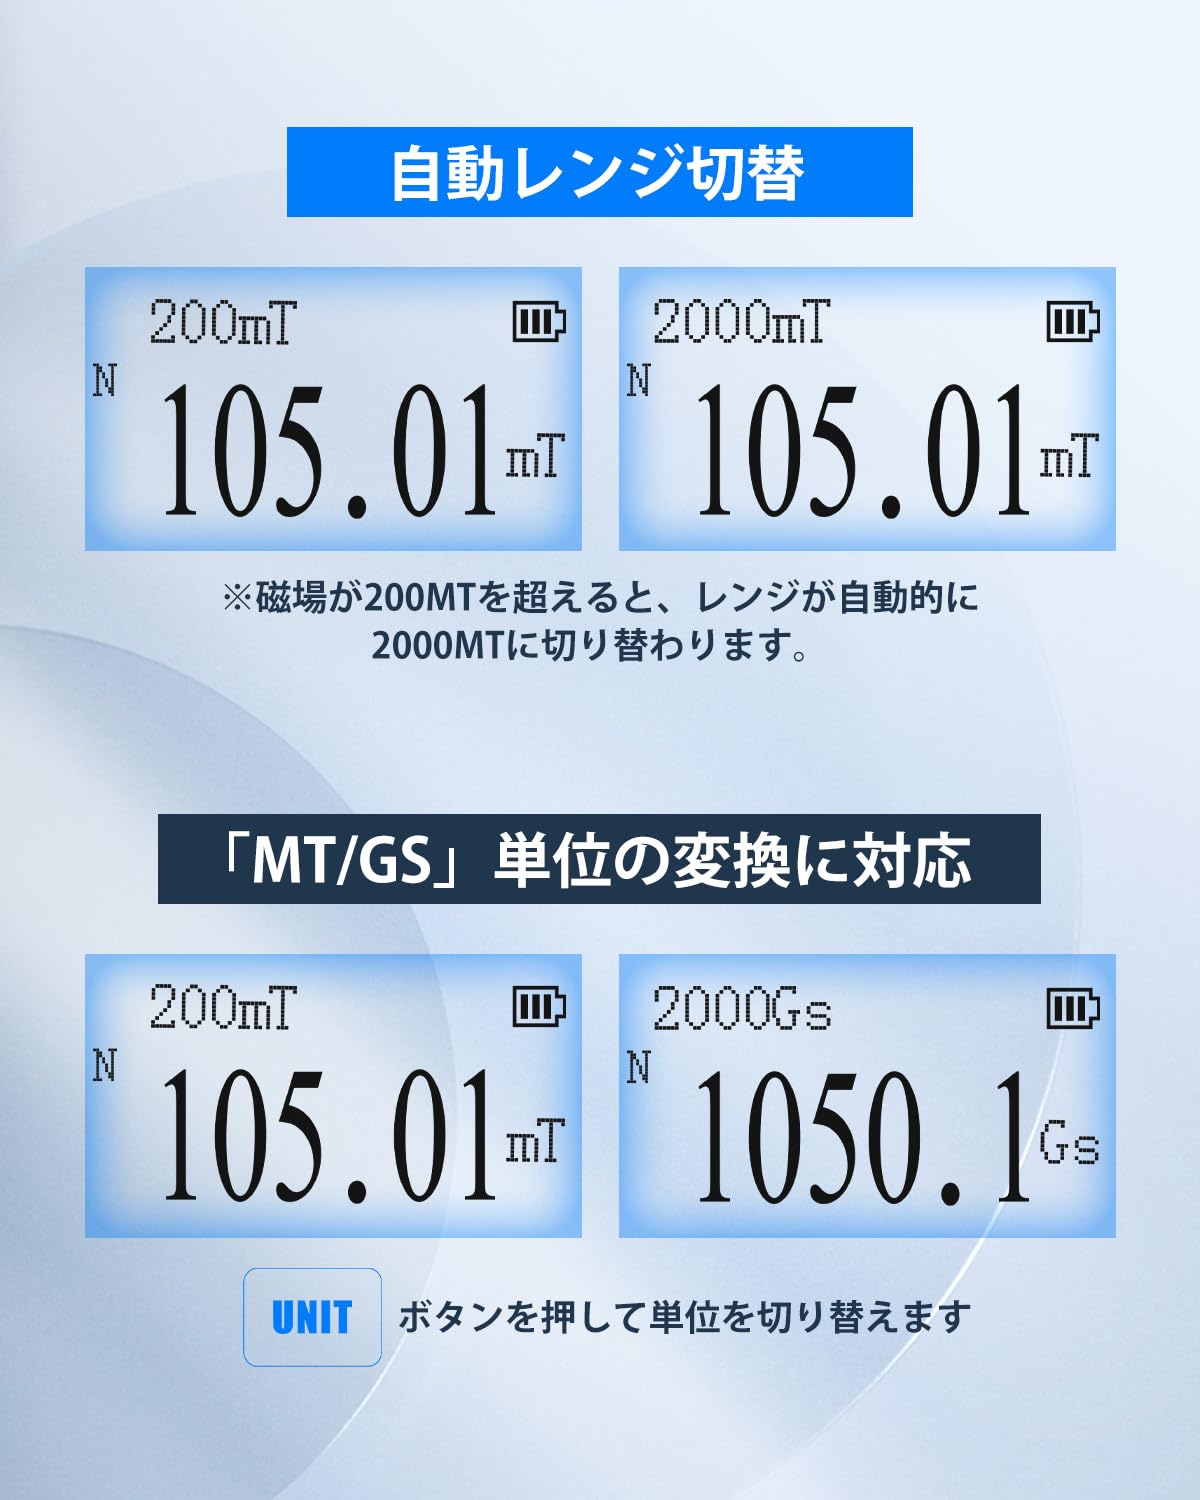
Figure 5.3: Automatic range switching and unit conversion.
5.6 Automatic Range Switching
The device automatically switches its measurement range. If the magnetic field strength exceeds 200mT, the meter will automatically switch to the 2000mT range to provide accurate readings and prevent overflow errors.
5.7 Automatic N-pole/S-pole Detection
The Tesla Meter can automatically detect and display the polarity of the magnetic field. When the magnetic field passes through the front of the Hall sensor, 'N' (North pole) is displayed. When it passes through the back of the sensor, 'S' (South pole) is displayed.

Figure 5.4: Automatic N-pole/S-pole detection.
5.8 Uitvoering van 'n meting
Om 'n meting uit te voer:
- Ensure the Hall probe is securely connected and the device is powered on.
- Perform a one-touch zero setting by pressing the NUL knoppie.
- Place the Hall sensor (tip of the probe) into the magnetic field you wish to measure.
- Wait for the displayed value to stabilize.
- Read the measurement value from the LCD display. The unit and polarity (N/S) will also be shown.
- You can switch between Peak and Real-time modes using the PUIK button as needed.
- You can switch between mT and Gs units using the EENHEID knoppie.

Figure 5.5: Performing a magnetic field measurement.
Video 5.2: This video demonstrates the operation of a digital Tesla meter, including measurement and unit switching. Note that this video is for a similar product, but the core functionality is comparable.
6. Aansoeke
The GOYOJO Digital Tesla Meter is a versatile tool suitable for various applications, including:
- Measuring working magnetic fields in production and engineering.
- Analyzing surface magnetism and residual magnetism in laboratories.
- Testing guitar pickups, permanent magnets, and speakers.
- Inspecting magnetic separators, iron removers, and DC motors.

Figure 6.1: Diverse applications of the Tesla Meter.
7. Spesifikasies
| Kenmerk | GT129A | GT129B | GT129C |
|---|---|---|---|
| Akkuraatheid | ±1.0% | ±2.0% | ±2.0% (0-1000mT), ±5.0% (1000-2000mT) |
| Meetreeks | 0-2000mT (20000G) | ||
| Resolusie | 200mT resolusie: 0.01mT (0.1G) | 200mT resolusie: 0.01mT (0.1G) | 200mT resolusie: 0.1mT (1G) |
| Reeks | 200mT (2000G) / 2000mT (20000G) | ||
| Auto Range Switching | For measurements below 200mT, 200mT is displayed. For measurements above 200mT, it automatically switches to 2000mT. | ||
| Meetsensor | High-precision Hall sensor, cable length approx. 1m | ||
| Eenheid | 2 types (mT and Gs) switchable, 1mT = 10Gs | ||
| Agterlig | Ingesluit | ||
| Peak Hold | Can hold maximum value in Peak mode | ||
| Outo af | 5 minute | ||
| Kragtoevoer | 9V battery x1 | ||
| Bedryfsomgewing | 0°C ~ 50°C, 20% ~ 85% RH, non-condensing | ||
| Berging omgewing | -20°C ~ 70°C, <85% RH, non-condensing | ||
| Grootte | 160 mm × 75 mm × 34 mm | ||
| Gewig | Ongeveer. 260g | ||
8. Onderhoud
To ensure the longevity and accuracy of your Tesla Meter, follow these maintenance guidelines:
- Skoonmaak: Gebruik 'n sagte, droë lap om die toestel skoon te maak. Moenie skuurmiddels of oplosmiddels gebruik nie.
- Berging: When not in use, store the device in its provided storage case in a cool, dry place, away from direct sunlight and extreme temperatures.
- Battery: Verwyder die battery as die toestel nie vir 'n lang tydperk gebruik gaan word om lekkasie te voorkom.
- Sondeversorging: Handle the Hall probe with care. Avoid bending or subjecting it to excessive force, as this can damage the sensitive sensor.
9. Probleemoplossing
If you encounter issues with your Tesla Meter, refer to the following common problems and solutions:
- Toestel skakel nie aan nie:
- Kontroleer of die 9V-battery korrek geïnstalleer is en voldoende lading het. Vervang indien nodig.
- Ensure the ON/OFF button is pressed and held for a few seconds.
- Onakkurate lesings:
- Perform a one-touch zero setting by pressing the ZERO button in an area free of magnetic fields.
- Ensure the Hall sensor is positioned correctly relative to the magnetic field (perpendicular for optimal reading).
- Check for any physical damage to the Hall probe.
- Skerm is dof of onleesbaar:
- Press the LIGHT button to activate the backlight.
- Check battery level; a low battery can affect display brightness.
- Geen N/S-poolopsporing:
- Ensure the magnetic field is strong enough for detection.
- Verify the Hall sensor is passing through the magnetic field in the correct orientation.
Indien die probleem voortduur nadat u hierdie stappe probeer het, kontak asseblief kliëntediens vir verdere hulp.
10. Waarborg en Ondersteuning
1-jaar vervaardigerwaarborg: If a defect occurs in a Gauss meter purchased from our store, we will resend the product or parts free of charge within one year from the order date.
How to Contact Manufacturer: Please contact us from 'Order History' -> 'Seller' -> 'Ask a Question' within your Amazon account service. We provide support 365 days a year and will respond within 10 hours.