1. Inleiding
This manual provides essential information for the safe and efficient operation of your Pretul DESI-36P2 3.6V Cordless Screwdriver. Please read it thoroughly before first use and keep it for future reference. This compact cordless screwdriver is designed for light-duty fastening tasks, featuring a two-position handle and an integrated LED work light.

Figuur 1: Pretul DESI-36P2 Cordless Screwdriver. This image shows the screwdriver in its straight configuration, highlighting its compact design and yellow and black color scheme.
2. Veiligheidsinligting
Neem altyd basiese veiligheidsmaatreëls in ag wanneer u elektriese gereedskap gebruik om die risiko van brand, elektriese skok en persoonlike besering te verminder.
- Werksarea veiligheid: Hou jou werkarea skoon en goed belig. Deurmekaar of donker areas nooi ongelukke uit.
- Elektriese veiligheid: Moenie elektriese gereedskap aan reën of nat toestande blootstel nie. Water wat 'n elektriese gereedskap binnedring, sal die risiko van elektriese skok verhoog.
- Persoonlike veiligheid: Bly wakker, kyk wat jy doen en gebruik gesonde verstand wanneer jy 'n elektriese gereedskap gebruik. Moenie 'n elektriese gereedskap gebruik terwyl jy moeg of onder die invloed van dwelms, alkohol of medikasie is nie.
- Gereedskap gebruik en versorging: Moenie die elektriese gereedskap forseer nie. Gebruik die regte kraggereedskap vir jou toepassing. Dit sal die werk beter en veiliger doen teen die tempo waarvoor dit ontwerp is.
- Batterysorg: Herlaai slegs met die laaier wat deur die vervaardiger gespesifiseer word. 'n Herlaaier wat geskik is vir een tipe batterypak kan 'n brandrisiko skep wanneer dit saam met 'n ander batterypak gebruik word.
3. Produkkomponente en -kenmerke
Familiarize yourself with the parts of your Pretul DESI-36P2 cordless screwdriver.
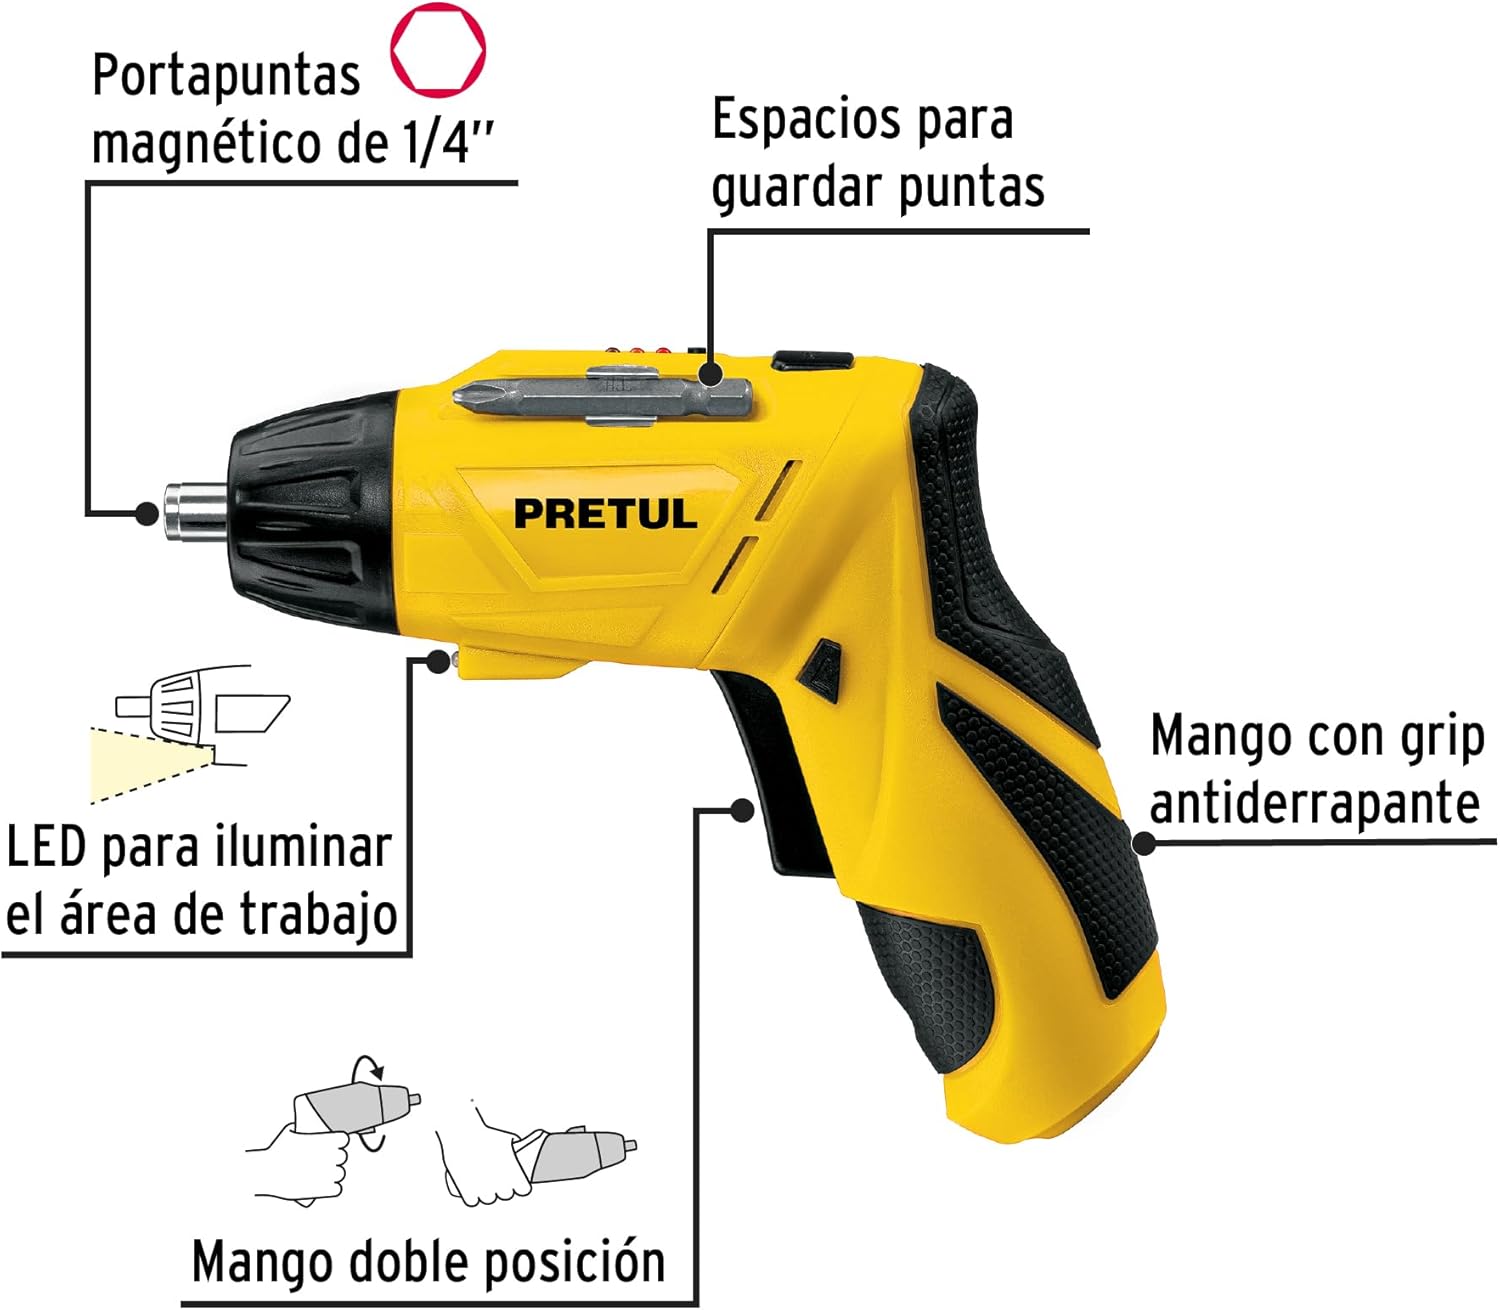
Figuur 2: Key features of the Pretul DESI-36P2. This diagram illustrates the magnetic 1/4" bit holder, bit storage slots, anti-slip grip handle, LED work light, and the two-position handle mechanism.
- Magnetiese 1/4" Seskantboorhouer: Securely holds screwdriver bits for quick changes.
- Bit Storage Slots: Conveniently located on the tool for storing extra bits.
- Anti-slip Grip Handle: Provides comfortable and secure handling during operation.
- LED werkslig: Verlig die werkarea vir verbeterde sigbaarheid in dof verligte ruimtes.
- Two-Position Handle: Allows the screwdriver to be used in a straight or pistol-grip configuration for versatility and access in tight spaces.
- Vorentoe/Agtertoe skakelaar: Controls the direction of rotation for tightening and loosening screws.
- Kragknoppie: Activates the screwdriver.
4. Opstelling
4.1 Aanvanklike laai
Before first use, fully charge the screwdriver's internal battery. Connect the charger to a standard electrical outlet and then to the charging port on the screwdriver. The charging indicator (if present) will show the charging status. Disconnect the charger once the battery is fully charged.
4.2 Attaching Screwdriver Bits
- Select the appropriate 1/4" hex screwdriver bit for your task.
- Insert the bit firmly into the magnetic bit holder at the front of the screwdriver until it is securely seated.
- To remove a bit, simply pull it out from the holder.
4.3 Aanpassing van die handvatselposisie
The screwdriver features a two-position handle for enhanced versatility:
- Pistoolgreep: Standard configuration for most tasks.
- Reguit greep: For reaching into confined spaces. To change the handle position, firmly grasp the handle and the body of the screwdriver, then pivot the handle until it locks into the desired position.
5. Bedryfsinstruksies
5.1 Aan-/afskakel
Press and hold the power button to activate the screwdriver. Release the button to stop operation. The LED work light will activate when the power button is pressed.
5.2 Kies van rotasierigting
Use the forward/reverse switch, typically located near the trigger, to select the desired rotation direction:
- Push the switch to the left for forward rotation (tightening screws).
- Push the switch to the right for reverse rotation (loosening screws).
- Ensure the switch is in the center position to lock the tool and prevent accidental activation.
5.3 Bevestigingsskroewe
- Ensure the correct bit is installed and the rotation direction is set to forward.
- Place the bit onto the screw head, applying gentle pressure.
- Press the power button to start driving the screw. Release the button once the screw is fully seated or the desired torque is reached.
5.4 Maak skroewe los
- Ensure the correct bit is installed and the rotation direction is set to reverse.
- Place the bit onto the screw head, applying gentle pressure.
- Press the power button to start loosening the screw. Release the button once the screw is free.
6. Onderhoud
Gereelde onderhoud verseker optimale werkverrigting en verleng die lewensduur van jou gereedskap.
- Skoonmaak: Hou die gereedskap se ventilasie-openinge skoon en vry van puin. Gebruik 'n sagte, damp lap om die buitekant skoon te maak. Moenie harde chemikalieë of skuurmiddels gebruik nie.
- Bitshouer: Periodically inspect the bit holder for wear or damage. Clean any accumulated dust or metal shavings.
- Battery berging: Store the screwdriver in a cool, dry place away from direct sunlight and extreme temperatures. For long-term storage, ensure the battery is partially charged (around 50%).
- Inspeksie: Regularly check for loose screws, damaged cords (if applicable), or any other conditions that may affect safe operation.
7. Probleemoplossing
As jy probleme met jou skroewedraaier ondervind, raadpleeg die volgende algemene probleme en oplossings:
| Probleem | Moontlike oorsaak | Oplossing |
|---|---|---|
| Skroewedraaier skakel nie aan nie. | Battery is ontlaai. | Laai die battery vol. |
| Screwdriver lacks power. | Battery is laag. | Herlaai die battery. |
| Die punt gly van die skroefkop af. | Verkeerde boorpuntgrootte of verslete boorpunt. | Use the correct bit size; replace worn bits. |
| Handle does not lock into position. | Not fully pivoted. | Ensure the handle is fully pivoted until it clicks into place. |
Indien die probleem voortduur nadat u hierdie oplossings probeer het, kontak kliëntediens.
8. Spesifikasies
Technical specifications for the Pretul DESI-36P2 Cordless Screwdriver.

Figuur 3: Dimensions of the Pretul DESI-36P2. This image shows the screwdriver with measurements indicating a length of 17.5 cm and a height of 13 cm.
| Kenmerk | Spesifikasie |
|---|---|
| Modelnommer | DESI-36P2 (26402) |
| Handelsmerk | Pretul |
| Kragbron | Battery |
| Battery Voltage | 3.6 Volt |
| Spoed | 230 RPM |
| Wringkrag | 3E+1 Pound-inches (approximately 30 in-lbs) |
| Bithouer | 1/4" Hex Magnetic |
| Materiaal | Plastiek, metaal |
| Dimensies (L x H) | 17.5 cm x 13 cm (approximate, based on image) |
| Gewig | 530 0.53 g (XNUMX kg) |
| Ingesluit komponente | 5 Phillips bits 1" (PH1, PH2, PH3), Charger, 2 Phillips bits 2" (PH1, PH2), 1/4" Magnetic extension |
9. Waarborg en Ondersteuning
The Pretul DESI-36P2 Cordless Screwdriver comes with a 1 jaar waarborg vanaf die aankoopdatum. Bewaar asseblief u bewys van aankoop vir waarborgeise.

Figuur 4: Product packaging showing the included components and a "1 year warranty" seal.
For technical support, service, or warranty inquiries, please contact Pretul customer service through their official channels or the retailer where the product was purchased.