OFFNOVA CD12
OFFNOVA 21-Hole Binding Machine User Manual
Model: CD12
1. Inleiding
Dankie vir die aankoopasing the OFFNOVA 21-Hole Binding Machine. This manual provides detailed instructions for the safe and efficient operation, maintenance, and troubleshooting of your new binding machine. Please read this manual thoroughly before use and keep it for future reference.

Figure 1: OFFNOVA 21-Hole Binding Machine. This image shows the complete binding machine with its dual-arm handle and the comb binding mechanism.
2. Veiligheidsinstruksies
- Gebruik die masjien altyd op 'n stabiele, plat oppervlak.
- Hou hande en los klere weg van bewegende dele tydens werking.
- Do not attempt to bind materials thicker than the specified maximum capacity.
- Keep the machine away from water or other liquids.
- Moenie toelaat dat kinders die masjien sonder toesig van volwassenes gebruik nie.
- Ensure the punching lever is fully depressed during punching to prevent paper jams.
- Clean the machine regularly as instructed in the Maintenance section.
3. Pakketinhoud
Kontroleer asseblief die inhoud van die pakket na uitpak om seker te maak dat alle items teenwoordig is:
- 1 x OFFNOVA 21-Hole Binding Machine (Model CD12)
- 100 x 0.95 cm (3/8 inch) Black Comb Spines
- 1 x Comb Protector
- 1 x Oil Absorbent Paper Sheet

Figure 2: Included accessories and machine dimensions. This image illustrates the machine's dimensions and shows the oil absorbent paper and the box of 100 black comb spines that are included with the product.
4. Produk verbyview
Familiarize yourself with the main components of the OFFNOVA Binding Machine:
- Dual-Arm Handle: Designed for improved efficiency and reduced effort during punching.

Figure 3: Dual-Arm Handle. This image highlights the ergonomic dual-arm handle, designed for effortless punching and binding.
- Punch Margin Adjustment Knob: Allows customization of the paper margin (3mm, 4mm, 5mm) for professional-looking documents.

Figure 4: Punch Margin Adjustment. This image shows the knob for adjusting the punch margin to 3mm, 4mm, or 5mm.
- Paper Slider / Edge Guide: Ensures precise alignment for Letter, A4, and A5 paper formats.

Figure 5: Paper Slider and Size Lock. This image demonstrates how the paper slider locks the paper size, indicating hole counts for A5 (15 holes), Letter (19 holes), and A4 (21 holes).
- Punching Mechanism: Advanced cutting blade for effortless paper punching.

Figure 6: Punching Blade Mechanism. This image provides a detailed view of the "Offset on another" blade design, which facilitates effortless punching.
- Comb Binding Mechanism: Located at the top, used to open and close comb spines for binding.
- Chip skinkbord: Versamel papiersnippers van ponswerk.
5. Opstelling
The OFFNOVA Binding Machine comes fully assembled for immediate use. Follow these steps before your first binding project:
- Pak die masjien uit: Carefully remove the binding machine and all accessories from the packaging.
- Aanvanklike skoonmaak: Before first use, clean the machine with the included oil absorbent paper. Punch at least 8 times with the oil absorbent paper to remove any pre-lubrication residue and prevent staining your documents.
- Plaas op 'n stabiele oppervlak: Position the machine on a flat, stable, and clean surface.
6. Bedryfsinstruksies
The binding process involves two main steps: punching and binding.
6.1 Punching Documents
- Adjust Paper Margin: Use the punch margin adjustment knob (Figure 4) to set the desired margin depth (3mm, 4mm, or 5mm) based on your document's requirements.
- Set Paper Size: Adjust the paper slider/edge guide (Figure 5) to align with your paper size (Letter, A4, or A5) for precise hole alignment.
- Voeg papier in: Insert up to 10-12 sheets of 80g paper, 2 sheets of 230g cover paper, or 1 sheet of 5-12mm PVC cover into the punching slot. Ensure the paper is flush against the edge guide.
- Pons: Firmly press the dual-arm punching lever down completely and without pause. Releasing the lever mid-punch can cause paper jams.
- Herhaal: Remove the punched sheets and repeat the process until all pages are punched.
Note: For optimal results and to prevent paper jams, always press the punching handle all the way down without stopping.
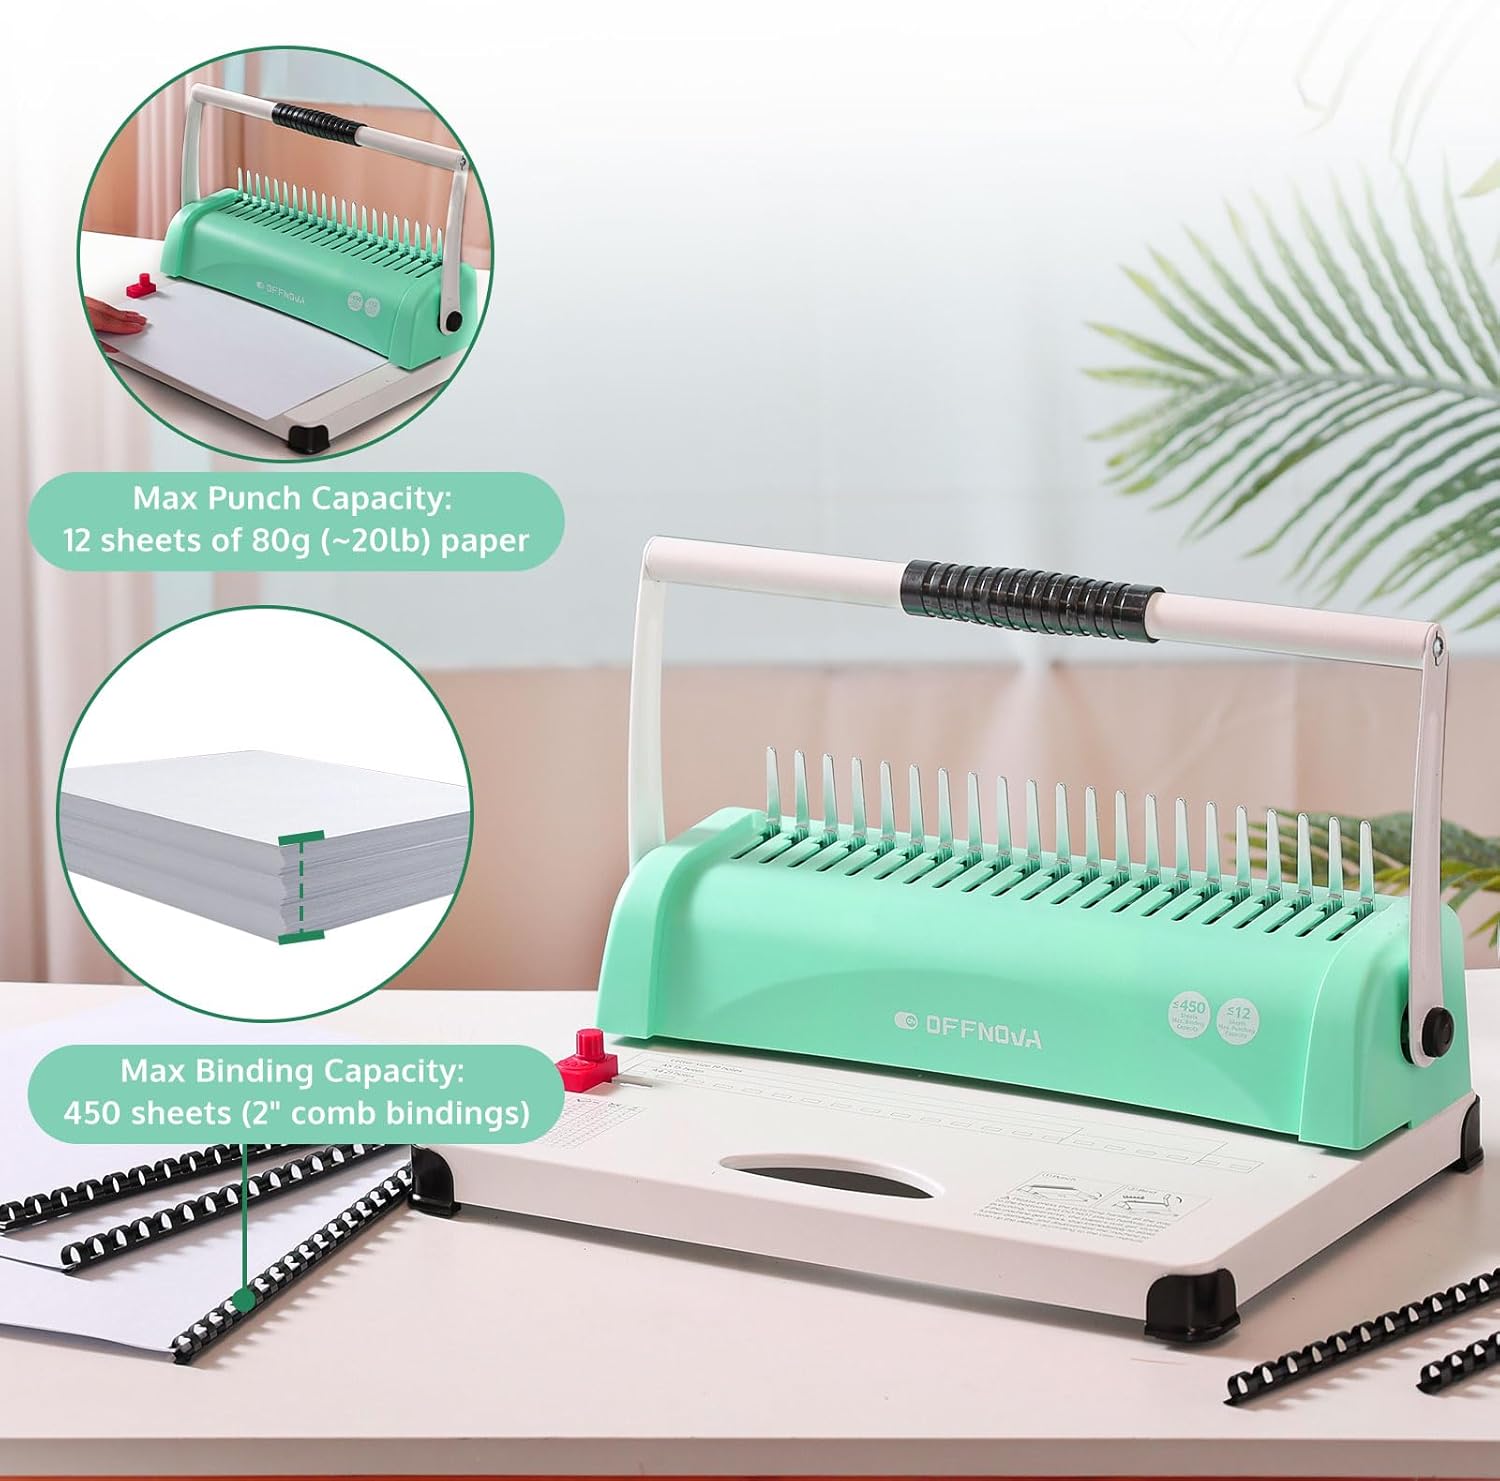
Figure 7: Punching and Binding Capacity. This image illustrates the maximum punch capacity of 12 sheets of 80g paper and a maximum binding capacity of 450 sheets using 2-inch comb bindings.
6.2 Binding Documents
- Open Comb Spine: Place a comb spine onto the binding mechanism's teeth. Pull the dual-arm handle towards you to open the comb spine.
- Insert Punched Pages: Carefully slide the punched pages onto the open comb spine, starting with the front cover, followed by the document pages, and finally the back cover. Ensure all pages are correctly aligned on the comb.
- Close Comb Spine: Push the dual-arm handle away from you to close the comb spine, securing the document.
- Verwyder dokument: Verwyder die gebonde dokument versigtig uit die masjien.
7. Onderhoud
Regular maintenance ensures the longevity and optimal performance of your binding machine:
- Empty Chip Tray: Regularly empty the chip tray located at the bottom of the machine to prevent accumulation of paper chads, which can interfere with punching.
- Skoon lemme: Periodically punch the included oil absorbent paper (or a few sheets of scrap paper) to clean the punching blades and remove any paper dust or residue.
- Vee af: Use a soft, dry cloth to wipe down the exterior of the machine. Do not use abrasive cleaners or solvents.
- Berging: When not in use, store the machine in a clean, dry place, away from direct sunlight and extreme temperatures.
8. Probleemoplossing
| Probleem | Moontlike oorsaak | Oplossing |
|---|---|---|
| Paper jam during punching. | Punching lever not fully depressed; too many sheets inserted; paper not aligned. | Ensure the lever is pressed completely down. Reduce the number of sheets. Align paper correctly against the edge guide. |
| Holes are not clean or complete. | Dull blades; chip tray is full; too many sheets. | Punch oil absorbent paper or scrap paper to clean blades. Empty the chip tray. Reduce the number of sheets. |
| Comb spine does not open/close smoothly. | Mechanism is stiff or dirty. | Operate the binding mechanism a few times without a comb to loosen it. Ensure no debris is obstructing the mechanism. |
| Documents are stained after punching. | Pre-lubrication residue from manufacturing. | Punch the included oil absorbent paper at least 8 times before first use with actual documents. |
9. Spesifikasies
| Kenmerk | Detail |
|---|---|
| Handelsmerk | OFFNOVA |
| Modelnommer | CD12 |
| Pons kapasiteit | Up to 10-12 sheets (80g paper), 2 sheets (230g cover paper), or 1 sheet (5-12mm PVC cover) |
| Bindende kapasiteit | Max 450 sheets (using 2-inch comb bindings) |
| Aantal gate | 21 gaatjies |
| Ondersteunde papiergroottes | Letter, A4, A5 |
| Adjustable Margin | 3 mm, 4 mm, 5 mm |
| Produkafmetings (L x B x H) | Approx. 370mm x 260mm x 240mm (14.6 x 10.2 x 9.45 inches) |
| Item gewig | 4.3 kilogram |
| Kleur | Munt |
10. Waarborg en Ondersteuning
Specific warranty details for this product are not provided in this manual. For warranty information, technical support, or service inquiries, please contact OFFNOVA customer service or refer to the product's purchase documentation.
Jy kan gewoonlik kontakbesonderhede vind op die vervaardiger se amptelike webwerf. webwebwerf of deur die kleinhandelaar waar die produk gekoop is.