Inleiding
The DYNASTY PROAUDIO TMP-1 is a professional vacuum tube microphone preamplifier designed to enhance audio signals with warmth and clarity. It features a 12AX7 vacuum tube, 48V phantom power, and a built-in limiter, making it suitable for a variety of recording and live sound applications with both condenser and dynamic microphones, as well as instruments.
Veiligheidsinstruksies
- Lees alle instruksies noukeurig voor operasie.
- Moenie die eenheid aan reën of vog blootstel nie.
- Moenie die c oopmaak nieasing. Verwys alle diens na gekwalifiseerde personeel.
- Verseker behoorlike ventilasie om oorverhitting te voorkom.
- Use only the specified power adapter (AC 9V).
- Disconnect power before cleaning or when not in use for extended periods.
Pakketinhoud
Verifieer dat alle items in die pakket teenwoordig is:
- TMP-1 Professional Vacuum Tube Microphone Preamplewendiger
- Power Adapter (AC 9V)
- Gebruikershandleiding (hierdie dokument)
Produk verbyview
The TMP-1 features a robust design with intuitive controls for optimal audio processing.

Hierdie beeld wys 'n hoekige view of the DYNASTY PROAUDIO TMP-1 Professional Vacuum Tube Microphone Preamplifier. The front panel with controls and indicators is visible, along with the sturdy black casing.

Hierdie beeld bied 'n nabyskoot view of the TMP-1's front panel. It clearly displays the "OUTPUT LEVEL" LED indicators, "Gain Input" and "Drive" rotary knobs, and push-buttons for "Phantom Power", "Limit", "Phase", and "Gain".
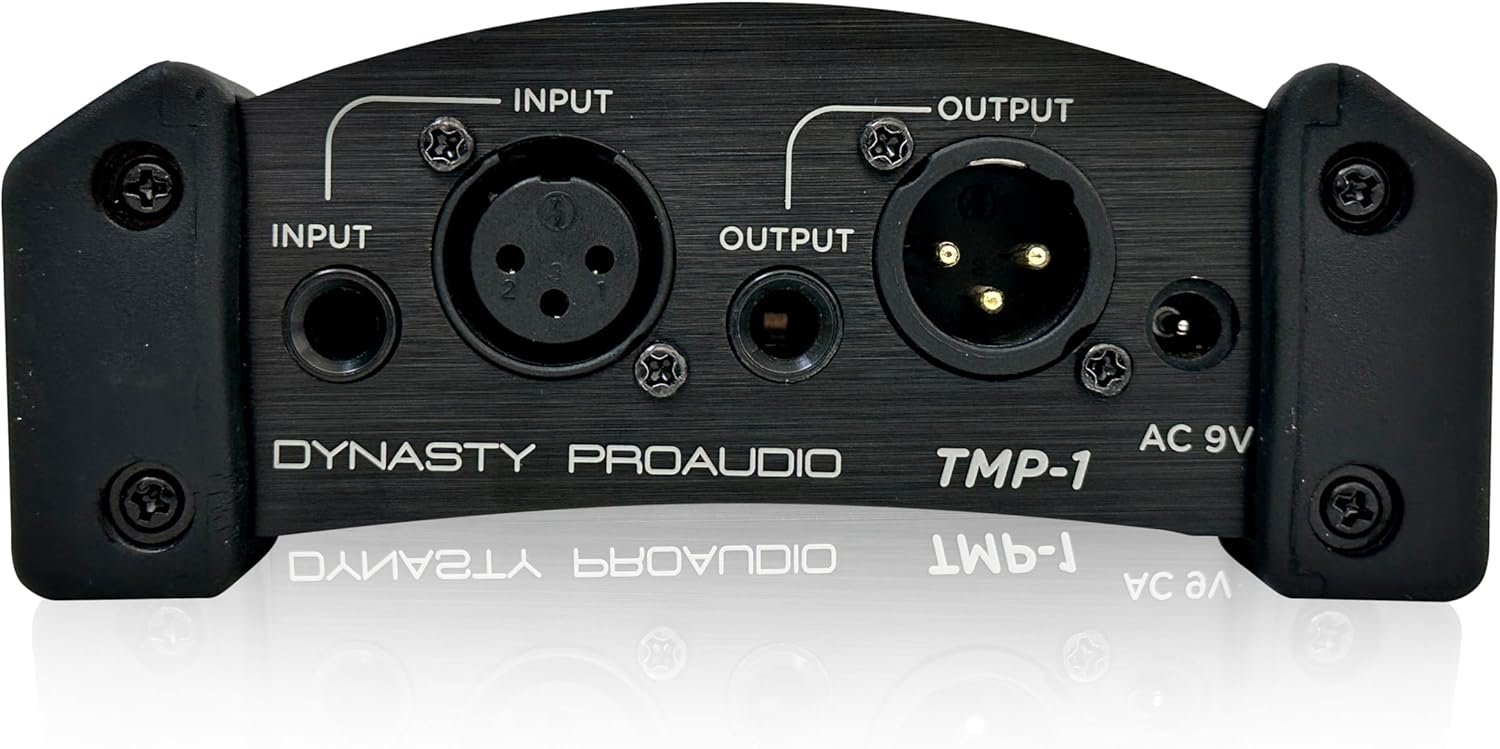
This image shows the rear panel of the TMP-1, highlighting the input and output connections. It includes XLR and 1/4-inch (6.35mm) input jacks, XLR and 1/4-inch (6.35mm) output jacks, and the AC 9V power input.
Voorpaneelkontroles en aanwysers
- OUTPUT LEVEL LEDs: Indicators for signal level (-10, -5, 0, +3, +6dB Peak).
- Gain Input Knob: Adjusts the input gain from minimum to maximum.
- Drive Knob: Controls the amount of tube saturation/drive.
- Phantom Power Button (ON/OFF): Activates/deactivates 48V phantom power for condenser microphones.
- Limit Button (ON/OFF): Engages/disengages the built-in limiter to prevent clipping.
- Phase Button (Reverse/Normal): Reverses the phase of the input signal.
- Gain Button (+20dB/Normal): Provides an additional +20dB gain boost.
Agterpaneelverbindings
- INPUT (XLR & 1/4-inch): Balanced XLR and unbalanced 1/4-inch (6.35mm) inputs for microphones or instruments.
- OUTPUT (XLR & 1/4-inch): Balanced XLR and unbalanced 1/4-inch (6.35mm) outputs for connecting to mixers, audio interfaces, or other audio devices.
- AC 9V: Power input for the included AC adapter.
Opstelling
- Kragverbinding: Connect the supplied AC 9V power adapter to the "AC 9V" input on the rear panel of the TMP-1, then plug the adapter into a suitable power outlet.
- Invoerverbinding:
- For microphones: Connect your microphone to either the XLR or 1/4-inch INPUT jack on the rear panel.
- For instruments: Connect your instrument (e.g., guitar, bass) to the 1/4-inch INPUT jack.
- Uitsetverbinding: Connect the TMP-1's XLR or 1/4-inch OUTPUT to your mixer, audio interface, or recording device's input.
- Aanvanklike instellings: Before powering on, ensure the "Gain Input" and "Drive" knobs are set to their minimum positions. Ensure "Phantom Power" is OFF unless using a condenser microphone.

This image shows the TMP-1 preamplifier with various audio cables connected to its input and output jacks, demonstrating a typical setup.
Bedryfsinstruksies
Skakel aan
Once all connections are made, power on the TMP-1. The "Power" LED on the front panel will illuminate.
Gebruik Phantom Power
If you are using a condenser microphone, press the Fantastiese krag button to activate 48V phantom power. The corresponding LED will light up. Warning: Do not activate phantom power when using dynamic microphones or ribbon microphones, as this can cause damage.
Verstel insetwins
Draai stadig die Gain Input knob clockwise to increase the input signal level. Monitor the "OUTPUT LEVEL" LEDs. Aim for the signal to primarily light up the -5 and 0 dB LEDs during normal operation, with occasional peaks into the +3 dB LED. Avoid consistently hitting the +6dB Peak LED, which indicates clipping.
Applying Drive (Tube Saturation)
Die Ry knob controls the amount of tube saturation. Turn it clockwise to add warmth and harmonic richness to your signal. Experiment with this control to find the desired sonic character.
Using the Limiter
Druk die Beperk button to engage the built-in limiter. This helps prevent signal peaks from exceeding a certain level, protecting your recording equipment from clipping and providing a more consistent output level.
Fase Omkering
Die Fase button allows you to reverse the phase of the input signal. This can be useful in multi-microphone setups to correct phase cancellation issues or for creative effects.
Additional Gain Boost
If your input signal is very low, you can press the Wins button to apply an additional +20dB gain boost. Use this judiciously to avoid introducing unwanted noise or distortion.

This image shows a close-up of a glowing vacuum tube, representing the 12AX7 tube inside the TMP-1 that provides its characteristic warmth.

This image features a professional condenser microphone in a studio environment, illustrating the type of microphone that benefits from the TMP-1's phantom power and preamplifikasie.

This image shows hands playing a bass guitar, demonstrating the TMP-1's versatility in handling instrument-level signals.
Onderhoud
- Skoonmaak: Gebruik 'n sagte, droë lap om die buitekant van die eenheid skoon te maak. Moenie vloeibare skoonmaakmiddels of oplosmiddels gebruik nie.
- Berging: Bêre die eenheid op 'n koel, droë plek weg van direkte sonlig en uiterste temperature.
- Buis vervanging: The 12AX7 vacuum tube has a finite lifespan. If you notice a degradation in sound quality or increased noise over time, the tube may need replacement. This should be performed by qualified service personnel.
Probleemoplossing
| Probleem | Moontlike oorsaak | Oplossing |
|---|---|---|
| Geen krag nie | Power adapter not connected; faulty outlet; faulty adapter. | Check power connections; try a different outlet; test adapter if possible. |
| Geen klankuitset nie | Incorrect cable connections; gain too low; phantom power not engaged for condenser mic; faulty cable. | Verify all input/output cables are securely connected; increase Gain Input; activate Phantom Power for condenser mics; try different cables. |
| Verwronge klank | Gain too high (clipping); faulty tube; incorrect impedance. | Reduce Gain Input; check OUTPUT LEVEL LEDs for clipping; if distortion persists, consult service for tube inspection; ensure proper impedance matching. |
| Gezoem of geraas | Ground loop; faulty cables; interference from other electronics. | Use balanced cables; try isolating power; move unit away from other electronic devices; check for faulty cables. |
Spesifikasies
- Model: TMP-1
- Buis tipe: 12AX7 Vacuum Tube
- Fantastiese krag: +48V (skakelbaar)
- Insette: XLR Balanced, 1/4-inch (6.35mm) Unbalanced
- Uitsette: XLR Balanced, 1/4-inch (6.35mm) Unbalanced
- Kragtoevoer: AC 9V (included adapter)
- Produk afmetings: 9.5 x 6 x 3.5 duim (24.13 x 15.24 x 8.89 cm)
- Item gewig: 2.6 pond (1.18 kg)
- Vervaardiger: Dynasty Proaudio
- Eerste datum beskikbaar: 19 Augustus 2024
Waarborg en Ondersteuning
For warranty information and technical support, please contact DYNASTY PROAUDIO directly.
Visit the official DYNASTY PROAUDIO Store on Amazon for more information: DYNASTY PROAUDIO Store
Behou asseblief jou aankoopbewys vir waarborgeise.