1. Inleiding
This manual provides essential information for the safe and efficient operation, setup, and maintenance of your Heltec HT-SW01H+2040M25 Capacitor Storage Battery Spot Welding Machine. Please read this manual thoroughly before using the device to ensure proper function and to prevent damage or injury.
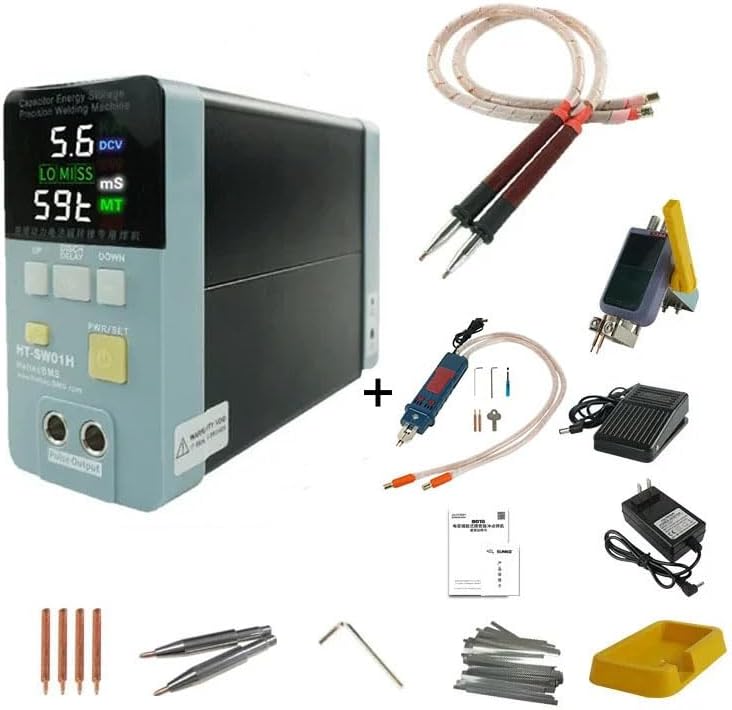
Figure 1: Heltec HT-SW01H+2040M25 Spot Welding Machine
2. Veiligheidsinligting
WARNING: Improper use of this spot welding machine can result in serious injury or damage to the equipment. Always follow safety guidelines.
- Always wear appropriate personal protective equipment (PPE), including safety glasses and gloves, when operating the machine.
- Maak seker die werkarea is goed geventileer en vry van vlambare materiale.
- Do not operate the machine in wet conditions or with wet hands.
- Hou kinders en ongemagtigde personeel weg van die bedryfsarea.
- Ontkoppel die krag voordat enige onderhoud of aanpassings uitgevoer word.
- The machine operates on a low voltage supply system with CE certification, designed for high safety. It is not prone to overheating, flammability, or explosion under normal operating conditions.
3. Pakketinhoud
Verifieer dat alle items in die pakket teenwoordig is:
- Heltec HT-SW01H+2040M25 Spot Welding Machine Unit
- Welding Pens (integrated or external, depending on configuration)
- Kragadapter
- Seskantsleutels (vir verstellings)
- Spare Welding Pins
- Gebruikershandleiding (hierdie dokument)
- Other accessories as shown in product images.
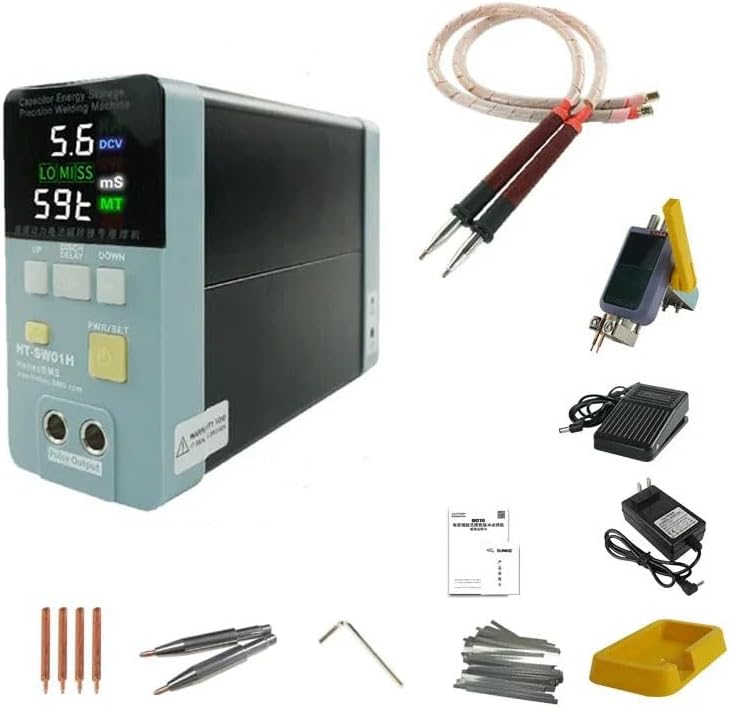
Figuur 2: Tipiese pakketinhoud
4. Produkkenmerke
- Hittebeskerming: Designed for low heat generation, preventing overheating during operation.
- Comfortable Welding Pen: The welding pen remains cool, preventing hand burns during extended use.
- Stable Welding Current: Provides up to 3500A pulse current with stable output, minimizing battery damage. The actual pulse current is displayed on the LED screen.
- High-Quality Welding Spots: Produces fine, uniform, and strong welding spots without blackening, achieving industrial-grade stored energy welding quality.
- Masjienveiligheid: Beskik oor 'n lae volumetage supply system with CE certification, ensuring high safety by preventing heat generation, flammability, and explosions.
- Reliability and Longevity: Incorporates a highly reliable internal industrial super energy storage capacitor and laser welding busbar technology for long service life and consistent welding quality.

Figuur 3: oorview of key product features
5. Spesifikasies
| Parameter | Waarde | Parameter | Waarde |
|---|---|---|---|
| Model | HT-SW01H+2040M25 | Piekkrag | 21KW (HT-SW01H) |
| Piekstroom | 3500A | Preloading Delay Time | 100/200/300/400/500ms |
| Voltage Uitset | 5-6V (DC) | Sweisdikte | 0.05mm-0.5mm (Nickel), 0.2mm (Aluminum) |
| Piek sweisenergie | 238J | Polstyd | 0-20ms (100 grade) |
| Invoer Voltage | 100 Volt | Item gewig | 7.7 pond (3.5 kg) |
| Kleur | Swart | Afmetings (ongeveer) | 176 mm (L) x 67 mm (B) x 126 mm (H) |
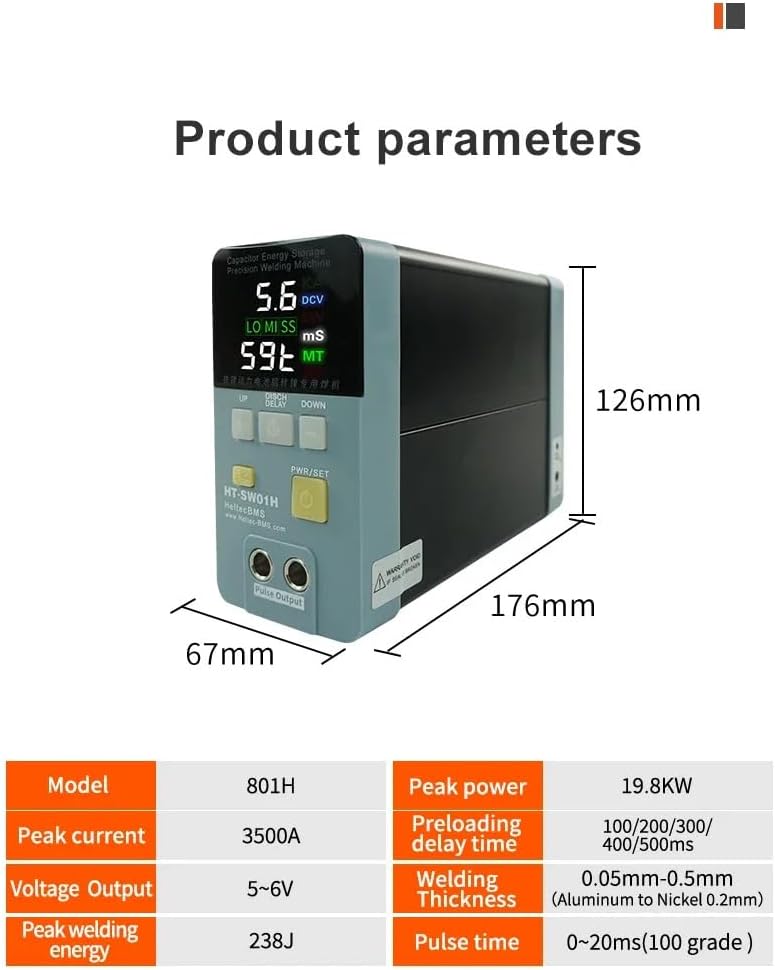
Figure 4: Detailed product parameters and dimensions
6. Opstelling
- Pak uit: Verwyder alle komponente versigtig uit die verpakking. Inspekteer vir enige versendingskade.
- Plasing: Place the welding machine on a stable, level, and non-flammable surface in a well-ventilated area.
- Verbind sweispenne: Insert the welding pens securely into the designated output ports on the front of the machine. Ensure a firm connection.
- Koppel krag: Plug the power adapter into the machine's power input port, then connect the adapter to a suitable 100V AC power outlet.
- Aanvanklike kontrole: Before powering on, ensure all connections are secure and there are no loose wires or foreign objects near the welding tips.

Figure 5: Welding pens connected to the machine

Figure 6: External welding pen and power adapter setup
7. Bedryfsinstruksies
- Krag aan: Press the PWR/SET button to turn on the machine. The LED display will illuminate.
- Select Welding Mode: The machine supports different welding modes. For Aluminum to Nickel welding, press the AL/NI button (if available, indicated by a red light) to activate this dedicated mode. For Nickel to Nickel spot welding, ensure the AL/NI button is not pressed.
- Pas instellings aan: Use the UP and DOWN buttons to adjust welding parameters such as pulse time and preloading delay time. The display shows the current settings and actual pulse current.
- Berei werkstuk voor: Ensure the surfaces to be welded are clean and free of oxidation or contaminants.
- Perform Welding: Position the welding tips firmly against the workpiece. The machine will automatically discharge the capacitor to perform the weld. Observe the welding spot quality.
- Verify Weld Quality: A good weld should be fine, uniform, and strong. The machine is capable of welding up to 0.5mm nickel and 0.2mm aluminum.

Figure 7: Welding mode selection (Aluminum to Nickel vs. Nickel to Nickel)

Figuur 8: Example of 0.2mm pure nickel welding and tensile strength test
7.1. Amptelike produkvideo's
Video 1: Demonstration of the spot welding machine in operation (0:56). This video illustrates the general usage and welding process.
Video 2: Short clip showcasing a specific welding application (0:23). This video provides a quick view of the machine's performance.
8. Onderhoud
- Skoonmaak: Regularly clean the welding tips and the machine's exterior with a dry, soft cloth. Ensure no metal dust or debris accumulates around the welding area.
- Wenkvervanging: Replace welding tips when they become worn or pitted to ensure consistent weld quality. Use the provided hex wrenches for replacement.
- Berging: Store the machine in a dry, cool place, away from direct sunlight and moisture, when not in use.
- Inspeksie: Inspekteer kabels en verbindings gereeld vir enige tekens van slytasie of skade.
9. Probleemoplossing
| Probleem | Moontlike oorsaak | Oplossing |
|---|---|---|
| Masjien skakel nie aan nie | Geen kragtoevoer nie; foutiewe kragadapter | Check power connection; ensure outlet is functional; test power adapter. |
| Weak or inconsistent welds | Worn welding tips; incorrect settings; dirty workpiece; poor contact | Replace welding tips; adjust pulse time/power settings; clean workpiece surfaces; ensure firm contact with welding tips. |
| Welding tips overheat | Excessive continuous use; incorrect settings | Allow machine to cool down; verify settings are appropriate for material thickness. |
| Vertoning wys foutkode | Internal fault; specific issue | Refer to the manufacturer's specific error code guide or contact support. |
10. Waarborg en Ondersteuning
For warranty information, please refer to the documentation provided with your purchase or contact Heltec BMS directly. The product is designed for high reliability and long service life, utilizing industrial-grade components.
If you encounter any issues not covered in this manual or require technical assistance, please contact Heltec BMS customer support through their official webwebwerf of die kleinhandelaar waar die produk gekoop is.
Vervaardiger: heltec bms
Modelnommer: HT-SW01H+2040M25