
1. Inleiding
This manual provides essential information for the safe and effective operation of your YXJPP HO102-100M Handheld Digital Oscilloscope. This device integrates a digital oscilloscope, a multimeter, and a waveform generator into a compact, portable unit, designed for various electrical testing and measurement applications. Please read this manual thoroughly before using the instrument and keep it for future reference.
2. Veiligheidsinligting
To ensure safe operation and prevent damage to the instrument or injury to yourself, observe the following safety precautions:
- Gebruik altyd die korrekte voltage range and input terminals for your measurements.
- Moenie toepas voltage or current that exceeds the maximum ratings specified for the instrument.
- Inspect test leads and probes for damage before each use. Replace any damaged accessories.
- Do not operate the instrument in wet or damp voorwaardes.
- Ensure the instrument is turned off before connecting or disconnecting test leads, especially when measuring high voltages of strome.
- Refer to the specifications section for detailed input limits.
3. Produk verbyview
The YXJPP HO102-100M is a versatile handheld device featuring a 3.5-inch HD LED display for clear waveform visualization. Its compact design makes it suitable for fieldwork and educational purposes.
3.1 Sleutelkenmerke
- TFT True Color Display for clear and stable waveform display.
- Mini and portable design for easy handling and transport.
- Dual-channel oscilloscope with 100MHz bandwidth.
- Max Waveform Capture Rate: 1,000,000wfm/s.
- Intydse sampling rate: 250MSa/s (Single CH), 125MSa/s (Dual CH).
- Automatic measurement functions.
- One-click storage.
- Integrated Multimeter with True RMS.
- Waveform Generator output.
3.2 Toesteluitleg en -kontroles
Familiarize yourself with the device's physical layout and controls as shown below:
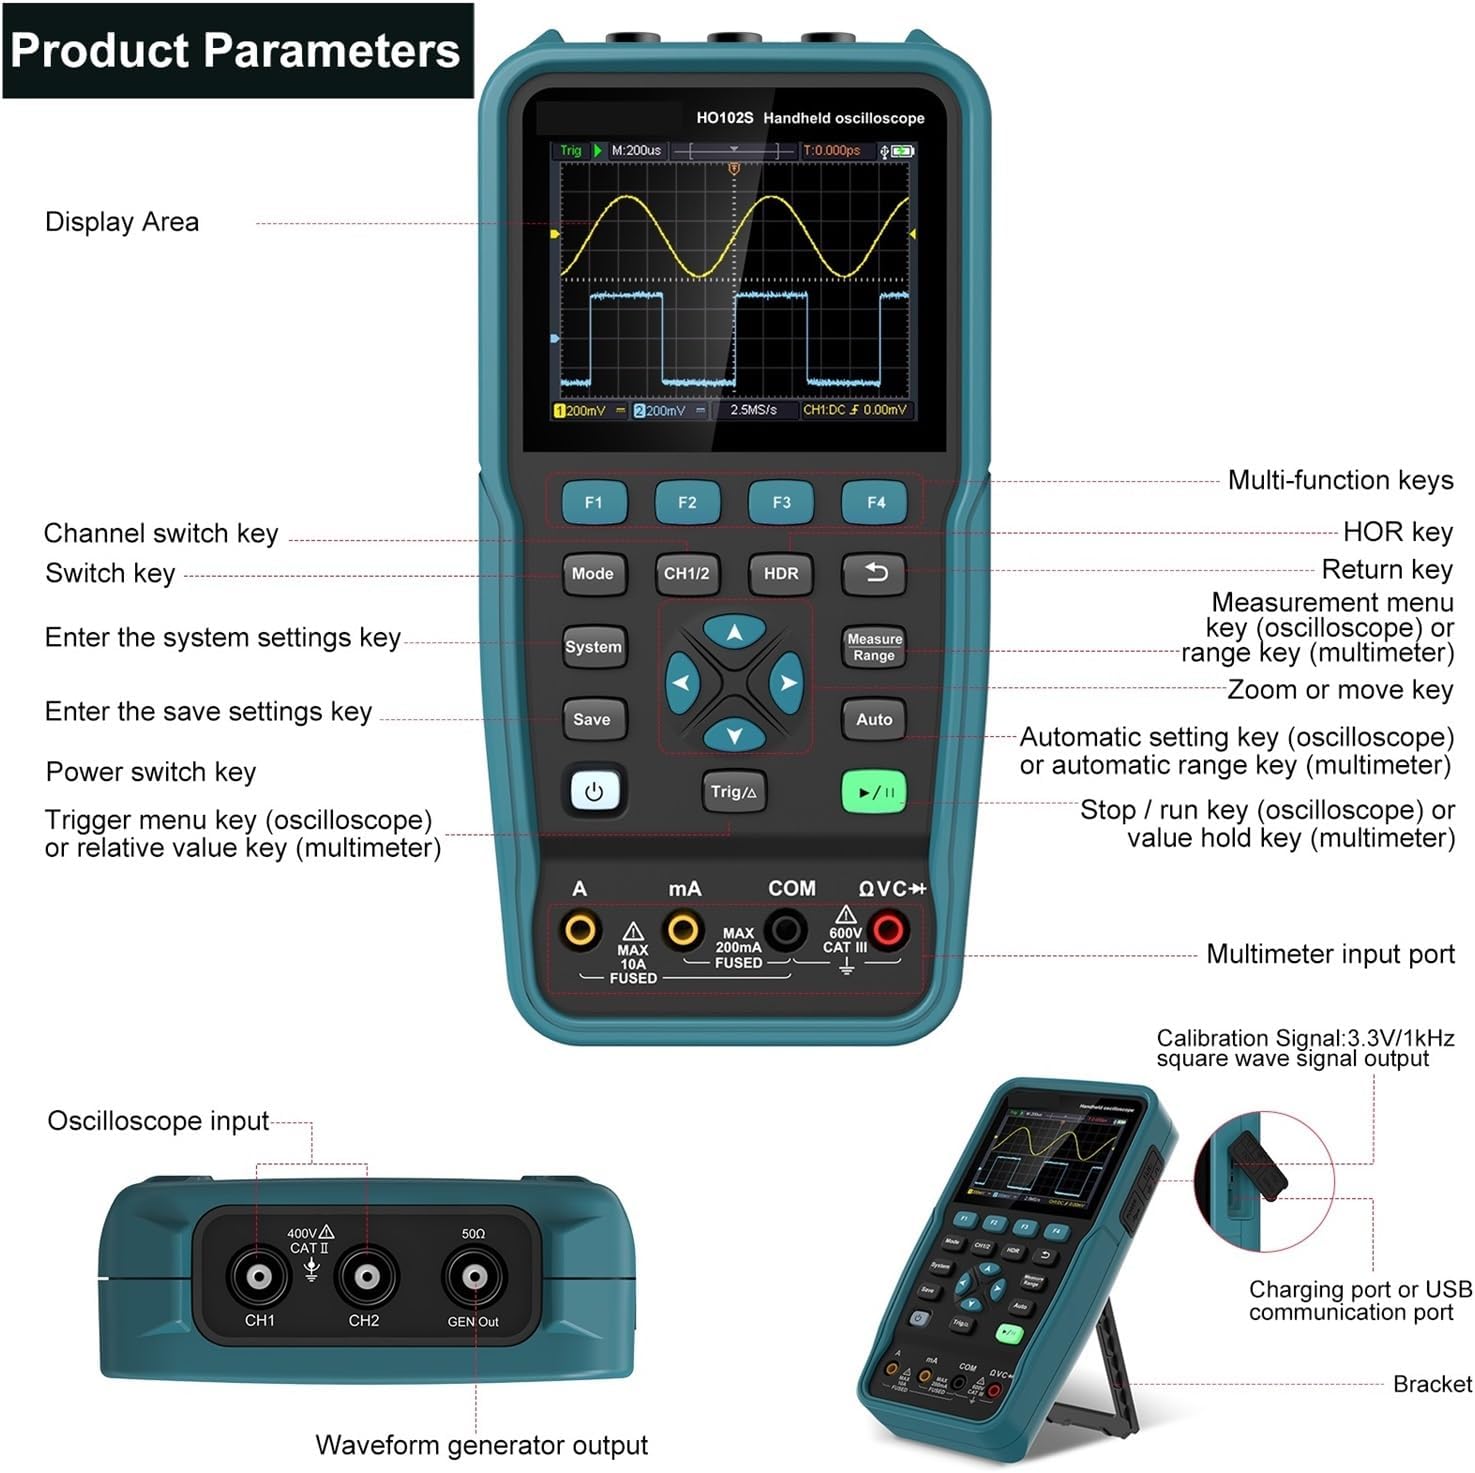
Figuur 1: Voor- en sykant view of the HO102-100M showing display area, multi-function keys, input ports, and controls. Key labels include F1-F4, Mode, CH1/2, HDR, System, Save, Measure Range, Auto, Power, Trig/Δ, Run/Stop, Multimeter input port, Oscilloscope input (CH1, CH2), GEN Out, Charging port, and Bracket.
- Vertoon area: Shows waveforms, measurement data, and menu options.
- F1-F4 Sleutels: Context-sensitive function keys, their labels appear on the screen.
- Modussleutel: Switches between different operating modes (Oscilloscope, Multimeter, Waveform Generator).
- CH1/2 Key: Channel switch key for oscilloscope.
- HDR Key: Terug-sleutel.
- Stelselsleutel: Voer stelselinstellings in.
- Stoor sleutel: Enters save settings.
- Measure Range Key: Meting kieslys sleutel (ossilloskoop) of reeks sleutel (multimeter).
- Outosleutel: Outomatiese instellingsleutel (ossilloskoop) of outomatiese reekssleutel (multimeter).
- Kragsleutel: Skakel die toestel aan/af.
- Trig/Δ Key: Sneller kieslys sleutel (ossilloskoop) of relatiewe waarde sleutel (multimeter).
- Run/Stop Key (Play/Pause icon): Stops/runs waveform acquisition (oscilloscope) or value hold key (multimeter).
- Navigation Keys (Up/Down/Left/Right/Center): Gebruik vir menu-navigasie en parameteraanpassing.
- Multimeter Input Port (A, mA, COM, VΩC+): For multimeter measurements.
- Oscilloscope Input (CH1, CH2): BNC connectors for oscilloscope probes.
- GEN Out: Output for the waveform generator.
- Charging Port / USB Communication Port (Type-C): Vir laai en rekenaarverbinding.
- Hakie: Integrated kickstand for desktop use.

Figuur 2: The HO102-100M features a 3.5-inch HD LED display and compact dimensions (approximately 10cm x 20cm x 3.5cm). It highlights one-click storage, automatic measurement, dual channel +100MHz bandwidth, and a sample rate of 250MSa/s (Single CH) / 125MSa/s (Dual CH).
4. Opstelling
4.1 Aanvanklike laai
Before first use, fully charge the device using the provided Type-C USB cable and a compatible power adapter. The charging port is located on the side of the unit.
4.2 Aan-/afskakel
Druk en hou die Krag knoppie om die toestel aan of af te skakel.
4.3 Connecting Probes and Leads
- Ossilloskoop-sondes: Connect BNC oscilloscope probes to the CH1 or CH2 input ports. Ensure a secure connection.
- Multimeter-kabels: Connect multimeter test leads to the appropriate input ports (A, mA, COM, VΩC+) based on the measurement type.
- Golfvormgenerator-uitvoer: Connect a BNC cable to the GEN Uit port for waveform output.
5. Bedryfsinstruksies
5.1 Algemene navigasie
Use the central navigation keys (Up, Down, Left, Right, Center) to navigate menus, adjust parameters, and confirm selections. The HDR key typically acts as a return or back button.
5.2 Ossilloskoopmodus
- Druk die Modus button until the oscilloscope interface is displayed.
- Gebruik die CH1/2 button to select the desired input channel.
- Connect the oscilloscope probe to the circuit under test.
- Druk die Outo button for automatic waveform display and scaling.
- Adjust vertical sensitivity (Volts/Div) and horizontal time base (Time/Div) using the navigation keys or dedicated function keys (F1-F4, if labeled).
- Gebruik die Trig/Δ button to access trigger settings (e.g., edge, level, mode).
- Druk die Meet Reeks button to display automatic measurements (e.g., Vpp, Vmax, Freq).
- Die Hardloop / stop button (play/pause icon) pauses or resumes waveform acquisition.
5.3 Multimetermodus
- Druk die Modus button until the multimeter interface is displayed.
- Connect the multimeter test leads to the appropriate input jacks for the desired measurement (Voltage, Current, Resistance, Capacitance, Diode, Continuity).
- Gebruik die Meet Reeks button to cycle through measurement types or ranges, or use the Outo button for auto-ranging.
- The display will show the measurement value.
- Druk die Hardloop / stop button (play/pause icon) to hold the current reading.
5.4 Golfvormgenerator
- Druk die Modus button until the waveform generator interface is displayed.
- Connect a BNC cable from the GEN Uit port to the input of the device you wish to test.
- Use the navigation keys and function buttons to select the desired waveform type (e.g., sine, square, triangle), frequency, and amplitude.
- Confirm settings to output the waveform.
5.5 Data Storage and PC Connection
- One-Click Storage: Gebruik die Stoor button to quickly store waveform data or measurement results.
- PC-verbinding: Connect the device to a computer using the Type-C USB cable. This allows for data transfer and potentially real-time monitoring with compatible software (software not included, check manufacturer's website for availability).

Figuur 3: The HO102-100M in various applications, including PC connection via Type-C, charging, electronic repair, and use in research and education settings.
6. Onderhoud
- Skoonmaak: Maak die instrument se c skoonasing met 'n sagte, damp lap. Moenie skuur skoonmaakmiddels of oplosmiddels gebruik nie.
- Berging: Bêre die toestel op 'n koel, droë plek weg van direkte sonlig en uiterste temperature.
- Batterysorg: Although the battery is not demountable, ensure regular charging to maintain battery health. Avoid fully discharging the battery for extended periods.
- Sonde-inspeksie: Regularly inspect test leads and probes for any signs of wear or damage. Replace them if necessary to ensure accurate and safe measurements.
7. Probleemoplossing
| Probleem | Moontlike oorsaak | Oplossing |
|---|---|---|
| Toestel skakel nie aan nie. | Lae battery of aan/af-knoppie nie korrek gedruk nie. | Charge the device. Press and hold the power button firmly for a few seconds. |
| No waveform displayed in oscilloscope mode. | Probe not connected, incorrect input settings, or no signal. | Check probe connection. Press Outo button. Verify signal source. Adjust vertical/horizontal scales. |
| Multimeter readings are incorrect or unstable. | Incorrect lead connection, wrong measurement range, or faulty leads. | Ensure leads are in correct ports. Use Outo range or manually select appropriate range. Inspect and replace leads if damaged. |
| Toestel vries of reageer nie meer nie. | Sagtewarefout of tydelike fout. | Perform a soft reset by holding the power button until the device turns off, then restart. If issue persists, contact support. |
8. Spesifikasies
| Parameter | Waarde |
|---|---|
| Modelnommer | HO102-100M |
| Digitale kanale | 2 |
| Bandwydte | 100 MHz |
| Real Time S.ampling Koers | 250MSa/s (Single CH), 125MSa/s (Dual CH) |
| Maksimum golfvorm-opnametempo | 30 000 wfm/s |
| Rekord Lengte | 8K |
| Vertoon grootte | 3.5 duim |
| Vertoon resolusie | 320*240 piksels |
| Tipe vertoon | TFT True Color LED |
| Battery | Non-demountable |
| Konnektiwiteit | USB Tipe-C |
| DIY-benodigdhede Kategorie | ELEKTRIES |
9. Waarborg en Ondersteuning
Vir waarborginligting en tegniese ondersteuning, verwys asseblief na die dokumentasie wat saam met u aankoop verskaf is of kontak die vervaardiger direk. Bewaar u aankoopbewys as bewys van aankoop.