1. Inleiding
The wolfcraft PRO Miter Box and Angle Finder 6956000 is a versatile 2-in-1 tool designed for precise measurement and cutting of miter joints, particularly for skirting boards. This manual provides essential information for the safe and effective use of your tool, ensuring optimal results for your projects. It is ideal for skirting boards up to 120 mm in height.

Figure 1: wolfcraft PRO Miter Box and Angle Finder with removable trestles and guide pins.
2. Veiligheidsinstruksies
- Always wear appropriate personal protective equipment, including safety glasses and gloves, when operating the tool.
- Ensure the workpiece (skirting board) is securely clamped or held in place before cutting to prevent movement and ensure accuracy.
- Use a sharp hand saw appropriate for the material being cut. Dull blades can cause kickback or imprecise cuts.
- Keep hands and fingers clear of the saw blade's path at all times.
- Do not force the saw; let the blade do the work.
- Hou die werkarea skoon en goed belig.
- Store the tool in a dry, safe place out of reach of children.
3. Komponente
The wolfcraft PRO Miter Box and Angle Finder consists of the following main components:
- Hoofliggaam: The central unit housing the angle measurement arms and cutting guides.
- Buigsame arms: Two movable arms for measuring internal and external angles (85° to 275°).
- Locking Screws: Two screws to secure the measured angle.
- Sliding Stops: Adjustable stops to hold skirting boards up to 40 mm thick.
- Gidspenne: Four integrated 140 mm guide pins for hand saw guidance.
- Plastic Protections: Covers around the guide pins to prevent saw jamming and protect the blade.
- Removable Trestles: Two trestles for stabilizing longer skirting boards during cutting.
- Anti-gly kussings: For secure placement during use.
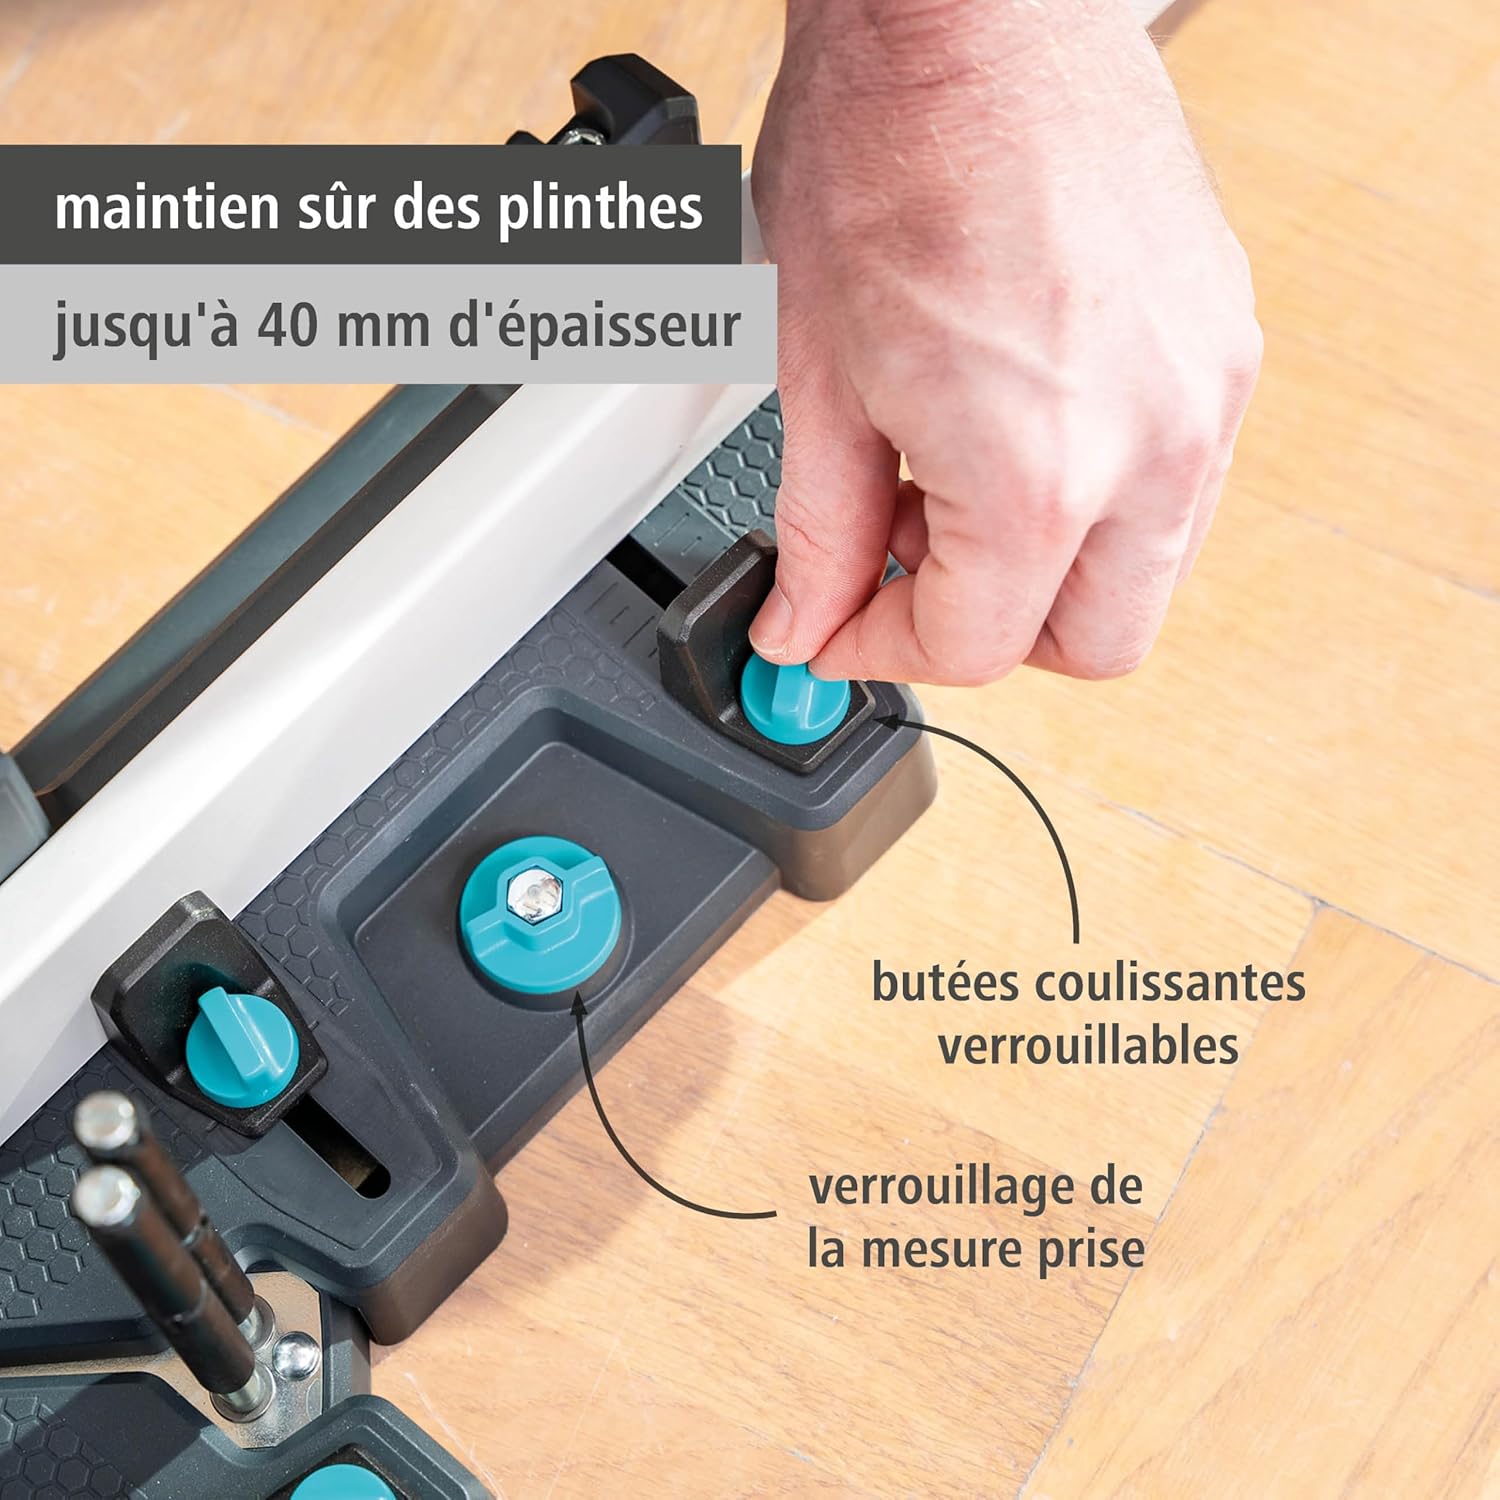
Figure 2: Detail of lockable sliding stops and angle measurement locking screw.

Figure 3: Integrated guide pins with plastic protection for precise saw cuts.
4. Opstelling
The tool is supplied partially disassembled. Follow these steps for initial setup:
- Uitpak: Verwyder alle komponente versigtig uit die verpakking.
- Assemble Guide Pins: If not already assembled, insert the guide pins into their designated slots on the main body. Ensure they are securely fastened.
- Attach Trestles (Optional): For longer skirting boards, attach the two removable trestles to the sides of the miter box to provide additional support.
- Plasing: Place the miter box on a stable, flat, and clean surface. The anti-slip pads on the base will help secure it during use.

Figure 4: The tool's flexible arms allow angle measurement from 85° to 275°.
5. Bedryfsinstruksies
5.1 Measuring Angles
The tool can measure both internal and external angles directly from the wall.
- Posisionering: Place the miter box directly against the corner where the skirting board will be installed.
- Verstel arms: Adjust the two flexible arms to align perfectly with the walls of the corner. The metal arms are designed to reach into narrow areas.
- Sluithoek: Once the arms are aligned, tighten the two locking screws to secure the measured angle. The tool automatically bisects the angle, setting the correct cutting angle for your miter joint.

Figure 5: Measuring an internal corner angle with the flexible arms.

Figure 6: Metal arms allow angle measurement even in tight spaces.
5.2 Making Miter Cuts
After measuring the angle, proceed with cutting:
- Position Skirting Board: Place the skirting board (up to 120 mm high and 40 mm thick) into the miter box. Ensure it is flush against the back and bottom surfaces.
- Secure Skirting Board: Adjust the sliding stops to firmly hold the skirting board in place. For longer boards, use the removable trestles for additional stability.
- Align Saw: Position your hand saw between the integrated guide pins. The plastic protections will help guide the saw and prevent it from binding or damaging the blade.
- Sny: Carefully saw through the skirting board, maintaining a steady and even stroke. The guide pins will ensure a precise miter cut.
- Herhaal: For the opposing piece of skirting board, the tool can be used in the opposite direction to achieve the complementary angle.
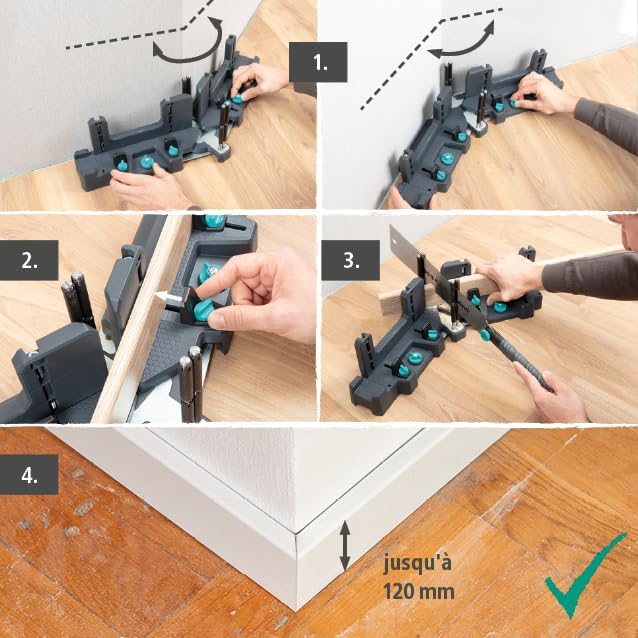
Figure 7: Step-by-step process for angle measurement and miter cutting.

Figure 8: Securing the skirting board with lockable sliding stops.

Figure 9: Making a precise miter cut with a hand saw.

Figuur 10: Example of a precisely fitted skirting board corner.
6. Onderhoud
- Skoonmaak: After each use, remove sawdust and debris from the miter box using a brush or compressed air. Ensure the guide pins and sliding mechanisms are free of obstructions.
- Inspeksie: Regularly inspect the tool for any signs of wear or damage, especially to the guide pins, flexible arms, and locking mechanisms.
- Berging: Store the tool in a clean, dry environment to prevent corrosion and damage.
7. Probleemoplossing
| Probleem | Moontlike oorsaak | Oplossing |
|---|---|---|
| Inaccurate angle measurement | Arms not flush against the wall; locking screws not tightened. | Ensure arms are pressed firmly against the wall. Tighten locking screws securely after measurement. |
| Saw binds or gets stuck | Dull saw blade; excessive force; sawdust buildup in guides. | Use a sharp saw. Apply steady, moderate pressure. Clean guide pins and channels regularly. |
| Skirting board moves during cutting | Sliding stops not tight enough; board not supported. | Ensure sliding stops are firmly secured. Use trestles for long boards. |
| Ruwe of gesplete snye | Dull saw blade; incorrect saw type for material; too much pressure. | Use a sharp, fine-toothed saw. Reduce cutting pressure. |
8. Spesifikasies
- Modelnommer: 6956000
- Handelsmerk: wolfcraft
- Produkafmetings (L x B x H): 57.5 x 19.8 x 6.7 cm
- Item gewig: 2.43 kilogram
- Material (Handle): Lightweight and durable plastic or synthetic material
- Material (Blade): Carbon steel (for compatible saws, not included)
- Kleur: Grys
- Kragbron: Handleiding
- Spesiale kenmerk: Liggewig
- Ingesluit komponente: 1 PRO Miter Box and Angle Finder, 2 Trestles
- Max Skirting Board Height: 120 mm
- Max Skirting Board Thickness: 40 mm
- Hoekreeks: 85 tot 275 grade
- Guide Pin Length: 140 mm
- Land van oorsprong: Slowakye
9. Waarborg en ondersteuning
The wolfcraft PRO Miter Box and Angle Finder 6956000 comes with a 10-year wolfcraft warranty, reflecting its robust, durable, and high-quality "Made in Europe" construction.
For warranty claims, technical support, or spare parts availability, please contact wolfcraft customer service directly or visit their official website. Please refer to your purchase receipt for proof of purchase.

Figure 11: Quality assurance: Made in Europe with a 10-year guarantee.