1. Inleiding
Dankie vir die aankoopasing the Minetom BL-HW02 Outdoor RGB Christmas Laser Light Projector. This device is designed to create dynamic and decorative light displays for various occasions, both indoors and outdoors. Featuring multiple color combinations, motion effects, and remote control operation, it offers a versatile lighting solution. Please read this manual thoroughly before use to ensure proper operation and safety.
2. Veiligheidsinligting
- Oogveiligheid: Do not look directly into the laser light beam. Direct exposure to laser light can cause eye damage.
- Kragbron: Maak seker die kragbron pas by die voltage requirements specified on the product label. Use only the provided power adapter.
- Buiteluggebruik: While the projector is IP65 waterproof, ensure the power adapter and connections are protected from water exposure.
- Installasie: Install the projector securely to prevent it from falling or being dislodged by wind or other environmental factors.
- Kinders en Troeteldiere: Keep the device out of reach of children and pets to prevent accidental damage or injury.
- Temperatuur: Do not operate the device outside its specified temperature range (-30°F to 104°F).
- Onderhoud: Moenie probeer om die toestel self oop te maak of te herstel nie. Verwys alle diens na gekwalifiseerde personeel.
3. Pakketinhoud
Verifieer dat alle items in die pakket teenwoordig is:
- Minetom RGB Christmas Laser Light Projector
- RF afstandbeheer
- Grondpaal
- Ronde basis
- Power Adapter (with 16.4ft extension cord)
- Gebruikershandleiding (hierdie dokument)
4. Opstelling
4.1 Die keuse van 'n installasiemetode
The projector offers three installation options: ground-mounted, wall-mounted, or placed on a flat surface.
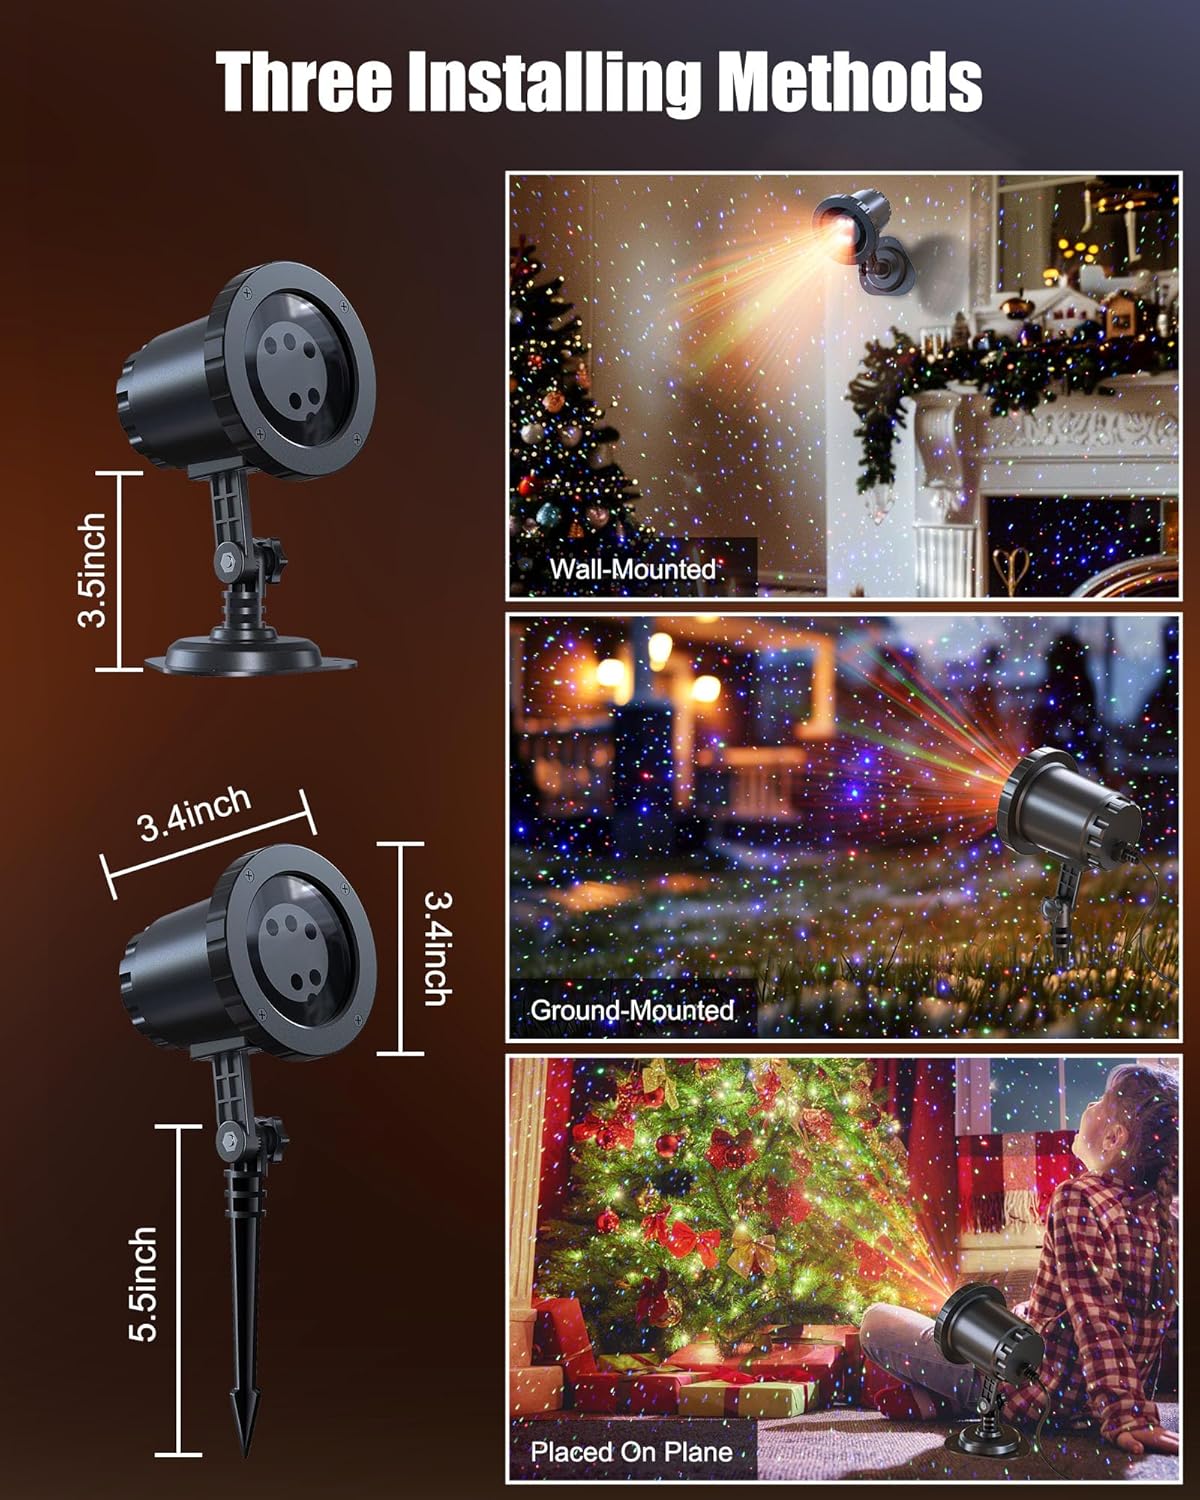
Image: The Minetom laser light projector can be installed in three ways: wall-mounted, ground-mounted, or placed on a flat surface using the included accessories.
- Ground-Mounted: Attach the ground stake to the projector. Insert the stake firmly into soft ground in your desired outdoor location.
- Muur gemonteer: Attach the round base to the projector. Secure the base to a wall using appropriate screws (not included) for a stable installation.
- Placed on Plane: Attach the round base to the projector. Place the projector on any stable, flat surface indoors or outdoors.
4.2 Kragverbinding
- Connect the projector to the provided power adapter.
- Use the 16.4ft extension cord to reach a suitable outdoor power outlet.
- Maak seker dat alle verbindings stewig is en teen vog beskerm word.
- Steek die kragadapter in 'n geaarde elektriese aansluiting.
5. Bedryfsinstruksies
Once powered on, the projector will begin its default light show. Use the RF remote control to customize the display.
5.1 Afstandbeheerfunksies
The RF remote control allows you to manage various settings from a distance. Ensure 2*AAA batteries (not included) are installed in the remote.

Image: RF Remote Control layout with functions for each button.
| Knoppie | Funksie |
|---|---|
| AAN/AF | Skakel die projektor aan of af. |
| 2H / 4H / 6H | Sets the timer for 2, 4, or 6 hours. |
| (H) Restore | Restores to default timing (6 hours on, 18 hours off). |
| Kleur siklus | Cycles through Green, Blue, Red-Green, Blue-Green, Red-Blue, Red-Green-Blue, and Red-Green-Blue cycle. |
| Asemhalingsmodus | Activates a slow fade-in/fade-out effect. |
| Jumping Mode | Activates a rapid color change effect. |
| S0 (Static) | Sets the light display to static (no motion). |
| S- / S+ | Adjusts rotation speed (S- for slow, S+ for fast). |
| R/G/B | Selects Red, Green, or Blue light individually. |
| R/G/B Breathing | Activates breathing mode for individual Red, Green, or Blue colors. |
| R/G/B Strobe | Activates strobe mode for individual Red, Green, or Blue colors. Press sequentially to adjust speed (Slow, Medium, Fast, Stop). |
| R/G/B Steady | Sets individual Red, Green, or Blue colors to steady (non-flashing). |
5.2 kleurkombinasies
The projector supports various color combinations to create diverse effects.

Beeld: Bvamples of the 7 available color combinations.
- Rooi
- Groen
- Blou
- Rooi Groen
- Rooi Blou
- Groen Blou
- Rooi Groen Blou
6. IP65 Waterproof Rating
The projector body is designed with an IP65 waterproof rating, ensuring reliable performance in various weather conditions such as snow, rain, dust, and intense sunlight. It is cold-proof, operating effectively from -30°F to 104°F.

Image: The projector operating in rainy and snowy conditions, highlighting its IP65 waterproof and cold-proof features.
7. Coverage Area
The projector can cover a significant area, illuminating indoor ceilings, walls, or outdoor walls, gardens, lawns, trees, and rooftops. From a distance of 32.8 feet, it can cover approximately 3229.17 square feet.

Image: Coverage area chart illustrating how the projected area expands with increased distance from the surface.
8. Onderhoud
- Skoonmaak: Gently wipe the projector lens and body with a soft, dry cloth. Do not use abrasive cleaners or solvents.
- Berging: Wanneer dit nie gebruik word nie, bêre die projektor op 'n koel, droë plek, weg van direkte sonlig en uiterste temperature.
- Kabel inspeksie: Periodically check the power cord and adapter for any signs of damage. Discontinue use if damage is found.
9. Probleemoplossing
| Probleem | Oplossing |
|---|---|
| Projektor skakel nie aan nie. |
|
| Die afstandbeheer reageer nie. |
|
| Liguitset is dof of inkonsekwent. |
|
| Multiple projectors interfere with each other. |
|
10. Spesifikasies
| Kenmerk | Detail |
|---|---|
| Modelnommer | BL-HW02 |
| Handelsmerk | Minetom |
| Kleur | Rooi Groen Blou |
| Materiaal | Plastiek |
| Voltooi Tipe | Projektor |
| Ligbrontipe | Ligemitterende diode |
| Kragbron | Elektries met koord |
| Montage tipe | Vloermontering, Muurmontering |
| Produk afmetings | 2.75 cm L x 2.75 cm B x 11.02 cm H |
| Item gewig | 14 onse |
| Straalhoek | 120 grade |
| Waterdigte gradering | IP65 |
| Bedryfstemperatuur | -30°F tot 104°F |
| Coverage Area (approx.) | 3229.17 sq ft at 32.8 ft distance |
11. Waarborg en Ondersteuning
For warranty information or technical support, please refer to the contact details provided at the point of purchase or visit the official Minetom webwebwerf. Bewaar u aankoopbewys as bewys van aankoop.