Baseus Inflator-6K
Baseus 4-in-1 Car Jump Starter and Air Inflator User Manual
Model: Inflator-6K
This comprehensive manual provides instructions for the safe and efficient use of your Baseus 4-in-1 device, combining a car jump starter, air inflator, power bank, and LED flashlight.
Produk verbyview
The Baseus 4-in-1 Car Jump Starter and Air Inflator is a versatile and essential tool for roadside emergencies and daily convenience. It integrates four critical functions: a powerful jump starter for vehicles, an efficient air compressor for tires and inflatables, a portable power bank for charging electronic devices, and a bright LED flashlight for illumination.
 'n Voorkant view of the Baseus 4-in-1 device, showcasing its digital display indicating 100% charge, and control buttons below.
Sleutel kenmerke
- 4-in-1-funksionaliteit: Combines a power bank, car jump starter, air inflator, and flashlight.
- Hoë prestasie: 6000mAh capacity / 3.7V / 22.2Wh power bank with 150 PSI air compressor.
- Jump Start Capability: 12V start voltage, 600A peak current, capable of jump starting a car up to 50 times on a full charge.
- Versatile Inflation: Includes various inflation attachments for different tire types, balls, and other inflatables.
- Geïntegreerde skerm: Built-in screen shows battery charge level for the jump starter.
- Duursame batteryselle: High-performance polymer battery cells resistant to extreme low and high temperatures.
- Lae bystandkrag: Very low power consumption in standby mode, retaining up to 85% charge after one year of non-use.
- Veiligheidsbeskermings: Built-in protection prevents damage to connected devices.
- USB-uitset: 5V/3A, 9V/3A, 12V/2.5A (Max) for charging external devices.
- Tipe C-uitvoer: 45W 9V/5A (Max).
Tegniese spesifikasies
| Kenmerk | Spesifikasie |
|---|---|
| Handelsmerk | Baseus |
| Model | Inflator-6K |
| Battery Tipe | Litium polimeer |
| Battery kapasiteit | 6000 mAh |
| Gegradeerde uitsetkapasiteit | 3700 mAh |
| Invoer (tipe-C) | 5V-2.4A |
| Uitset (USB-A) | 5V-3A (maksimum) |
| Begin Voltage | 12 V |
| Begin Huidig | 600A |
| Piekstroom | 600A |
| Lugkompressordruk | 150 PSI |
| Bedryfstemperatuur | Tot 35°C |
| Afmetings | 10 x 5 x 5 cm |
| Gewig | 50 gram |
Pakketinhoud
Maak seker dat alle items in die pakket teenwoordig is:
- 1 x Baseus 4-in-1 Car Jump Starter and Air Inflator
- 4 x Inflation Nozzles (for various tire types and inflatables)
- 1 x Tipe-C-laaikabel
- 1 x Smart Ignition Clip (Jump Start Clamps)
Veiligheidsinligting
Read all safety warnings and instructions carefully before using this product. Failure to follow the warnings and instructions may result in electric shock, fire, and/or serious injury.
- Moenie die toestel uitmekaar haal, verander of probeer herstel nie.
- Hou die toestel weg van water, vog en hoë temperature.
- Do not use the device if it is damaged or has been dropped.
- Ensure correct polarity (+ to +, - to -) when connecting jump start clamps to a vehicle battery. Incorrect connection can cause damage.
- Hou buite bereik van kinders.
- Gebruik dit in 'n goed geventileerde area.
- Avoid over-inflating tires or other items. Follow recommended pressure levels.
- Do not store the device in direct sunlight or in extreme temperatures.
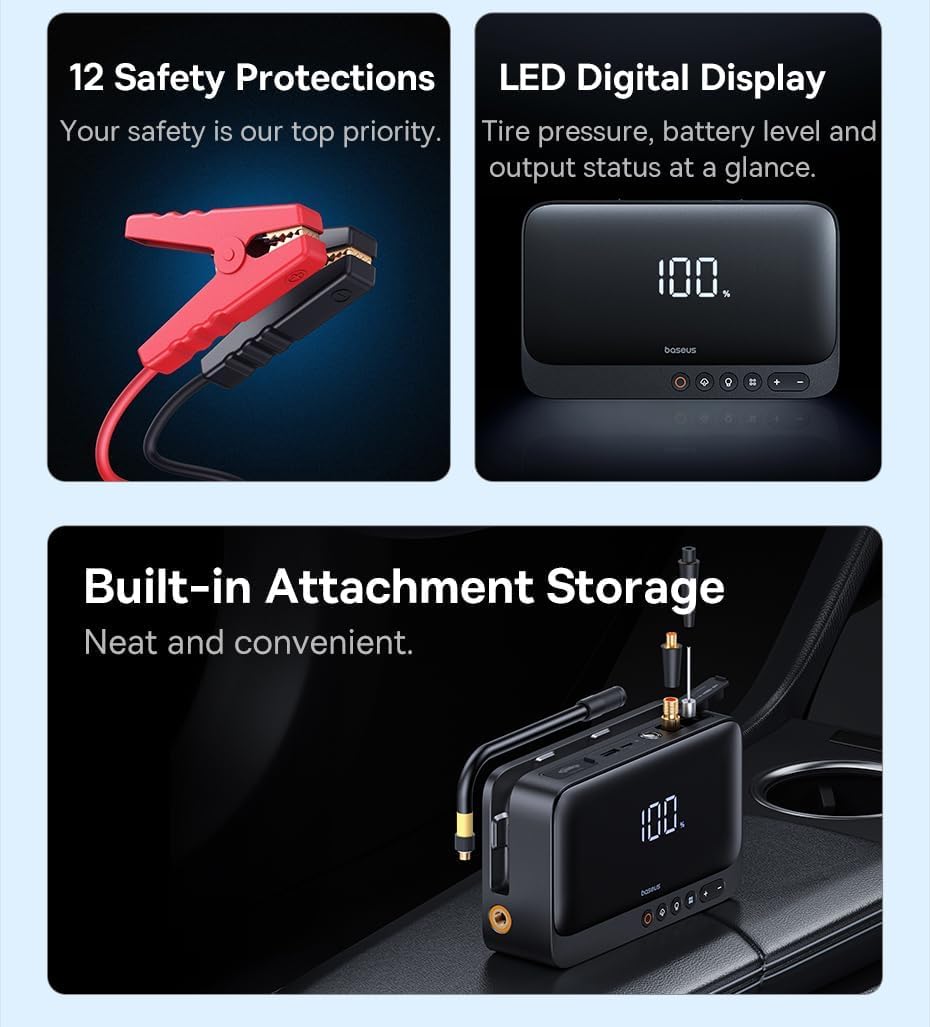 This image highlights the smart safety protections integrated into the jump starter clamps, designed to prevent overcharging, overheating, and short circuits, ensuring safe operation.
Opstelling
Laai die toestel
Before first use, fully charge the device. It is recommended to fully charge the device after each use to ensure it is ready for emergencies.
- Connect the provided Type-C cable to the device's input port.
- Connect the other end of the Type-C cable to a suitable USB power adapter (not included).
- The digital display on the device will show the charging progress. Charge until the display indicates 100%.
 The device can be charged using the provided Type-C cable. Ensure the device is fully charged before use for optimal performance.
Operasie
Spring 'n voertuig aan die gang
Use this function to start a dead car battery. Ensure the device has at least 50% charge before attempting a jump start.
- Connect the smart ignition clip (jump start clamps) to the designated jump start port on the device.
- Heg die ROOI clamp (+) to the positive terminal of the car battery.
- Heg die SWART clamp (-) to the negative terminal of the car battery.
- Verseker beide clamps are securely connected to prevent arcing.
- Begin die voertuig se enjin.
- Once the vehicle starts, immediately remove the clamps from the car battery, starting with the black (-) clamp, dan die rooi (+) clamp.
- Disconnect the smart ignition clip from the device.
This image demonstrates the correct connection of the jump starter clamps to a car battery, showing the device ready to initiate a jump start.
Using the Air Inflator
The built-in air compressor can inflate car tires, bicycle tires, and various sports equipment. Refer to the item's recommended pressure before inflating.
- Select the appropriate inflation nozzle from the included accessories and securely attach it to the air hose.
- Connect the air hose to the device's inflation port.
- Connect the nozzle to the valve of the item to be inflated.
- Use the digital display and control buttons (+ en -) to set the desired pressure (PSI/Bar).
- Press the start button (often indicated by a fan icon) to begin inflation. The device will automatically stop when the preset pressure is reached.
- Disconnect the nozzle and air hose from the item and the device.
 The device actively inflating a car tire, with its digital display showing the current pressure reading, demonstrating its powerful inflation capability.
Gebruik as 'n Power Bank
The device can charge your mobile phones, tablets, and other USB-powered devices via its USB-A output port.
- Connect your device's USB charging cable to the USB-A output port on the Baseus 4-in-1 device.
- The device will automatically begin charging the connected electronic device.
- Monitor the charging status on your connected device.
The device is shown charging a smartphone, highlighting its function as a portable power bank for various electronic devices.
Gebruik die LED-flitslig
The integrated LED flashlight provides illumination for various situations, including emergencies.
- Press the flashlight button (usually indicated by a light bulb icon) to turn on the LED light.
- Press the button again to cycle through different modes (e.g., steady light, SOS signal, emergency beacon).
- Press and hold the button to turn off the flashlight.
Onderhoud
Behoorlike onderhoud verseker die lang lewensduur en optimale werkverrigting van u toestel.
- Skoonmaak: Maak die toestel skoon met 'n sagte, droë lap. Moenie harde chemikalieë of skuurmiddels gebruik nie.
- Berging: Bêre die toestel op 'n koel, droë plek weg van direkte sonlig en uiterste temperature.
- Batterysorg: If the device is not in regular use, charge it every 3-6 months to maintain battery health and prevent deep discharge.
- Hawe onderhoud: Keep all ports (charging, USB, jump start) free of dust and debris.
Probleemoplossing
If you encounter issues with your Baseus 4-in-1 device, refer to the table below for common problems and solutions.
| Probleem | Moontlike oorsaak/oplossing |
|---|---|
| Toestel skakel nie aan nie. | Check the battery level. Recharge the device if the battery is low. |
| Vehicle not jump starting. | Ensure the jump start clamps are correctly connected (positive to positive, negative to negative). Verify the device has sufficient charge (at least 50%). The vehicle battery might be severely damaged and require professional assistance. |
| Air inflator not working or not reaching desired pressure. | Check that the inflation nozzle is securely attached to the item and the air hose is firmly connected to the device. Verify the preset pressure is correctly set. Ensure the device has sufficient power. |
| Device not charging external devices (power bank function). | Ensure the USB charging cable is securely connected to both the device and the external device. Verify the Baseus device has sufficient charge. Try a different USB cable. |
Waarborg en Ondersteuning
This Baseus product comes with a standard manufacturer's warranty. For detailed warranty information, technical support, or service inquiries, please refer to the warranty card included in your package or visit the official Baseus webwerf. Hou jou aankoopkwitansie vir waarborgeise.
Ask a question about this manual
Ask about setup, troubleshooting, compatibility, parts, safety, or missing instructions. Manuals+ will review the question and use this page’s manual context to help answer it.