1. Belangrike veiligheidsinstruksies
When using electrical appliances, basic safety precautions should always be followed to reduce the risk of fire, electric shock, and personal injury. Read all instructions carefully before using the Milex Digital Steam Iron.
- Verseker altyd die voltagDie e op die graderingsetiket stem ooreen met jou hoofstroomvolume.tage.
- Moenie die strykyster, kragkabel of prop in water of ander vloeistowwe dompel nie.
- Ontkoppel die strykyster uit die elektriese aansluiting wanneer jy dit met water vul, leegmaak of wanneer dit nie gebruik word nie.
- Moenie enige toestel gebruik met 'n beskadigde koord of prop, of nadat die toestel wanfunksioneer of op enige manier laat val of beskadig is nie.
- Hou die strykyster en sy koord buite bereik van kinders en troeteldiere wanneer dit aangeskakel is of afkoel.
- Never leave the iron unattended while it is connected to the power supply or on an ironing board.
- Gebruik die strykyster slegs vir die beoogde huishoudelike gebruik.
- The soleplate of the iron can become extremely hot. Avoid direct contact with the hot soleplate.
- Plaas die strykyster altyd op 'n stabiele, hittebestande oppervlak wanneer dit rus.
2. Produk verbyview
The Milex Digital Steam Iron MSI004 is designed for efficient garment care. Familiarize yourself with its components before use.
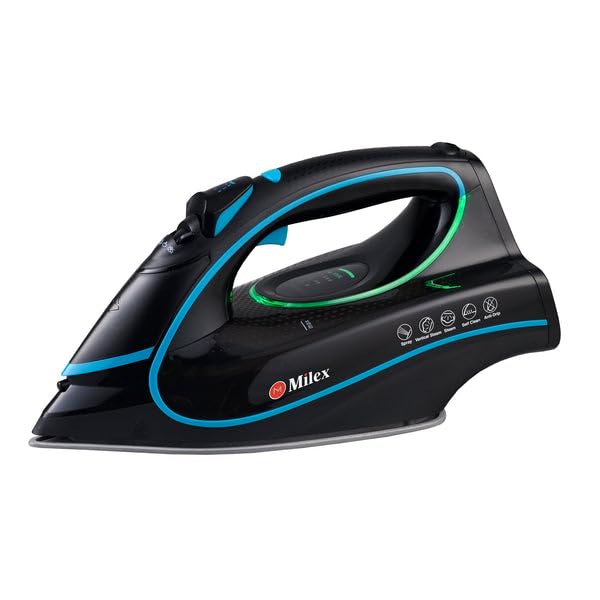
Figure 1: Milex Digital Steam Iron (3/4 view)
This image displays the Milex Digital Steam Iron from a three-quarter angle, highlighting its sleek black design with blue and green accents. Key features visible include the handle, water tank, and the general shape of the soleplate.
Komponente:
- Waterspuitkop: For moistening fabrics.
- Watervulinlaat: Waar water by die tenk gevoeg word.
- Steam Control Dial/Buttons: To adjust steam output.
- Temperature Control Dial/Buttons: To select desired heat setting.
- LED skerm: Shows current settings.
- Hanteer: For gripping the iron.
- Watertenk: Reservoir for water.
- Zoolplaat: The heated surface that glides over fabric.
- Kragkabel: Verbind die strykyster aan die elektriese aansluiting.

Figure 2: Ceramic Soleplate
Hierdie beeld bied 'n nabyskoot view of the ceramic soleplate, showing its textured surface and steam vents designed for even heat distribution and smooth gliding.
3. Opstelling en eerste gebruik
3.1 Uitpak
- Remove the iron from its packaging.
- Remove any protective film or stickers from the soleplate.
- Inspect the iron for any signs of damage. If damaged, do not use and contact customer support.
3.2 Vul die watertenk
- Maak seker dat die strykyster van die kragtoevoer afgekoppel is.
- Set the steam control to the "Dry Ironing" position (if applicable).
- Maak die watervulinlaatdeksel oop.
- Using a measuring cup, carefully pour clean tap water into the water tank up to the "MAX" fill line. Do not overfill.
- Maak die watervulinlaatdeksel stewig toe.
Let wel: For areas with hard water, it is recommended to use a mixture of 50% tap water and 50% distilled water to prevent mineral buildup. Never use perfumed water, vinegar, starch, or descaling agents in the water tank.
4. Bedryfsinstruksies
4.1 Voorbereiding vir Stryk
- Sort garments according to fabric type (e.g., linen, cotton, wool, silk, synthetics).
- Check garment care labels for recommended ironing temperatures.
- Plug the iron into a suitable electrical outlet. The LED display will illuminate.
4.2 Temperatuur en Stoom instel
- Use the temperature control buttons to select the appropriate heat setting for your fabric. The LED display will show the selected temperature.
- Allow the iron to heat up until the indicator light (if present) or LED display confirms it has reached the desired temperature.
- For steam ironing, ensure the water tank is filled. Adjust the steam control to the desired steam level. Steam is typically available at higher temperature settings.
- For dry ironing, ensure the water tank is empty or the steam control is set to "Dry Ironing".
4.3 Gebruik van stoomfunksies
- Deurlopende stoom: Select a steam setting on the control. Steam will be continuously emitted from the soleplate.
- Stoombars: Press the "Burst" button for an extra shot of steam to remove stubborn wrinkles. Wait a few seconds between bursts.
- Watersproei: Press the "Spray" button to lightly moisten fabric before ironing.
4.4 Auto-Shutoff Feature
The iron is equipped with an auto-shutoff safety feature. If left unattended horizontally for a certain period (e.g., 30 seconds) or vertically (e.g., 8 minutes), the heating element will automatically turn off. To reactivate, simply move the iron.
4.5 Anti-drupstelsel
The anti-drip system prevents water from dripping from the soleplate when the iron is not hot enough to produce steam. This helps prevent water stains on delicate fabrics.
5. Onderhoud en Skoonmaak
Regular maintenance ensures optimal performance and extends the life of your Milex Digital Steam Iron.
5.1 Na elke gebruik
- Ontkoppel die strykyster en laat dit heeltemal afkoel.
- Maak enige oorblywende water uit die watertenk leeg.
5.2 Skoonmaak van die zoolplaat
- Wanneer die soolplaat koel is, vee dit af met 'n vuilgoedhouer.amp lap en 'n nie-skurende skoonmaakmiddel indien nodig.
- Do not use abrasive scouring pads or harsh chemicals, as these can damage the ceramic coating.
5.3 Selfreinigende funksie
The iron features a self-cleaning function to remove mineral deposits from the steam vents.
- Vul die watertenk tot by die MAX-lyn.
- Steek die strykyster in en stel die temperatuur op maksimum.
- Sodra die strykyster maksimum temperatuur bereik, ontkoppel dit.
- Hou die strykyster horisontaal oor 'n wasbak.
- Press and hold the self-clean button (refer to product diagram for location). Hot water and steam will be expelled from the soleplate, flushing out mineral deposits.
- Skud die strykyster liggies heen en weer totdat die watertenk leeg is.
- Plug the iron back in and allow it to heat up again to dry the soleplate.
- Ontkoppel en bêre sodra dit afgekoel het.
5.4 Berging
Always store the iron upright on its heel rest, with the cord neatly wrapped, once it has completely cooled down and the water tank is empty.
6. Probleemoplossing
| Probleem | Moontlike oorsaak | Oplossing |
|---|---|---|
| Yster word nie warm nie. | Nie ingeprop nie; krag aftage; auto-shutoff activated; faulty outlet. | Check power connection; check circuit breaker; move iron to reactivate; try a different outlet. |
| Geen stoom of onvoldoende stoom nie. | Water tank empty; temperature too low for steam; steam vents clogged; steam control set to "Dry". | Vul die watertenk; verhoog die temperatuurinstelling; voer selfreiniging uit; pas stoombeheer aan. |
| Water drup van die soolplaat af. | Temperatuur te laag vir stoom (anti-drupstelsel werk); watertenk oorvol. | Verhoog die temperatuur; moenie die watertenk oorvul nie. |
| Wit vlokkies of oorskot op klere. | Mineral buildup in water tank/steam vents. | Perform self-clean function; use distilled water or a mix with tap water. |
7. Spesifikasies
| Modelnommer | MSI004 |
| Handelsmerk | Milex |
| Krag | 2400 W |
| Voltage | 220-240V, 50Hz |
| Funksies | Dry, Spray, Steam, Burst |
| Soolplaatmateriaal | Keramiek |
| Tipe vertoon | LED |
| Watertenk kapasiteit | 450ml |
| Spesiale kenmerke | Anti-drip, Auto-shutoff, Lightweight |
| Produk Afmetings (L x B) | 32L x 16W sentimeter |
8. Waarborg en Kliëntediens
For information regarding warranty coverage, please refer to the warranty card included with your product or contact the retailer where the product was purchased.
If you experience any issues or have questions about your Milex Digital Steam Iron, please contact Milex customer support. You can find more information and contact details on the official Milex webwebwerf of deur die Milex Store on Amazon.