1. Inleiding
This manual provides essential information for the safe and effective operation of your Mastech MS8301A Digital Multimeter. Please read this manual thoroughly before using the device to ensure proper functionality and to prevent potential hazards. Keep this manual for future reference.
2. Veiligheidsinligting
Always adhere to the following safety precautions to avoid electric shock or personal injury, and to prevent damage to the multimeter or the equipment under test.
- Lees instruksies: Understand all instructions and safety information before use.
- Gegradeerde Voltage: Moenie meer as die gegradeerde voltage, as marked on the multimeter, between the terminals or between any terminal and ground.
- Toetsleidrade: Inspekteer toetsdrade vir beskadigde isolasie of blootgestelde metaal. Vervang indien beskadig.
- Circuit Disconnection: Disconnect the circuit power and discharge all high-voltage kapasitors voordat weerstand, kontinuïteit, diodes of kapasitansie getoets word.
- Funksie keuse: Maak seker dat die funksieskakelaar in die korrekte posisie is vir die meting wat uitgevoer word.
- Lewendige stroombane: Do not measure current on a live circuit with the test leads connected in parallel.
- Bedryfsomgewing: Do not operate the multimeter in explosive gas, vapor, or damp omgewings.
- Persoonlike beskermende toerusting: Always wear appropriate personal protective equipment, such as safety glasses, when working with electrical circuits.
- Veiligheidsgradering: This device is rated for CAT III 600V. Do not exceed this rating.
3. Produk verbyview
3.1 Kenmerke
The Mastech MS8301A Digital Multimeter offers a range of features for various electrical measurements:
- Vertoon: 2000 tellings
- Datahou: Vries die vertoonde lesing vir gerieflike opname.
- Batterytoetser: For 1.5V and 9V batteries.
- Kompakte ontwerp: Product Size: 150mm x 74mm x 48mm (5.9" x 2.9" x 1.7")
- Liggewig: Product Weight: 220g (0.48lb)

Image: Detailed features and specifications of the Mastech MS8301A multimeter, including display count, data hold, battery test function, and physical dimensions.
3.2 Komponente
The Mastech MS8301A package typically includes the following components:
- Mastech MS8301A Digital Multimeter Unit
- Toetsdrade (Rooi en Swart)
- AAA Batteries (2x1.5V)
- Calibration Certificate (if applicable)
- Vinnige Begingids
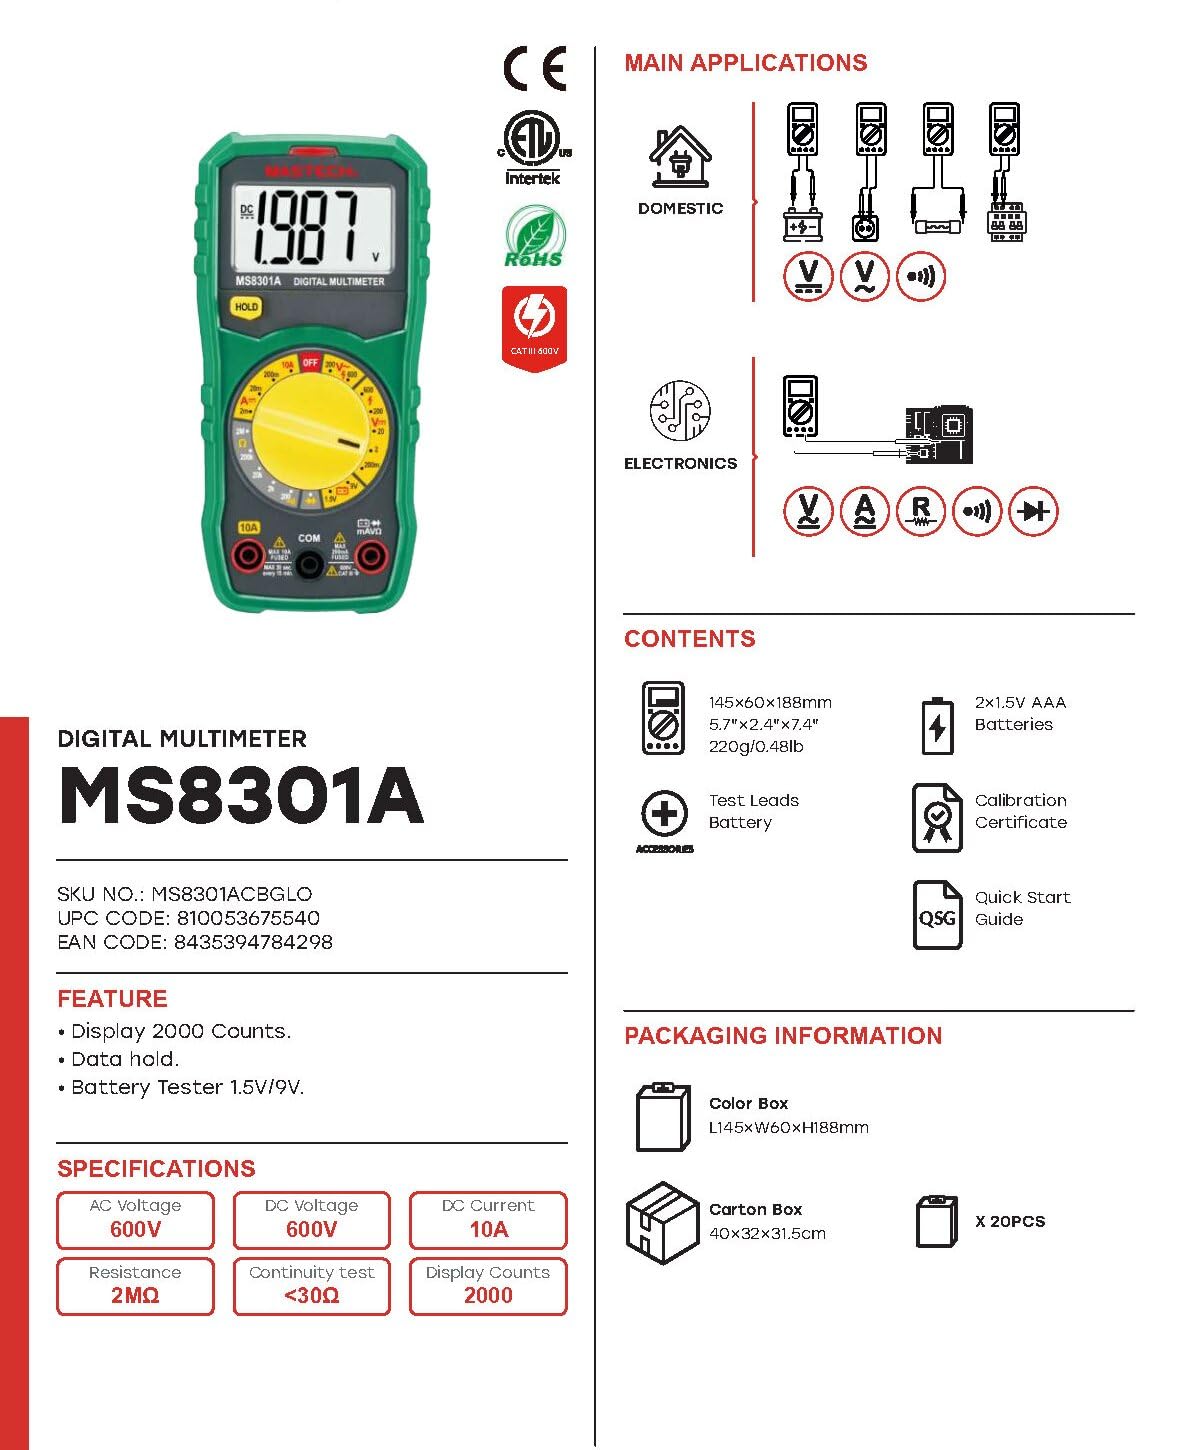
Image: The Mastech MS8301A Digital Multimeter showing its front panel, rotary switch, display, input jacks, and a list of included accessories such as test leads and batteries.
4. Opstelling
4.1 Battery installasie
- Maak seker dat die multimeter afgeskakel is en ontkoppel enige toetsdrade.
- Vind die batteryklepdeksel aan die agterkant van die multimeter.
- Draai die bevestigingsskroef(e) los en verwyder die deksel.
- Plaas twee 1.5V AAA-batterye in en let op die korrekte polariteit (+ en -) soos aangedui in die kompartement.
- Plaas die batteryklepdeksel terug en maak dit vas met die skroef(e).
4.2 Verbinding van toetsdrade
Koppel die toetsdrade aan die toepaslike invoeraansluitings op die multimeter:
- Plaas die swart toetsdraad in die COM (common) jack.
- Vir die meeste metings (Vol.tage, Resistance, Diode, Continuity, Temperature, Battery Test), insert the rooi toetsdraad in die VΩmA domkrag.
- Vir hoë stroommetings (tot 10A), plaas die rooi toetsdraad in die 10A domkrag.
5. Bedryfsinstruksies
Before taking any measurement, ensure the test leads are correctly connected and the rotary switch is set to the desired function.
5.1 Meet DC Voltage (V=)
- Set the rotary switch to the desired V= range (e.g., 20V for measuring up to 20V DC).
- Verbind die rooi toetsdraad aan die positiewe (+) kant van die stroombaan en die swart toetsdraad aan die negatiewe (-) kant.
- Lees die voltage waarde op die skerm.
5.2 Meting van AC Voltage (V~)
- Set the rotary switch to the desired V~ range (e.g., 200V for measuring up to 200V AC).
- Verbind die toetsdrade oor die WS-volumetage bron.
- Lees die voltage waarde op die skerm.
5.3 Measuring DC Current (A=)
- Belangrik: Disconnect power to the circuit before connecting the multimeter in series.
- Set the rotary switch to the desired A= range (e.g., 200mA or 10A). Remember to move the red lead to the 10A jack for high current.
- Open the circuit where current is to be measured.
- Connect the multimeter in series with the circuit, ensuring the current flows through the multimeter.
- Skakel krag na die stroombaan en lees die stroomwaarde op die skerm.
5.4 Measuring Resistance (Ω)
- Belangrik: Maak seker dat die stroombaan gedeaktiveer is en alle kapasitors ontlaai is voordat weerstand gemeet word.
- Set the rotary switch to the desired Ω reeks.
- Verbind die toetsdrade oor die komponent wat gemeet moet word.
- Lees die weerstandswaarde op die skerm.
5.5 Diodetoets (→|)
- Belangrik: Maak seker dat die diode van die stroombaan ontkoppel is.
- Stel die draaiskakelaar op die Diodetoets posisie.
- Connect the red test lead to the anode and the black test lead to the cathode of the diode. The display will show the forward voltage druppel.
- Reverse the leads. The display should show "OL" (Open Loop) for a good diode.
5.6 Kontinuïteitstoets ())))
- Belangrik: Maak seker dat die stroombaan gedeaktiveer is.
- Stel die draaiskakelaar op die Kontinuïteitstoets posisie.
- Connect the test leads across the component or wire to be tested.
- If the resistance is below approximately 30Ω, the buzzer will sound, indicating continuity. The display will also show the resistance value.
5.7 Battery Test (1.5V/9V)
- Stel die draaiskakelaar op die 1.5 V or 9V battery test position, corresponding to the battery type.
- Connect the red test lead to the positive (+) terminal of the battery and the black test lead to the negative (-) terminal.
- Lees die battery voltage op die skerm.
5.8 Datavashouding
Press the "HOLD" button to freeze the current reading on the display. Press it again to release the hold function and resume live readings.
6. Spesifikasies
| Meting | Reeks | Resolusie |
|---|---|---|
| DC Voltage | 200mV / 2V / 20V / 200V / 600V | 100µV / 1mV / 10mV / 100mV / 1V |
| AC Voltage | 200V / 600V | 100mV / 1V |
| DC Stroom | 2mA / 20mA / 200mA / 10A | 1µA / 10µA / 100µA / 10mA |
| Weerstand | 200Ω / 2kΩ / 20kΩ / 200kΩ / 2MΩ | 0.1Ω / 1Ω / 10Ω / 100Ω / 1kΩ |
| Kontinuïteitstoets | Buzzer sounds at <30Ω | — |
| Diodetoets | Voorwaarts voltage druppel | — |
| Battery toets | 1.5V / 9V | — |
Algemene spesifikasies
- Vertoon: 2000 tellings
- Kragtoevoer: 2 x 1.5V AAA-batterye
- Afmetings: 150mm x 74mm x 48mm (5.9 "x 2.9" x 1.7 ")
- Gewig: 220 g (0.48 lb)
- Veiligheidsgradering: CAT III 600V
- Materiaal: Akrielnitril Butadieen Styreen (ABS)
- Kleur: Blou

Image: A table detailing manual ranging specifications for various Mastech digital multimeters, including the MS8301A, showing display counts, safety ratings, and measurement capabilities.
7. Onderhoud
7.1 Batteryvervanging
When the battery low indicator appears on the display, replace the batteries immediately to ensure accurate readings. Follow the steps outlined in Section 4.1 for battery installation.
7.2 Skoonmaak
Vee die omhulsel af met advertensieamp cloth and mild detergent. Do not use abrasives or solvents. Ensure the multimeter is completely dry before use.
7.3 Berging
If the multimeter is not used for an extended period, remove the batteries to prevent leakage and damage to the device. Store in a cool, dry place away from direct sunlight.
8. Probleemoplossing
| Probleem | Moontlike oorsaak | Oplossing |
|---|---|---|
| Geen vertoon of dowwe vertoon | Dooie of lae batterye; verkeerde batterypolariteit. | Vervang batterye; kontroleer batteryoriëntasie. |
| "OL" (Oorlading) word vertoon | Measurement exceeds selected range; open circuit. | Select a higher range; check for open circuit in the component or leads. |
| Verkeerde lesings | Incorrect function selected; poor test lead connection; damaged test leads. | Verify function switch position; ensure secure lead connection; inspect and replace damaged leads. |
| Geen kontinuïteitspiep nie | Open circuit; resistance too high. | Check for breaks in the circuit; ensure resistance is below 30Ω. |
9. Waarborg en Ondersteuning
Mastech products are designed for reliability and performance. For specific warranty information, please refer to the warranty card included with your product or contact Mastech customer support. Keep your purchase receipt as proof of purchase.
For technical support or service inquiries, please visit the official Mastech webwebwerf of kontak hul gemagtigde dienssentrums.