1. Inleiding
The Mastech MS8250D is a high-performance digital multimeter designed for accurate measurement of AC/DC voltage, AC/DC current, resistance, capacitance, frequency, and temperature. It features a 6600-count display, auto/manual ranging, True RMS, Non-Contact Voltage (NCV) detection, diode and continuity testing, and a USB interface for PC connectivity. This manual provides detailed instructions for safe and effective use of the device.
Sleutel kenmerke:
- 6600-count digital display
- Automatic and Manual Ranging
- Ware RMS-meting
- Kontakloos Voltage (NCV) opsporing
- Diode and Continuity Tester (buzzer < 50Ω)
- MAX/MIN value recording
- Data Hold funksie
- Vertoon Agterlig
- Outomatiese afskakeling
- Relatiewe Metingsmodus
- Lae battery aanduiding
- USB Interface for Windows OS
2. Veiligheidsinligting
WAARSKUWING: To avoid electric shock or personal injury, and to avoid damage to the meter or to the equipment under test, read all safety information carefully before using the meter. This device complies with CE, RoHS, and UL safety standards.
- Always ensure the test leads are in good condition and properly connected.
- Moenie meer as die gegradeerde voltage, soos gemerk op die meter, tussen die terminale of tussen enige terminale en aardaarde.
- Wees versigtig wanneer u met voltagbo 30V AC RMS, 42V piek, of 60V DC. Hierdie volumestagdit hou 'n skokgevaar in.
- Before measuring current, ensure the circuit is de-energized and the meter is connected in series.
- Ontkoppel altyd die toetsdrade van die stroombaan voordat u funksies of reekse verander.
- Moenie die meter gebruik as dit beskadig lyk of as die kas oop is nie.
- Vervang die battery sodra die lae battery-aanwyser verskyn om akkurate lesings te verseker.
- Adhere to the specified measurement categories (CAT III 1000V / CAT IV 600V) for safe operation.
3. Produk verbyview
Familiarize yourself with the components of your Mastech MS8250D Digital Multimeter.

Prent 3.1: Voorkant view of the Mastech MS8250D Digital Multimeter, showing the display, function dial, and input jacks. The display shows "1.987 V", indicating a voltage measurement. The function dial is set to T-RMS. Input jacks are labeled for µA mA, A, VΩHz%, and COM.
Hoofkomponente:
- LCD-skerm: Toon metingslesings, eenhede en funksie-aanwysers.
- Funksieskakelaar: Word gebruik om die verlangde meetfunksie te kies (bv. Vol.tage, Current, Resistance, Diode, Continuity, Temperature).
- Funksie knoppies:
- HOU: Vries die huidige skermlesing.
- RANGE: Switches between auto and manual ranging.
- REL: Aktiveer relatiewe metingsmodus.
- MAX/MIN: Teken maksimum en minimum waardes aan.
- FUNC: Selects sub-functions within a dial position (e.g., AC/DC, Diode/Continuity).
- T-RMS: (Indicated on dial) True RMS measurement.
- NCV: Kontakloos Voltage opsporing.
- Agterlig-knoppie: Activates display backlight.
- Invoeraansluitings:
- COM: Common terminal for all measurements (negative lead).
- VΩHz%: Inset vir voltage, resistance, frequency, capacitance, and diode/continuity measurements (positive lead).
- µA mA: Invoer vir mikroampere en milliampere current measurements (positive lead). Fused for protection.
- A: Insette vir ampere current measurements (positive lead). Fused for protection.
Ingesluit komponente:
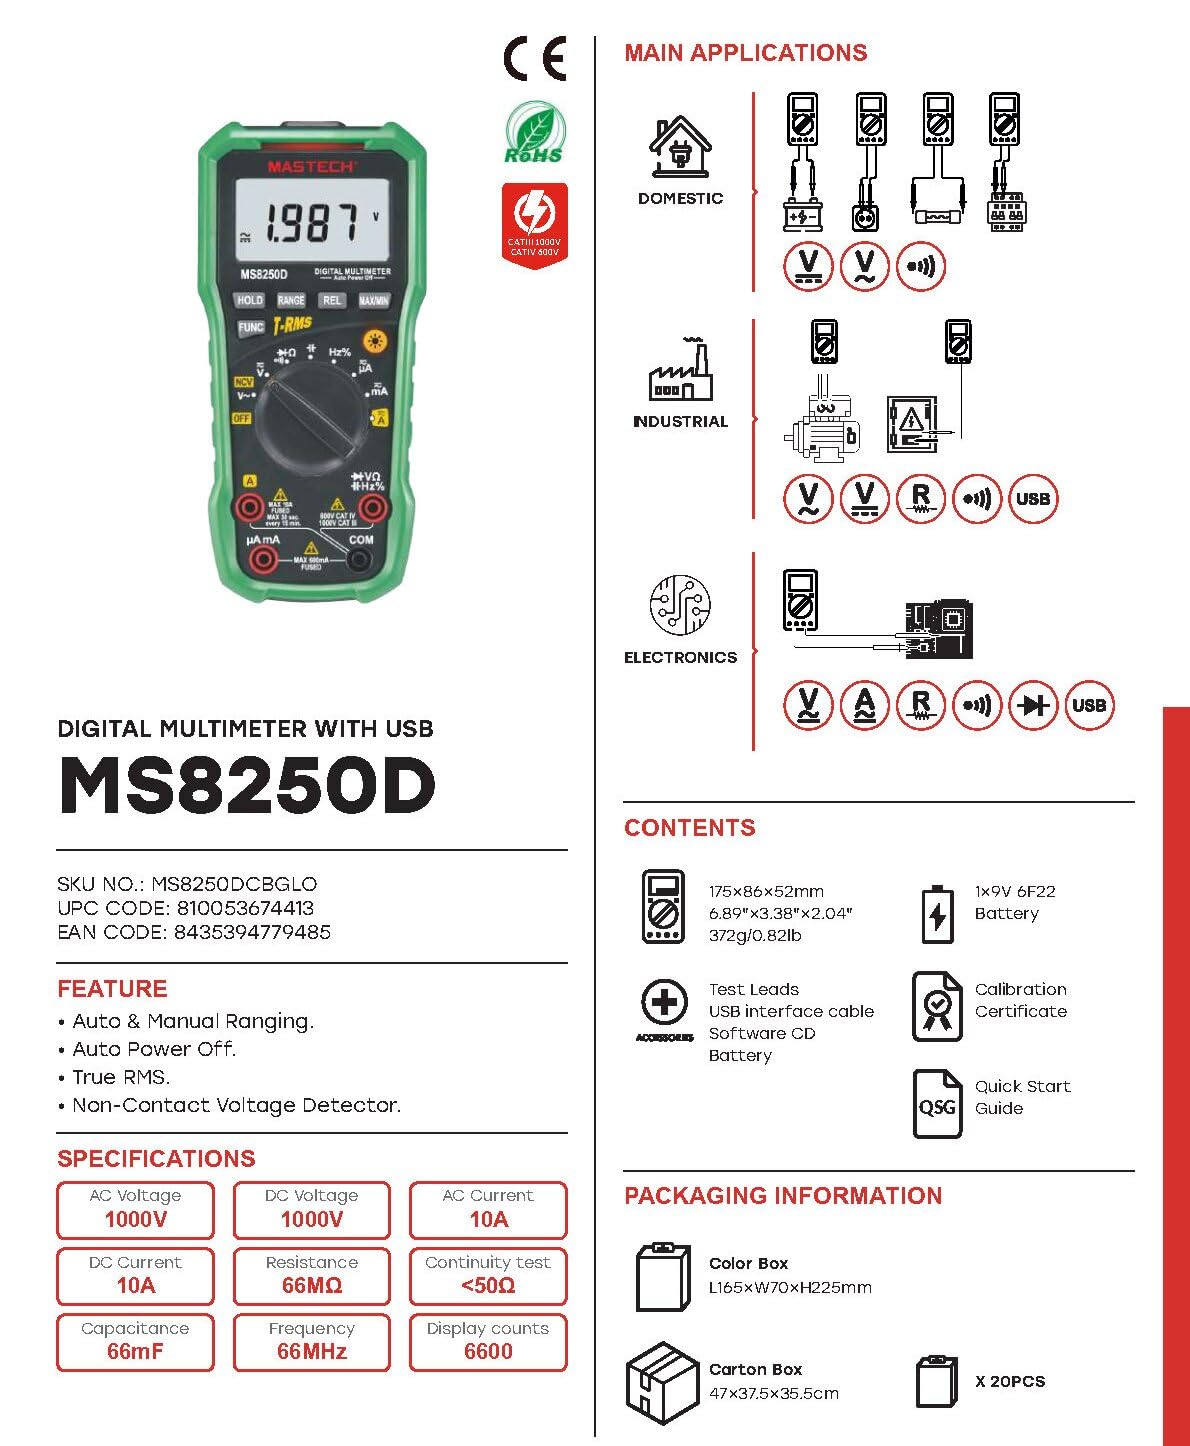
Prent 3.2: Diagram showing the Mastech MS8250D Multimeter and its included accessories. The image also illustrates typical applications in domestic, industrial, and electronics settings.
- Mastech MS8250D Digital Multimeter
- Toetsdrade (Rooi en Swart)
- 1x 9V 6F22 Battery (vooraf geïnstalleer of apart ingesluit)
- USB-koppelvlakkabel
- Software CD (for Windows OS)
- Kalibrasie Sertifikaat
- Kitsbegin-gids
4. Opstelling
4.1 Battery installasie
The MS8250D requires one 9V 6F22 battery for operation. Two LR44 batteries are also mentioned in specifications, likely for a different internal component or an error in data. For the main power, use the 9V battery.
- Maak seker dat die multimeter AFGESKAKEL is.
- Vind die batteryklepdeksel aan die agterkant van die meter.
- Gebruik 'n skroewedraaier om die skroef(e) wat die deksel vasmaak, los te maak.
- Verwyder die deksel.
- Koppel die 9V-battery aan die batteryklemme en let op die korrekte polariteit (+ en -).
- Plaas die battery in die kompartement.
- Plaas die batteryklepdeksel terug en maak dit vas met die skroef(e).
Let wel: The meter also uses 2 LR44 batteries, which are typically included and pre-installed for specific functions like the backlight or non-contact voltage detection. Refer to the quick-start guide for specific details on these smaller batteries if replacement is needed.
4.2 Verbinding van toetsdrade
Koppel altyd die swart toetsdraad aan die COM-aansluiting. Koppel die rooi toetsdraad aan die toepaslike ingangsaansluiting gebaseer op die metingtipe:
- Vir Voltage, Resistance, Capacitance, Frequency, Diode, and Continuity measurements: Connect the red lead to the VΩHz% domkrag.
- For Current measurements (µA or mA): Connect the red lead to the µA mA domkrag.
- For High Current measurements (A): Connect the red lead to the A domkrag.
Ensure the test leads are fully inserted into the jacks.
5. Bedryfsinstruksies
5.1 Krag aan/af
To turn the meter ON, rotate the function dial from the "OFF" position to any desired measurement function. To turn the meter OFF, rotate the function dial back to the "OFF" position.
The meter features an Outomatiese afskakeling function to conserve battery life. It will automatically power off after a period of inactivity. To disable or re-enable this feature, refer to the quick-start guide or the full user manual provided on the software CD.
5.2 Auto Ranging and Manual Ranging
The MS8250D defaults to Outo-wissel, which automatically selects the best measurement range. Press the RANGE knoppie om oor te skakel Handmatige rangskikking. In manual ranging, each press of the RANGE button cycles through available ranges. To return to auto ranging, press and hold the RANGE knoppie.
5.3 Meting AC/DC Voltage (V)
- Stel die funksieskakelaar op die V~ (WS-volumetage) of V- (DC Voltage) posisie.
- Koppel die swart toetskabel aan die COM Jack en die rooi toetsdraad na die VΩHz% domkrag.
- Koppel die toetsprobes oor die stroombaan of komponent wat gemeet moet word.
- Lees die voltage value on the display. The meter will automatically detect AC or DC if the dial is set to the combined V position, or you can use the FUNC button to toggle between AC and DC if available on your model.
5.4 Measuring AC/DC Current (A, mA, µA)
WAARSKUWING: Never connect the meter in parallel to a voltage source when measuring current. This can blow the fuse or damage the meter.
- Skakel die krag na die stroombaan AF.
- Stel die funksieskakelaar op die A~ (WS-stroom), A- (GS-stroom), mA~, mA-, µA~, of µA- posisie.
- Koppel die swart toetskabel aan die COM domkrag.
- Koppel die rooi toetsleiding aan die A jack for high current, or µA mA jack for low current.
- Open the circuit where the current is to be measured and connect the meter in series with the load.
- Pas krag aan die stroombaan toe.
- Read the current value on the display. Use the FUNC knoppie om tussen WS en GS te wissel indien nodig.
5.5 Measuring Resistance (Ω)
- Stel die funksieskakelaar op die Ω posisie.
- Koppel die swart toetskabel aan die COM Jack en die rooi toetsdraad na die VΩHz% domkrag.
- Maak seker dat die stroombaan of komponent wat getoets word, spanningsloos is.
- Verbind die toetsprobes oor die komponent.
- Lees die weerstandswaarde op die skerm.
5.6 Diodetoets en Kontinuïteitstoets
- Stel die funksieskakelaar op die Diode/Kontinuïteit position (often shared with resistance or capacitance).
- Koppel die swart toetskabel aan die COM Jack en die rooi toetsdraad na die VΩHz% domkrag.
- Gebruik die FUNC button to select between Diode Test and Continuity Test.
- Vir Diodetoets: Verbind die rooi sonde aan die anode en die swart sonde aan die katode van die diode. Die skerm sal die voorwaartse volume wys.tage drop (typically 0.5V to 0.8V for silicon diodes). Reversing the probes should show "OL" (Open Loop).
- Vir Kontinuïteitstoets: Connect the probes across the circuit or component. If resistance is less than approximately 50Ω, the buzzer will sound, indicating continuity.
5.7 Measuring Capacitance (F)
- Stel die funksieskakelaar op die Kapasitansie position (often shared with resistance or diode).
- Koppel die swart toetskabel aan die COM Jack en die rooi toetsdraad na die VΩHz% domkrag.
- Ensure the capacitor is fully discharged before testing to avoid damage to the meter.
- Verbind die toetsprobes oor die kondensatorterminale.
- Lees die kapasitansiewaarde op die skerm.
5.8 Measuring Frequency (Hz) and Duty Cycle (%)
- Stel die funksieskakelaar op die Hz% position (often shared with voltagen).
- Koppel die swart toetskabel aan die COM Jack en die rooi toetsdraad na die VΩHz% domkrag.
- Verbind die toetsprobes oor die seinbron.
- The display will show the frequency. Press the FUNC button to toggle to Duty Cycle measurement if available.
5.9 Nie-Kontak Voltage (NCV) Opsporing
- Stel die funksieskakelaar op die NCV posisie.
- Hold the meter with the NCV sensor (usually at the top of the meter) near a live AC voltage bron.
- Die meter sal die teenwoordigheid van WS-volume aanduitage through an audible beep and/or visual indicator (e.g., LED).
5.10 USB Interface (Windows OS)
The MS8250D includes a USB interface for connecting to a computer running Windows OS. This allows for data logging and real-time monitoring of measurements. Install the provided software from the CD and follow the on-screen instructions for driver installation and software usage.
6. Onderhoud
6.1 Skoonmaak
Vee die meter se kas af met advertensiemateriaalamp lap en 'n sagte skoonmaakmiddel. Moenie skuurmiddels of oplosmiddels gebruik nie. Maak seker dat die meter heeltemal droog is voor gebruik.
6.2 Batteryvervanging
When the low battery indicator appears on the display, replace the 9V battery immediately to ensure accurate readings. Follow the steps in Section 4.1 Battery Installation.
6.3 Sekeringvervanging
If the meter fails to measure current, the fuse may be blown. Fuses are located inside the meter. To replace a fuse:
- Ensure the meter is turned OFF and all test leads are disconnected.
- Open the battery compartment cover (and potentially the main case, depending on design).
- Verwyder die ou sekering versigtig.
- Replace with a fuse of the exact same type and rating (e.g., F600mA/250V for mA/µA range, F10A/250V for A range). Refer to the meter's internal markings or the full manual for specific fuse ratings.
- Reassemble the meter, ensuring all screws are tightened.
WAARSKUWING: Never use a fuse with a different rating or bypass the fuse. This can damage the meter and pose a serious safety hazard.
7. Probleemoplossing
| Probleem | Moontlike oorsaak | Oplossing |
|---|---|---|
| Meter skakel nie aan nie. | Dooie battery. | Vervang die 9V-battery. |
| "OL" (Oorlading) word vertoon. | Meting oorskry gekose reeks of meter se maksimum kapasiteit. | Switch to a higher range (if in manual ranging) or ensure the measurement is within the meter's limits. |
| No current reading. | Blown fuse; incorrect lead connection; open circuit. | Check and replace fuse if necessary. Ensure leads are connected correctly (in series). Verify circuit continuity. |
| Onakkurate lesings. | Low battery; poor lead contact; external interference. | Replace battery. Ensure leads are firmly connected. Move away from strong electromagnetic fields. |
| Display shows "USB" but no PC connection. | Drivers not installed; incorrect software settings. | Install drivers from the provided CD. Refer to software manual for connection instructions. |
8. Spesifikasies
The following table details the technical specifications of the Mastech MS8250D Digital Multimeter.

Prent 8.1: Detailed specifications table for the Mastech MS8250D, outlining ranges, resolutions, and accuracies for various measurement functions.
| Funksie | Reeks | Resolusie | Akkuraatheid |
|---|---|---|---|
| DC Voltage | |||
| 660mV | 0.1mV | ±(0.8%+3) | |
| 6.6V/66V/660V/1000V | 1mV/10mV/0.1V/1V | ±(0.5%+5) | |
| AC Voltage (Ware RMS) | |||
| 660mV | 0.1mV | ±(1.5%+5) | |
| 6.6V/66V | 1mV/10mV | ±(1.2%+5) | |
| 660V/1000V | 0.1V/1V | ±(1.0%+3) | |
| DC Stroom | |||
| 660µA/6600µA/66mA/660mA | 0.1µA/1µA/10µA/0.1mA | ±(1.0%+5) | |
| 10A | 10mA | ±(2.0%+5) | |
| AC-stroom (Ware RMS) | |||
| 660µA/6600µA/66mA/660mA | 0.1µA/1µA/0.01mA/0.1mA | ±(1.5%+5) | |
| 10A | 10mA | ±(3.0%+5) | |
| Weerstand | |||
| 660Ω / 6.6kΩ / 66kΩ / 660kΩ / 6.6MΩ | 0.1Ω / 1Ω / 10Ω / 100Ω / 1kΩ | ±(0.8%+5) | |
| 66 XNUMX MΩ | 10kΩ | ±(1.5%+5) | |
| Kapasitansie | |||
| 6.6nF/66nF/660nF/6.6µF/66µF | 1pF/10pF/0.1nF/1nF/10nF | ±(4.0%+5) | |
| 600 µF | 1 µF | ±(3.0%+5) | |
| 6.6mF/66mF | 1µF/10µF | ±(4.0%+5) | |
| Frekwensie | |||
| 66Hz/660Hz/6.6kHz/66kHz | 0.01Hz / 0.1Hz / 1Hz / 10Hz | ±(1.5%+5) | |
| 660kHz/6.6MHz/66MHz | 0.1kHz/1kHz/10kHz | ±(1.5%+5) | |
| Pligsiklus | |||
| 0.1%~99.9% | 0.1% | ±(2.0%+5) | |
Algemene spesifikasies:
- Vertoon: 6600 tellings
- Kragbron: 1x 9V 6F22 Battery (main power), 2x LR44 batteries (auxiliary, e.g., backlight)
- Outo-afskakeling: Ja
- Ware RMS: Ja
- Kontakloos Voltage (NCV) Detector: Ja
- Diode Oop Voltage: 3.2 V
- Kontinuïteits-gonser: < 50Ω
- MAX/MIN: Ja
- Datahou: Ja
- Lae battery-aanwyser: Ja
- Vertoon Agterlig: Ja
- USB-koppelvlak: Yes (Windows OS)
- Veiligheidsgradering: CAT III 1000V / CAT IV 600V
- Meting akkuraatheid: 0.4% (general, specific accuracies per function in table)
- Bedryfsvoltage (Min): 3.2 Volt
- Boonste temperatuurgradering: 50 grade Celsius
- Afmetings (L x B x H): 20 x 15 x 25 cm
- Item gewig: 1 kg
- Materiaal: Akrielnitril Butadieen Styreen (ABS)
- Kleur: Blou
- Vervaardiger: MASTECH
- Land van oorsprong: Taiwan
- Sertifiserings: CE, RoHS, UL
9. Waarborg en Ondersteuning
Mastech products are designed for reliability and durability. For specific warranty information, please refer to the warranty card included with your product or contact Mastech customer support directly. Typically, Mastech offers a limited warranty against defects in materials and workmanship.
For technical support, troubleshooting assistance, or warranty claims, please contact your authorized Mastech dealer or visit the official Mastech webwebwerf vir kontakinligting.
Beskikbaarheidsduur van EU-onderdele: 1 Jaar