1. Inleiding
The Mastech MS8233B is a compact, handheld digital multimeter designed for measuring AC/DC voltage, DC current, resistance, diode, continuity, and temperature. It features a 2000-count display, data hold function, and low battery indication, making it suitable for various electrical testing applications in domestic and electronics environments.
2. Veiligheidsinligting
To ensure safe operation and service of the meter, please read this manual thoroughly before use. Failure to observe safety warnings can result in severe injury or death.
- Maak altyd seker dat die meter in 'n goeie werkende toestand is voor gebruik.
- Moenie meer as die gegradeerde voltage, which is 600V CAT III.
- Wees versigtig wanneer u met voltagbo 30V AC RMS, 42V piek, of 60V DC, aangesien dit 'n skokgevaar inhou.
- Ontkoppel altyd die toetsdrade van die stroombaan voordat u funksies verander.
- Vervang die battery onmiddellik wanneer die lae battery-aanwyser verskyn.
- Do not operate the meter if the battery cover is not properly closed.
- Voldoen aan plaaslike en nasionale veiligheidskodes.
3. Produk verbyview
The Mastech MS8233B Digital Multimeter features a clear display, a rotary function switch, and dedicated input jacks for various measurements.

Figuur 3.1: Voorkant view of the Mastech MS8233B Digital Multimeter. This image displays the LCD screen, rotary function switch, input jacks, and control buttons.
3.1 Komponente
- LCD-skerm: Toon metingslesings, eenhede en funksie-aanwysers.
- Funksie Draaiskakelaar: Used to select the desired measurement function (e.g., V~, V-, A-, Ω, Diode, Continuity, Temp).
- HOU knoppie: Vries die huidige lesing op die skerm.
- Agterlig-knoppie: Aktiveer die skerm se agtergrond vir verbeterde sigbaarheid in lae ligtoestande.
- VΩmA Input Jack: Positiewe invoer vir voltage, resistance, diode, continuity, and current measurements up to 200mA.
- COM-invoeraansluiting: Gemeenskaplike (negatiewe) invoer vir alle metings.
- 10A-insetaansluiting: Positive input for high current measurements (up to 10A).
4. Opstelling
4.1 Battery installasie
The MS8233B requires 2 LR44 batteries for operation. Ensure the batteries are installed correctly before first use or when replacing them.
- Skakel die multimeter af en ontkoppel alle toetsdrade.
- Vind die batterykompartement aan die agterkant van die meter.
- Gebruik 'n skroewedraaier om die batteryklepdeksel oop te maak.
- Insert the 2 LR44 batteries, observing the correct polarity (+ and -).
- Plaas die deksel van die batterykompartement terug en maak dit met die skroef vas.
5. Bedryfsinstruksies
Before taking any measurements, ensure the test leads are properly connected to the meter and the circuit under test.
5.1 Algemene werking
- Turn the rotary switch from the "OFF" position to the desired measurement function.
- Connect the test leads to the appropriate input jacks and the circuit.
- Lees die meetwaarde op die LCD-skerm.
- To turn off the meter, rotate the switch back to the "OFF" position.
5.2 DC Voltage Measurement (V-)
- Stel die draaiskakelaar op die verlangde GS-volumetage-reeks (bv. 200mV, 2V, 20V, 200V, 600V).
- Koppel die rooi toetskabel aan die VΩmA-aansluiting en die swart toetskabel aan die COM-aansluiting.
- Verbind die toetsdrade oor die komponent of stroombaan wat gemeet moet word.
5.3 AC Voltage Meting (V~)
- Stel die draaiskakelaar op die verlangde WS-volumetage-reeks (bv. 200V, 600V).
- Koppel die rooi toetskabel aan die VΩmA-aansluiting en die swart toetskabel aan die COM-aansluiting.
- Verbind die toetsdrade oor die WS-volumetage bron.
5.4 DC Current Measurement (A-)
- Stel die draaiskakelaar op die verlangde GS-stroombereik (bv. 200µA, 2mA, 20mA, 200mA, 10A).
- For currents up to 200mA, connect the red test lead to the VΩmA jack. For currents up to 10A, connect the red test lead to the 10A jack. Always connect the black test lead to the COM jack.
- Connect the meter in series with the circuit to measure the current.
- Waarskuwing: Do not attempt to measure currents exceeding 200mA through the VΩmA jack or 10A through the 10A jack.
5.5 Weerstandsmeting (Ω)
- Stel die draaiskakelaar op die verlangde weerstandsbereik (bv. 200Ω, 2kΩ, 20kΩ, 200kΩ, 2MΩ).
- Koppel die rooi toetskabel aan die VΩmA-aansluiting en die swart toetskabel aan die COM-aansluiting.
- Connect the test leads across the resistor or component to be measured. Ensure the circuit is de-energized.
5.6 Diode-toets
- Stel die draaiskakelaar op die diodesimbool.
- Koppel die rooi toetskabel aan die VΩmA-aansluiting en die swart toetskabel aan die COM-aansluiting.
- Connect the red test lead to the anode and the black test lead to the cathode of the diode. The display will show the forward voltage druppel.
- Reverse the leads. An open circuit (OL) reading indicates a good diode. A reading in both directions or no reading indicates a faulty diode.
5.7 Kontinuïteitstoets
- Stel die draaiskakelaar op die Kontinuïteitsimbool.
- Koppel die rooi toetskabel aan die VΩmA-aansluiting en die swart toetskabel aan die COM-aansluiting.
- Connect the test leads across the circuit or component. If the resistance is less than approximately 60Ω, the buzzer will sound, indicating continuity.
5.8 Temperatuurmeting
While the product title mentions temperature, the MS8233B model's detailed specifications do not explicitly list a temperature function. If your specific unit includes this feature, typically you would:
- Set the rotary switch to the Temperature function (usually marked with °C or °F).
- Connect a K-type thermocouple (if included) to the VΩmA and COM jacks, observing polarity.
- Plaas die termokoppel-sonde op die punt waar die temperatuur gemeet moet word.
5.9 Data Vashou Funksie
- Press the "HOLD" button to freeze the current reading on the display.
- Press the "HOLD" button again to release the reading and resume live measurements.
5.10 Agtergrondbeligtingsfunksie
- Press the backlight button (often marked with a sun symbol) to turn on the display backlight.
- Press the button again to turn off the backlight.
6. Onderhoud
6.1 Batteryvervanging
When the low battery indicator appears on the display, replace the batteries as described in Section 4.1. Always use 2 new LR44 batteries.
6.2 Skoonmaak
Vee die omhulsel af met advertensieamp lap en sagte skoonmaakmiddel. Moenie skuurmiddels of oplosmiddels gebruik nie. Maak seker dat die meter heeltemal droog is voor gebruik.
7. Probleemoplossing
- Geen vertoon/Dowwe vertoon: Kontroleer batteryinstallasie en laai. Vervang batterye indien nodig.
- "OL" of "1" op skerm: Indicates an over-range condition or open circuit. Select a higher range or check connections.
- Verkeerde lesings: Ensure correct function selection, proper lead connection, and that the circuit is de-energized for resistance/diode tests.
- Geen kontinuïteits-gonser: Check if the resistance is above 60Ω or if the function is correctly selected.
8. Spesifikasies
The following table outlines the technical specifications for the Mastech MS8233B Digital Multimeter.
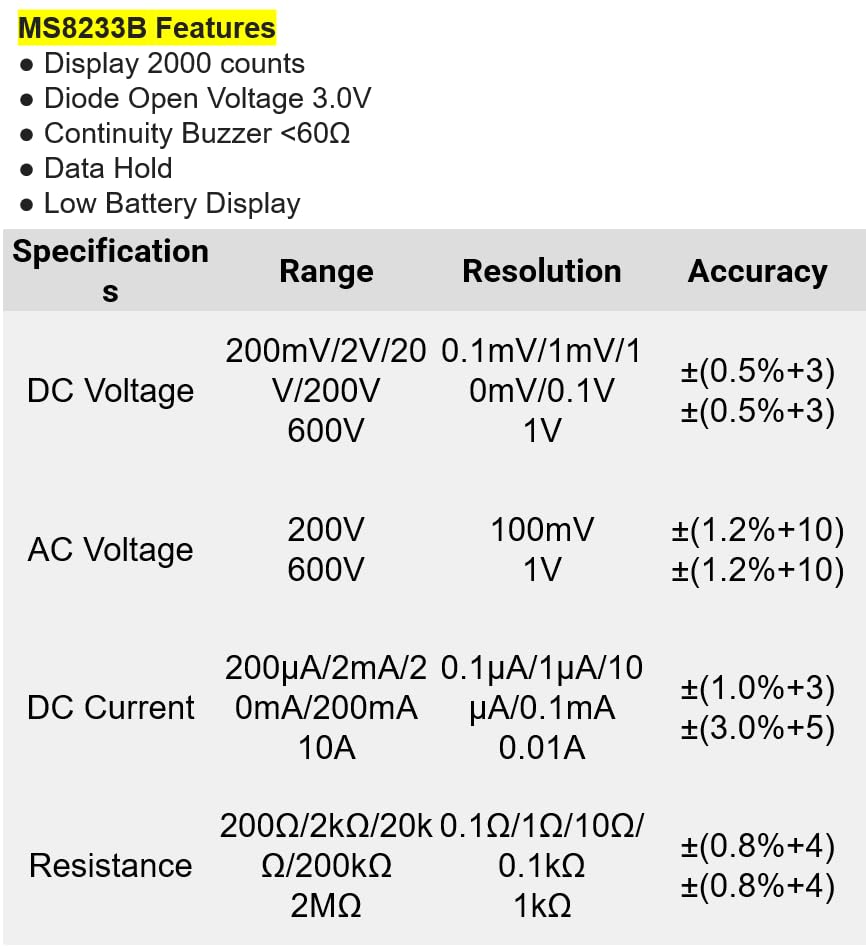
Figuur 8.1: Detailed specifications for the Mastech MS8233B, including ranges, resolutions, and accuracies for various measurements.
| Spesifikasie | Waarde |
|---|---|
| Vertoon | 2000 tellings |
| Diode Oop Voltage | 3.0 V |
| Kontinuïteit Buzzer | <60Ω |
| Data hou | Ja |
| Lae battery vertoon | Ja |
| DC Voltage Reeks | 200mV, 2V, 20V, 200V, 600V |
| AC Voltage Reeks | 200V, 600V |
| GS-stroomreeks | 200µA, 2mA, 20mA, 200mA, 10A |
| Weerstandsreeks | 200Ω, 2kΩ, 20kΩ, 200kΩ, 2MΩ |
| Veiligheidsgradering | CAT III 600V |
| Kragbron | 2 x LR44-batterye (ingesluit) |
| Produk afmetings | 20 x 15 x 25 cm |
| Item gewig | 1 Kilogram |
| Vervaardiger | MASTECH |
| Item Modelnommer | YQ-MS8233B |
| Land van oorsprong | Taiwan |

Figuur 8.2: A comparison table showing features across various Mastech digital multimeter models, including the MS8233B.
9. Waarborg en Ondersteuning
For warranty information, technical support, or service inquiries, please refer to the documentation provided with your purchase or contact your retailer. Keep your purchase receipt as proof of purchase for any warranty claims.