Brilvibera Black-Motion Sensor
Brilvibera Large Motion Sensor Outdoor Wall Lights User Manual
Model: Black-Motion Sensor (B0D2DC8XCZ)
1. Inleiding
This user manual provides detailed instructions for the installation, operation, and maintenance of your Brilvibera Large Motion Sensor Outdoor Wall Light. Designed for outdoor use, this fixture combines modern aesthetics with advanced motion sensing and dusk-to-dawn capabilities to enhance the safety and ambiance of your home's exterior.

Figure 1.1: Brilvibera Large Motion Sensor Outdoor Wall Light. This image shows the black-finished outdoor wall light with its clear glass panels, revealing two E12 bulb sockets inside. A motion sensor is visible at the top of the fixture.
2. Produkkenmerke
- Upgraded Sensor with 4 Lighting Modes: Features High, Low, Dusk to Dawn (DTD), and Manual Override modes for versatile lighting control.
- Large Size & Versatile Application: Measures 18 inches in height, suitable for porches, front doors, garages, entryways, balconies, and gardens.
- Modern Style & E12 Base Socket: Two-light modern design with clear lamp shades, compatible with 40W max E12-based bulbs (bulbs not included).
- Waterproof & Weather Resistance: Constructed from premium aluminum with an IP65 waterproof rating, ensuring durability against rain, snow, and extreme temperatures.
- ETL-sertifisering: Guarantees superior quality and safe operation.
3. Pakketinhoud
Maak asseblief seker dat alle komponente teenwoordig is voordat u met die installasie begin:
- Brilvibera Outdoor Wall Light Fixture
- Monteringshardeware (skroewe, draadmoere, monteerplaat)
- Shade (pre-installed)
- Gebruikershandleiding
4. Spesifikasies
| Eienskap | Waarde |
|---|---|
| Handelsmerk | Brilvibera |
| Model | Black-Motion Sensor |
| Kleur | Swart |
| Materiaal | Aluminum, Glass, Metal |
| Styl | Modern, Klassiek, Kontemporêr, Midde-eeuse Modern |
| Liggaamvorm | Skons |
| Produk afmetings | 18 duim (Hoogte) |
| Spesifieke gebruike | Slegs buite gebruik |
| Kragbron | AC/DC |
| Installasie tipe | Oppervlakmontering |
| Spesiale kenmerke | Energy Efficient, Motion Sensor, Waterproof |
| Beheer metode | Touch (via sensor settings) |
| Ligbrontipe | LED (compatible) |
| Voltooi Tipe | Mat |
| Skadu Materiaal | Glas |
| Aantal ligbronne | 2 |
| Voltage | 120 Volt |
| Wattage (maks.) | 40 watt per gloeilamp |
| Gloeilamp basis | E12 |
| Waterweerstandvlak | Waterdig (IP65) |
| Sertifiserings | ETL gelys |
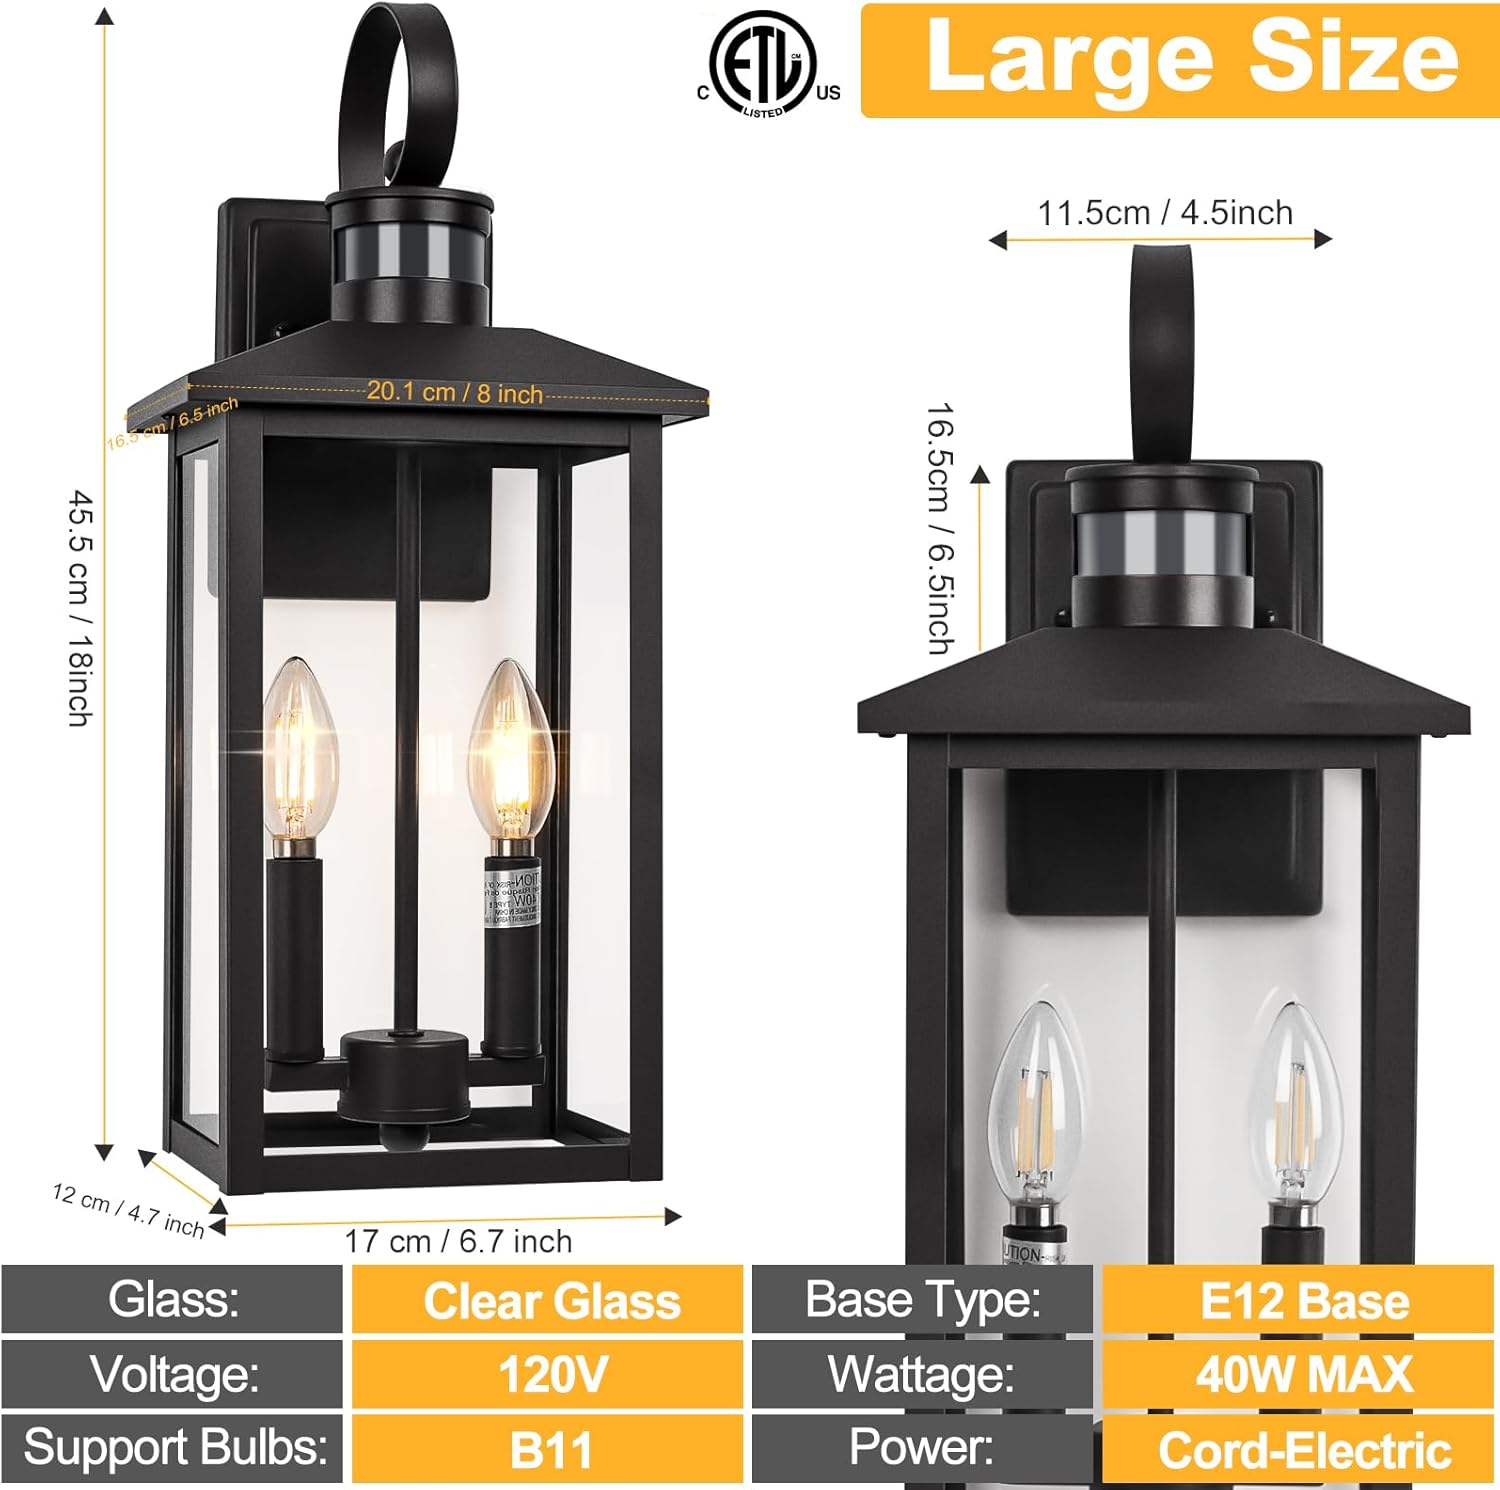
Figure 4.1: Product Dimensions. This image provides detailed measurements of the outdoor wall light, including its 18-inch height and other key dimensions for installation planning.
5. Veiligheidsinligting
Lees en verstaan asseblief alle instruksies voordat u hierdie toestel installeer of gebruik. Versuim om dit te doen, kan lei tot elektriese skok, brand of ander gevare wat beserings of skade aan eiendom kan veroorsaak.
- Always turn off power at the circuit breaker before installation or servicing.
- Raadpleeg 'n gekwalifiseerde elektrisiën as jy onseker is oor die installasieproses.
- Maak seker dat alle elektriese verbindings veilig is en voldoen aan plaaslike kodes en verordeninge.
- Moenie die maksimum wat oorskry nietage specified for the bulbs (40W max E12).
- This fixture is designed for outdoor use only.
- Hanteer glaskomponente versigtig om breek te voorkom.
6. Opstelling en installering
Follow these steps for proper installation of your outdoor wall light. It is recommended to have two people for installation for safety and ease.
- Berei voor vir installasie:
- Turn off the power to the light fixture at the main circuit breaker.
- Maak seker dat die monteeroppervlak skoon, droog en struktureel gesond is.
- Heg monteerplaat aan:
- Bevestig die monteerplaat aan die aansluitkas met die meegeleverde skroewe. Maak seker dat die plaat gelyk is.
- Draadverbindings:
- Verbind die swart draad van die toestel aan die swart (lewendige) draad van die huis.
- Verbind die wit draad van die toestel aan die wit (neutrale) draad van die huis.
- Connect the fixture's ground wire to the house's ground wire (or ground screw on the mounting plate).
- Bevestig alle verbindings met draadmoere en draai dit toe met elektriese band vir ekstra veiligheid.
- Monteer die armatuur:
- Carefully align the fixture with the mounting plate and secure it with the provided screws or nuts.
- Installeer gloeilampe:
- Insert E12 base bulbs (not included) into the sockets. Do not exceed 40W per bulb.
- Herstel krag:
- Skakel die krag weer aan by die stroombreker.

Figure 6.1: Key Components. This image highlights the main parts of the light fixture, including the top handle, the dusk to dawn sensor, the E12 bulb base, and the durable aluminum construction.
7. Bedryfsinstruksies
Your Brilvibera outdoor wall light features an advanced sensor with multiple operating modes. The mode selection switch is located under the sensor cap at the top of the fixture.
7.1 Skakel van Beligtingsmodusse
To change the lighting mode:
- Carefully unscrew the cap of the sensor located at the top of the light fixture.
- Locate the small switch inside the sensor housing.
- Slide the switch to select your desired mode: LOW, HIGH, or DTD (Dusk to Dawn).
- Screw the sensor cap back on securely.
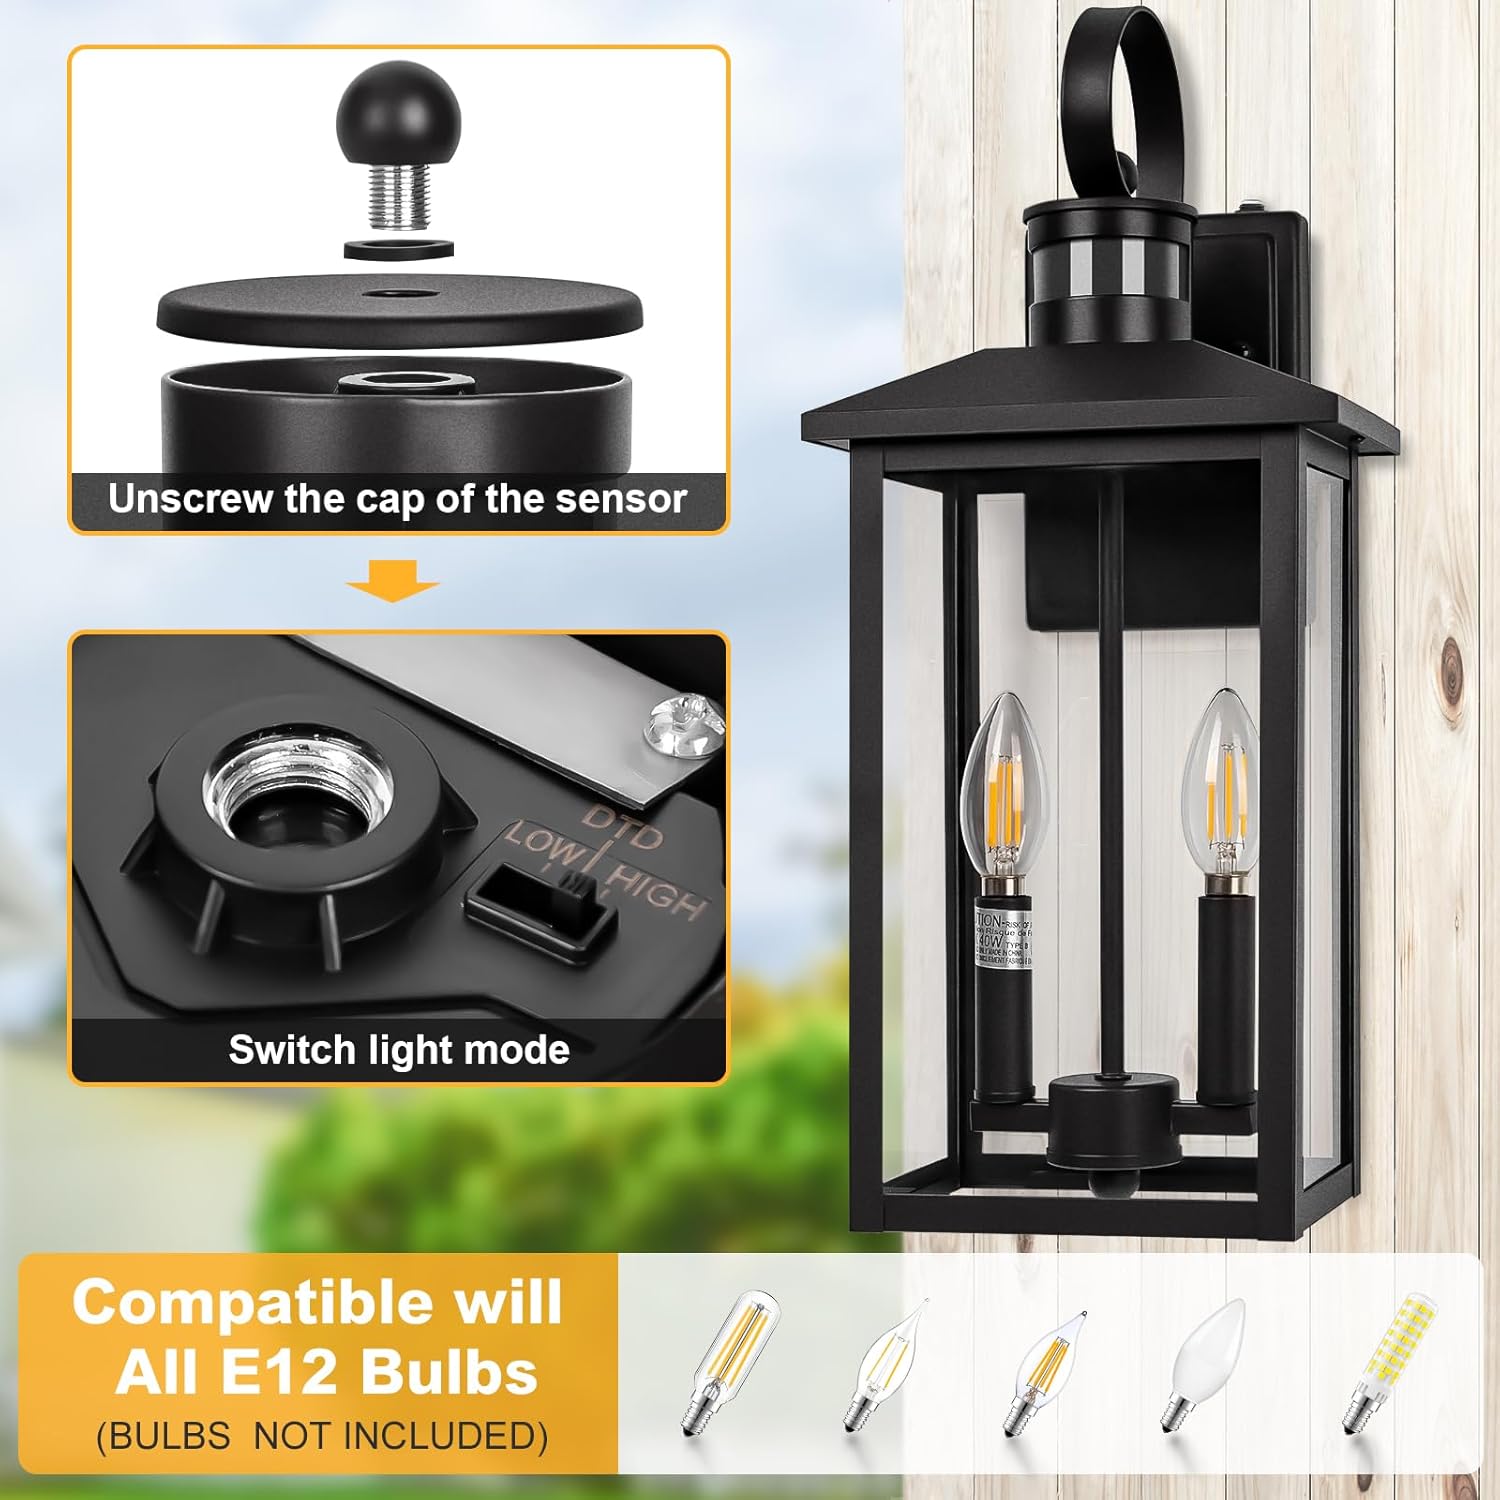
Figure 7.1: Switching Light Modes. This image illustrates the process of accessing the mode selection switch by unscrewing the sensor cap.
7.2 Lighting Modes Explained
- Hoë modus:
During nighttime, the light stays on at 30% brightness. When motion is detected, it automatically brightens to 100% for 120 seconds, then returns to 30% brightness if no further motion is detected.
- Lae modus:
During nighttime, the light remains off when no motion is detected. When motion is detected, it turns on to 100% brightness for 120 seconds, then turns off if no further motion is detected.
- DTD (Dusk to Dawn) Mode:
The light automatically turns on at night and stays on at 100% brightness until dawn, when it automatically turns off.
- Handmatige oorheersingsmodus:
To activate manual override, quickly turn the wall switch OFF and then ON within 2 seconds. The light will stay on at 100% brightness for 8 hours. It will then turn off at dawn and automatically return to the previously selected Auto mode (High, Low, or DTD).

Figure 7.2: Lighting Mode Behavior. This diagram illustrates how the light behaves in Low, High, and Dusk to Dawn modes based on motion detection and time of day.
7.3 Bewegingsensorfunksionaliteit
The integrated motion sensor detects movement up to 40 feet away with a 220-degree detection angle. This ensures reliable activation when people, animals, or vehicles approach the fixture.
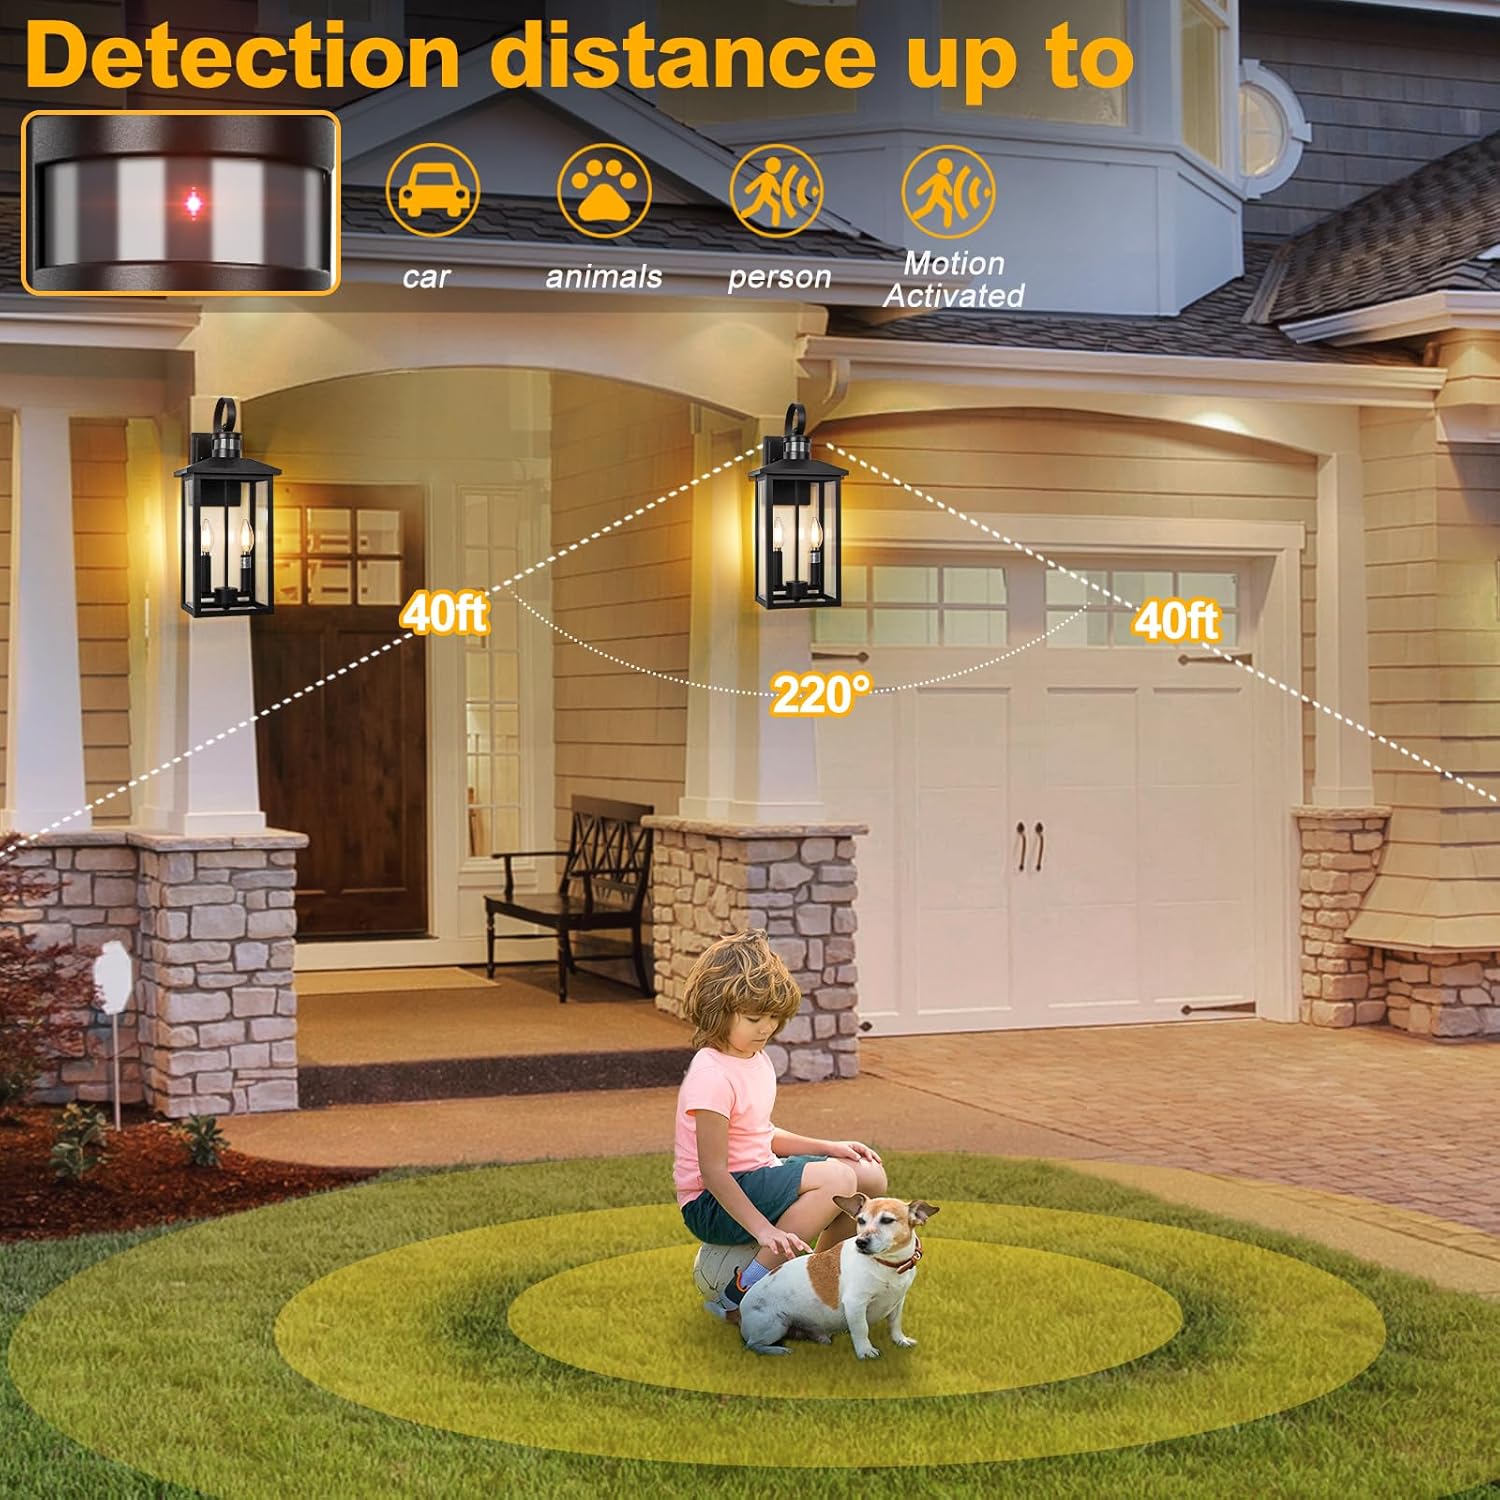
Figure 7.3: Motion Detection Range. This image visually represents the effective detection distance and angle of the motion sensor.
8. Onderhoud
Regular maintenance will help prolong the life and appearance of your outdoor wall light.
- Skoonmaak:
- Maak seker dat krag af is voor skoonmaak.
- Vee die toebehore af met 'n sagte, damp cloth. Do not use abrasive cleaners or solvents, as they may damage the finish or glass.
- Clean the motion sensor lens periodically to ensure optimal performance.
- Gloeilamp vervanging:
- Skakel krag by die stroombreker af.
- Laat die bolle heeltemal afkoel voordat jy dit aanraak.
- Unscrew the old E12 bulb and screw in a new one. Ensure the new bulb does not exceed 40W.
- Weerweerstand:
The fixture is designed to withstand various weather conditions, including rain, snow, sun, and wind, thanks to its IP65 waterproof rating and durable aluminum construction.

Figure 8.1: Weather Resistance. This image visually confirms the fixture's ability to withstand various outdoor elements.
9. Probleemoplossing
As jy probleme met jou ligte ondervind, raadpleeg die volgende algemene probleme en oplossings:
| Probleem | Moontlike oorsaak | Oplossing |
|---|---|---|
| Lig skakel nie aan nie. | No power; loose wiring; faulty bulb; sensor obstructed. | Check circuit breaker. Verify all wire connections are secure. Replace bulb. Ensure sensor is not covered or dirty. |
| Lig bly konstant aan. | Sensor in DTD mode; continuous motion detected; sensor malfunction. | Check sensor mode setting (ensure not DTD). Remove any objects causing constant motion detection. If problem persists, contact support. |
| Ligte flikkering of dowwe. | Loose bulb; incompatible bulb; unstable power supply. | Tighten bulb. Ensure bulb is compatible (E12, 40W max). Consult an electrician for power supply issues. |
| Bewegingsensor bespeur nie. | Sensor obstructed; incorrect mode; sensor sensitivity issue. | Clear any obstructions from sensor. Verify sensor is in High or Low mode. Ensure sensor lens is clean. |
10. Waarborg en Ondersteuning
This Brilvibera product is ETL Listed, ensuring it meets recognized safety standards. For specific warranty details or technical support, please refer to the product packaging or contact Brilvibera customer service directly. Contact information can typically be found on the manufacturer's website or the original purchase receipt.
Ask a question about this manual
Ask about setup, troubleshooting, compatibility, parts, safety, or missing instructions. Manuals+ will review the question and use this page’s manual context to help answer it.