Inleiding
This manual provides detailed instructions for the safe and efficient operation, maintenance, and troubleshooting of your Hamilton Beach FlexBrew and 2-Way Programmable Coffee Makers. Please read all instructions carefully before using your appliance.
Belangrike veiligheidsinligting
- Lees alle instruksies.
- Moenie aan warm oppervlaktes raak nie. Gebruik handvatsels of knoppe.
- Om teen elektriese skok te beskerm, moenie die koord, prop of koffiemasjien in water of ander vloeistof dompel nie.
- Noukeurige toesig is nodig wanneer enige toestel deur of naby kinders gebruik word.
- Trek uit die stopcontact wanneer dit nie gebruik word nie en voor skoonmaak. Laat afkoel voor jy onderdele aan- of afhaal, en voordat jy die toestel skoonmaak.
- Moenie enige toestel gebruik met 'n beskadigde koord of prop, of nadat die toestel wanfunksioneer of op enige manier beskadig is nie.
- Die gebruik van bykomstighede wat nie deur die toestelvervaardiger aanbeveel word nie, kan beserings veroorsaak.
- Moenie buite gebruik nie.
- Moenie dat koord oor die rand van tafel of toonbank hang, of aan warm oppervlaktes raak nie.
- Moenie op of naby 'n warm gas- of elektriese brander, of in 'n verhitte oond plaas nie.
- Om te ontkoppel, draai enige beheerder na 'af' en verwyder dan die prop uit die muursok.
- Moenie die toestel vir ander as die bedoeling gebruik nie.
Onderdele-identifikasie
Familiarize yourself with the components of your coffee makers:


FlexBrew Coffee Maker Components:
- Waterreservoir: Hou water vir brou.
- Single-Serve Brew Head: For K-Cup pods or ground coffee.
- Carafe Brew Basket: For 12-cup brewing with ground coffee.
- Beheerpaneel: Buttons for time, delay brew, cup size, brew strength, and power.
- Glas karaf: 12-koppie kapasiteit.
- K-Cup-peulhouer: For single-serve pods.
- Gemaalde Koffie Filtermandjie: For single-serve ground coffee.
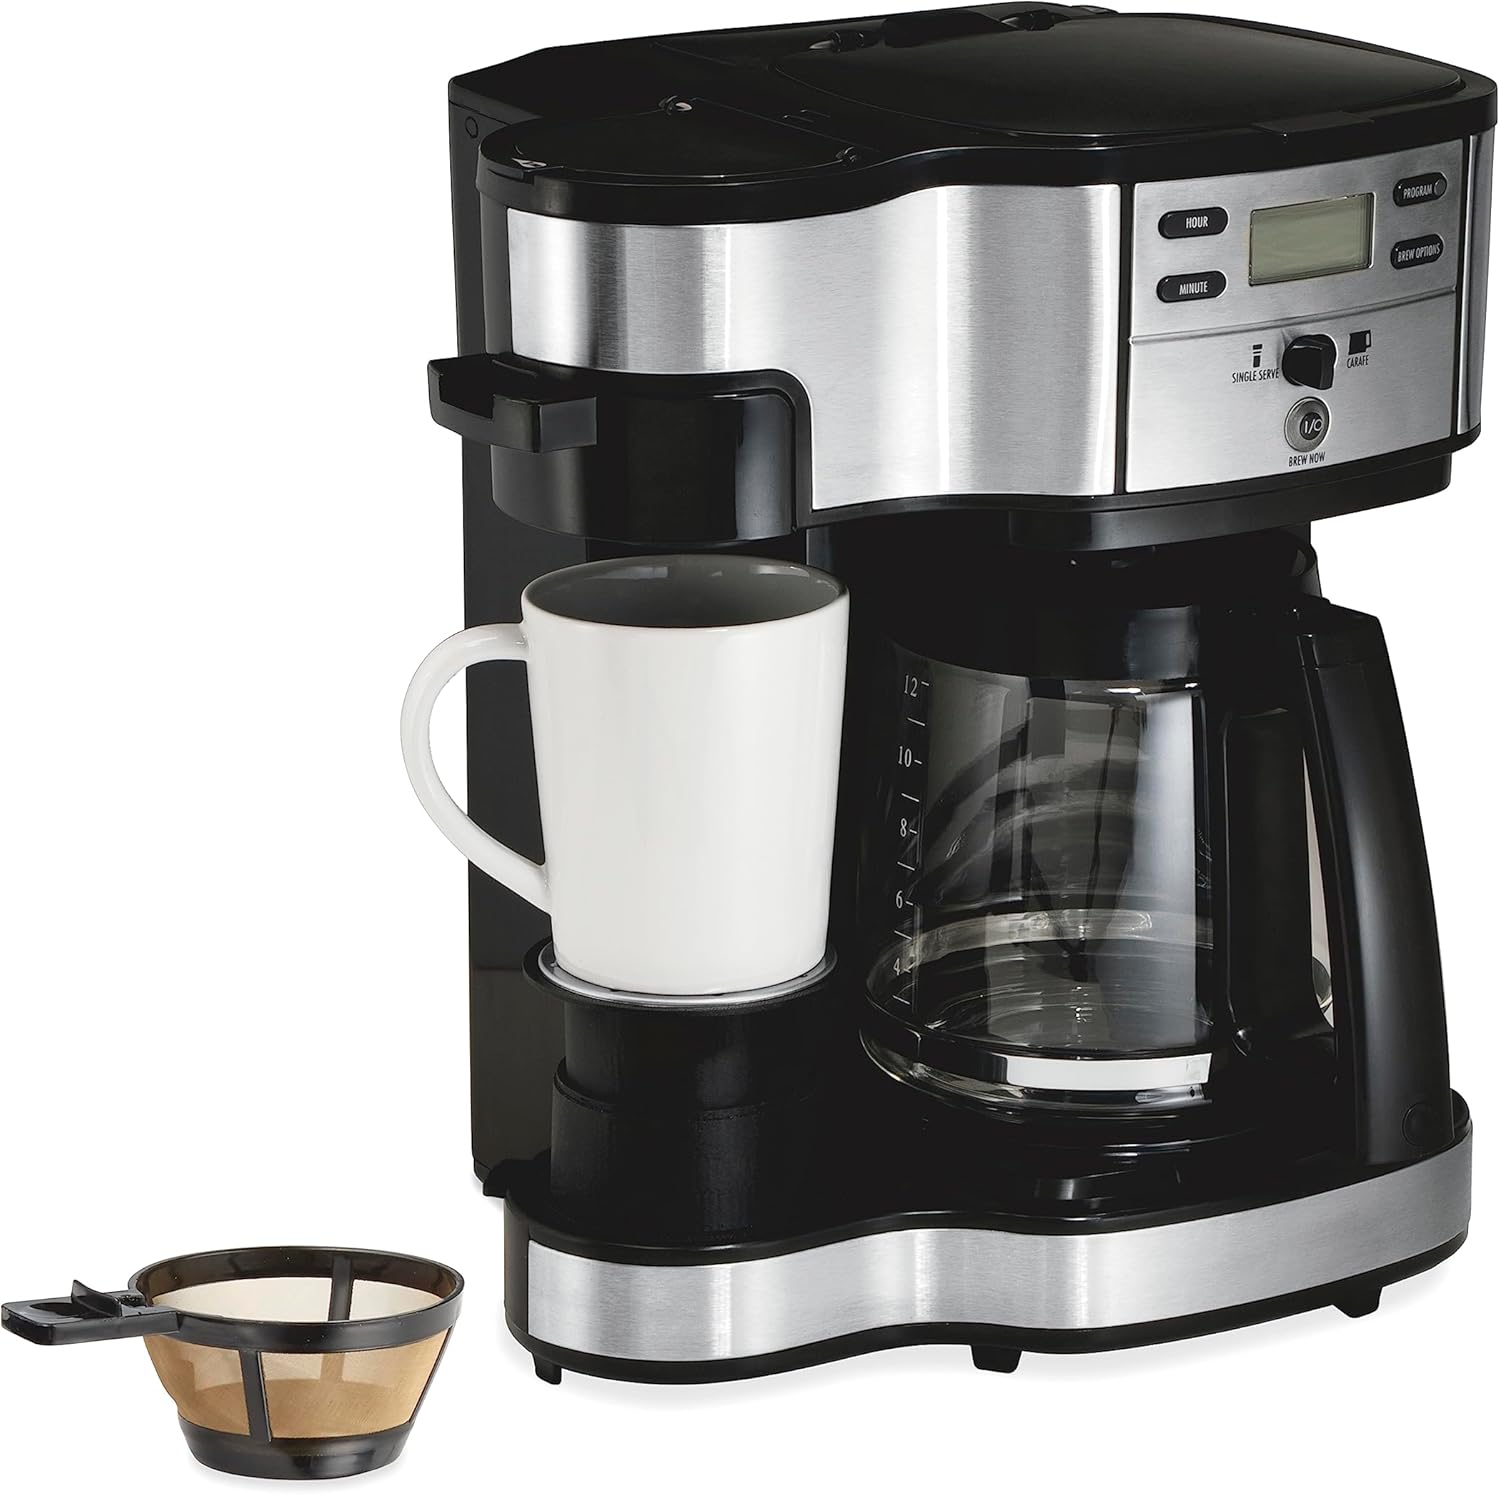
2-Way Programmable Coffee Maker Components:
- Waterreservoir: Shared for both single-serve and carafe.
- Enkelbediening-kant: For ground coffee with mesh scoop.
- 12-Cup Carafe Side: For ground coffee.
- Beheerpaneel: Buttons for programming and brew selection.
- Glas karaf: 12-koppie kapasiteit.
- Mesh Scoop Filter: For single-serve ground coffee.
Opstelling
- Pak uit: Verwyder alle verpakkingsmateriaal en bykomstighede versigtig.
- Skoon: Wash the carafe, brew baskets, K-Cup pod holder, and reusable ground coffee filter in warm, soapy water. Rinse thoroughly.
- Eerste gebruiksiklus: Before brewing coffee for the first time, run two or three brewing cycles with water only to clean the internal components. Fill the water reservoir to the MAX line, place an empty carafe or mug, and run a brew cycle. Discard the water.
- Plasing: Place the coffee maker on a flat, stable surface away from the edge of the counter. Ensure adequate ventilation.
Bedryfsinstruksies
A. FlexBrew Single-Serve Brewing (Models 49902, 49980R)
The FlexBrew allows brewing a single cup using either a K-Cup pod or ground coffee.


1. Using K-Cup Pods:
- Lift the single-serve brew head lid.
- Insert a K-Cup pod into the K-Cup pod holder. Close the lid firmly.
- Fill the water reservoir with the desired amount of water for your cup size. Do not exceed the MAX fill line.
- Plaas jou beker op die lekbak.
- Press the 'SINGLE' button. The coffee maker will begin brewing.
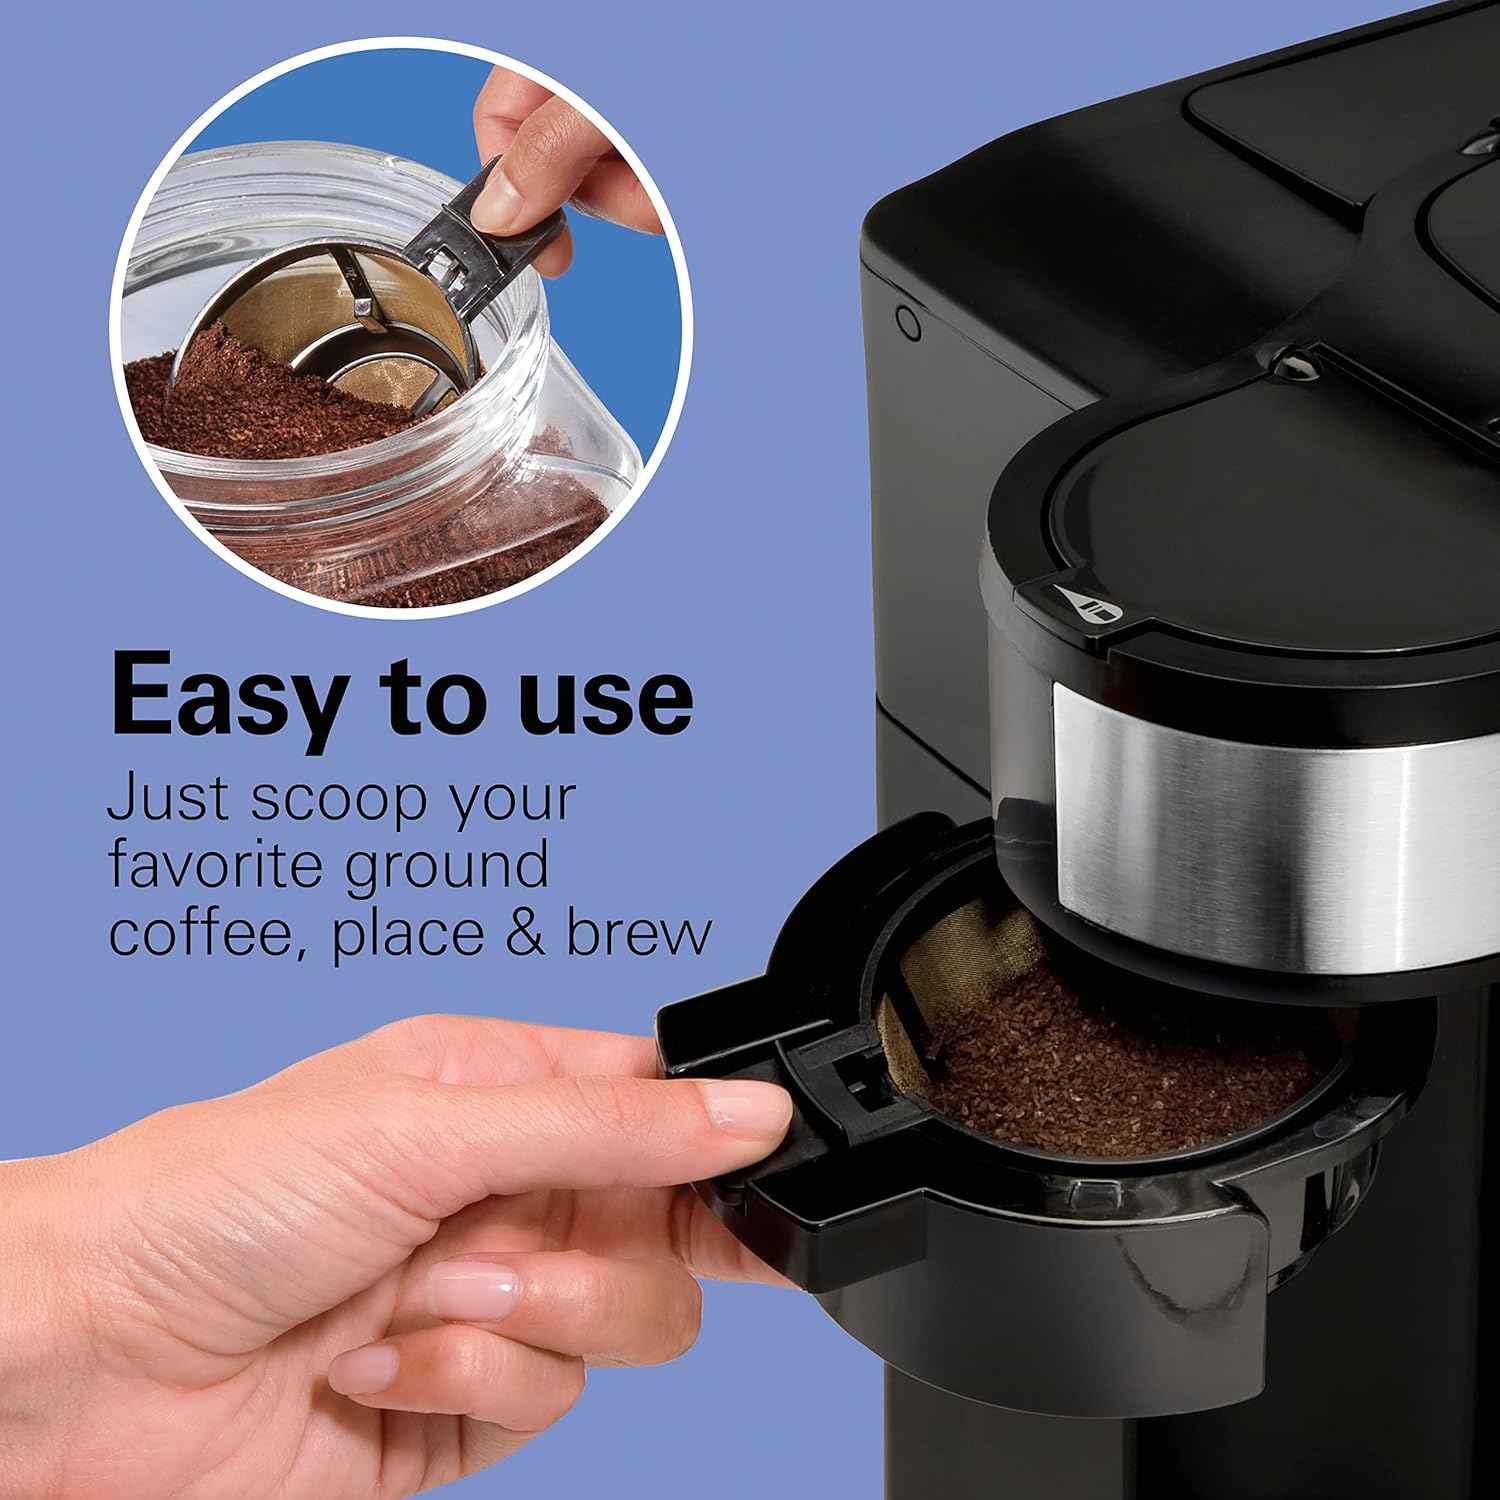
2. Using Ground Coffee (Single-Serve):
- Lift the single-serve brew head lid.
- Place the reusable ground coffee filter basket into the K-Cup pod holder.
- Add 1 to 3 tablespoons of ground coffee to the filter basket. Do not overfill. Close the lid firmly.
- Fill the water reservoir with the desired amount of water for your cup size.
- Plaas jou beker op die lekbak.
- Press the 'SINGLE' button.
3. Setting Brew Strength (FlexBrew):
- After selecting 'SINGLE' or 'CARAFE', press the 'BREW STRENGTH' button to cycle through Regular or Bold options. The selected strength will display on the screen.
4. Setting Cup Size (FlexBrew Single-Serve):
- After selecting 'SINGLE', press the 'CUP SIZE' button to choose from 6, 8, 10, 12, or 14 ounces.
5. Programmable Brewing (FlexBrew):

- Set the current time using the 'SET TIME' button.
- Prepare your coffee (pod or grounds) and fill the water reservoir.
- Press the 'DELAY BREW' button. The display will flash 'START TIME'.
- Use the 'HOUR' and 'MINUTE' buttons to set your desired brew time.
- Press 'DELAY BREW' again to confirm. The indicator light will illuminate, and the coffee maker will brew at the set time.
B. 12-Cup Carafe Brewing (Both Models)
Both coffee makers offer a 12-cup carafe brewing option.

1. Using Ground Coffee (Carafe):
- Open the carafe brew basket.
- Place a paper filter (basket style) or the permanent filter (if included) into the brew basket.
- Add the desired amount of ground coffee (approximately 1 tablespoon per cup).
- Fill the water reservoir with cold water to the desired cup marking.
- Plaas die glaskaraf op die warmplaat.
- Press the 'CARAFE' or 'BREW NOW I/O' button to start brewing.
2. Programmable Brewing (12-Cup Carafe):
- Prepare the coffee maker with ground coffee and water as described above.
- Set the current time (if not already set).
- Press the 'DELAY BREW' button (FlexBrew) or 'PROGRAM' button (2-Way).
- Set your desired brew time using the 'HOUR' and 'MINUTE' buttons.
- Confirm the setting. The indicator light will show that the delay brew is active.
3. Automatic Shutoff:
- The 2-Way Programmable Coffee Maker features an automatic 2-hour shutoff for safety and energy saving.
Onderhoud en Skoonmaak
A. General Cleaning
- Ontkoppel altyd die koffiemasjien voordat u dit skoonmaak en laat dit heeltemal afkoel.
- Wash the carafe, brew baskets, K-Cup pod holder, and reusable ground coffee filter in warm, soapy water. These parts are generally top-rack dishwasher safe.
- Vee die buitekant van die koffiemaker met adamp lap. Moenie skuurskoonmakers of skuursponsies gebruik nie.
- Maak die warmplaat skoon met advertensieamp lap. Moenie skuurmateriaal gebruik nie.
B. Descaling
Mineral deposits (calcium) can build up in your coffee maker over time, affecting performance. Descale your coffee maker every 1-3 months, depending on water hardness.
- Pour 1 cup of white vinegar and 2 cups of cold water into the water reservoir.
- Plaas die leë karaf op die warmplaat.
- Run a brew cycle. After about 30 seconds, turn the coffee maker off and let it soak for 30 minutes.
- Turn the coffee maker back on and let the brew cycle complete.
- Gooi die asynoplossing weg.
- Run 2-3 cycles with clean, cold water to rinse out any remaining vinegar.
Probleemoplossing
| Probleem | Moontlike oorsaak | Oplossing |
|---|---|---|
| Koffie brou nie. | No water in reservoir; coffee maker not plugged in; brew cycle not initiated. | Fill reservoir; ensure plug is secure; press appropriate brew button. |
| Koffie smaak swak. | Not enough coffee grounds; coarse grind; brew strength set to regular. | Add more coffee; use finer grind; select 'Bold' brew strength. |
| Koffie loop oor van die filter. | Te veel koffiedik; filter nie korrek geplaas nie; verstopte broumandjie. | Reduce coffee amount; ensure filter is properly placed; clean brew basket. |
| Water lek uit eenheid. | Water reservoir not properly seated; overfilled reservoir. | Ensure reservoir is securely in place; do not exceed MAX fill line. |
| Programmable brew does not start. | Delay brew not activated; incorrect time set. | Ensure 'DELAY BREW' indicator is lit; verify programmed time. |
Spesifikasies
| Kenmerk | Detail |
|---|---|
| Handelsmerk | Hamilton Beach |
| Modelle | 49902, 49980R |
| Capacity (FlexBrew) | Single-serve (6-14 oz), 12-cup carafe |
| Capacity (2-Way) | Single-serve, 12-cup carafe |
| Koffie-invoertipe | K-Cup-peule, gemaalde koffie |
| Spesiale kenmerke | Programmable, Auto Shutoff (2-Way), Brew Strength Selector (FlexBrew), Cup Size Selector (FlexBrew) |
| Materiaal | Metaal, plastiek |
| Kleur | Swart |
| Ingesluit komponente | Cleaning Brush, Mesh Scoop |
Waarborg en Ondersteuning
Vir waarborginligting of produkondersteuning, verwys asseblief na die waarborgkaart wat by u aankoop ingesluit is of besoek die amptelike Hamilton Beach-webwerf. website. You may also contact customer service directly for assistance.
- Webwebwerf: www.hamiltonbeach.com
- Kliëntediens: Refer to your product registration or included documentation for specific contact numbers and hours of operation.