
1. Inleiding
The JoFomp Digital Wall Clock is designed to provide clear and comprehensive timekeeping, environmental monitoring, and alarm functions for various indoor settings. Its large 9-inch LED display ensures excellent visibility, day or night. This manual provides detailed instructions for setup, operation, and maintenance of your new digital clock.

Image: The digital clock shown with its dimensions (8.98" / 22.8cm length, 2.95" / 7.5cm height, 1.38" / 3.5cm depth) and icons representing its multiple functions: Dual Alarm, Temperature, Week, Brightness Control, Drowsiness (Snooze), Humidness, Memory Function, and Date.
2. Pakketinhoud
- JoFomp Digital Wall Clock (Model: 5503)
- USB-kragkabel
- Kragadapter
- Mounting Nails (x2)
- Gebruikershandleiding (hierdie dokument)
3. Veiligheidsinligting
- Ensure the power adapter and cable are undamaged before use.
- Moenie die toestel blootstel aan uiterste temperature, direkte sonlig of hoë humiditeit nie.
- Hou buite bereik van kinders.
- Moenie probeer om die horlosie self uitmekaar te haal of te herstel nie. Raadpleeg gekwalifiseerde personeel vir diens.
- Use only the provided USB cable and adapter, or a compatible 5V/1A power source.
- Gooi batterye verantwoordelik weg volgens plaaslike regulasies.
4. Opstelling
4.1 Kragverbinding
- Connect the USB power cable to the clock's USB port (located on the back).
- Steek die ander kant van die USB-kabel in die meegeleverde kragadapter.
- Insert the power adapter into a standard wall outlet. The clock display will illuminate.
4.2 Memory Battery Installation (Optional but Recommended)
The clock requires a constant power supply to operate. A memory battery ensures that time data is retained during power outages, preventing the need to reset the time. Two 1.5V AAA batteries are required (not included).
- Vind die battery kompartement op die agterkant van die horlosie.
- Maak die batteryvakdeksel oop.
- Insert two 1.5V AAA batteries, observing the correct polarity (+/-).
- Maak die batterykompartement se deksel stewig toe.
4.3 Montage-opsies
The JoFomp Digital Wall Clock can be placed on a desk or mounted on a wall.
- lessenaar plasing: Simply place the clock on any flat, stable surface.
- Muurmontering: Use the two provided mounting nails. Insert the nails into the wall at the desired location, ensuring they are level and spaced correctly to fit the hanging holes on the back of the clock. Carefully hang the clock onto the nails.

Image: The back panel of the clock, highlighting the "SET", "UP", and "DOWN" buttons, the memory battery storage compartment, the wall hanging hole, and the USB power outlet.

Image: Two illustrations demonstrating the clock's versatility: one showing it hung on a wall, and another showing it placed on a desktop.
5. Bedryfsinstruksies
5.1 Stel tyd en datum in
- Press and hold the "STEL" button on the back of the clock to enter time setting mode.
- Use the "UP"en"AF" buttons to adjust the hour. Press "STEL" to confirm and move to minutes.
- Repeat the process to set minutes, year, month, and day.
- After setting the date, press "STEL" to exit the setting mode.
5.2 12/24 uur formaat skakelaar
In normal time display mode, short press the "UP" button to switch between 12-hour (with AM/PM indicator) and 24-hour formats.
Video: Demonstration of the JoFomp digital clock's features, including switching between 12-hour and 24-hour time formats, changing temperature units, and showing timer and countdown functions. This video highlights the clock's versatility and ease of use.
5.3 Daylight Saving Time (DST) Function
To enable or disable DST, short press the "AF" button in the time display state. The clock will automatically adjust the time by one hour forward or backward as appropriate.

Image: The clock display illustrating the Daylight Saving Time (DST) function, showing how the time shifts by one hour when DST is enabled or disabled, along with visual cues for "Spring Forward" and "Fall Back".
5.4 Helderheidsbeheer
The clock features automatic and manual brightness adjustment modes.
- Outomatiese helderheid: The built-in light sensor adjusts display brightness based on ambient light.
- Manual Brightness: You can manually set the brightness level to your preference.
- Slaap stelling: A light-sensitive sleep mode is available for minimal disturbance during rest.

Image: The clock display showing different brightness settings: "L-AU" (Third Gear Auto-Brightness), "L-SL" (Fourth Gear Sleep Mode Auto-Brightness), "L-01" (Low light level), "L-02" (Medium brightness), and "L-03" (High brightness).

Image: A side-by-side comparison of the clock's display brightness during the day (bright) and at night (dimmed), demonstrating its automatic brightness adjustment feature for optimal visibility.
5.5 Dual Alarm Function
The clock supports two independent alarms.
- Druk die "STEL" button repeatedly until "AL1" or "AL2" appears on the display.
- Press and hold "STEL" to enter alarm setting mode.
- Use "UP"en"AF" to set the alarm hour and minutes.
- Druk "STEL" to confirm each step.
- To activate/deactivate an alarm, short press the "UP" of "AF" button when "AL1" or "AL2" is displayed. An alarm icon will appear when active.
- When an alarm sounds, press any button to activate snooze, or press and hold "STEL" to turn off the alarm.

Image: The clock display showing two alarm icons, indicating the dual alarm function. The image also depicts scenarios like "Wake Up Time" and "Exercise Time" to illustrate practical uses of the dual alarms.

Image: A visual representation of the dual alarm feature, showing the clock in two different environments (a kitchen and a gym), suggesting its utility for setting multiple reminders for various daily activities.
5.6 Temperatuur- en humiditeitsaanwyser
The clock continuously displays temperature in Celsius (°C) or Fahrenheit (°F) and relative humidity (%).
- To switch between °C and °F, short press the "AF" button when the temperature is displayed.
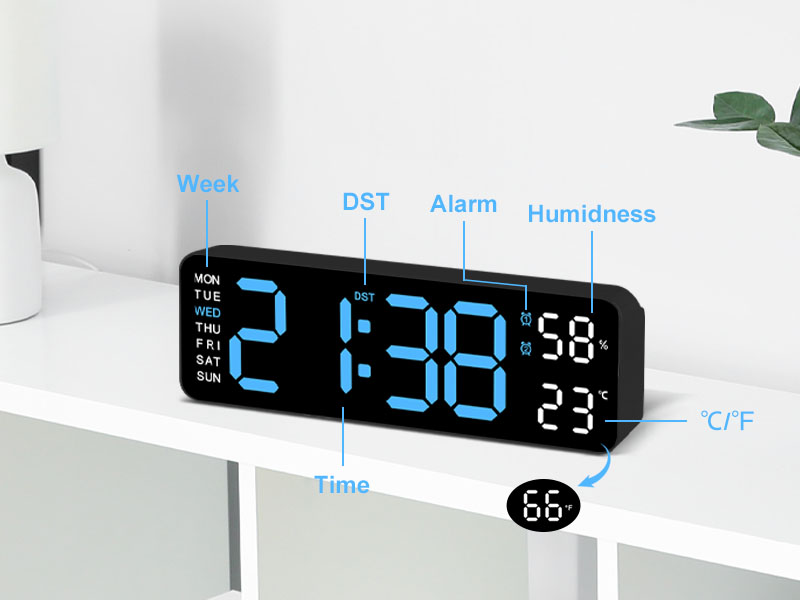
Beeld: 'n Gedetailleerde view of the clock's display, with labels pointing to the Week, DST, Alarm, Humidness, Temperature (°C/°F), and Time indicators, along with a small icon for the temperature sensor.
6. Onderhoud
- Maak die horlosie skoon met 'n sagte, droë lap. Moenie skuurmiddels of oplosmiddels gebruik nie.
- Avoid placing the clock in areas with excessive dust or moisture.
- If not in use for an extended period, disconnect the power and remove the memory batteries.
7. Probleemoplossing
| Probleem | Moontlike oorsaak | Oplossing |
|---|---|---|
| Die klokvertoning is af. | Geen kragtoevoer. | Ensure USB cable is securely connected and power adapter is plugged into a working outlet. |
| Time/Date resets after power outage. | Memory batteries not installed or depleted. | Install two new 1.5V AAA batteries in the memory compartment. |
| Temperature/Humidity reading seems inaccurate. | Clock placed near heat/cold source or in direct sunlight. | Verskuif die horlosie na 'n area met stabiele omgewingstemperatuur en humiditeit. Gee tyd vir die lesings om te stabiliseer. |
| Die alarm lui nie. | Alarm not activated or volume too low (if applicable). | Ensure the alarm is set and activated (alarm icon visible). Check if there's a volume setting (refer to specific alarm setting instructions). |
8. Spesifikasies
| Kenmerk | Detail |
|---|---|
| Handelsmerk | JoFomp |
| Modelnommer | 5503 |
| Tipe vertoon | Digitale LED |
| Vertoon grootte | 9 duim |
| Produk afmetings | 11.8"W x 4"H (approx. 22.8cm x 7.5cm x 3.5cm) |
| Kragbron | Corded Electric (USB 5V/1A) |
| Geheue battery | 2 x 1.5V AAA-batterye (nie ingesluit nie) |
| Spesiale kenmerke | Dual Alarm, Adjustable Brightness (Auto/Manual), Calendar, Large Display, Temperature (°C/°F), Humidity, DST, 12/24H Format, Snooze |
| Montage tipe | Wall Mount or Desk Placement |
| Materiaal | Akrilonitrielbutadieenstireen (plastiek) |
| Binne/buiteluggebruik | Slegs binnenshuis |
9. Waarborg en Ondersteuning
JoFomp products are manufactured with high-quality standards. For any issues or inquiries regarding your digital wall clock, please contact JoFomp customer support through the retailer's platform or the official JoFomp webwebwerf.
Please retain your purchase receipt for warranty claims. Specific warranty terms and conditions may vary by region and retailer.
Vir verdere hulp, besoek die JoFomp Store on Amazon.