FREDEES BL-97022-25/29
FREDEES Farmhouse Dresser Instruction Manual
Model: BL-97022-25/29
Handelsmerk: FREDEES
1. Belangrike veiligheidsinligting
Lees en verstaan asseblief alle instruksies voor montering en gebruik. Bewaar hierdie handleiding vir toekomstige verwysing.
- Anti-wenk toestel: Always install the anti-tip device provided to prevent serious or fatal crushing injuries.
- Gewigsbeperkings: Do not exceed the maximum weight capacity for the top surface or drawers. Refer to the specifications section for details.
- Vergadering: Assemble the dresser on a soft, clean surface to prevent scratches. Ensure all parts are securely fastened before use.
- Kinderveiligheid: Keep small parts and packaging materials away from children. Do not allow children to climb on or play with the dresser.
- Elektriese veiligheid: When using the charging station, ensure cables are not pinched or damaged. Do not overload the electrical outlets.
2. Pakketinhoud
Verifieer dat alle komponente teenwoordig is voordat u met montering begin. Indien enige onderdele ontbreek of beskadig is, kontak asseblief kliëntediens.

Figuur 2.1: Ontplof view of dresser components.
This diagram illustrates the various parts of the dresser, including the frame, 8 wooden drawers, tempered glass tabletop, built-in charging station, retro metal handles, and solid sliding rails. All necessary hardware is included for assembly.
3. Monteer-instruksies
Assembly is required for this product. Follow the step-by-step instructions provided in the included assembly guide. All parts and screws are labeled for easy identification.
- Berei die area voor: Clear a spacious, clean, and soft area for assembly to prevent damage to the dresser components.
- Identifiseer dele: Unpack all components and hardware. Match each part to the corresponding label in the assembly guide.
- Stel die raam bymekaar: Begin by assembling the main frame of the dresser according to the diagrams. Ensure all connections are secure.
- Installeer laaiskyfies: Attach the drawer slides to the dresser frame and to the drawer boxes as indicated.
- Monteer laaie: Construct each of the 8 drawers, ensuring the bottoms are properly seated and the handles are attached.
- Install Tempered Glass Top: Carefully place the tempered glass top onto the dresser frame.
- Verbind elektriese komponente: Follow instructions to connect the LED lighting and charging station. Ensure proper power connection.
- Invoeglaaie: Slide the assembled drawers into their respective slots.
- Installeer Anti-Kantel Stel: Secure the dresser to the wall using the provided anti-tip kit to prevent tipping.
- Finale kontrole: Verify that all screws are tightened and the dresser is stable before placing items inside.
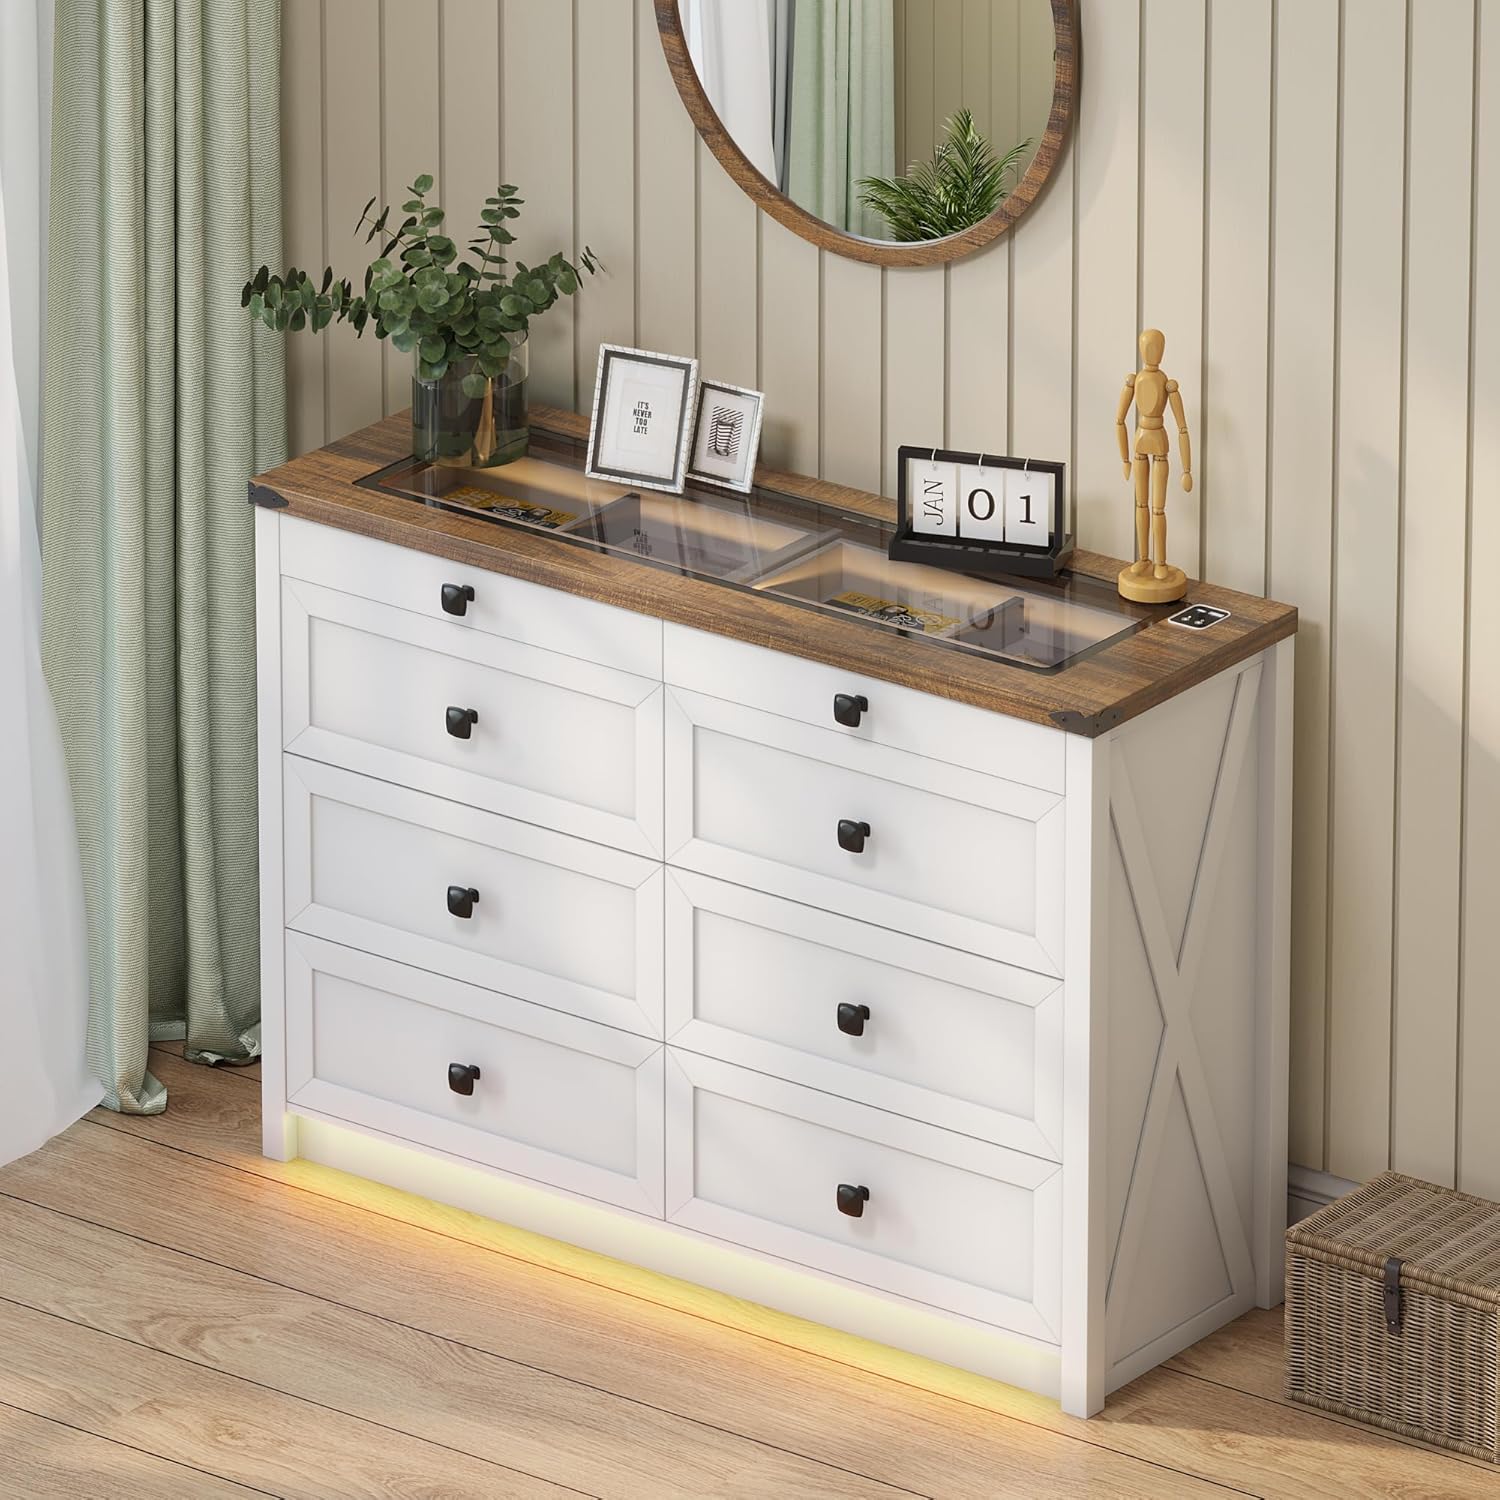
Figure 3.1: Fully assembled dresser.
This image shows the dresser fully assembled and placed in a room, ready for use. Note the integrated LED lighting at the base and the clear glass top.
4. Bedryfsinstruksies
4.1. LED-beligtingstelsel
The dresser features integrated LED lighting with customizable color and brightness settings, along with a human sensor for automatic activation.
- Krag aan/af: Locate the touch button on the top surface near the charging station. A short press will turn the lights on or off.
- Verander kleurmodus: With the lights on, short press the touch button repeatedly to cycle through the three available color modes: Warm Light, Natural Light, and White Light.
- Pas Helderheid aan: To adjust brightness, long press the touch button. The brightness will gradually increase or decrease. Release the button when the desired brightness is reached.
- Menslike sensor: The dresser is equipped with a human sensor. When activated, the lights will automatically turn on when motion is detected nearby and turn off after a period of inactivity. Refer to the specific controls on the dresser for sensor activation/deactivation.

Figure 4.1: LED lighting color options.
This image demonstrates the visual difference between the Natural, White, and Warm light settings of the integrated LED strip, along with a brightness control slider.

Figure 4.2: Tempered glass top with and without illumination.
This visual shows how the transparent black tea-tinted glass top allows visibility of stored items when the internal light is on, and provides privacy when the light is off.
4.2. Laaistasie
The dresser is equipped with a convenient 2-in-1 charging station on its surface, featuring both USB and Type-C ports.
- Koppel krag: Ensure the dresser's power cord is securely plugged into a functional wall outlet.
- Laaitoestelle: Connect your smartphone, tablet, or other electronic devices to the available USB (5V/2A) or Type-C ports using their respective charging cables.
- Gebruik: The charging station is designed for convenient access to power for your devices while keeping them organized on the dresser top.

Figure 4.3: Integrated charging station.
A close-up of the dresser's surface, showing the integrated USB and Type-C charging ports, ready for device connection.
5. Sorg en Onderhoud
Behoorlike sorg sal die lewensduur en voorkoms van jou laaikas verleng.
- Skoonmaak: Vee die oppervlaktes van die laaikas af met 'n droë, sagte lap. Vir hardnekkige merke, gebruik 'n effens droë lap.amp 'n Lap kan gebruik word, gevolg onmiddellik deur 'n droë lap. Vermy harde chemikalieë of skuurmiddels.
- Glass Top: Clean the tempered glass top with a glass cleaner and a soft, lint-free cloth.
- Afstof: Stof gereeld alle oppervlaktes af om opbou te voorkom.
- Vermy vog: Do not place hot or wet items directly on the wood or glass surfaces without protection.
- Sonligblootstelling: Vermy langdurige blootstelling aan direkte sonlig om vervaag of verkleuring van die houtafwerking te voorkom.
- Laaie Onderhoud: Periodically check drawer slides for smooth operation. If needed, a silicone-based lubricant can be applied sparingly.
6. Probleemoplossing
| Probleem | Moontlike oorsaak | Oplossing |
|---|---|---|
| LED-ligte skakel nie aan nie. | Power cord not connected; loose connection; faulty LED strip. | Ensure power cord is securely plugged in. Check all electrical connections. If problem persists, contact customer support. |
| Laaistasie werk nie. | Power cord not connected; device cable faulty; device not compatible. | Verify dresser is plugged in. Try a different charging cable or device. Ensure device is compatible with USB/Type-C charging. |
| Laaie is moeilik om oop/toe te maak. | Overloaded drawer; misaligned slides; loose hardware. | Reduce contents in the drawer. Check if drawer slides are properly aligned. Tighten any loose screws on the drawer or slides. |
| Die dressoir voel wankelrig. | Uneven floor; loose assembly hardware; anti-tip kit not installed. | Adjust furniture levelers if present, or place shims under the base. Retighten all assembly screws. Ensure the anti-tip kit is correctly installed and secured to the wall. |
7. Produkspesifikasies
- Handelsmerk: FREDEES
- Model Naam: BL-97022-25/29
- Produk afmetings: 15.75" D x 47.24" B x 33.46" H
- Kleur: Wit
- Montage tipe: Vloerberging
- Aantal laaie: 8
- Spesiale kenmerke: Ample Storage Space, Convenient 2-in-1 Charging Solution (USB & Type-C), Customizable 3-Color Lighting, Tempered Glass Top Design, Human Sensor
- Meubelafwerking: Brown (top) / White (body)
- Item gewig: 110.2 pond
- Vergadering benodig: Ja
- Produkversorging: Vee af met 'n droë lap
- UPC: 756940843978
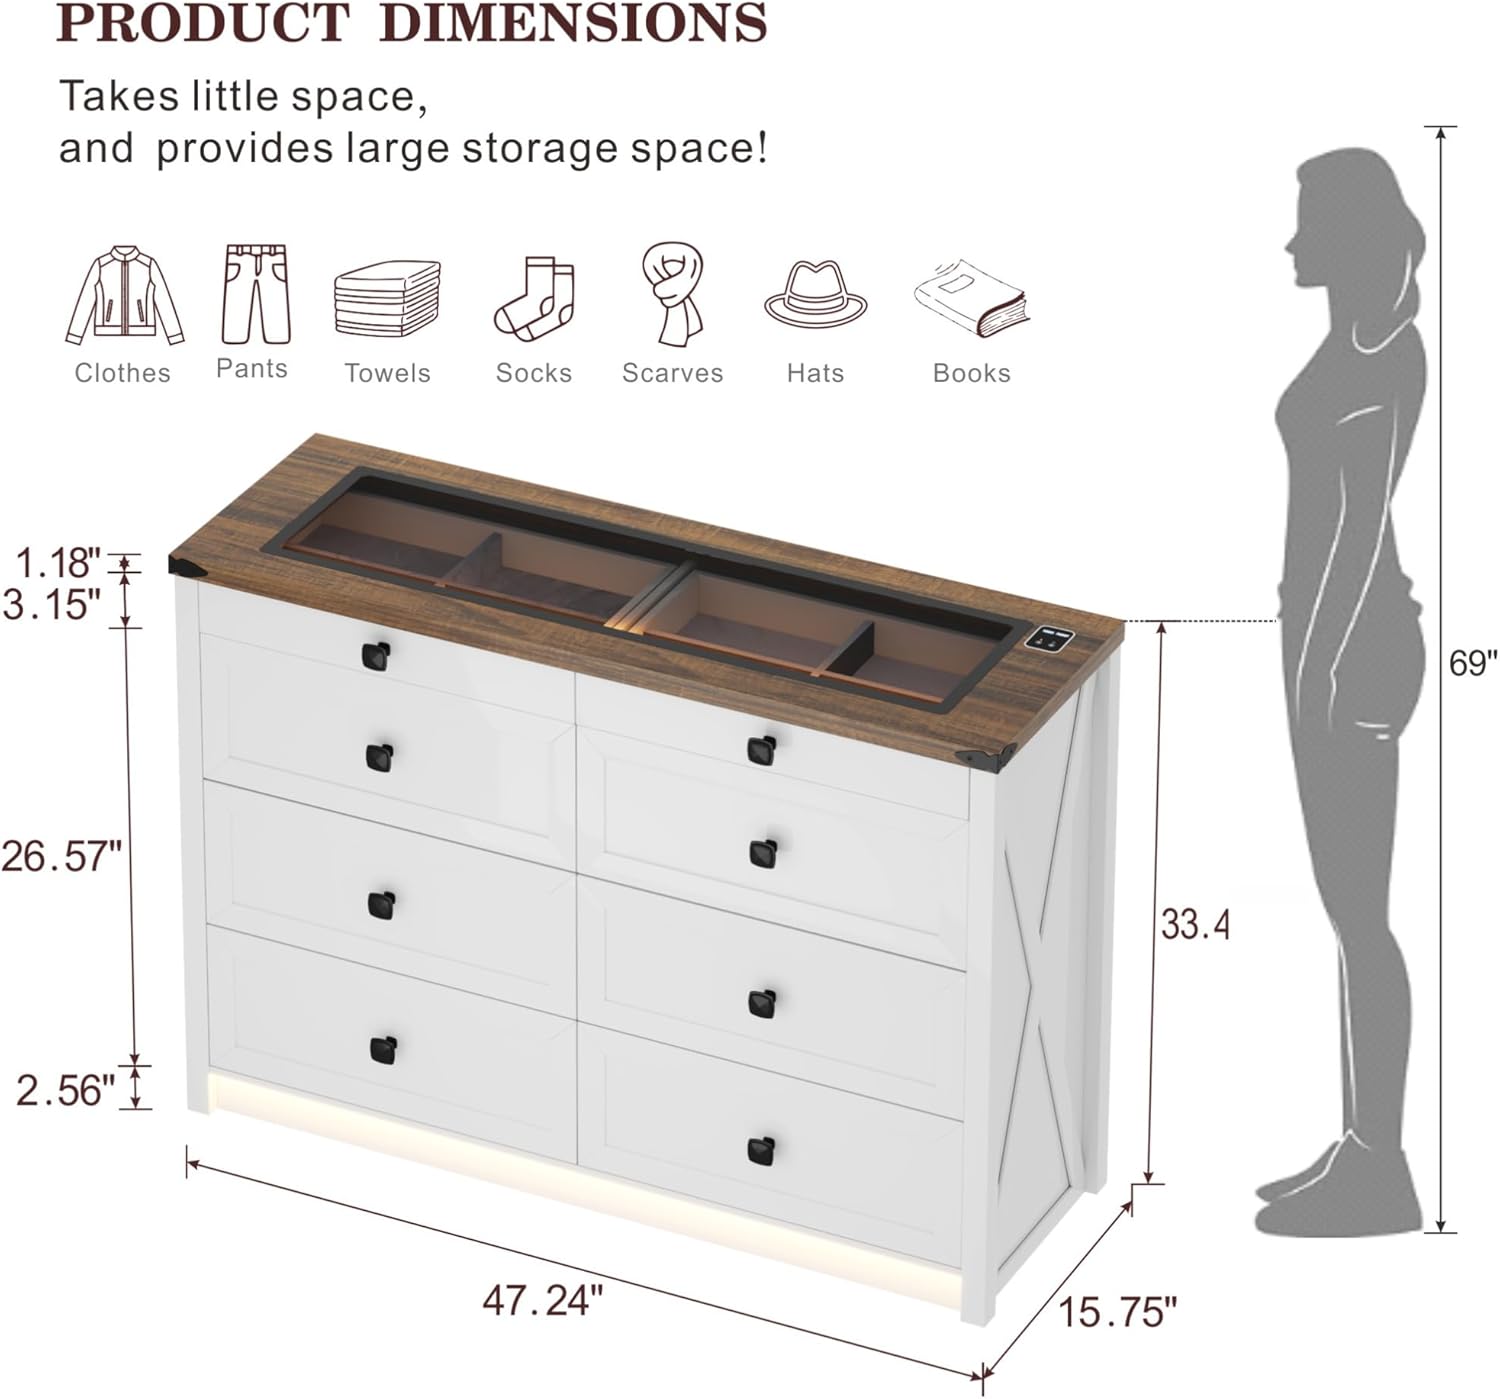
Figuur 7.1: Gedetailleerde produkdimensies.
Hierdie diagram bied 'n omvattende oorview of the dresser's dimensions, including overall height, width, depth, and specific measurements for drawer height and top surface thickness.

Figure 7.2: Storage capacity illustration.
An illustrative image demonstrating the ample storage capacity of each large drawer, capable of holding approximately 20-25 t-shirts or 15-20 pairs of jeans.
8. Waarborg en Ondersteuning
For warranty information, technical support, or to order replacement parts, please contact FREDEES customer service directly. Refer to the product packaging or the original purchase documentation for contact details.
Please have your model number (BL-97022-25/29) and purchase date available when contacting support.
Ask a question about this manual
Ask about setup, troubleshooting, compatibility, parts, safety, or missing instructions. Manuals+ will review the question and use this page’s manual context to help answer it.