JENABOM TY-CM01
JENABOM Mini Cordless Rotary Tool User Manual
Model: TY-CM01
1. Inleiding
Thank you for choosing the JENABOM Mini Cordless Rotary Tool. This versatile tool is designed for various crafting, DIY, and light-duty tasks such as sanding, polishing, drilling, and engraving. Its compact size, cordless operation, and USB charging capability make it convenient for both beginners and experienced users. Please read this manual thoroughly before operation to ensure safe and efficient use of the tool.
Veiligheidsinligting
- Dra altyd gepaste persoonlike beskermende toerusting, insluitend veiligheidsbril, wanneer u die gereedskap gebruik.
- Hou die werkarea skoon en goed belig. Deurmekaar of donker areas nooi ongelukke uit.
- Moenie elektriese gereedskap in plofbare atmosfeer gebruik nie, soos in die teenwoordigheid van vlambare vloeistowwe, gasse of stof.
- Hou kinders en omstanders weg terwyl 'n elektriese gereedskap gebruik word. Afleidings kan veroorsaak dat jy beheer verloor.
- Vermy onbedoelde aanskakeling. Maak seker dat die skakelaar in die af-posisie is voordat u aan die batterypak koppel, die gereedskap optel of dra.
- Moenie oorreik nie. Hou te alle tye behoorlike voet en balans. Dit maak 'n beter beheer van die kraggereedskap moontlik in onverwagte situasies.
- Ontkoppel die batterypak van die kraggereedskap voordat enige aanpassings gemaak word, bykomstighede verander word of kraggereedskap gestoor word.
- Gebruik die elektriese gereedskap, bykomstighede en gereedskappunte ens. in ooreenstemming met hierdie instruksies, met inagneming van die werksomstandighede en die werk wat uitgevoer moet word.
- Onderhou elektriese gereedskap. Kyk vir wanbelyning of binding van bewegende dele, breek van dele en enige ander toestand wat die kraggereedskap se werking kan beïnvloed. Indien beskadig, laat die elektriese gereedskap herstel voor gebruik.
- Use only with the specified USB charging cable and power adapter.
2. Pakketinhoud
Verifieer dat alle items in jou pakket teenwoordig is:
- JENABOM Mini Cordless Rotary Tool (Model: TY-CM01)
- USB-laaikabel
- Grinding Heads (5 pcs)
- Rubber Wheels (6.3mm x 1, 12.7mm x 1)
- Sand Rings (6.3mm x 4, 12.7mm x 4)
- Plastiekbergkas

Figure 2.1: Contents of the JENABOM Mini Cordless Rotary Tool kit, including the tool, USB cable, various grinding heads, rubber wheels, and sand rings, all neatly organized in a plastic storage box.
3. Produk verbyview en Onderdele-identifikasie
Familiarize yourself with the different parts of your rotary tool:

Figure 3.1: Labeled components of the rotary tool. Key parts include the Chuck, Main Shaft Lock Switch, Cooling Port, Tap Position Indicator Light, Power Switch (with 3-gear adjustment), and USB Charging Port.
- tjok: Holds the various accessories securely.
- Main Shaft Lock Switch: Used to lock the shaft for easy accessory changes.
- Cooling Port: Helps dissipate heat during operation.
- Tap Position Indicator Light: Indicates the current speed setting.
- Power Switch / 3-Gear Adjustment: Turns the tool on/off and cycles through speed settings.
- USB-laaipoort: Vir die koppeling van die USB-laaikabel.
4. Spesifikasies
| Kenmerk | Spesifikasie |
|---|---|
| Modelnommer | TY-CM01 |
| Handelsmerk | JENABOM |
| Krag tipe | Batteryaangedrewe (koordloos) |
| Battery Tipe | 1 Litium-ioon (ingesluit) |
| Voltage | 3.7 Volt |
| Spoedinstellings | 3 Gears (Variable Speed) |
| Minimum spoed | 5000 RPM |
| Maksimum spoed | 15000 RPM |
| Clamping Range (Collet Size) | 1-3 mm |
| Netto gewig | 200 gram |
| Bykomstighede ingesluit | 15 pieces (Grinding heads, rubber wheels, sand rings) |
| Spesiale kenmerke | Cordless, Variable Speed, Compact, USB Charging |


Figure 4.1: Visual representation of the tool's three-speed adjustment (5000, 10000, 15000 RPM) and the collet system with a 1-3mm clamping reeks.
5. Opstelling
5.1 Laai die Gereedskap
Before first use, fully charge the rotary tool. The tool features USB fast charging.
- Locate the USB charging port on the tool (refer to Figure 3.1).
- Connect the provided USB charging cable to the tool's charging port.
- Koppel die ander kant van die USB-kabel aan 'n versoenbare USB-kragadapter (nie ingesluit nie) of 'n rekenaar se USB-poort.
- The indicator lights will show charging status. Once fully charged, the lights will indicate completion (refer to tool's specific light behavior for full charge).

Figure 5.1: The rotary tool connected via USB for charging, illustrating the fast charging capability and the 3-gear power adjustment indicators.

Figure 5.2: The rotary tool connected to a wall adapter for USB charging.
5.2 Installering van bykomstighede
Volg hierdie stappe om bykomstighede veilig te installeer of te verander:
- Stap 1: Press down the main shaft lock switch (located near the chuck) and unscrew the chuck counter-clockwise until it is loose enough to insert an accessory.
- Stap 2: Insert the desired accessory into the chuck. Ensure the accessory shaft is fully seated.
- Stap 3: While still holding down the main shaft lock switch, tighten the chuck clockwise until the accessory is firmly secured. Release the lock switch.
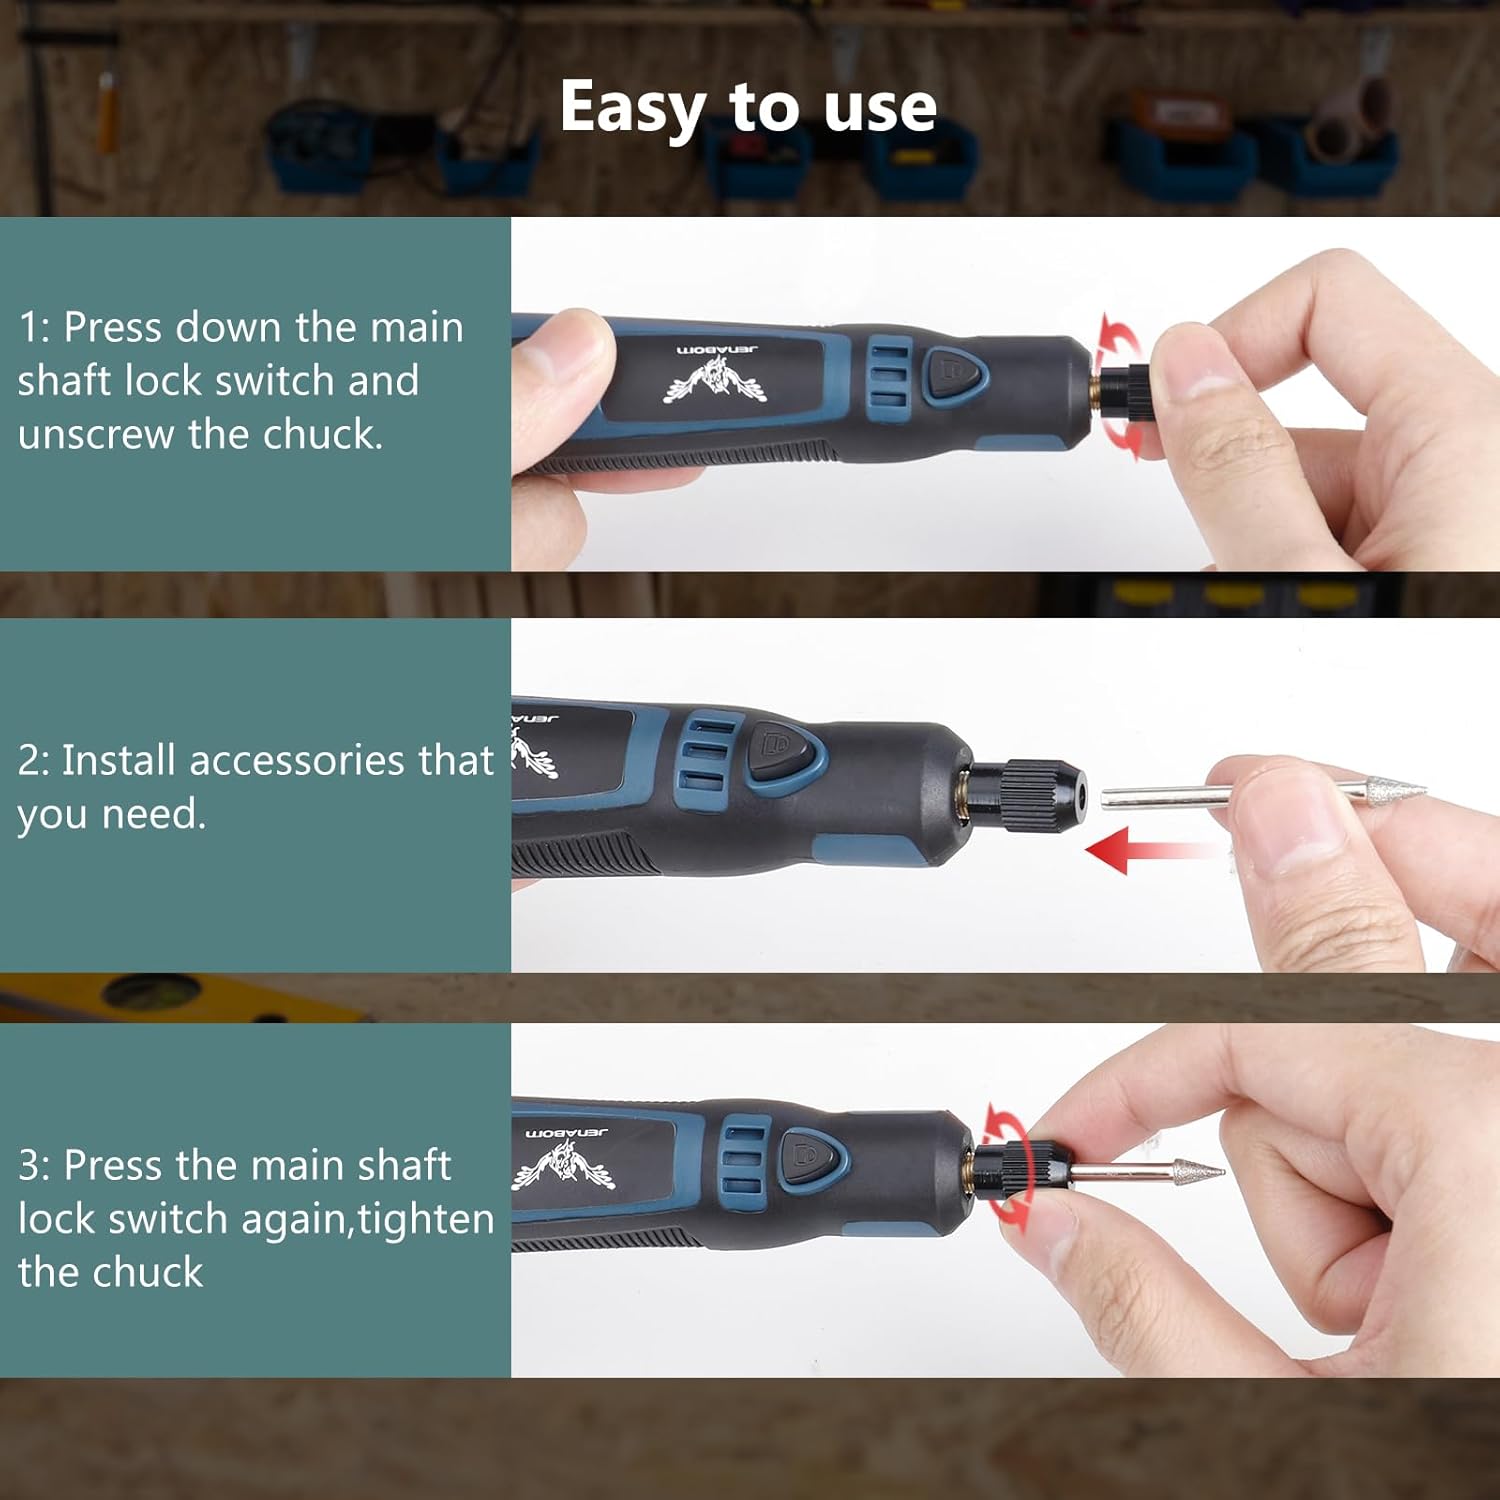
Figure 5.3: Step-by-step instructions for installing accessories: 1. Press shaft lock and unscrew chuck. 2. Insert accessory. 3. Tighten chuck while holding lock.
Ensure the accessory is securely fastened before operating the tool to prevent injury or damage.
6. Bedryfsinstruksies
6.1 Aan-/afskakeling en spoedaanpassing
- To turn the tool ON, press the Power Switch button. The tool will start at the lowest speed setting (5000 RPM).
- To increase the speed, press the Power Switch button again. Each press will cycle through the speed settings: 5000 RPM (first gear), 10000 RPM (second gear), and 15000 RPM (third gear). The tap position indicator lights will illuminate accordingly.
- To turn the tool OFF, press the Power Switch button after the highest speed setting, or press and hold the button for a few seconds.

Figure 6.1: Key features of the tool, highlighting the multi-speed switch for precise control and its compact, pen-like design for comfortable handling.

Figure 6.2: The tool's design ensures high concentricity, allowing it to hold accessories firmly without jumping or shaking during operation, which is crucial for precision tasks.
6.2 Aansoeke
The JENABOM Mini Cordless Rotary Tool is suitable for a variety of tasks. Always select the appropriate accessory and speed for the material and task at hand.
- Poleer: Use polishing accessories to achieve a smooth, shiny finish on various surfaces.
- skuur: Utilize sand rings for smoothing rough edges, shaping, or preparing surfaces for finishing.
- Boor: With appropriate drill bits, the tool can be used for small, precise drilling tasks in soft materials.
- Gravure: Engraving bits allow for detailed work on wood, plastic, and soft metals.
- Sny: Small cutting discs can be used for light cutting of thin materials.
- Rust Removal: Wire brushes or abrasive accessories can help remove rust from small metal objects.

Figuur 6.3: Examples of the tool's diverse applications, including polishing, rust removal, grinding, carving, drilling, and cutting, demonstrating its multifunctionality.
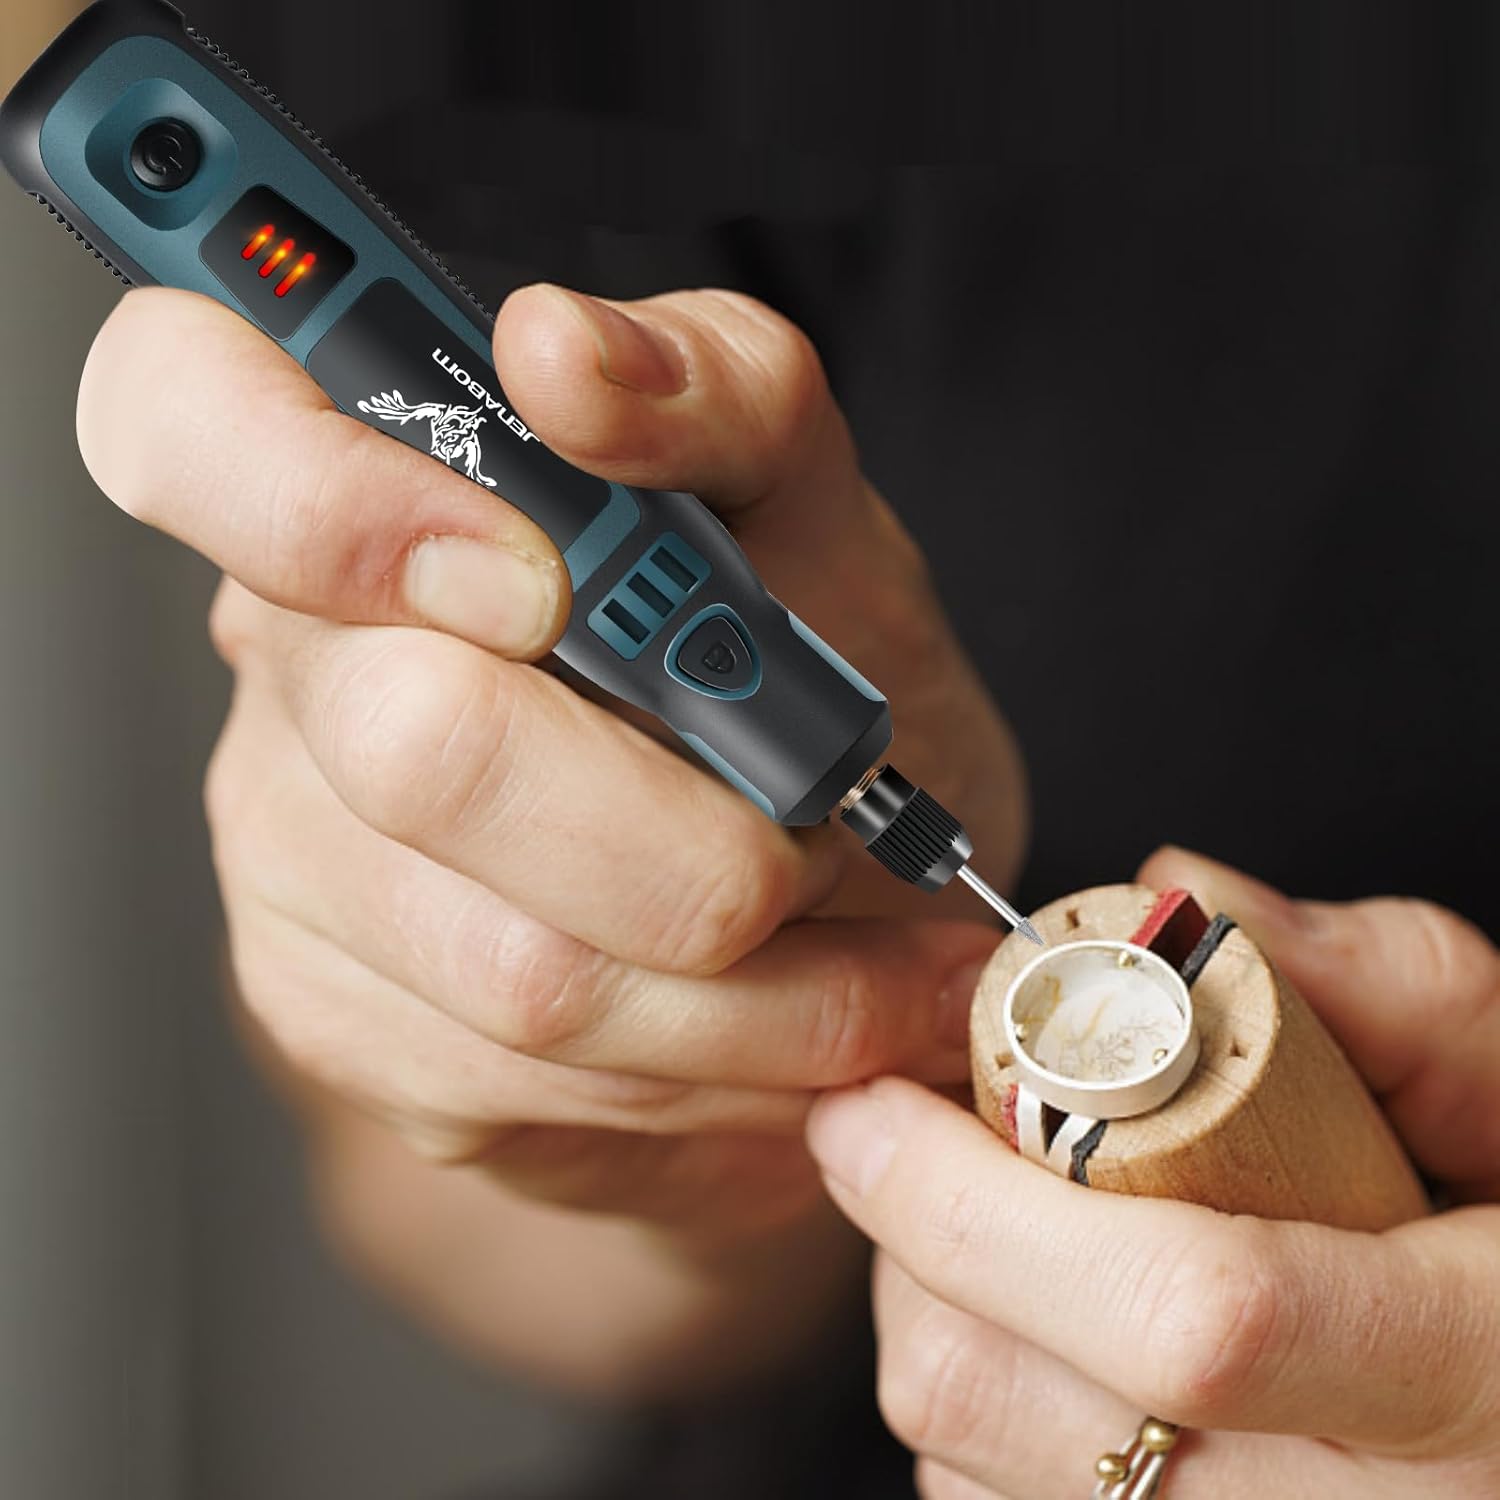
Figure 6.4: The tool in use, demonstrating its suitability for intricate and detailed craft work due to its compact size and precise control.
7. Onderhoud
Proper maintenance ensures the longevity and optimal performance of your rotary tool.
- Skoonmaak: After each use, wipe down the tool with a clean, dry cloth to remove dust and debris. Do not use harsh chemicals or abrasive cleaners.
- Bybehore sorg: Clean accessories after use. Store them in the provided plastic box to prevent loss and damage.
- Berging: Store the tool and accessories in a cool, dry place, away from direct sunlight and moisture. Keep out of reach of children.
- Batterysorg: For long-term storage, charge the battery to approximately 50% to prolong its lifespan. Recharge every 3-6 months if not in use.
8. Probleemoplossing
If you encounter issues with your JENABOM Mini Cordless Rotary Tool, refer to the following common problems and solutions:
| Probleem | Moontlike oorsaak | Oplossing |
|---|---|---|
| Gereedskap skakel nie aan nie. | Battery is leeg. | Charge the tool fully using the provided USB cable. |
| Die bykomstigheid is los of wiebel. | Chuck not tightened sufficiently. Incorrect accessory size. | Ensure the chuck is tightened firmly while holding the main shaft lock switch. Verify accessory shaft diameter is within 1-3mm. |
| Gereedskap stop tydens werking. | Oorlading of lae battery. | Reduce pressure on the tool. Charge the battery if low. |
| Reduced performance/power. | Low battery. Accessory is dull or worn. | Recharge the tool. Replace worn accessories. |
| Gereedskap word warm. | Prolonged use or heavy load. Blocked cooling ports. | Allow the tool to cool down. Ensure cooling ports are clear of debris. |
If the problem persists after trying these solutions, please contact JENABOM customer support for further assistance.
9. Waarborg en Ondersteuning
JENABOM products are manufactured with quality and reliability in mind. For information regarding warranty coverage, technical support, or replacement parts, please refer to the contact information provided with your purchase or visit the official JENABOM website. Please have your model number (TY-CM01) and purchase details ready when contacting support.
Ask a question about this manual
Ask about setup, troubleshooting, compatibility, parts, safety, or missing instructions. Manuals+ will review the question and use this page’s manual context to help answer it.