WLJBIDET O7L-Side panel (Elongated)
WLJBIDET Smart Bidet Toilet Seat User Manual
Model: O7L-Side panel (Elongated)
Handelsmerk: WLJBIDET
1. Inleiding
Thank you for choosing the WLJBIDET Smart Bidet Toilet Seat. This manual provides essential information for the safe and efficient operation, installation, and maintenance of your new bidet seat. Please read this manual thoroughly before installation and use, and retain it for future reference.
2. Veiligheidsinligting
Om veilige werking te verseker en skade te voorkom, neem asseblief die volgende voorsorgmaatreëls in ag:
- Ensure the bidet seat is connected to a grounded electrical outlet.
- Do not immerse the unit in water or spray water directly onto the electrical components.
- Hou die kragsnoer weg van verhitte oppervlaktes.
- Moenie probeer om die eenheid self uitmekaar te haal of te herstel nie. Kontak gekwalifiseerde personeel vir diens.
- Ontkoppel die eenheid van die kragtoevoer voordat u skoonmaak of enige onderhoud uitvoer.
- Hierdie toestel is nie bedoel vir gebruik deur persone (insluitend kinders) met verminderde fisiese, sensoriese of geestelike vermoëns, of 'n gebrek aan ervaring en kennis nie, tensy hulle toesig of instruksies oor die gebruik van die toestel gegee is deur 'n persoon wat verantwoordelik is vir hul veiligheid.
3. Produkkenmerke
The WLJBIDET Smart Bidet Toilet Seat is designed to provide a comfortable and hygienic experience with its advanced features:
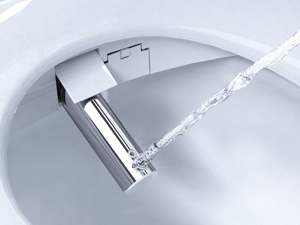
- Veelvuldige skoonmaakmodusse: Offers customizable warm water washing from 92℉ to 102℉. Includes posterior wash, feminine wash, child-friendly wash, and one-touch automatic cleaning.
- Selfreinigende spuitstuk: The nozzle automatically cleans itself before and after each use for enhanced hygiene.
- Adjustable Nozzle Position: Tailor your cleaning experience with adjustable nozzle positions and oscillating wash functionality. The nozzle remembers your last setting.
- Heated Toilet Seat: Provides soothing warmth with adjustable, consistently warm temperature settings, eliminating discomfort from cold seats.
- Warmlugdroging: Integrated warm air dryer gently dries you after washing, reducing the need for toilet paper. Adjustable drying temperatures ensure maximum comfort.
- Sagte sluit deksel: The toilet lid and seat close silently, preventing slamming and ensuring a quiet environment.
- LED naglig: A soft-glow nightlight makes midnight trips to the bathroom more convenient without harsh overhead lighting.


4. Installasiehandleiding
4.1 Voor installasie
Before replacing your old toilet seat, please measure your toilet size to ensure compatibility. This model is designed for elongated toilets.

4.2 Installasiestappe
Volg hierdie stappe vir behoorlike installasie:
- Voorbereiding: Turn off the water supply to your toilet and flush to empty the tank. Disconnect the existing water supply line from the toilet tank.
- Verwyder ou sitplek: Verwyder jou bestaande toiletsitplek.
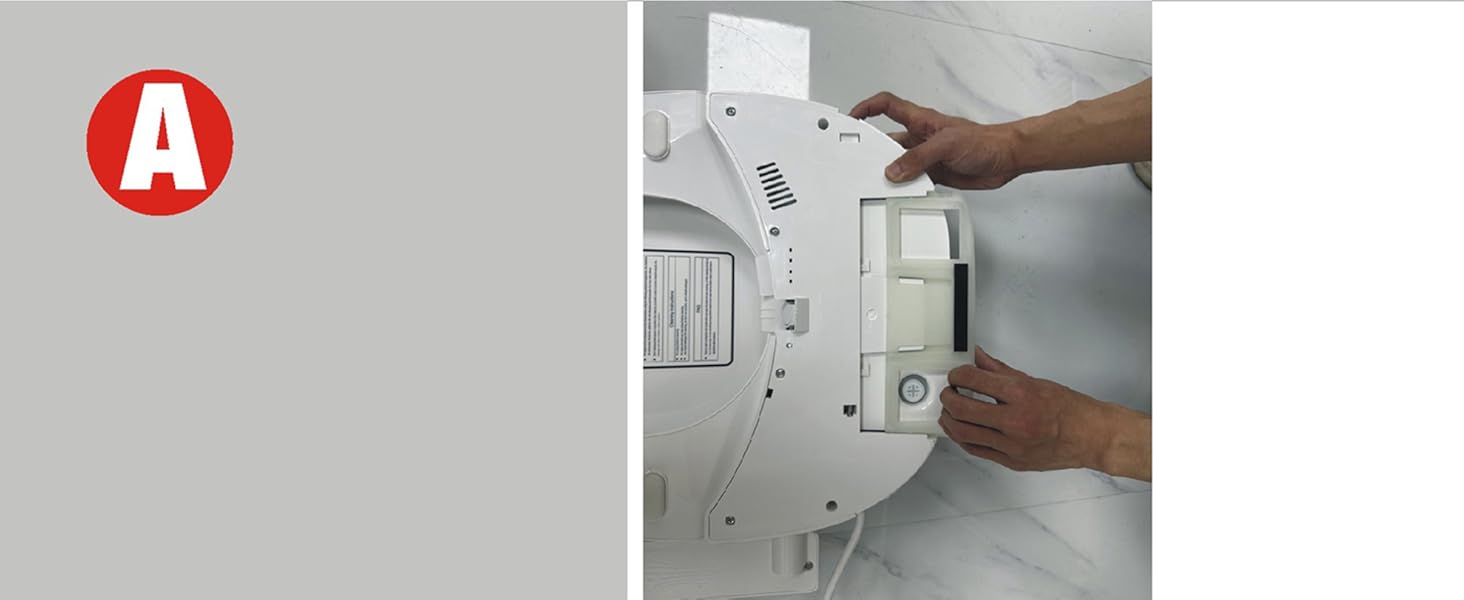
- Installeer Montageplaat: Attach the bidet seat mounting plate to the toilet bowl using the provided hardware. Ensure it is securely fastened.
- Koppel watertoevoer: Connect the provided 3-way valve to the toilet's water supply line and the toilet tank. Then, connect the bidet seat's water supply hose (DMT Pipe) to the 3-way valve. Ensure all connections are tight to prevent leaks.
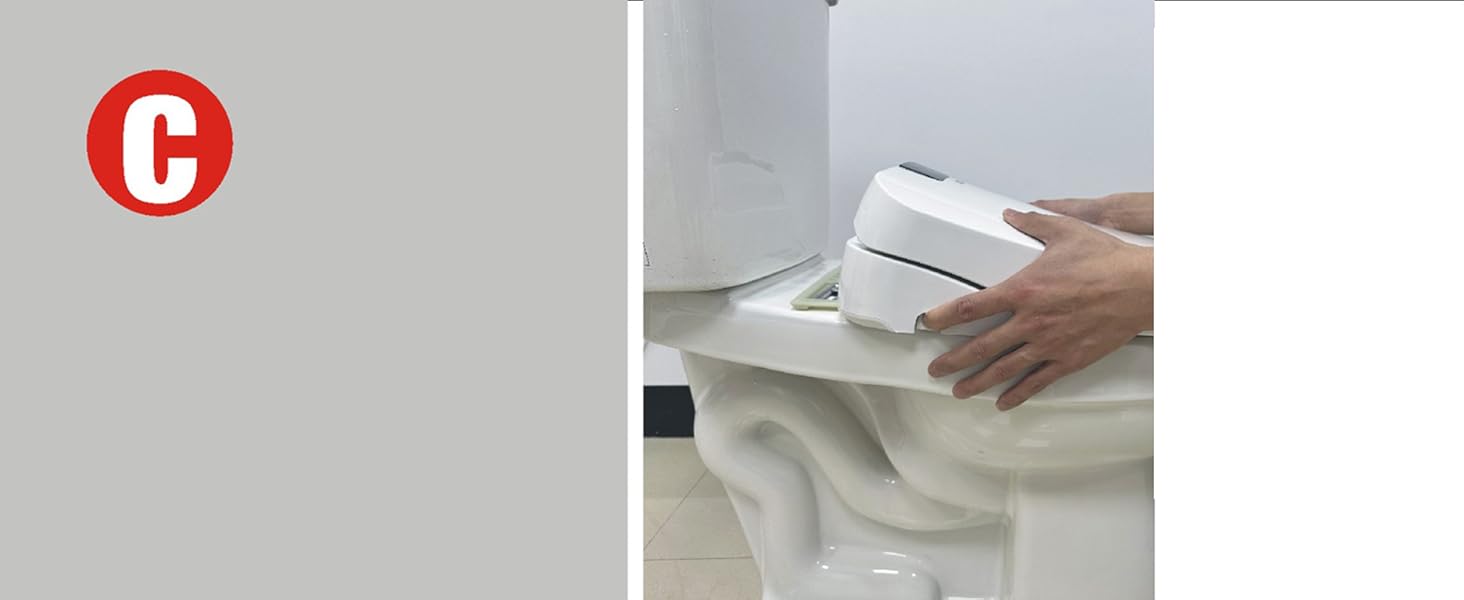
- Heg bidetstoel aan: Slide the bidet seat onto the installed mounting plate until it clicks into place.
- Koppel krag: Plug the bidet seat into a grounded electrical outlet.
- Herstel watervoorraad: Slowly turn on the water supply to the toilet.
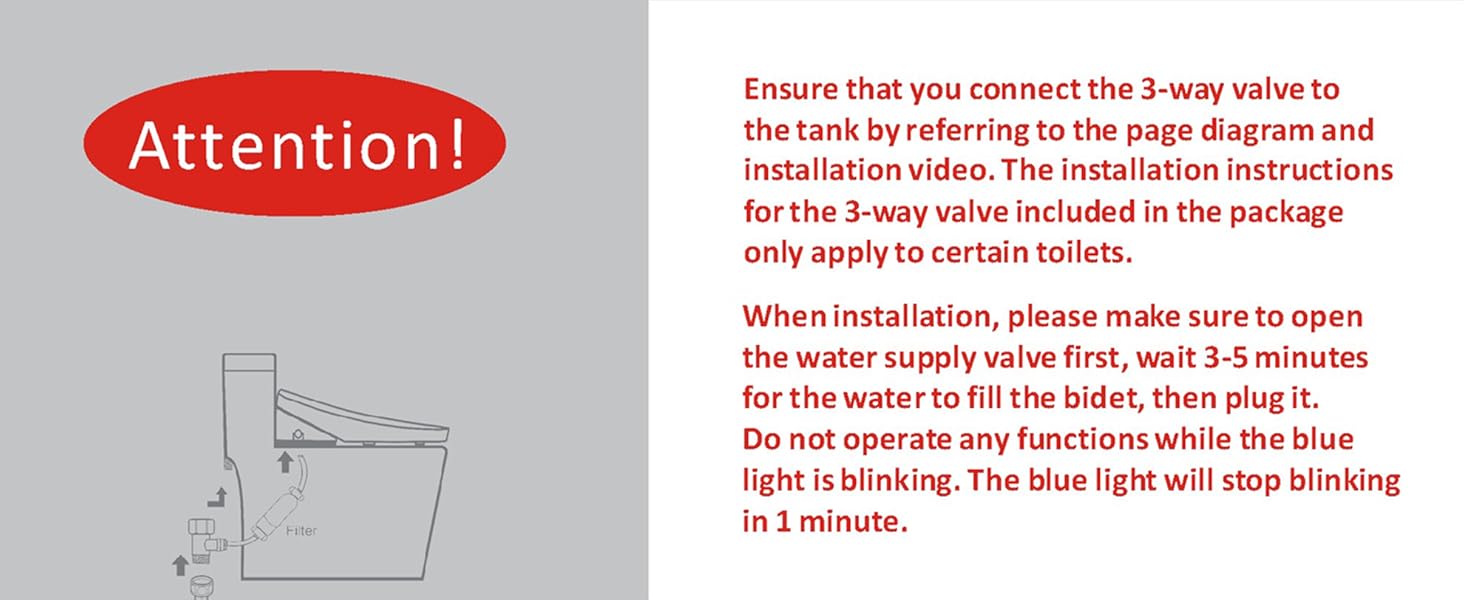

Belangrike installasie nota:

Ensure that you connect the 3-way valve to the tank by referring to the page diagram and installation video (if available). The installation instructions for the 3-way valve included in the package only apply to certain toilets. When installation is complete, please make sure to open the water supply valve first, wait 3-5 minutes for the water to fill the bidet, then plug it in. Do not operate any functions while the blue light is blinking. The blue light will stop blinking in approximately 1 minute.
5. Bedryfsinstruksies
The WLJBIDET Smart Bidet Toilet Seat is operated via a convenient side control panel. Refer to the icons on the panel for specific functions.
5.1 Basiese Funksies
- Agterwas: Activates the posterior cleaning function.
- Vroulike was: Activates the gentle feminine cleaning function.
- Ossillerende Was: Beweeg die spuitstuk heen en weer vir 'n wyer skoonmaakarea.
- Spuitkop selfreinigend: Initiates an automatic cleaning cycle for the nozzle.
- stop: Stops any active washing or drying function.
5.2 Temperature and Position Adjustment
- Water temperatuur: Adjust the water temperature for washing (92℉ to 102℉).
- Sitplek temperatuur: Adjust the heated seat temperature (92℉, 98℉, 104℉, or off).
- Air Drying Temperature: Adjust the warm air dryer temperature (multiple levels).
- Spuitstukposisie: Adjust the nozzle's forward or backward position for optimal cleaning.
5.3 Spesiale kenmerke
- Child-Friendly Wash: A gentle wash setting suitable for children.
- One-Touch Automatic Cleaning: Initiates a pre-programmed cleaning cycle.
- Naglig: Activates the soft LED night light for visibility in the dark.
6. Onderhoud
Regular maintenance ensures the longevity and hygienic operation of your bidet seat.
6.1 Skoonmaak van die spuitstuk
The nozzle performs a self-cleaning cycle automatically. For additional cleaning, you can manually activate the nozzle cleaning function or gently wipe the nozzle with a soft cloth and mild detergent when it is extended.
6.2 Algemene Skoonmaak
Wipe the exterior of the bidet seat with a soft, damp cloth and a mild, non-abrasive cleaner. Do not use harsh chemicals, abrasive cleaners, or brushes that could scratch the surface. Ensure the unit is unplugged before cleaning.
7. Probleemoplossing
If you encounter issues with your bidet seat, refer to the following common troubleshooting steps:
| Probleem | Moontlike oorsaak | Oplossing |
|---|---|---|
| No power/Unit not working | Not plugged in; Power outlet issue; Circuit breaker tripped. | Ensure power cord is securely plugged in. Check the power outlet with another device. Reset the circuit breaker if tripped. |
| No water spray or weak spray | Water supply valve closed; Filter clogged; Nozzle blocked. | Ensure water supply valve is fully open. Clean the water filter. Clean the nozzle. |
| Water not warm | Water heater setting too low; Heater malfunction. | Adjust water temperature setting. If issue persists, contact customer support. |
| Sitplek nie verhit nie | Heated seat setting too low; Sensor issue. | Adjust seat temperature setting. Ensure proper contact with the seat sensor. |
| Air dryer not working or weak | Air dryer setting too low; Air vent blocked. | Adjust air dryer temperature setting. Check for any obstructions in the air vent. |
| lek | Los verbindings; Beskadigde seëls. | Check all water connections and tighten if necessary. If leaks persist, contact customer support. |
If the problem persists after attempting these solutions, please contact WLJBIDET customer support for assistance.
8. Spesifikasies
| Spesifikasie | Detail |
|---|---|
| Model | O7L-Side panel (Elongated) |
| Vervaardiger | WLJBIDET |
| Produk afmetings | 51.05 x 44.45 x 13.97 cm |
| Item gewig | 5.47 kg |
| Grootte | Langwerpig |
| Kleur | Wit |
| Materiaal | Vlekvrye staal |
| Vorm | Ovaal |
| Voltage | 120 Volt |
| Wattage | 1300 watt |
| Bedryfsmodus | Outomatiese |
9. Waarborg en Ondersteuning
For warranty information and customer support, please refer to the documentation included with your product or visit the official WLJBIDET webwebwerf. Bewaar u aankoopbewys as bewys van aankoop vir enige waarborgeise.
Ask a question about this manual
Ask about setup, troubleshooting, compatibility, parts, safety, or missing instructions. Manuals+ will review the question and use this page’s manual context to help answer it.