Inleiding
This manual provides essential information for the safe and efficient operation, maintenance, and troubleshooting of your CONENTOOL 12V Cordless Drill Driver Kit. Please read this manual thoroughly before first use and keep it for future reference.
The CONENTOOL 12V Cordless Drill Driver is designed for drilling into wood, plastic, metal, and other materials, as well as for driving and removing screws. It features a powerful 35 N.m max torque, 25+1 torque settings, and two variable speeds for versatile applications.

Image: The CONENTOOL 12V Cordless Drill Driver Kit, including the drill, two batteries, charger, and a case filled with various drill bits and screwdriver bits.
Belangrike veiligheidsinstruksies
Volg altyd basiese veiligheidsmaatreëls wanneer u elektriese gereedskap gebruik om die risiko van brand, elektriese skok en persoonlike besering te verminder.
- Dra gepaste persoonlike beskermende toerusting (PPE) soos veiligheidsbril, handskoene en gehoorbeskerming.
- Hou jou werkarea skoon en goed belig. Deurmekaar of donker areas nooi ongelukke uit.
- Moenie elektriese gereedskap in plofbare atmosfeer gebruik nie, soos in die teenwoordigheid van vlambare vloeistowwe, gasse of stof.
- Maak seker dat die gereedskap afgeskakel is voordat u enige aanpassings maak, bykomstighede verander of die gereedskap bêre.
- Gebruik die korrekte gereedskap vir jou toepassing. Moenie die gereedskap forseer nie.
- Berg ledige gereedskap buite bereik van kinders en ander onopgeleide persone.
Produkkomponente en kenmerke
Familiarize yourself with the various parts and features of your CONENTOOL Cordless Drill Driver.

Image: A detailed diagram of the CONENTOOL drill driver highlighting its key components: 3/8" keyless chuck, 25+1 adjustable clutch, LED light, variable speed switch, forward and reverse button, 2 variable speeds, and 2000 mAh lithium battery.
- 3/8" Keyless Chuck: For quick and easy bit changes. Features an all-metal automatic spindle lock.
- 25+1 Adjustable Clutch: Allows precise torque settings for various applications, preventing overtightening or stripping screws.
- LED lig: Verlig die werkarea vir verbeterde sigbaarheid in donker ruimtes.
- Variable Speed Switch: Provides precise control over drilling and driving speed.
- Forward and Reverse Button: Easily switch between drilling/driving and unscrewing.
- 2 Veranderlike snelhede: Low speed (0-450 RPM) for screwing, high speed (0-1650 RPM) for drilling.
- 2000 mAh Lithium Battery: Offers long-lasting power and reliable performance.
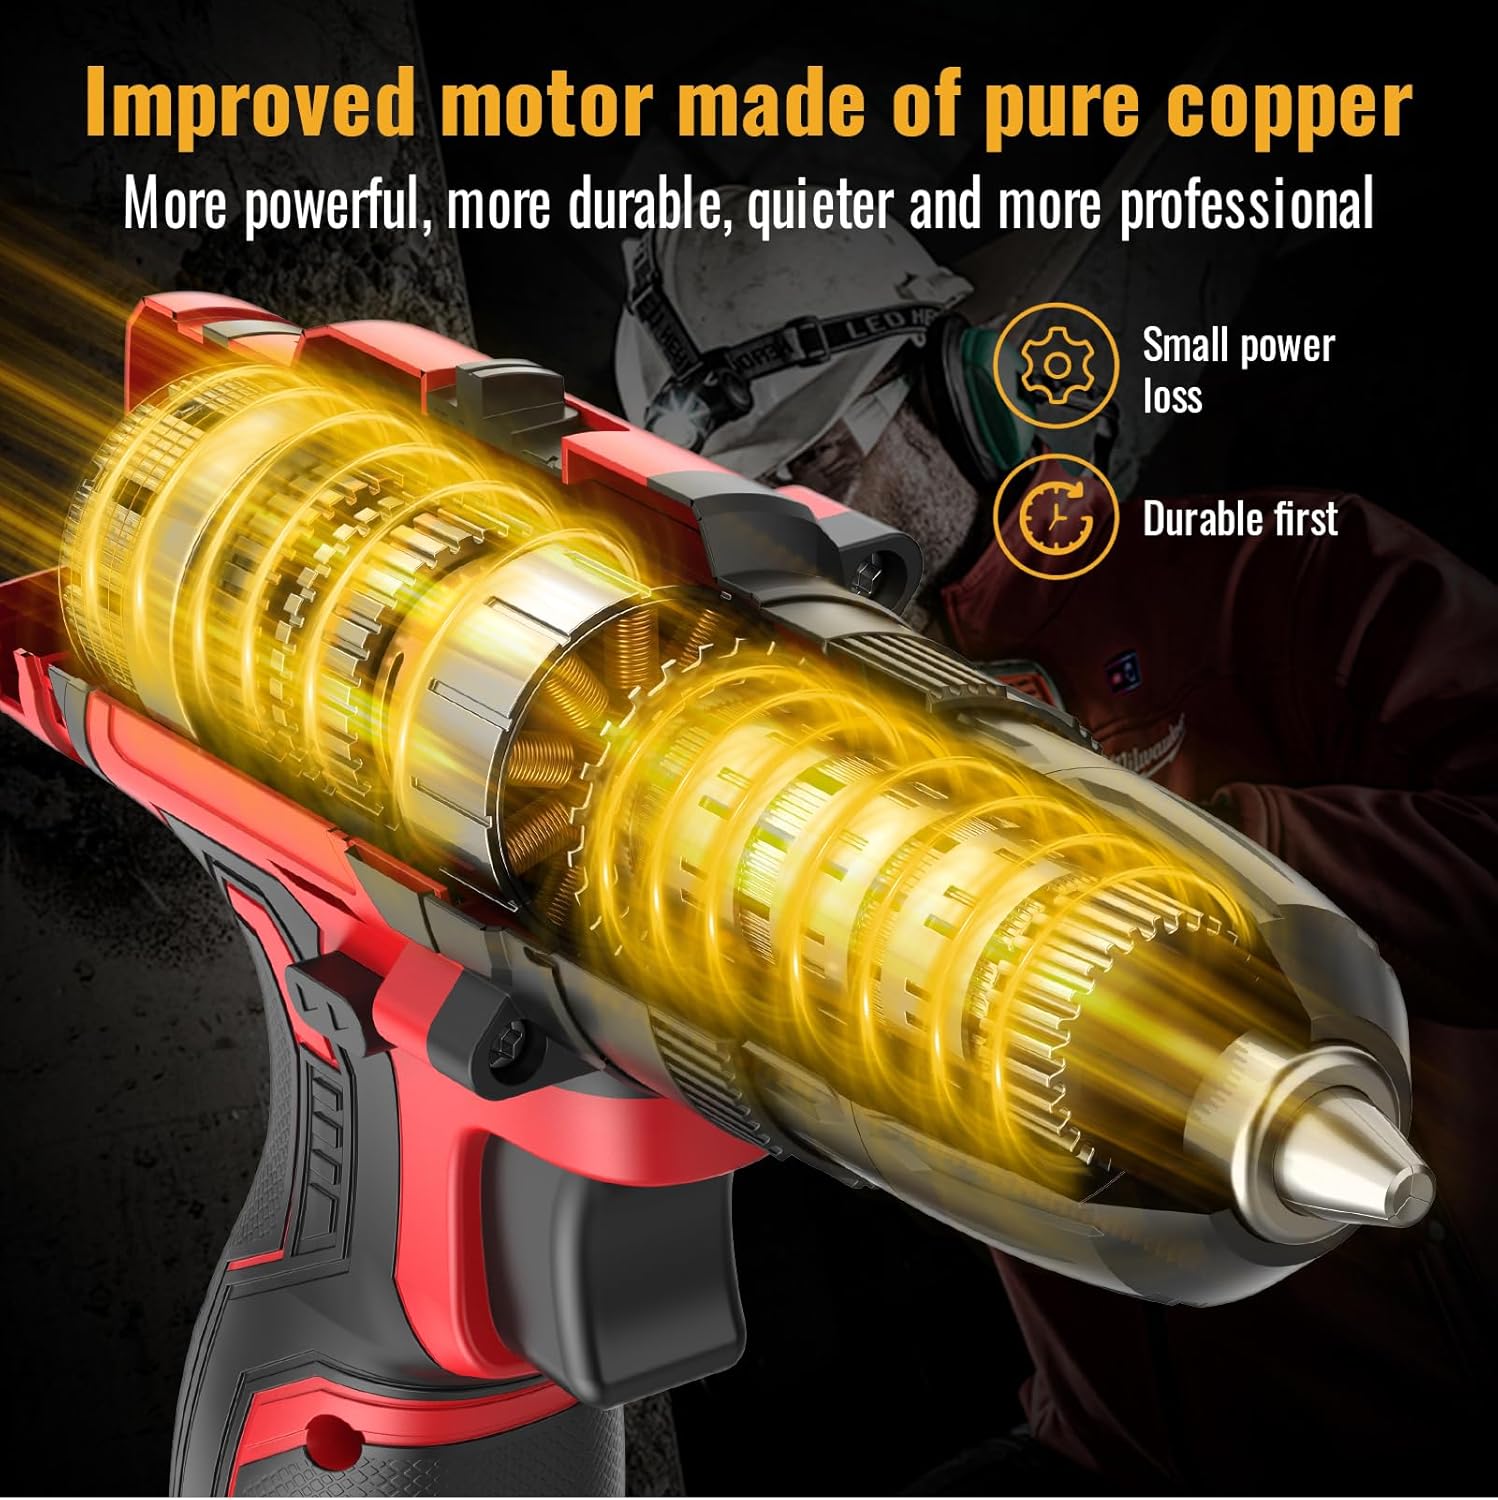
Beeld: 'n Interne view of the drill, highlighting the improved motor made of pure copper, designed for more power, durability, and quieter operation with small power loss.

Image: A graph illustrating the extended working hours provided by the 2x 2.0AH large capacity batteries compared to other batteries, showing a slower discharge rate over time.
Opstelling
Laai die battery
- Koppel die laaier aan 'n standaard kragpunt.
- Skuif die batterypak op die laaier totdat dit in plek klik.
- Allow the battery to charge fully before first use. The indicator light on the charger will change when charging is complete.
- Always disconnect the charger from the power supply and remove the battery once fully charged.
Installeer/verwyder die battery
- Om te installeer: Rig die batterypak met die basis van die boorhandvatsel en skuif dit in totdat dit stewig vassluit.
- To remove: Press the battery release button (usually located on the side of the battery pack) and slide the battery out.
Installing/Removing Drill Bits or Screwdriver Bits

Image: A close-up showing the operation of the 3/8" (10mm) self-locking drill chuck, demonstrating how to open and close it to insert or remove bits.
- Ensure the drill is switched off and the forward/reverse switch is in the center (locked) position.
- Draai die klauwplaat antikloksgewys om die kake oop te maak.
- Steek die verlangde boorpunt of skroewedraaierpunt volledig in die boorkop.
- Draai die boorkop kloksgewys om die kake stewig om die boorpunt vas te draai. Maak seker dat die boorpunt gesentreer en stewig vasgehou is.
- Om te verwyder: Draai die boorkop antikloksgewys om die kake los te maak en trek die boorpunt uit.
Bedryfsinstruksies
Kies spoed
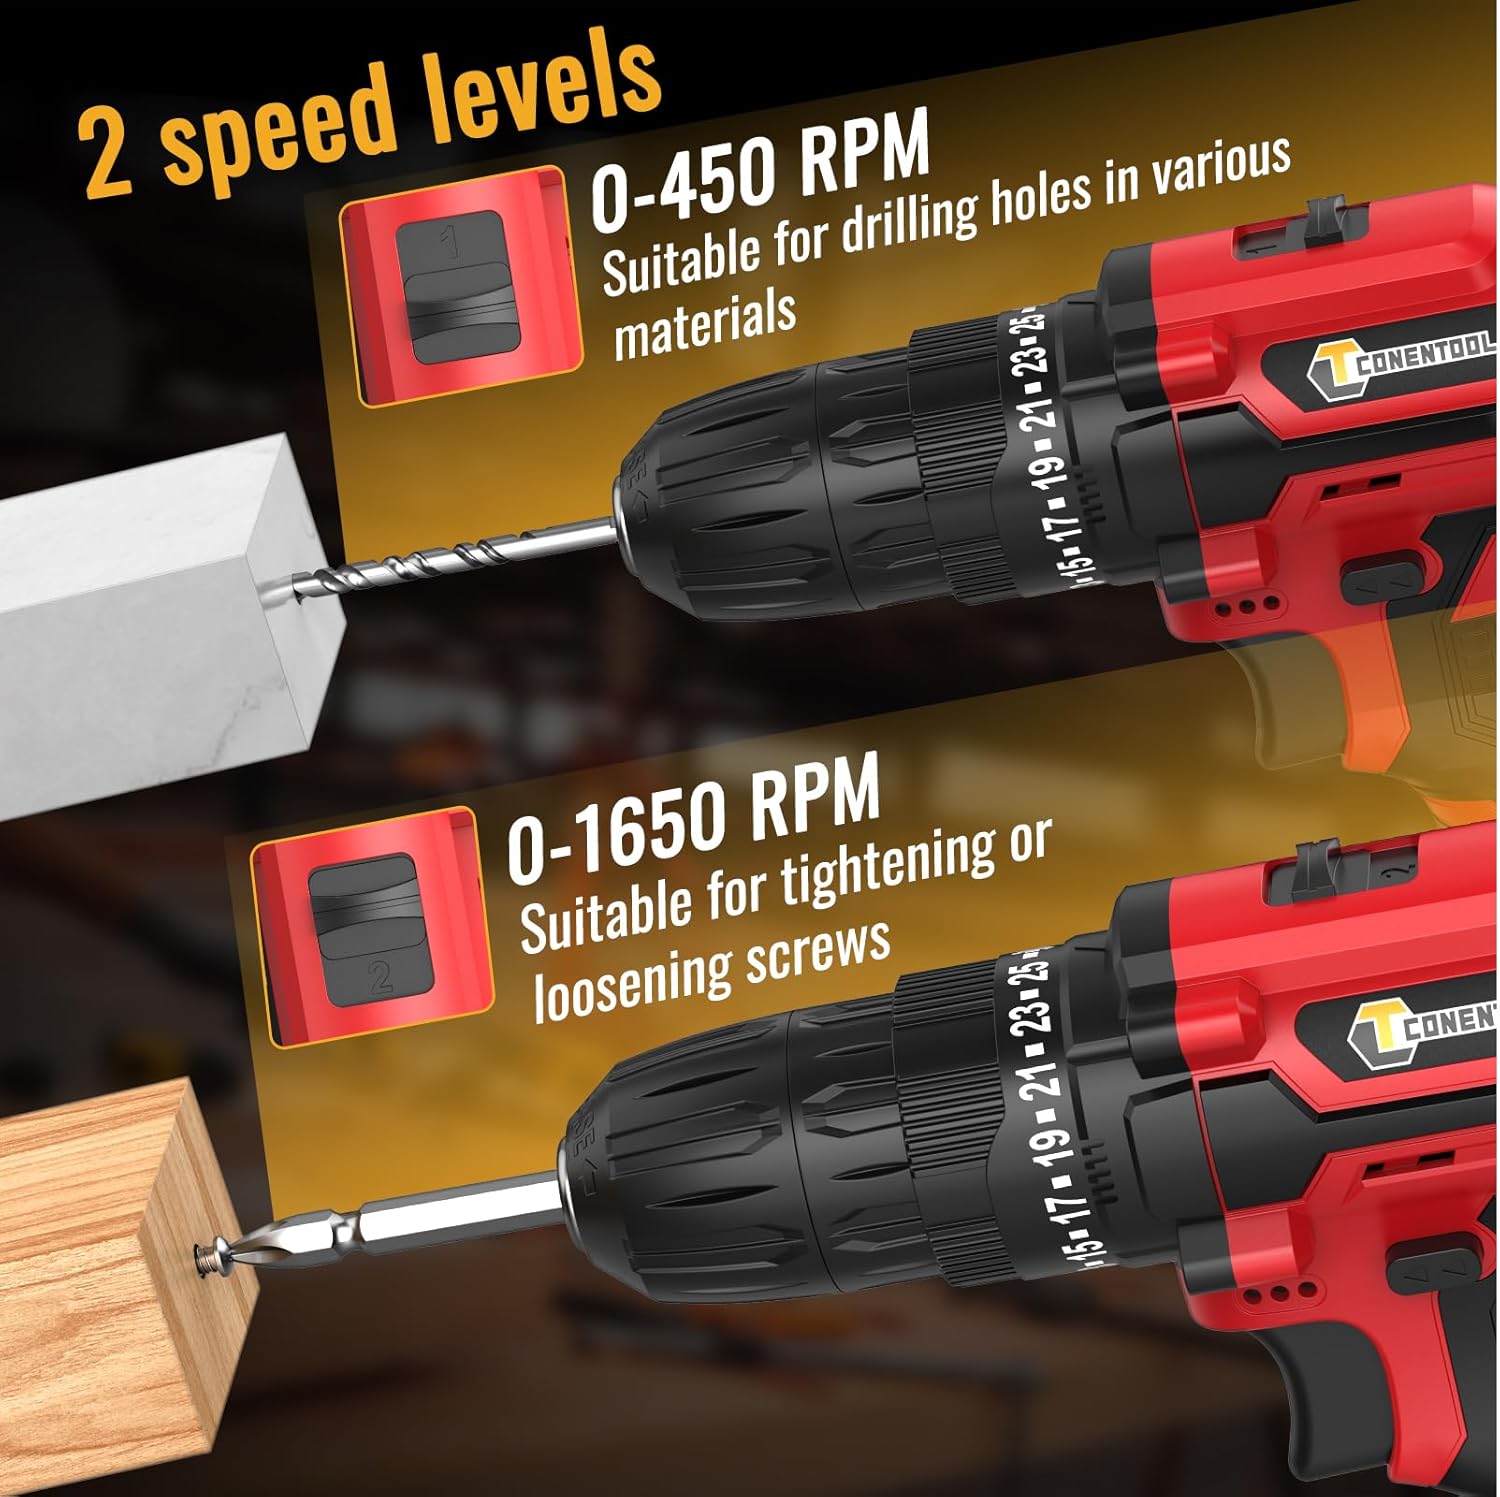
Image: A visual representation of the two-speed levels: 0-450 RPM for drilling holes in various materials (Speed 1) and 0-1650 RPM for tightening or loosening screws (Speed 2).
- Speed 1 (Low, 0-450 RPM): Ideal for driving screws, larger diameter drilling, or applications requiring higher torque.
- Speed 2 (High, 0-1650 RPM): Suitable for smaller diameter drilling and applications requiring faster speed.
- Adjust the speed by sliding the gear selector switch located on top of the drill.
Adjusting Torque (Clutch Setting)

Image: A chart illustrating the drill's multifunctional capabilities, showing increasing torque/power levels suitable for screws, wood, ceramics, brick, concrete, and steel, with distinct settings for drilling and screwdriving.
- The torque adjustment ring is located behind the chuck. Rotate it to select the desired torque setting from 1 to 25.
- The higher the number, the greater the torque. Start with a lower setting and increase as needed to prevent overtightening or damaging the workpiece.
- Use the drill symbol setting for drilling applications, which provides maximum torque without clutch engagement.
Voorwaartse/Agterwaartse Bediening
- Push the forward/reverse selector switch (located above the trigger) to the left for forward rotation (drilling/driving screws).
- Druk die skakelaar na regs vir omgekeerde rotasie (verwyder skroewe).
- For safety, place the switch in the center position to lock the trigger and prevent accidental starting.
Bedien die boor
- Ensure the correct bit is installed and the battery is charged.
- Select the appropriate speed and torque setting for your task.
- Plaas die boorpunt op die werkstuk.
- Press the trigger to start the drill. The LED light will illuminate the work area.
- Pas bestendige, egalige druk toe. Moenie die boor forseer nie.
- Laat die sneller los om die boor te stop.
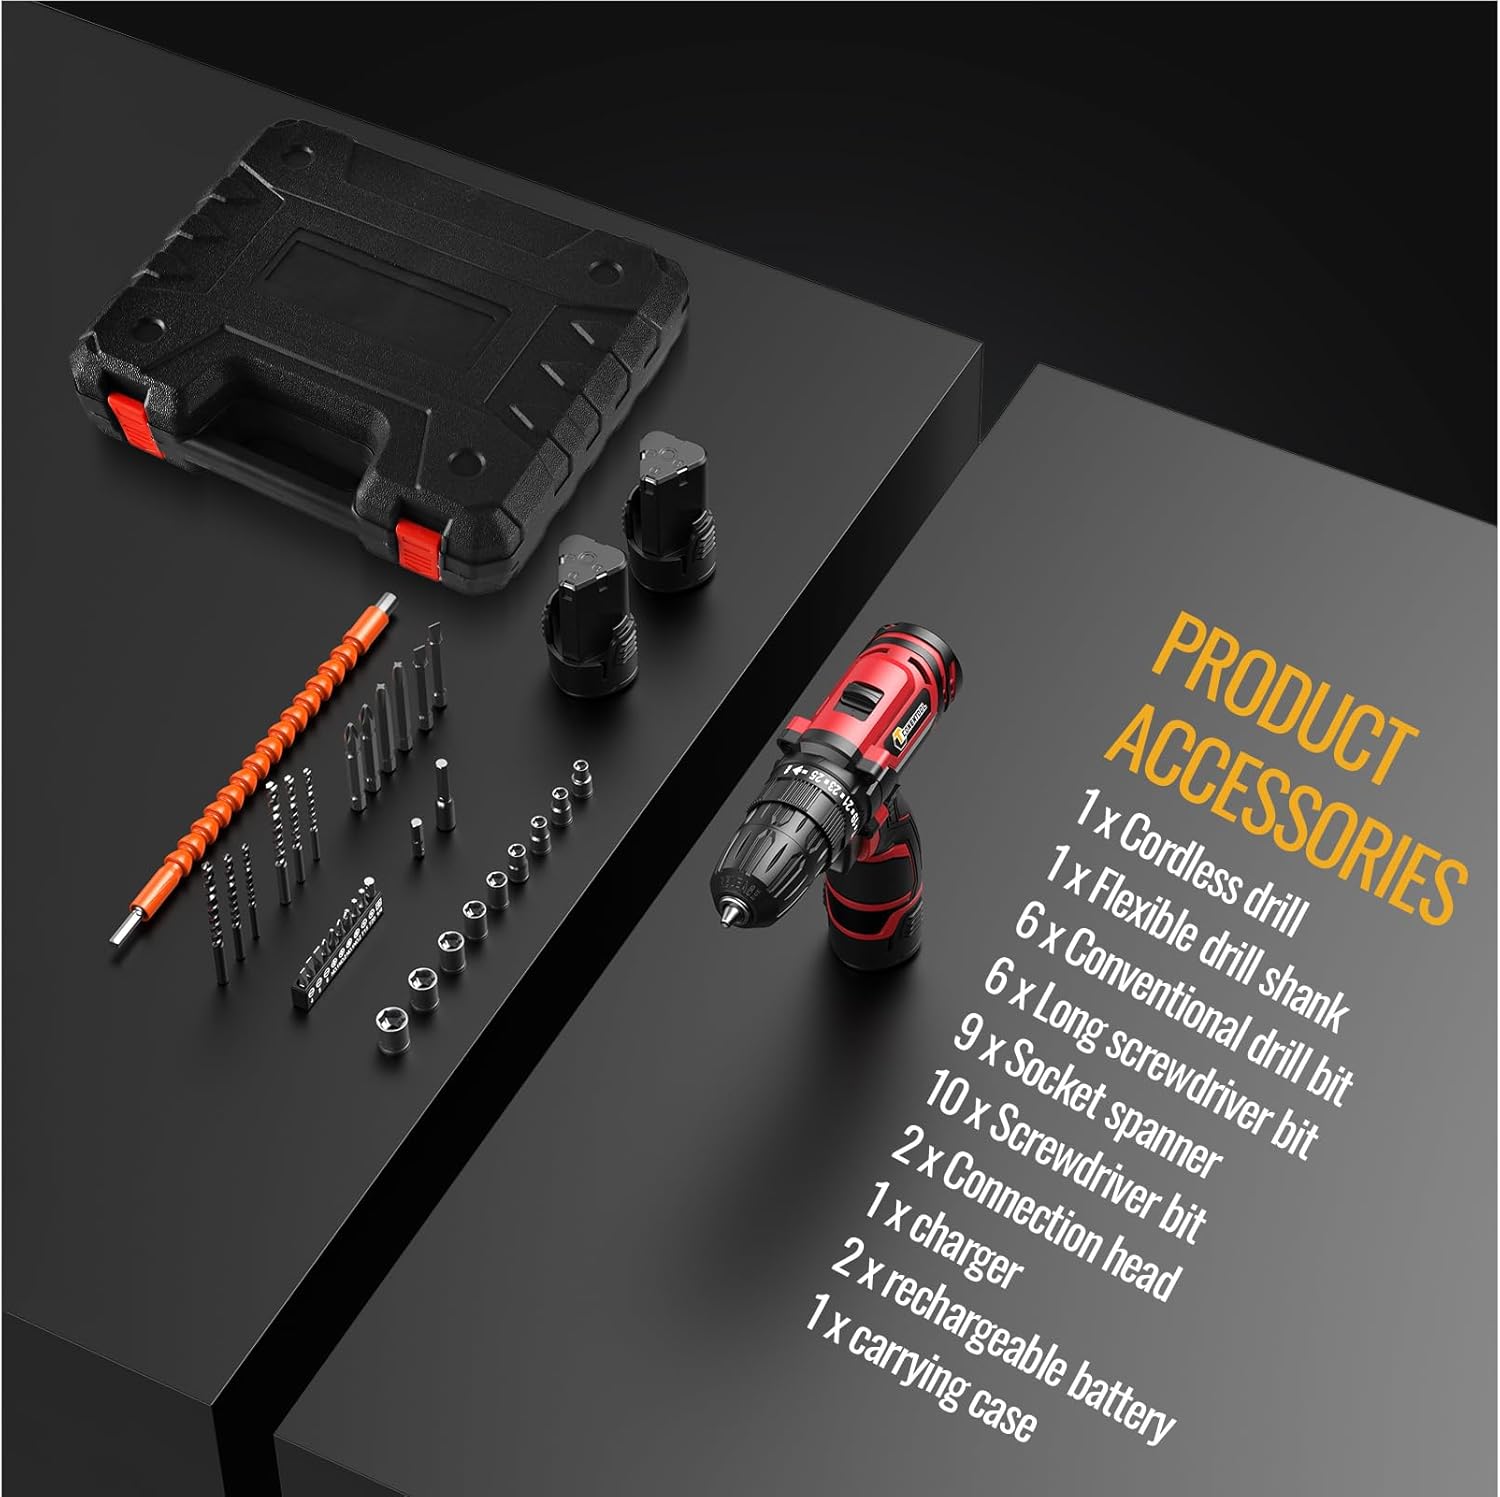
Image: A user demonstrating the versatility of the CONENTOOL drill, shown both drilling into wood and driving a screw into a wall, illustrating its practical application.
Onderhoud
Algemene skoonmaak
- Ontkoppel altyd die batterypak voor skoonmaak.
- Vee die gereedskap af met 'n skoon, damp lap. Moenie harde chemikalieë of skuur skoonmaakmiddels gebruik nie.
- Hou die ventilasie-openinge vry van stof en puin om oorverhitting te voorkom. Gebruik saamgeperste lug indien nodig.
Battery sorg
- Berg batterye in 'n koel, droë plek weg van direkte sonlig en uiterste temperature.
- Moenie batterye vir lang tye in 'n ontlaaide toestand bêre nie. Laai hulle gereeld op as hulle nie gebruik word nie.
- Moenie die batteryklemme kortsluit nie.
Bybehore sorg
- Clean drill bits and screwdriver bits after use.
- Store accessories in the provided carrying case to prevent damage and loss.
Probleemoplossing
| Probleem | Moontlike oorsaak | Oplossing |
|---|---|---|
| Boor begin nie | Battery nie gelaai of nie behoorlik geïnstalleer nie. Vorentoe/agtertoe-skakelaar in middelste (gesluit) posisie. | Charge battery fully. Reinstall battery securely. Move forward/reverse switch to desired direction. |
| Verlies aan krag tydens werking | Battery is laag. Oorladingbeskerming geaktiveer. | Herlaai die battery. Verminder die druk of gebruik 'n hoër wringkraginstelling. |
| Bit wobbles or falls out | Chuck not tightened properly. Bit shank is damaged. | Draai die boorkop stewig vas. Vervang die beskadigde boorpunt. |
| Oorverhitting | Aanhoudende swaar gebruik. Geblokkeerde ventilasie. | Laat die gereedskap afkoel. Maak ventilasie-openinge skoon. |
Spesifikasies
| Kenmerk | Detail |
|---|---|
| Modelnommer | CR-314 |
| Voltage | 12 Volt |
| Max Torque | 35 Nm |
| Geen-las spoed (laag) | 0-450 XNUMX RPM |
| Geen-las spoed (hoog) | 0-1650 XNUMX RPM |
| Koppelaar instellings | 25+1 |
| Chuck Grootte | 3/8" (10mm) Keyless |
| Battery Tipe | Litium-ioon |
| Battery kapasiteit | 2000 mAh (2x included) |
| Gewig | 2.13 kg (met battery) |
| Afmetings (L x B x H) | 31 x 25 x 9 cm |
Bykomstighede ingesluit

Image: A display of all accessories included in the kit, such as the cordless drill, flexible drill shank, various drill bits, screwdriver bits, socket spanner, connection head, charger, rechargeable batteries, and carrying case.
- 1 x Cordless Drill
- 1 x Flexible Drill Shank
- 6 x Conventional Drill Bits
- 6 x Long Screwdriver Bits
- 9 x Socket Spanners
- 10 x skroewedraaier stukkies
- 2 x Connection Heads
- 1 x laaier
- 2 x Rechargeable Batteries (2000 mAh each)
- 1 x Dratas
Waarborg en Ondersteuning
CONENTOOL is committed to providing high-quality products. For any questions regarding your product, please refer to the seller's contact information or Amazon's customer service.
While specific warranty details are not provided in this manual, most products come with a standard manufacturer's warranty against defects in materials and workmanship. Please retain your proof of purchase for any warranty claims.
For further assistance or technical support, please contact the seller Zhen Hui Xiang EU through the Amazon platform.