Inleiding
This manual provides detailed instructions for the assembly, operation, and maintenance of your TIQLAB 47-Inch L-Shaped Gaming Desk. Please read all instructions carefully before beginning assembly and retain this manual for future reference. Proper assembly and use will ensure the longevity and optimal performance of your desk.
Veiligheidsinligting
Belangrike veiligheidsmaatreëls:
- Ensure proper assembly of the desk to support the weight of electronic devices and other items.
- Follow all manufacturer instructions for safe use and maintenance.
- Do not overload the desk or shelves beyond their intended weight capacity.
- Keep all electrical components (power outlets, LED lights) away from liquids.
- Ensure all power cords are routed safely to prevent tripping hazards.
- Use only the provided power cord and avoid using damaged cords or outlets.
Pakketinhoud
Before assembly, verify that all components are present and undamaged. Refer to the included parts list in your packaging for a complete inventory. If any parts are missing or damaged, contact TIQLAB customer support.
Tipiese komponente sluit in:
- Desk panels (main desktop, L-extension, monitor stand, shelves)
- Metal frame components (legs, support bars)
- Monteringshardeware (skroewe, boute, moere, inbussleutel)
- Power outlet unit with integrated USB and Type-C ports
- LED light strip with remote control
- Fabric storage pouch
- Verstelbare voetkussings
Opstel- en monteringsinstruksies
Assembly typically requires two people. Clear a spacious area for assembly. Do not fully tighten screws until all components are loosely fitted.
- Pak uit en identifiseer onderdele: Carefully remove all components from the packaging. Lay them out and compare them against the parts list provided in your box.
- Monteer die hoofraam: Begin by attaching the main desk legs and support bars according to the diagram in your specific assembly guide.
- Heg lessenaarpanele aan: Secure the main desktop panel to the assembled frame.
- Install L-Extension: The L-shaped design is reversible. Decide whether you want the extension on the left or right side of the main desk. Attach the L-extension frame and desktop panel accordingly.
- Monteer monitorstaander: Secure the monitor stand to the main desktop. This stand provides an ergonomic viewing angle and additional storage space.
- Installeer stoorrakke: Attach the double storage shelves to the L-extension frame. These shelves can be positioned on either side of the L-extension based on your preference.
- Integrate Power Outlets: Install the built-in power socket unit into the designated slot on the desk. Ensure it is securely fastened.
- Apply LED Lights: Adhere the LED light strip to the underside of the monitor stand or other desired location. Connect it to the power outlet unit.
- Attach Fabric Storage Pouch: Hook the fabric storage pouch to the side of the desk as desired.
- Pas voetkussings aan: Once the desk is fully assembled, adjust the foot pads at the bottom of the legs to ensure stability and level the desk on uneven floors.
- Finale stramming: Once all components are in place and the desk is level, fully tighten all screws and bolts.

Image: Desk dimensions and reversible design options. This diagram illustrates the overall dimensions of the desk and how the L-shaped section can be configured for left or right-hand use during assembly.

Image: Adjustable foot pad. This image shows a close-up of the adjustable foot pad at the base of a desk leg, used for leveling the desk.
Bedryfsinstruksies
Kragpunte
The desk is equipped with a built-in power socket for convenient charging and powering of your devices.
- Komponente: The power unit includes 2 standard AC outlets (125V/12A), 1 USB port (5V/3A), and 1 Type-C port (5V/3A).
- Verbinding: Plug the desk's 5ft power cord into a wall outlet.
- Gebruik: Connect your laptops, monitors, smartphones, tablets, and other electronic devices directly to the integrated outlets and USB ports.

Image: Built-in power outlets. This image displays a close-up of the integrated power strip on the desk, featuring two AC outlets, one USB-A port, and one USB-C port, with devices plugged in.
LED ligte
The integrated LED strip enhances your workspace ambiance.
- Beheer: Use the provided wireless remote control to manage the LED lights.
- Kenmerke: The LED strip offers adjustable brightness, 21 dynamic modes, speed control, and 20 static colors.
- Krag: Ensure the LED strip is connected to the desk's power outlet unit.

Image: LED lights and remote control. This image shows the LED light strip illuminating the area under the monitor stand, along with the wireless remote control used to adjust its settings.
Monitor Stand and Storage
- Monitor staander: The raised monitor stand promotes an ergonomic viewing posture, reducing neck and eye strain. It also frees up space on the main desktop.
- Bergrakke: The double storage shelves on the L-extension provide space for books, files, gaming consoles, or other accessories.
- Fabric Pouch: Use the removable fabric pouch for convenient storage of headphones, controllers, or small items.

Image: Ergonomic design illustration. This diagram compares an incorrect sitting posture with a correct ergonomic posture, demonstrating how the monitor stand helps achieve better alignment.
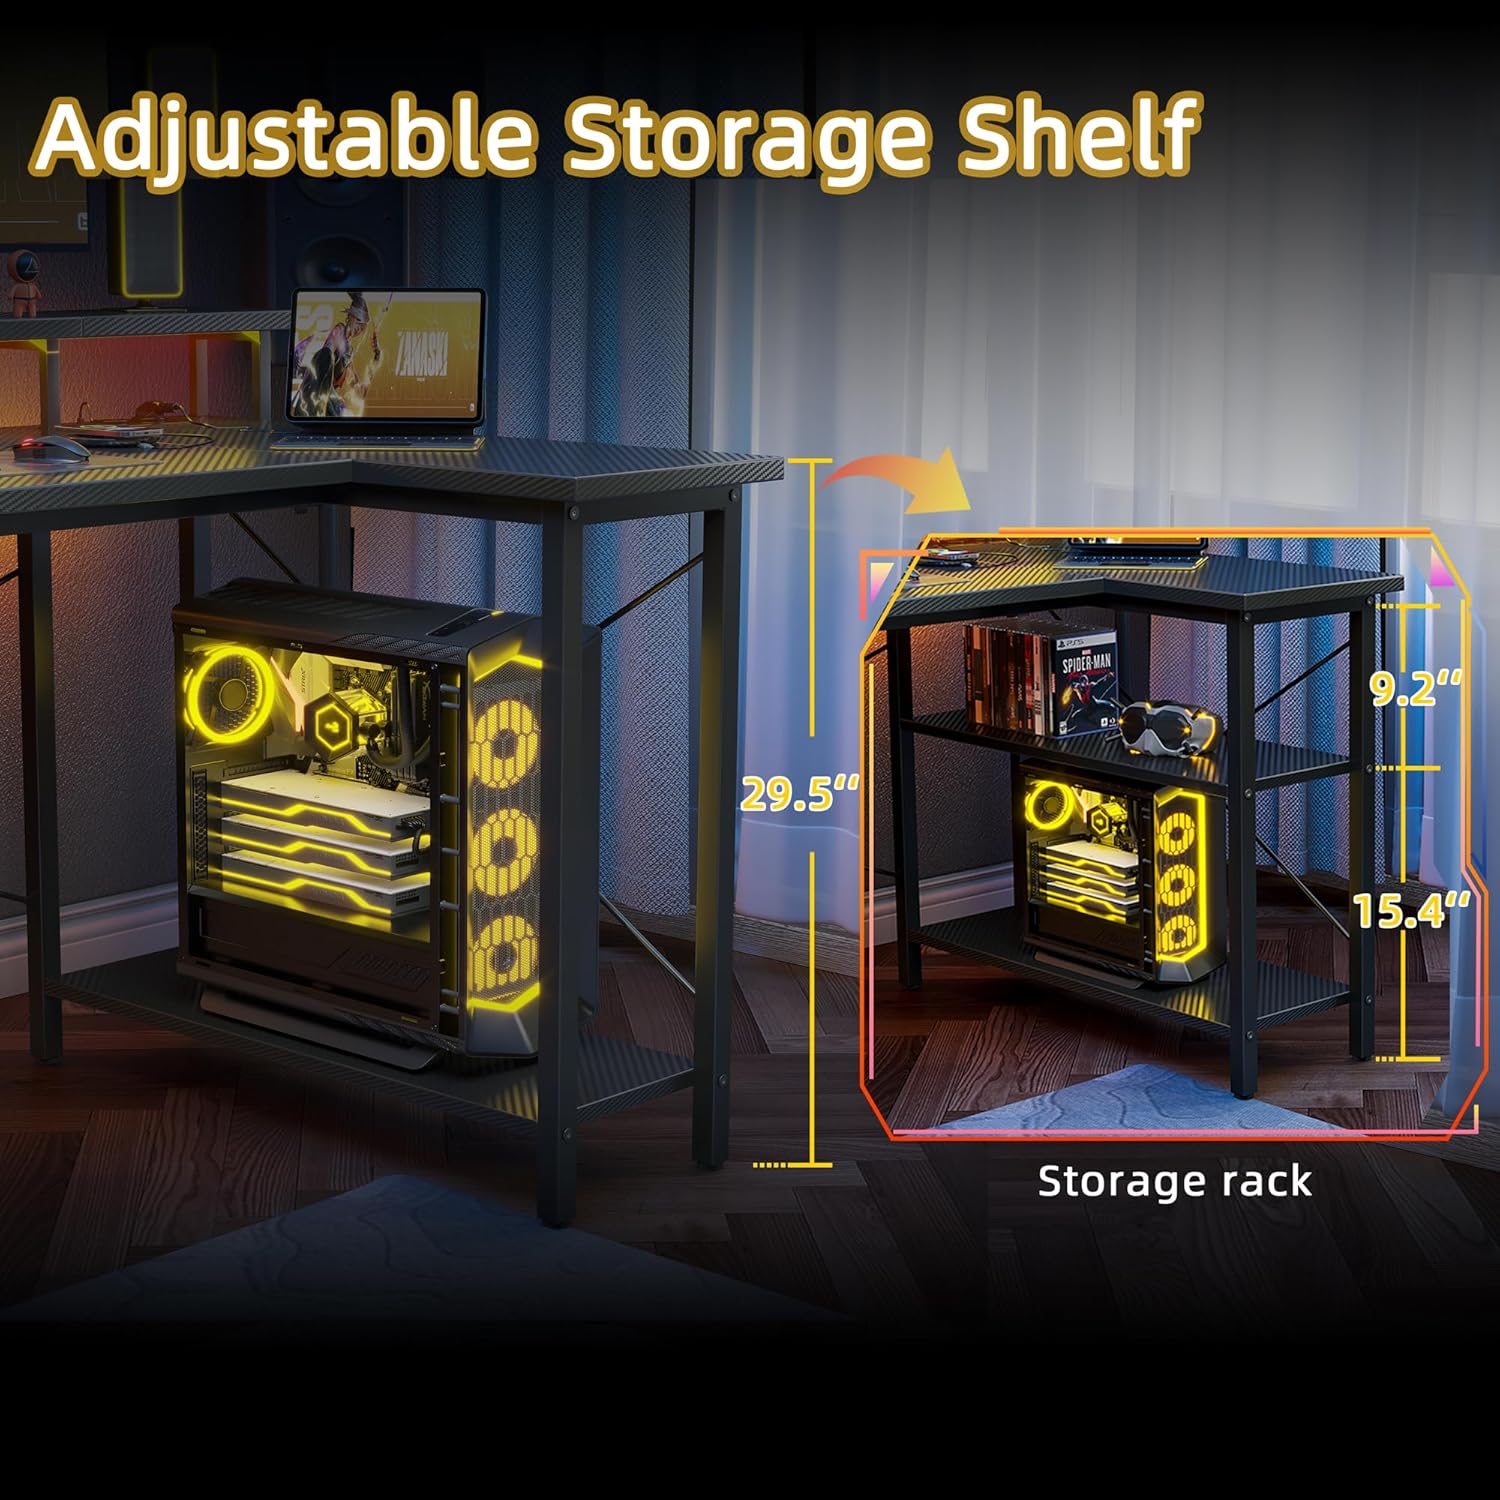
Image: Adjustable storage shelf. This image highlights the storage shelves on the L-extension, showing how they can accommodate a computer tower and other items.

Image: Desk with storage pouch. This close-up shows the fabric storage pouch attached to the side of the desk, providing convenient access to small items like controllers and headphones.
Onderhoud
To maintain the appearance and functionality of your TIQLAB Gaming Desk:
- Skoonmaak: Vee die lessenaaroppervlak af met 'n sagte, damp cloth. Avoid abrasive cleaners or harsh chemicals that could damage the carbon fiber finish.
- Gemors: Maak gemorste vloeistof onmiddellik skoon om vlekke of skade aan die vervaardigde hout te voorkom.
- Elektriese komponente: Ensure the power outlets and LED lights remain dry. Do not attempt to clean them with liquids while plugged in.
- Hardeware: Kontroleer en trek gereeld alle skroewe en boute vas om te verseker dat die lessenaar stabiel bly.

Image: Carbon fiber finish detail. This image provides a close-up view of the carbon fiber texture on the desk surface, highlighting its scratch-resistant quality.
Probleemoplossing
As jy probleme met jou lessenaar ondervind, raadpleeg die volgende algemene oplossings:
- lessenaar wiebels: Check that all screws are fully tightened. Adjust the leveling foot pads at the bottom of each leg to stabilize the desk on uneven surfaces.
- LED-ligte werk nie: Ensure the LED strip is properly connected to the power outlet unit and that the desk's main power cord is plugged into a functional wall outlet. Check the remote control battery.
- Kragpunte wat nie werk nie: Verify the desk's main power cord is securely plugged into a live wall outlet. Test the wall outlet with another device.
- Moeilikheid met montering: Review the assembly instructions carefully. Ensure all parts are oriented correctly before tightening screws. If a part seems misaligned, loosen adjacent screws, adjust, and then retighten.
Spesifikasies
| Kenmerk | Detail |
|---|---|
| Handelsmerk | TIQLAB |
| Vorm | L-vorm |
| lessenaar ontwerp | Rekenaar lessenaar |
| Produk Afmetings (D x B x H) | 31.5" x 47" x 29.5" |
| Kleur | Koolstofvesel Swart |
| Styl | Moderne |
| Basis materiaal | Metaal |
| Top materiaal tipe | Gemanipuleerde hout |
| Voltooi Tipe | Gelamineerd |
| Spesiale kenmerke | Built-in Outlets, LED Lights, Monitor Stand, Storage Shelves |
| Kragpunte | 2 AC (125V/12A), 1 USB (5V/3A), 1 Type-C (5V/3A) |
| Lengte van die kragsnoer | 5 vt |
| Aantal rakke | 2 |
| Vergadering benodig | Ja |
| Aanbevole Persone vir Vergadering | 2 |
Waarborg en Ondersteuning
For warranty information, product support, or to order replacement parts, please refer to the contact information provided in your product packaging or visit the official TIQLAB webwebwerf. Bewaar u aankoopbewys as bewys van aankoop.