1. Inleiding
This manual provides detailed instructions for the setup, operation, and maintenance of your OBSBOT Tail AIR 4K AI-Powered PTZ Camera. Designed for live streaming and video production, this camera features advanced AI tracking, gesture control, and versatile connectivity options to enhance your content creation.
2. Wat is in die boks
- OBSBOT Tail Air *1
- Female Splitter *1
- USB C Male to Dual USB C *1
- USB-C-kabel *1
- USB-C to USB-A Adapter *1
- Vinnige gids *1
- Waarborgkaart *1
- Stoorkas *1
- Outer Package *1

Image: Contents of the OBSBOT Tail AIR package, including the camera, cables, adapters, and carrying case.
3. Opstelling
3.1 Montering van die kamera
The OBSBOT Tail AIR features an integrated mounting system for easy attachment to monitors or tripods. The base includes a magnetic clip for secure placement and a 1/4-inch screw thread for tripod compatibility.

Image: The OBSBOT Tail AIR camera shown mounted on a mini tripod, highlighting its compact design and mounting versatility.
3.2 Aanskakeling en aanvanklike verbinding
Connect the camera to a power source using the provided USB-C cable. The camera will automatically power on. For initial setup and advanced controls, download the OBSBOT Start App on your mobile device or the OBSBOT Center software for your computer.
Video: Demonstrates the OBSBOT Tail AIR's performance in low-light shooting conditions, showcasing its ability to capture clear video with minimal noise.
4. Bedryfsinstruksies
4.1 AI Auto Tracking & Framing
The OBSBOT Tail AIR utilizes an advanced AI algorithm to track human, animal, pet, or other objects. Once a target is identified, the camera will maintain it within the frame, even if it temporarily leaves and re-enters the view. AI Auto Framing ensures that all subjects remain centered, expanding the view as needed when multiple individuals are present.
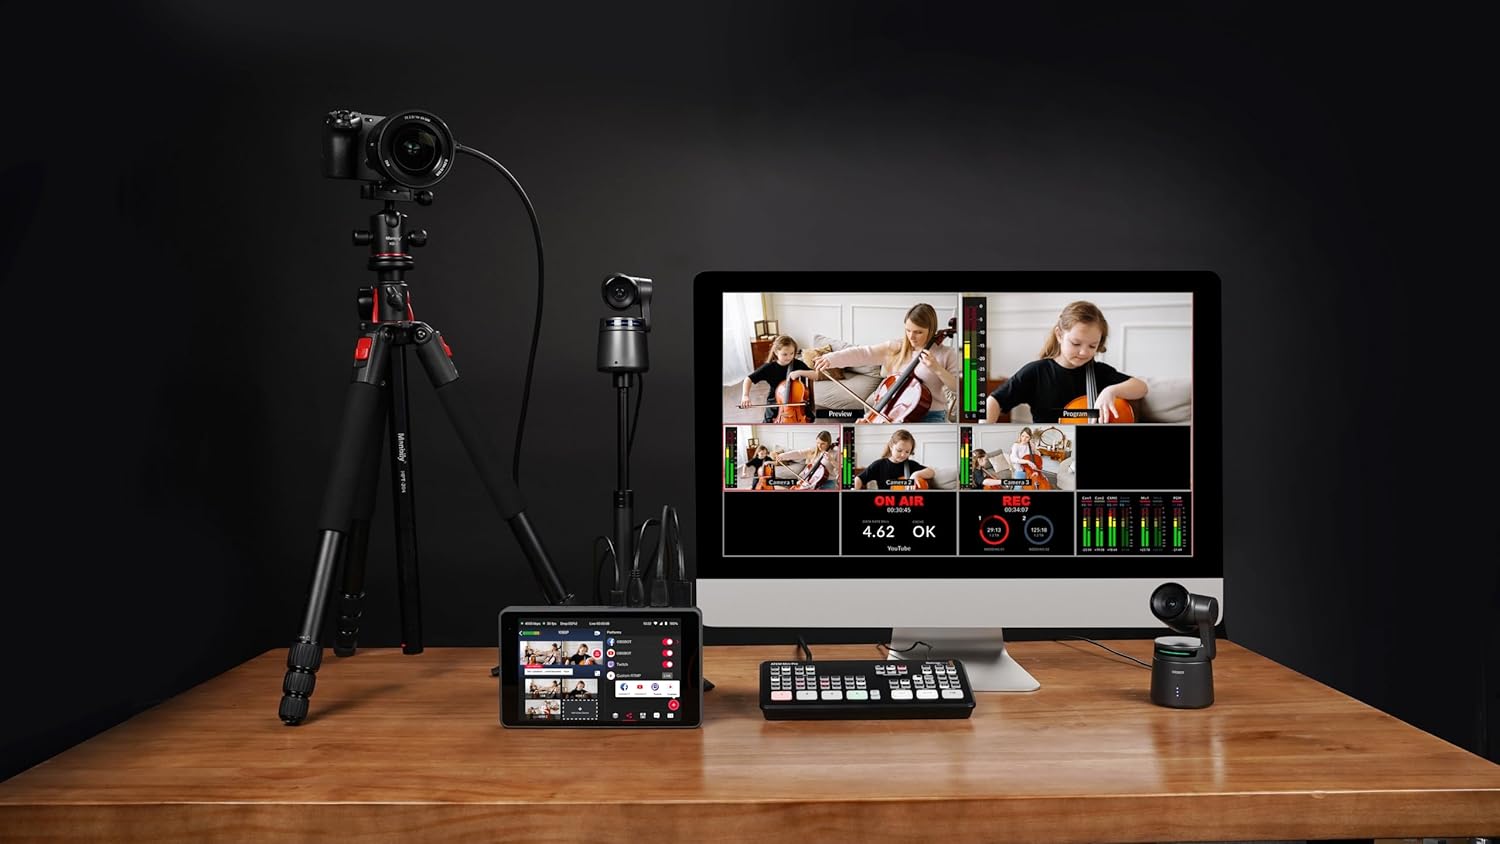
Image: Visual representation of the AI Auto Tracking feature, showing the camera's ability to follow humans, animals, and various objects.
4.2 Gesture Control 2.0
Control key camera functions using intuitive hand gestures. This includes initiating tracking, stopping tracking, and adjusting zoom levels dynamically. The camera's status light will provide visual feedback for gesture recognition.

Image: A guide illustrating the specific hand gestures for controlling the OBSBOT Tail AIR, including tracking and dynamic zoom.
4.3 Video Performance & Low Light Capabilities
The camera supports 4K resolution at 30fps and 1080P at 60fps. HDR and AI Enhancement features optimize video appearance. Equipped with an all-new camera system, including 8 prime lenses, f/1.8 aperture, and a 1.8-inch ultra-sensitive CMOS sensor with 2µm pixel size, the Tail AIR delivers enhanced image quality with wider dynamic range and reduced noise, even in low-light conditions.

Beeld: Gedetailleerd view of the OBSBOT Tail AIR's camera system, highlighting its 8-piece lens structure and 1/1.8-inch CMOS sensor.
Video: Illustrates the wireless NDI connection capabilities of the OBSBOT Tail AIR, demonstrating seamless integration into a live streaming setup.
4.4 Konnektiwiteitsopsies
The Tail AIR offers extensive connectivity for diverse live streaming and production needs. It supports both wired (Ethernet, USB-C, Micro-HDMI) and wireless (Wi-Fi) connections. NDI|HX3 support provides high-quality video streaming with low bandwidth. Note: An NDI License Key may require additional purchase.

Beeld: 'n Oorview of the OBSBOT Tail AIR's multiple wired and wireless connection interfaces, including NDI, RTMP, RTSP, and VISCA protocols.
Video: Illustrates the wireless NDI connection capabilities of the OBSBOT Tail AIR, demonstrating seamless integration into a live streaming setup.
4.5 OBSBOT Start App
The exclusive OBSBOT Start App allows users to customize image parameters before or during live streams and apply them instantaneously. It also features Director Grids for automatic video signal assignment based on common angles, aiding in quick evaluation of your live stream.

Image: The AI Director Grids feature, showing automatic framing and expansion of the view to include multiple subjects.
5. Spesifikasies
| Handelsmerk | OBSBOT |
| Modelnommer | Tail AIR |
| Item gewig | 12.3 onse |
| Produk afmetings | 2.76 x 5.31 x 2.95 duim |
| Fotosensortegnologie | CMOS |
| Video-opname-resolusie | 4K@30/25/24 fps |
| Maksimum diafragma | f/1.8 |
| Tipe flitsgeheue | Mikro SD (tot 512 GB) |
| Verbindingstegnologie | Ethernet, Infrared, NFC, USB, Wi-Fi |
| Spesiale kenmerke | Low Light, Microphone Input, Motion Detection, Night Vision, Remote Control |
6. Probleemoplossing
If you encounter issues with your OBSBOT Tail AIR, please refer to the following general troubleshooting steps:
- Kamera skakel nie aan nie: Maak seker dat die USB-C-kabel stewig aan beide die kamera en 'n werkende kragbron gekoppel is.
- Spoorprobleme: Verify that the lighting conditions are adequate. Ensure no obstructions are blocking the camera's view of the subject. Recalibrate AI tracking through the OBSBOT Start App or OBSBOT Center software.
- Verbindingsprobleme: For wired connections, check all cable connections. For wireless, ensure the camera is within range of your Wi-Fi network and that network settings are correctly configured.
- Firmware Update Required: Some features or performance improvements may require a firmware update. Ensure an U3 Micro SD card is inserted for firmware updates.
- Swak beeldkwaliteit: Check lighting conditions. Adjust exposure, white balance, and other image settings within the OBSBOT software.
7. Waarborg en Ondersteuning
For warranty information, technical support, or service inquiries, please refer to the Warranty Card included in your product package or visit the official OBSBOT webwebwerf. Bewaar u bewys van aankoop vir enige waarborgeise.
Additional protection plans may be available for purchase separately. Please check with your retailer for details.
Ask a question about this manual
Ask about setup, troubleshooting, compatibility, parts, safety, or missing instructions. Manuals+ will review the question and use this page’s manual context to help answer it.