1. Inleiding
Thank you for choosing the Conentool 21V Cordless Impact Drill/Driver Kit. This tool is designed for various drilling and screwdriving tasks in wood, metal, plastics, and masonry. Please read this manual carefully before operating the tool to ensure safe and efficient use. Keep this manual for future reference.

Image 1.1: The Conentool 21V Cordless Impact Drill/Driver Kit, including the drill, two 2500mAh batteries, charger, and a variety of drill bits and accessories in a carrying case.
2. Algemene Veiligheidsinstruksies
WAARSKUWING: Lees alle veiligheidswaarskuwings, instruksies, illustrasies en spesifikasies wat by hierdie elektriese gereedskap voorsien word. Versuim om alle instruksies hieronder gelys te volg, kan elektriese skok, brand en/of ernstige beserings tot gevolg hê.
2.1 Werkareaveiligheid
- Hou die werkarea skoon en goed belig. Deurmekaar of donker areas nooi ongelukke uit.
- Moenie elektriese gereedskap in plofbare atmosfeer gebruik nie, soos in die teenwoordigheid van vlambare vloeistowwe, gasse of stof. Elektriese gereedskap skep vonke wat die stof of dampe kan aansteek.
- Hou kinders en omstanders weg terwyl 'n elektriese gereedskap gebruik word. Afleidings kan veroorsaak dat jy beheer verloor.
2.2 Elektriese veiligheid
- Kraggereedskapproppe moet by die uitlaat pas. Moet nooit die prop op enige manier verander nie.
- Vermy liggaamskontak met geaarde of geaarde oppervlaktes, soos pype, verkoelers, reekse en yskaste. Daar is 'n verhoogde risiko van elektriese skok as jou liggaam geaard of geaard is.
- Moenie elektriese gereedskap aan reën of nat toestande blootstel nie. Water wat 'n elektriese gereedskap binnedring, sal die risiko van elektriese skok verhoog.
2.3 Persoonlike veiligheid
- Dra altyd oogbeskerming. Gebruik veiligheidsbril, 'n veiligheidsbril of 'n gesigskerm.
- Dra gehoorbeskerming wanneer u die gereedskap vir lang tye gebruik.
- Trek behoorlik aan. Moenie los klere of juweliersware dra nie. Hou jou hare en klere weg van bewegende dele.
- Bly wakker, kyk wat jy doen en gebruik gesonde verstand wanneer jy 'n elektriese gereedskap gebruik.
3. Pakketinhoud
Verifieer dat al die items wat hieronder gelys word in u pakket ingesluit is. Indien enige items ontbreek of beskadig is, kontak asseblief kliëntediens.
- 1 x Conentool 21V Cordless Impact Drill/Driver
- 2 x 2500mAh Lithium-ion Batteries
- 1 x batterylaaier
- 1 x Buigsame Asverlenging
- Various Drill Bits (for wood, metal, masonry)
- Various Screwdriver Bits
- Sok adapters
- Dratas
- Gebruikershandleiding

Image 3.1: A complete overview of the kit contents, including the drill, two batteries, charger, flexible shaft, various drill bits, screwdriver bits, and socket adapters, all neatly arranged.
4. Produk verbyview
Familiarize yourself with the main components of your drill/driver:
- tjok: Holds drill bits and screwdriver bits.
- Wringmomentverstellingsring: Selects the desired torque setting.
- Modus seleksie ring: Switches between screwdriving, drilling, and impact drilling modes.
- Spoedkeuseskakelaar: Changes between high and low-speed gears.
- Sneller skakelaar: Aktiveer die gereedskap en beheer spoed (veranderlike spoed).
- Vorentoe/Agtertoe-kieser: Verander die rotasierigting.
- LED werkslig: Verlig die werkarea.
- Batterypak: Verskaf krag aan die gereedskap.
- Battery-vrystellingsknoppie: Vir die verwydering van die battery.
- Hanteer: Ergonomiese greep vir gemaklike gebruik.

Beeld 4.1: 'n Interne view highlighting the brushless motor, which provides increased power, efficiency, and a quieter operation with no sparks.
5. Opstelling
5.1 Laai die battery
The battery pack is not fully charged at the time of purchase. It is recommended to fully charge the battery before first use.
- Koppel die laaier aan 'n standaard kragpunt.
- Slide the battery pack onto the charger base. Ensure it clicks into place.
- The charger indicator light will show the charging status. A red light typically indicates charging, and a green light indicates a full charge.
- Sodra dit ten volle gelaai is, ontkoppel die laaier van die kragaansluiting en verwyder die battery.

Image 5.1: The battery charger connected to a wall outlet, with a battery pack inserted for charging. The red light indicates charging, and the green light indicates a completed charge.
5.2 Installeer en verwyder die battery
- Om te installeer: Rig die batterypak met die basis van die gereedskaphandvatsel en skuif dit in totdat dit stewig in plek klik.
- Om te verwyder: Press the battery release button (usually located at the front of the battery) and slide the battery pack out of the tool.

Beeld 5.2: 'n Uitsnyding view of the 2500mAh battery pack, illustrating its internal lithium-ion cells and power management system, designed for up to 90 minutes of use per battery.
5.3 Installing and Removing Drill/Screwdriver Bits
- Om te installeer: Rotate the chuck counter-clockwise to open the jaws. Insert the desired bit into the chuck as far as it will go. Rotate the chuck clockwise to tighten the jaws firmly around the bit.
- Om te verwyder: Draai die boorkop antikloksgewys om die kake los te maak en die boorpunt uit te trek.
Ensure the bit is securely fastened to prevent it from slipping during operation.
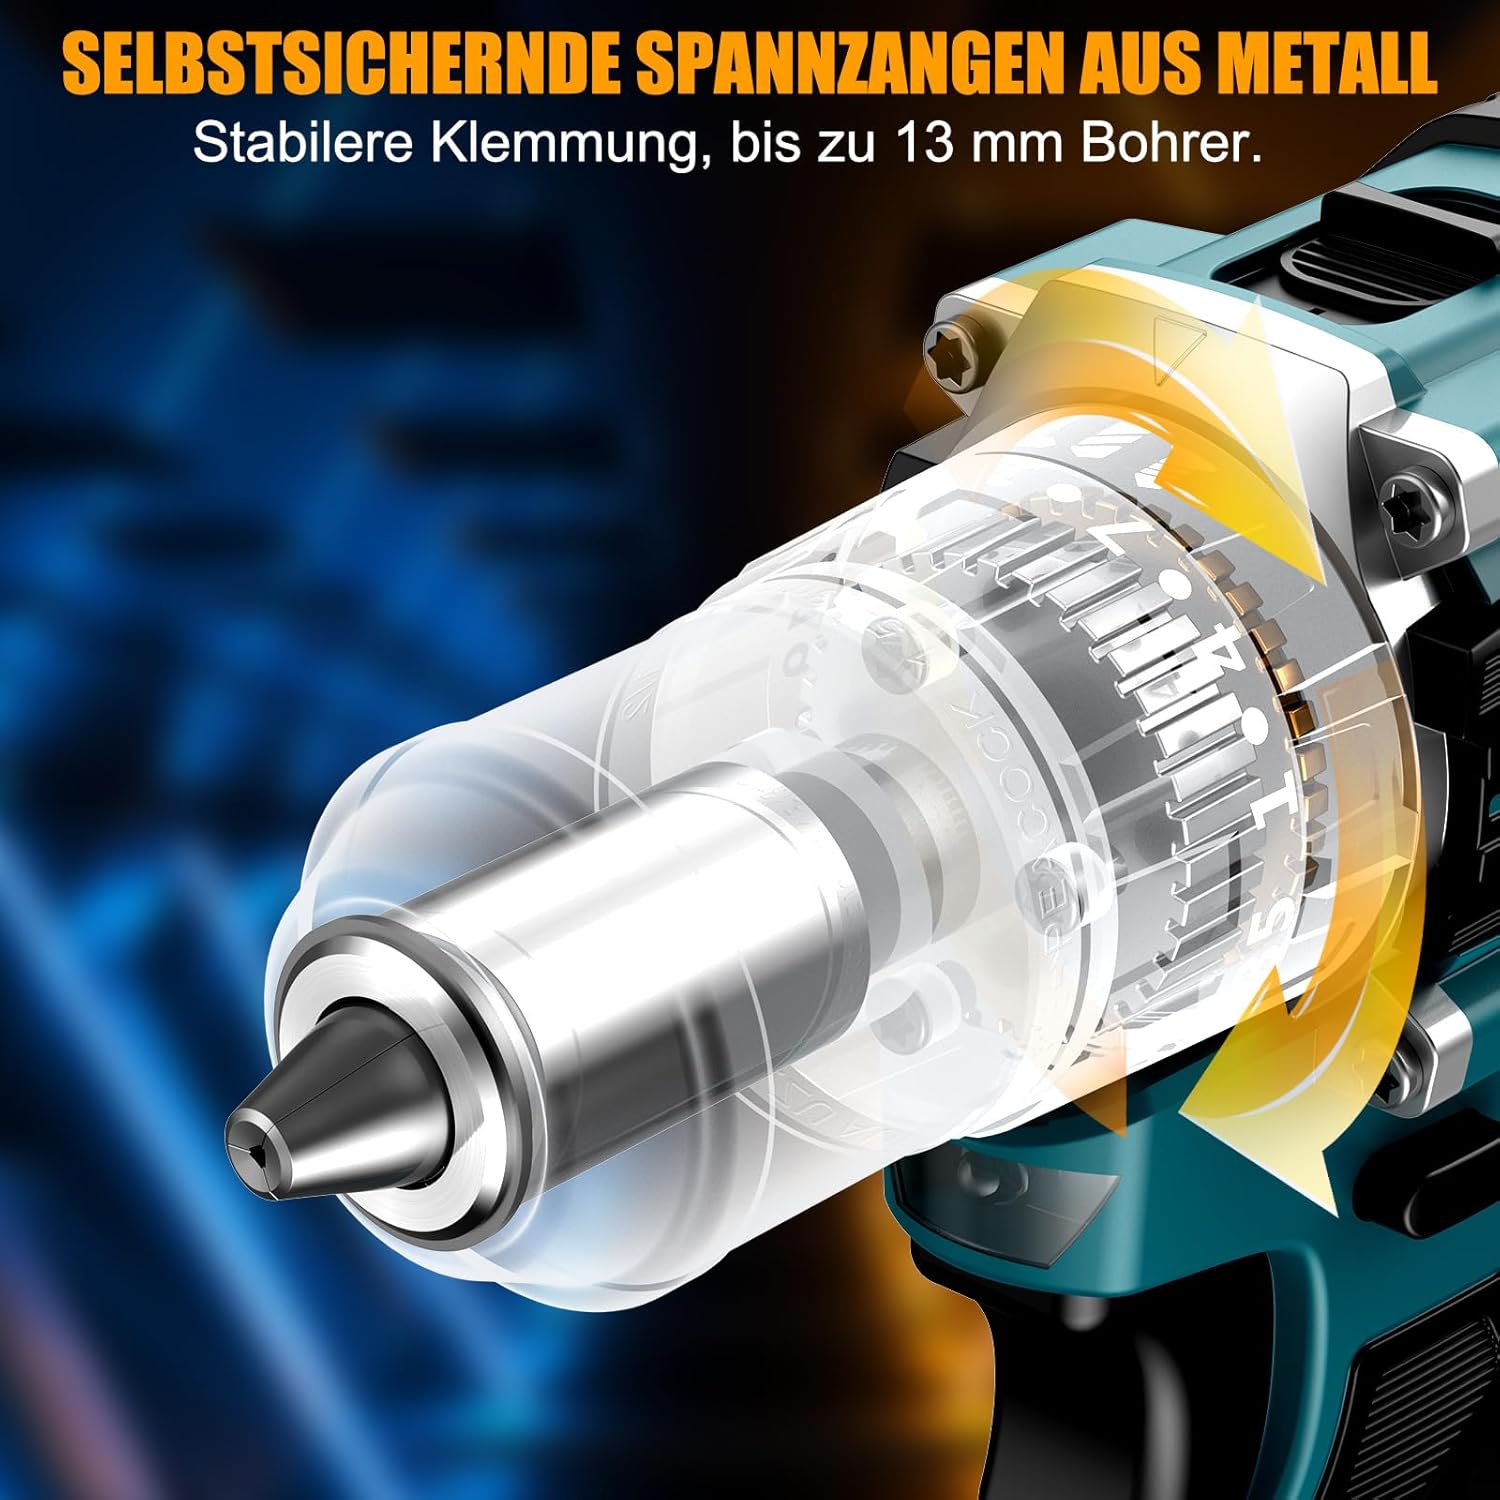
Beeld 5.3: 'n Gedetailleerde view of the self-locking metal chuck, demonstrating its stable clamping mechanism capable of holding drill bits up to 13mm securely.
6. Bedryfsinstruksies
6.1 Aan-/afskakeling en spoedbeheer
- To turn the tool ON, press the trigger switch. The speed is variable; press the trigger further for higher speed.
- To turn the tool OFF, release the trigger switch.
- The integrated LED work light will illuminate when the trigger is pressed, providing visibility in dimly lit areas.
6.2 Vorentoe/Agtertoe Rotasie
The forward/reverse selector switch is located above the trigger. Push it to the left for forward rotation (for screwdriving and drilling) and to the right for reverse rotation (for removing screws or freeing jammed bits). Ensure the tool is stopped before changing direction.
6.3 Speed Gear Selection
The drill features a 2-speed gear selector switch on top of the tool:
- Gear 1 (Low Speed, 0-650 RPM): Ideal for high-torque applications like driving large screws or drilling large holes.
- Gear 2 (High Speed, 0-1850 RPM): Suitable for fast drilling in softer materials and smaller diameter holes.
Always select the appropriate gear for the task. Change gears only when the tool is completely stopped.
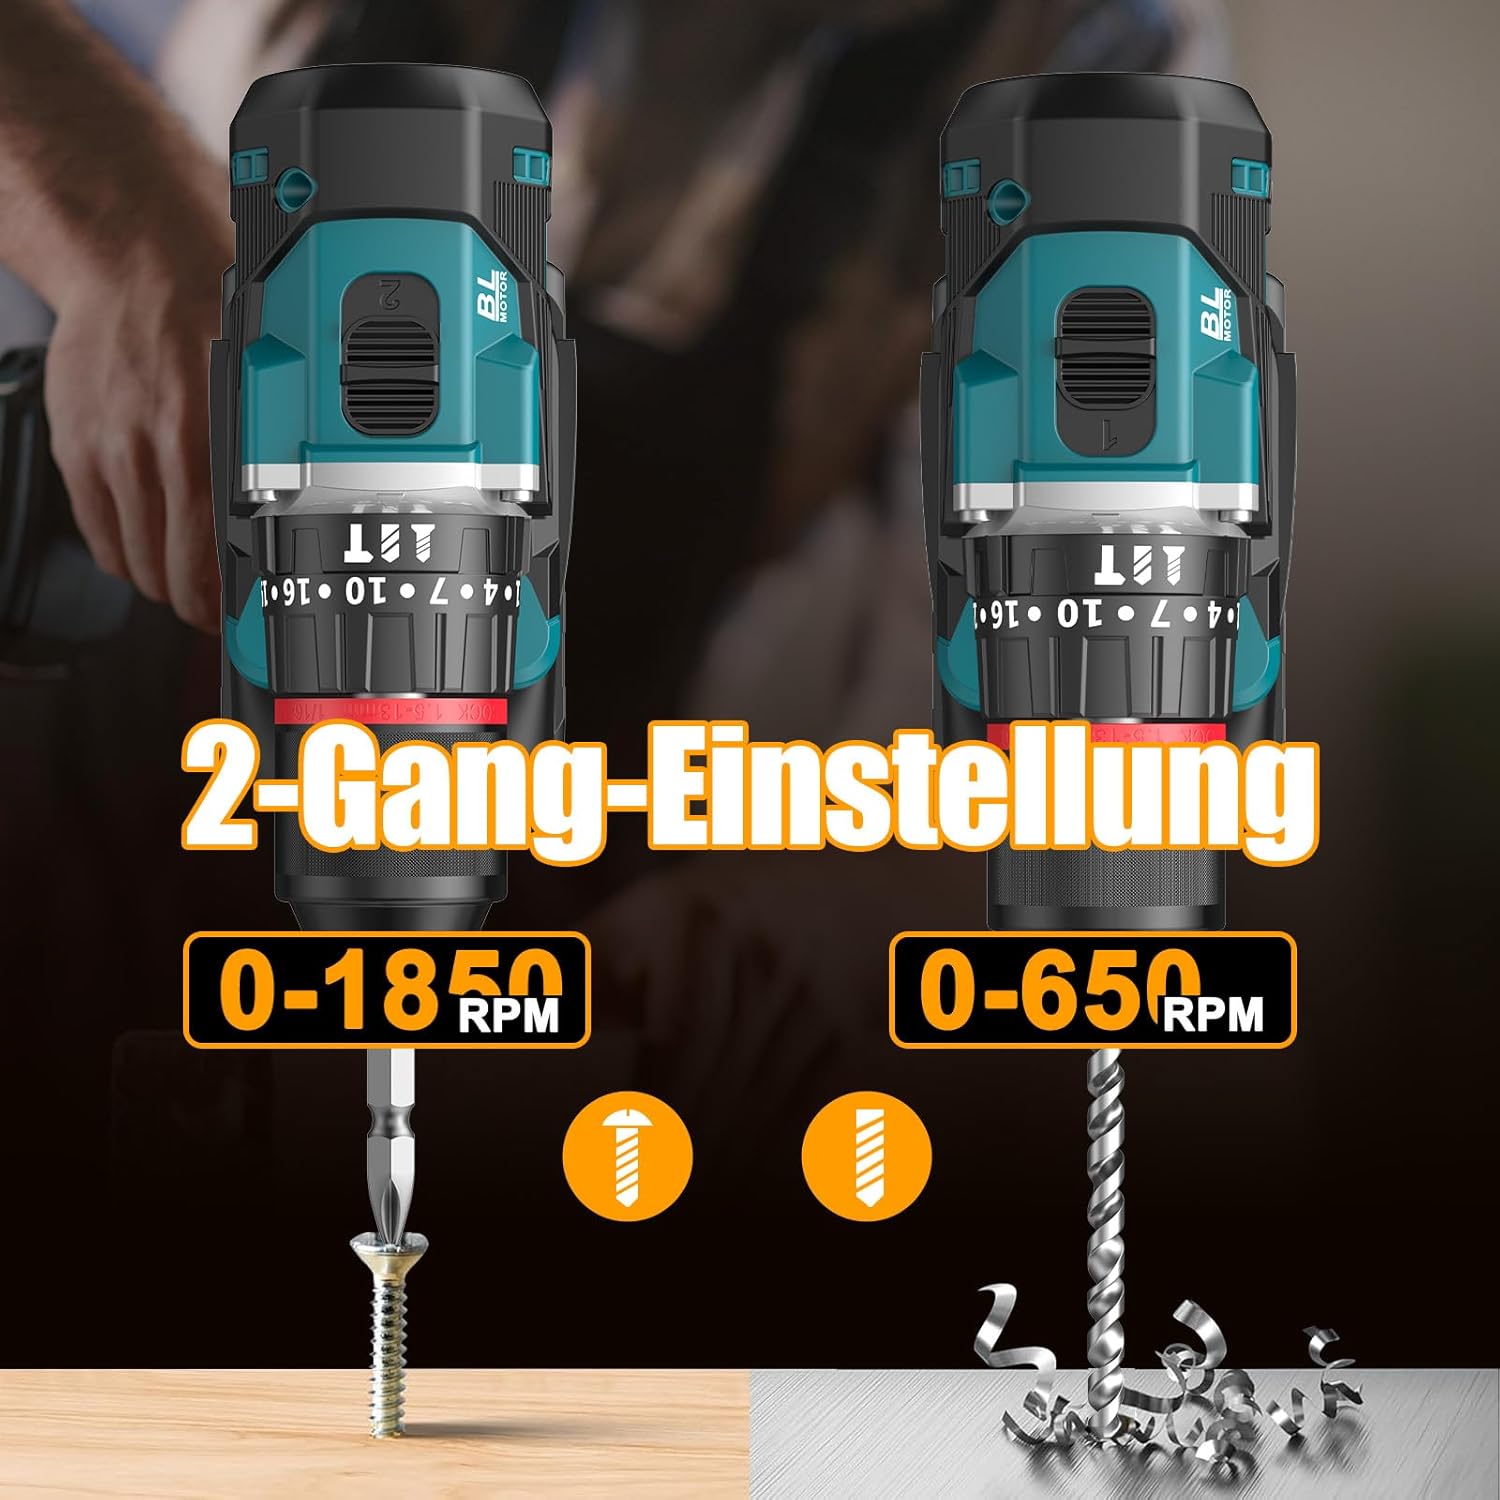
Image 6.1: An illustration demonstrating the two-speed gear settings: Gear 1 (0-650 RPM) for screwdriving and Gear 2 (0-1850 RPM) for drilling, allowing for optimal performance based on the application.
6.4 Torque Adjustment and Mode Selection
The torque adjustment ring allows you to set the desired torque for screwdriving applications, preventing overtightening or stripping screws. The mode selector ring allows you to switch between different operating modes.
- Screwdriving Mode (Torque Settings 1-35): Use these settings to match the torque to the screw size and material. Lower numbers for smaller screws/softer materials, higher numbers for larger screws/harder materials.
- Boormodus (Boorpunt-ikoon): For general drilling without impact. The clutch is disengaged, providing maximum torque.
- Impakboormodus (Hamerikoon): For drilling into masonry or concrete, providing a hammering action in addition to rotation.
The drill offers 35+3 settings, including 35 torque settings for screwdriving and 3 modes (screwdriving, drilling, impact drilling).

Image 6.2: A visual representation of the 35+3 torque and mode settings, indicating precise power control and a maximum torque of 55 N.m, suitable for various materials like wood, brick, plastic, and metal.
7. Onderhoud
7.1 Skoonmaak
- Ontkoppel altyd die batterypak voordat u enige skoonmaak of onderhoud uitvoer.
- Hou die ventilasie-openinge van die gereedskap skoon om oorverhitting te voorkom.
- Gebruik 'n sagte, damp lap om die gereedskap skoon te maak casing. Moenie harde chemikalieë of skuurmiddels gebruik nie.
7.2 Berging
- Store the tool and batteries in a cool, dry place, away from direct sunlight and moisture.
- Store the tool in its carrying case to protect it from dust and damage.
- Hou buite bereik van kinders.

Image 7.1: A person carrying the Conentool drill kit in its durable black carrying case, designed for convenient storage and transport of the tool and its accessories.
7.3 Batterysorg
- Do not store batteries in a discharged state. Recharge them regularly, especially if not used for extended periods.
- Vermy die blootstelling van batterye aan uiterste temperature.
- Moenie probeer om die batterypak uitmekaar te haal of te verander nie.
8. Probleemoplossing
| Probleem | Moontlike oorsaak | Oplossing |
|---|---|---|
| Gereedskap begin nie | Battery nie gelaai of verkeerd geïnstalleer. | Maak seker dat die battery volledig gelaai en korrek geplaas is. |
| Verminderde krag of spoed | Batterylading is laag. | Herlaai die battery. |
| Die boorpunt gly in die klauwplaat | Klouplaat nie voldoende vasgedraai nie. | Tighten the chuck firmly around the bit. Ensure the bit shank is clean. |
| Oorverhitting | Verstopte ventilasiegleuwe; voortdurende swaar gebruik. | Maak ventilasiegleuwe skoon. Laat die gereedskap afkoel tydens langdurige gebruik. |
9. Spesifikasies
| Kenmerk | Spesifikasie |
|---|---|
| Modelnommer | ebvc-sd-de |
| Voltage | 21 Volt |
| Battery Tipe | Litium-ioon |
| Battery kapasiteit | 2500 mAh (elk) |
| Max Torque | 55 Nm |
| Wringkrag instellings | 35 + 3 Modes (Screwdriving, Drilling, Impact Drilling) |
| Geen-las spoed (rat 1) | 0-650 XNUMX RPM |
| Geen-las spoed (rat 2) | 0-1850 XNUMX RPM |
| Chuck Grootte | 13 mm (3/8 inch) Keyless |
| Produk afmetings | 35 x 31 x 10 cm |
| Gewig (met battery) | 1.5 kilogram |
10. Waarborg en Ondersteuning
Conentool products are manufactured to high-quality standards. In the unlikely event of a defect due to material or manufacturing fault, please contact your retailer or Conentool customer service. Please retain your proof of purchase for warranty claims.
For further assistance, technical support, or to inquire about spare parts, please refer to the contact information provided with your purchase or visit the official Conentool webwebwerf.