1. Inleiding
Thank you for choosing the Brinyte HC01 Rechargeable Headlamp. This manual provides detailed instructions for the safe and efficient operation, maintenance, and troubleshooting of your new headlampLees asseblief hierdie handleiding deeglik deur voor gebruik en bewaar dit vir toekomstige verwysing.
Sleutel kenmerke:
- Triple Light System: 1000-lumen main white light, close-range white/red auxiliary lights.
- Verstelbare helderheid: Low, Medium, High, Turbo modes.
- Spesiale modusse: Strobe, SOS, Signal modes for various scenarios.
- Dubbele kragopsies: Rechargeable via USB-C and compatible with AAA batteries for backup.
- Patented Anti-Tangle Headband: Breathable, easily adjustable with a side knob, and detachable for handheld use.
- Rooiligmodus: Ideal for night hunting, fishing, maintaining night vision, and emergency signaling.
- Duursame konstruksie: IP66 waterproof rate and 1-meter drop-resistant.
- Liggewig ontwerp: Weighs only 2.29 oz for comfortable use.
2. Pakketinhoud
Nadat u die pakkie oopgemaak het, maak asseblief seker dat al die volgende items ingesluit is:
- 1 x Brinyte HC01 Headlamp
- 1 x kopband
- 1 x Beugel
- 1 x Tipe-C-laaikabel
- 1 x BR1200 Rechargeable Battery
- 1 x Gebruikershandleiding (hierdie dokument)
- 1 x Value-added Card

Image: Contents of the Brinyte HC01 Headlamp package, showing the headlamp, head strap, USB-C charging cable, and rechargeable battery.
3. Opstelling en eerste gebruik
3.1 Bevestig die kopband
- Plaas die kopamp unit into the bracket on the head strap. Ensure it clicks securely into place.
- Adjust the head strap to fit comfortably around your head. The patented anti-tangle headband can be adjusted using the side knob:
- To extend the strap: Press the knob and pull the buckle.
- To retract the strap: Rotate the knob to draw back the head strap.

Image: Step-by-step guide on adjusting the patented anti-tangle headband of the HC01 headlamp.
3.2 Laai die battery
The Brinyte HC01 headlamp is equipped with a rechargeable BR1200 battery. For optimal performance, fully charge the battery before first use.
- Vind die USB-C-laaipoort op die koptelefoonamp.
- Connect the provided Type-C charging cable to the headlamp and a compatible USB power source (e.g., laptop, power bank, AC adapter, car charger).
- The battery status indicator lights will illuminate during charging. A full charge typically takes approximately 1.5 hours.
- Sodra dit ten volle gelaai is, ontkoppel die laaikabel.

Image: The Brinyte HC01 headlamp being charged via USB-C, with an illustration of the 1200mAh battery capacity, 1.5 hours full charge time, and 45 hours usage.
3.3 Installing AAA Batteries (Optional Backup)
In situations where recharging is not possible, the HC01 can be powered by AAA batteries.
- Open the battery compartment of the headlamp.
- Plaas 3 AAA-batterye in en maak seker dat die polariteit (+/-) korrek is.
- Maak die batterykompartement stewig toe.

Image: Illustration of the dual power options for the Brinyte HC01 headlamp, highlighting both USB-C charging and the use of AAA batteries as a backup.
4. Operasie
The HC01 headlamp features two main buttons for control: one for white light and one for red light.
4.1 White Light Operation
- Skakel aan/af: Press the white light button once to turn on the main white light. Press again to turn off.
- Pas Helderheid aan: While the white light is on, press and hold the white light button to cycle through brightness modes: Low, Medium, High, Turbo. Release the button at your desired brightness.
- Special Modes (Strobe/SOS/Signal): Double-click the white light button to activate Strobe mode. Double-click again to cycle through SOS and Signal modes. Single-click to return to the previous brightness mode or turn off.
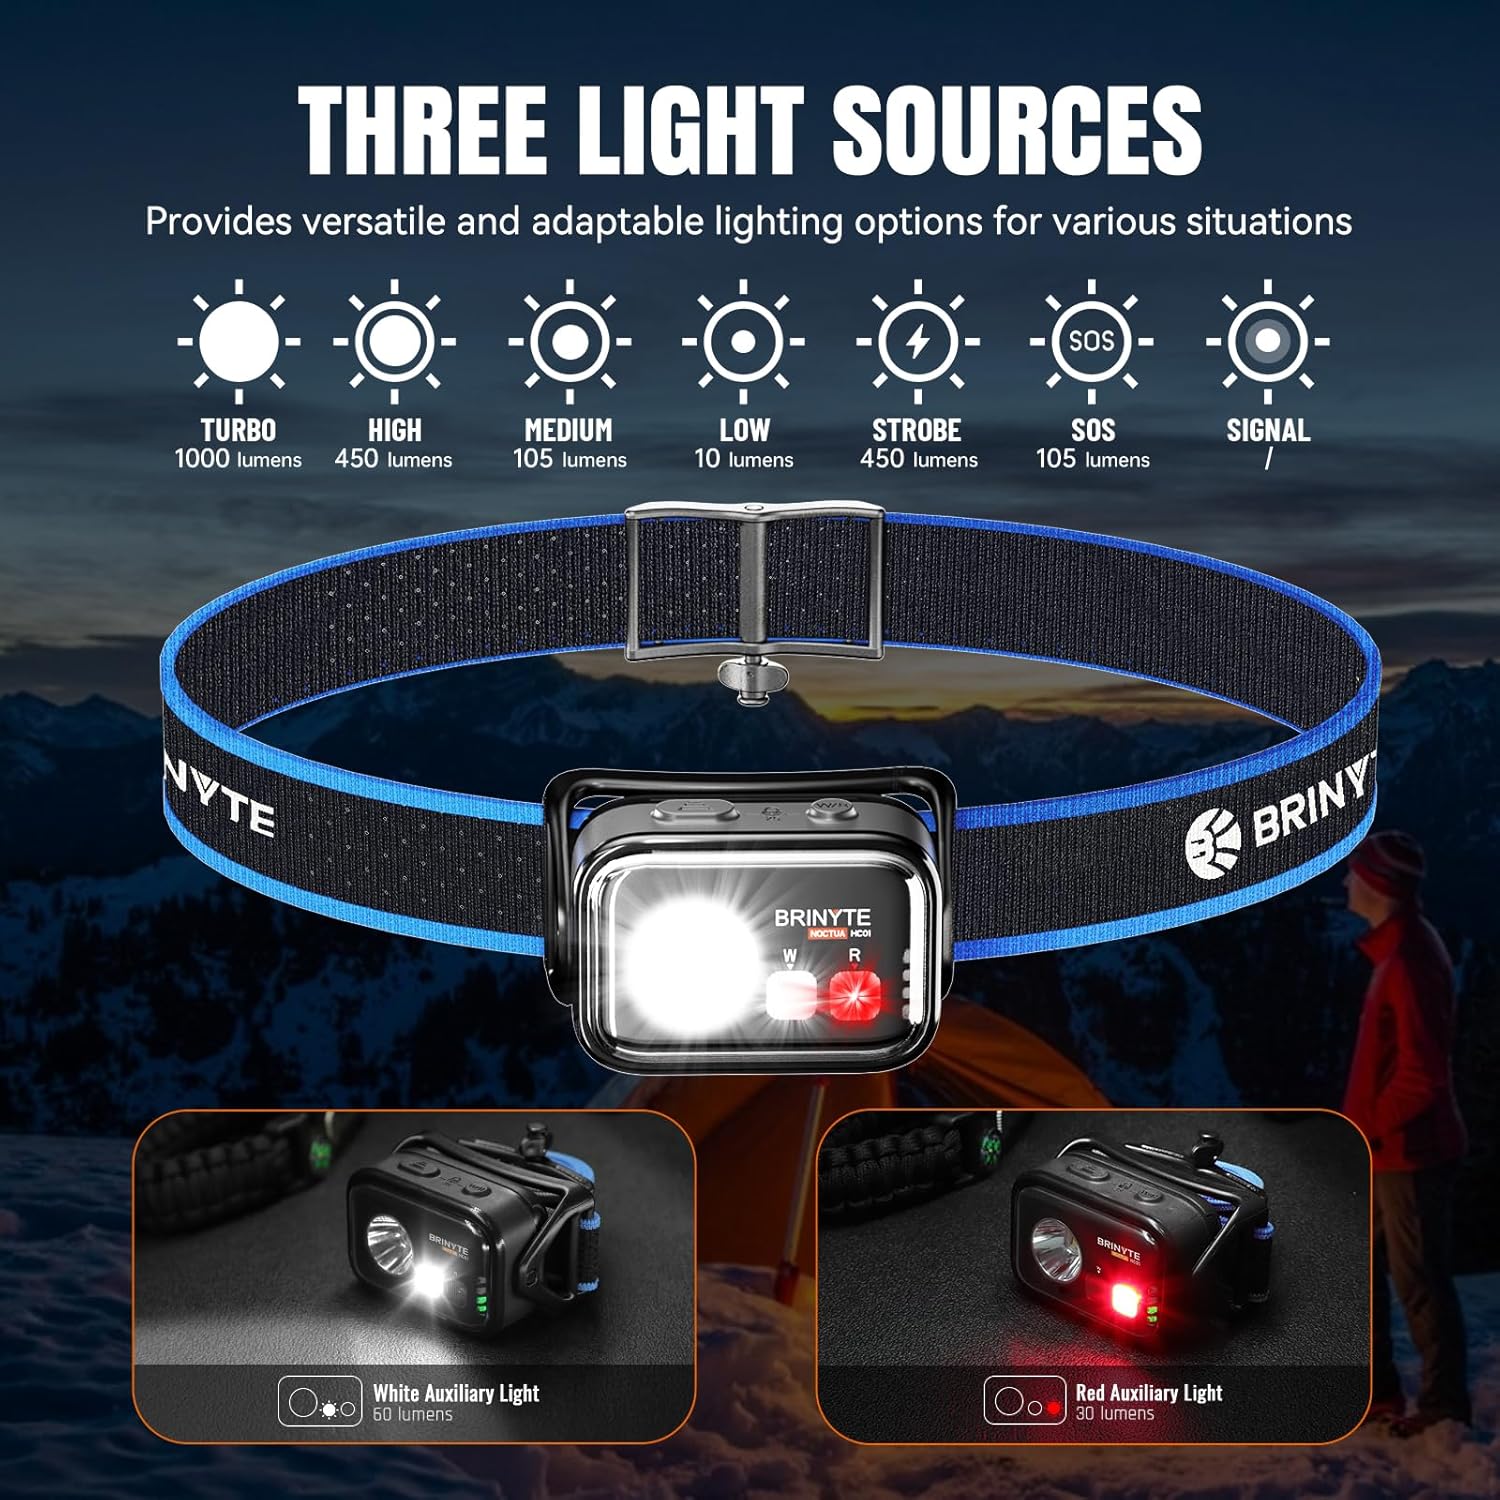
Image: The Brinyte HC01 headlamp wysasing its three light sources and various modes including Turbo, High, Medium, Low, Strobe, SOS, and Signal.
4.2 Red Light Operation
- Skakel aan/af: Press the red light button once to turn on the red auxiliary light. Press again to turn off.
- Pas Helderheid aan: While the red light is on, press and hold the red light button to cycle through brightness modes.
- Red Signal Mode: Double-click the red light button to activate the red signal mode.
The red light mode is particularly useful for preserving night vision during activities like hunting, fishing, or astronomical observation, and can also serve as an emergency warning signal.

Image: Practical applications of the red light mode, including hunting, camping, flashing safety light, astronomical observation, fishing, photography, and reading.
4.3 Simultaneous Light Use
The white and red lights can be operated simultaneously for combined illumination.
4.4 Sluit-/Ontsluitfunksie
Om toevallige aktivering te voorkom, moet die kopamp features a lock function.
- Om te sluit: Simultaneously press both the main white light and red light switches for 3 seconds. The main light will flash twice to indicate successful locking.
- Om te ontsluit: Simultaneously press both switches for 3 seconds again. The main light will flash twice to indicate successful unlocking.

Image: Instructions for locking and unlocking the headlamp by pressing both the main and auxiliary light switches simultaneously for 3 seconds.
4.5 Verstelbare Beligtingshoek
Die kopamp unit can pivot 360 degrees, allowing you to direct the light precisely where needed.

Image: The Brinyte HC01 headlamp demonstrating its 360-degree pivotable head for adjustable lighting angle.
5. Onderhoud
5.1 Skoonmaak
- Vee die kop afamp liggaam met 'n sagte, damp lap.
- Moenie skuur skoonmaakmiddels of oplosmiddels gebruik nie, aangesien dit die afwerking kan beskadig.
- Clean the lens gently with a lens cloth to maintain optimal light output.
5.2 Batterysorg
- Recharge the battery regularly, even if not in frequent use, to prolong its lifespan.
- If using AAA batteries, remove them if the headlamp will not be used for an extended period to prevent leakage.
5.3 Berging
- Bêre die kopamp in 'n koel, droë plek weg van direkte sonlig en uiterste temperature.
- Maak seker dat die kopamp is locked before storing to prevent accidental activation and battery drain.
6. Probleemoplossing
| Probleem | Moontlike oorsaak | Oplossing |
|---|---|---|
| Kopamp skakel nie aan nie. | Die battery is leeg of nie korrek geïnstalleer nie. Kopamp is in lock mode. | Recharge the battery or replace AAA batteries. Ensure correct polarity. Unlock the headlamp by pressing both buttons simultaneously for 3 seconds. |
| Liguitset is dof. | Lae battery. Lens is vuil. | Herlaai die battery. Maak die lens skoon met 'n sagte lap. |
| Kopamp flikker. | Los batteryverbinding. Battery nearly depleted. | Kontroleer die installering van die battery. Herlaai die battery. |
| Headband feels uncomfortable or tangles. | Verkeerde aanpassing. | Adjust the headband using the side knob for a comfortable, secure fit. |
If the problem persists after attempting these solutions, please contact Brinyte customer service for assistance.
7. Spesifikasies
| Kenmerk | Detail |
|---|---|
| Model Naam | HC01 |
| Main White Light Brightness | Up to 1000 Lumens (Turbo Mode) |
| Auxiliary White Light Brightness | 60 Lumen |
| Auxiliary Red Light Brightness | 30 Lumen |
| Max Runtime (Low Mode) | 45 Hours (2700 minutes) |
| Maksimum straalafstand | 126 XNUMX meter |
| Kragbron | Rechargeable BR1200 Battery (included) or 3x AAA Batteries (not included) |
| Laaipoort | USB Tipe-C |
| Laai tyd | Ongeveer. 1.5 uur |
| Waterweerstand | IP66 (Stofdig, Waterbestand) |
| Impak weerstand | 1 meter |
| Gewig | 2.29 Ounces (65g, battery included) |
| Afmetings (LxBxH) | 2.37" x 1.66" x 1.12" (60.3mm x 42.3mm x 28.7mm) |
| Materiaal | ABS, Polikarbonaat |

Image: Detailed technical specifications table for the Brinyte HC01 headlamp, including ANSI/NEMA FL1 standards for various light modes.
8. Waarborg en Kliëntediens
8.1 Waarborginligting
Brinyte offers the following warranty for the HC01 Headlamp:
- 30-dae gratis vervanging: For any manufacturing defects within 30 days of purchase.
- 2-jaar gratis herstelwerk: For functional issues under normal use within 2 years of purchase.
- Beperkte lewenslange waarborg: For certain components beyond the 2-year repair period.
Behou asseblief jou aankoopbewys vir waarborgeise.
8.2 Kliëntediens
If you have any questions, concerns, or require assistance with your Brinyte HC01 Headlamp, please do not hesitate to contact Brinyte customer service. We are committed to providing professional and friendly support, with responses typically within 24 hours.
For more information, visit the official Brinyte Store: Brinyte Store on Amazon

Image: Brinyte's commitment to customer service, highlighting 24-hour support, dedicated customer care, and a limited lifetime warranty.
9. Veiligheidsinligting
- Moenie direk in die ligstraal kyk om tydelike sigverlies te voorkom nie.
- Hou buite bereik van kinders.
- Moenie die kop uitmekaar haal nieamp; this will void the warranty.
- Gooi batterye verantwoordelik weg volgens plaaslike regulasies.