
1. Inleiding
This manual provides instructions for the safe and effective use of your AquilaPro KL02060 Laser Measuring Tool. This compact device is designed for accurate distance measurements up to 197 feet (60 meters) with an accuracy of ±0.078 inches (2mm). It features multiple measurement modes, unit switching, and a USB rechargeable battery.
2. Veiligheidsinligting
WARNING: Read all safety warnings and instructions before using this product.
- This device is a Class II laser product with a power output of less than 1mW.
- Moenie direk in die laserstraal staar nie.
- Moenie die laserstraal op mense of diere rig nie.
- Moenie die toestel uitmekaar haal of wysig nie. Herstelwerk moet slegs deur gemagtigde dienspersoneel uitgevoer word.
- Hou die toestel buite bereik van kinders.
- Use only the specified charging method (USB).
- Vermy die gebruik van die toestel in plofbare atmosfere of naby vlambare materiale.
3. Produk verbyview
Familiarize yourself with the components and controls of your AquilaPro KL02060 Laser Measuring Tool.

Figuur 3.1: Voorkant view of the AquilaPro KL02060 Laser Measuring Tool with key components labeled. Labels include: screen, single measurement/unit switch button, addition/subtraction measurement button, function/front/rear reference button, history/preset value setting button, and power/backlight button.
- Skerm: Displays measurements, modes, battery status, and other information.
- Single Measurement / Unit Switch Button: Initiates a single measurement or cycles through measurement units (m/in/ft).
- Addition / Subtraction Measurement Button: Activates addition or subtraction functions for measurements.
- Function / Front/Rear Reference Button (FUNC): Cycles through measurement modes (e.g., length, area, volume, Pythagorean) and switches the measurement reference point (front or rear of the device).
- History / Preset Value Setting Button (PRESET): Accesses measurement history or sets preset values.
- Power / Backlight Button: Turns the device on/off and controls the screen backlight.
4. Opstelling
4.1 Laai die battery
The AquilaPro KL02060 is equipped with a rechargeable Lithium-ion battery. Before first use, fully charge the device.
- Vind die USB-laaipoort op die toestel.
- Connect the device to a standard USB power source (e.g., computer, wall adapter) using the provided USB cable.
- Die battery-aanwyser op die skerm sal die laaistatus wys.
- Sodra dit volledig gelaai is, ontkoppel die USB-kabel.
5. Bedryfsinstruksies
5.1 Krag aan/af
- Om aan te skakel: Druk en hou die Power / Backlight Button () vir ongeveer 2 sekondes.
- Om af te skakel: Druk en hou die Power / Backlight Button for approximately 3 seconds. The device will also automatically power off after a period of inactivity to conserve battery.
5.2 Eenheidskakeling
The device supports measurements in meters (m), inches (in), and feet (ft).
- While the device is on, short press the Single Measurement / Unit Switch Button to cycle through the available units. The current unit will be displayed on the screen.
5.3 Benchmark Switching (Front/Rear Reference)
The measurement can be taken from the front edge or the rear edge of the device. The default setting is typically the rear edge.

Figuur 5.1: Illustration of switching between front and rear measurement reference points. The icon on the screen indicates the active reference point.
- Druk kort op die Function / Front/Rear Reference Button (FUNC) to toggle between front and rear reference points.
- An icon on the display will indicate whether the measurement is taken from the front or rear of the device.
- Front Reference: Meting begin vanaf die voorkant van die toestel.
- Rear Reference: Measurement starts from the rear edge of the device (includes the length of the device itself).
5.4 Meetmodusse
The AquilaPro KL02060 offers various measurement functions. Press the Function / Front/Rear Reference Button (FUNC) repeatedly to cycle through the modes.

Figuur 5.2: Visual representation of the different measurement modes available on the device.
- Enkele meting: Druk die Single Measurement / Unit Switch Button once to emit the laser, then press again to take a single distance measurement.
- Deurlopende Meting (Spooring): In this mode, the device continuously measures and displays the distance as you move it. This is useful for finding minimum/maximum distances or for real-time positioning.
- Oppervlaktemeting:
- Kies Gebiedsmodus.
- Meet die lengte.
- Meet die breedte.
- Die toestel sal outomaties die area bereken en vertoon.
- Volumemeting:
- Kies Volumemodus.
- Meet die lengte.
- Meet die breedte.
- Meet die hoogte.
- Die toestel sal outomaties die volume bereken en vertoon.
- Pythagorean Measurement (Indirect Measurement): Used to calculate inaccessible distances using the Pythagorean theorem.
- Select Pythagorean mode (e.g., two-point or three-point).
- Follow the on-screen prompts to measure the required sides (hypotenuse and one leg).
- The device will calculate the unknown leg or height.
5.5 Optelling en Aftrekking
Jy kan metings direk op die toestel byvoeg of aftrek.
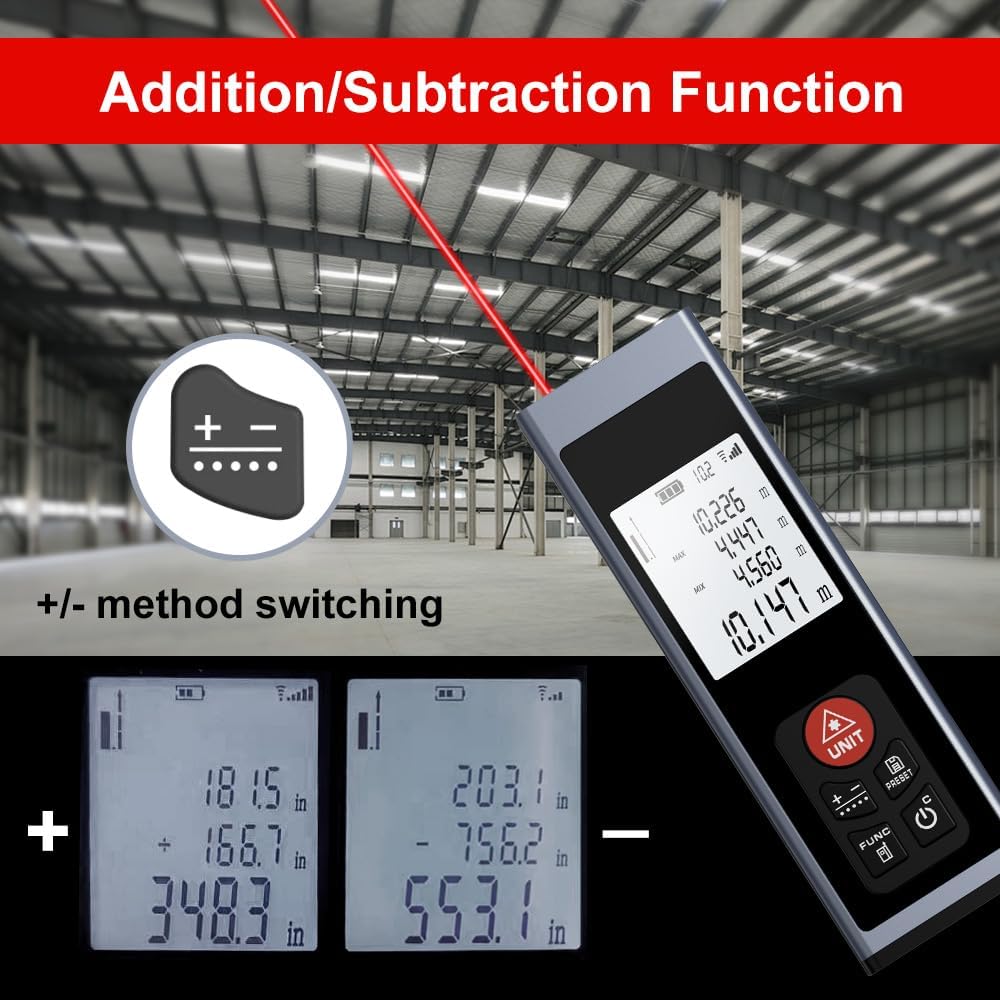
Figuur 5.3: Examples of addition and subtraction operations displayed on the device screen.
- Take your first measurement.
- Druk die Addition / Subtraction Measurement Button () to select either addition (+) or subtraction (-).
- Take your second measurement.
- The device will display the calculated sum or difference.
5.6 Measurement History and Preset Values
- Druk die History / Preset Value Setting Button (PRESET) om te herview previous measurements or to set specific preset values for quick recall. Refer to the on-screen prompts for detailed usage.
6. Onderhoud
- Skoonmaak: Gebruik 'n sagte, damp cloth to clean the device. Do not use abrasive cleaners or solvents. Ensure the laser lens and display are kept clean for optimal performance.
- Berging: Store the device in a cool, dry place, away from direct sunlight and extreme temperatures. If storing for an extended period, ensure the battery is partially charged (around 50%) to prolong its lifespan.
- Batterysorg: Laai die battery gereeld, selfs al word die toestel nie gereeld gebruik nie, om die battery se gesondheid te handhaaf.
7. Probleemoplossing
If you encounter issues with your AquilaPro KL02060, refer to the following common solutions:
| Probleem | Moontlike oorsaak | Oplossing |
|---|---|---|
| Toestel skakel nie aan nie. | Lae of uitgeputte battery. | Laai die toestel met die USB-kabel. |
| Onakkurate metings. | Dirty laser lens; incorrect reference point; unstable surface. | Clean the laser lens; verify the front/rear reference setting; ensure a stable measurement surface. |
| Die laserstraal is nie sigbaar nie. | Bright ambient light; device malfunction. | Use in lower light conditions; contact customer support if problem persists. |
| Die skerm is leeg of gevries. | Software error; low battery. | Try restarting the device. Ensure battery is charged. |
If the problem persists after attempting these solutions, please contact AquilaPro customer support.
8. Spesifikasies
| Kenmerk | Detail |
|---|---|
| Modelnommer | KL02060 |
| Meetreeks | 197 voet (60 m) |
| Akkuraatheid | ±0.078 inch (±2 mm) |
| Meeteenhede | Meters (m), Inches (in), Feet (ft) |
| Laser klas | Klas II, <1mW |
| Battery Tipe | Rechargeable Lithium-ion (included) |
| Laaipoort | USB |
| Produk afmetings | 2.79 x 1.52 x 8.64 cm (approx. 28L x 15W x 86H mm) |
| Item gewig | 50 g |
| Materiaal | Aluminium |
| Waterweerstandvlak | Waterproof (IP54 International Protection Rating) |
| Ingesluit komponente | Lanyard |
9. Waarborg en Ondersteuning
AquilaPro products are designed for reliability and performance. For warranty information or technical support, please refer to the contact details provided with your purchase or visit the official AquilaPro webwebwerf.