Inleiding
Thank you for choosing the Nuvance Professional Hair Clipper. This manual provides essential information for the safe and effective use, maintenance, and troubleshooting of your new hair clipper. Please read these instructions thoroughly before first use and keep them for future reference.
Belangrike veiligheidsinstruksies
Om die risiko van elektriese skok, besering of brand te verminder, volg altyd hierdie basiese veiligheidsmaatreëls:
- Moenie die toestel in water of ander vloeistowwe dompel nie.
- Keep the appliance away from water sources, especially when charging.
- Do not use the clipper if it has a damaged cord or plug, or if it is not working properly.
- Hierdie toestel is nie bedoel vir gebruik deur persone met verminderde fisiese, sensoriese of geestelike vermoëns, of 'n gebrek aan ervaring en kennis nie, tensy hulle toesig of instruksies rakende die gebruik van die toestel ontvang het van 'n persoon wat verantwoordelik is vir hul veiligheid.
- Kinders moet onder toesig wees om te verseker dat hulle nie met die toestel speel nie.
- Only use attachments supplied by the manufacturer.
- Unplug the clipper before cleaning or performing maintenance.
- Store the clipper in a dry place when not in use.
Pakketinhoud
Verifieer dat alle items in die pakket teenwoordig is:
- Nuvance Professional Hair Clipper
- 12 Guide Combs (various lengths)
- USB-laaikabel
- Skoonmaak Borsel
- Lemolie
- Gebruikershandleiding
Produk verbyview
Familiarize yourself with the components of your Nuvance Hair Clipper.

Figuur 1: Nuvance Hair Clipper components. This image shows the clipper from the side, highlighting the stainless steel blade, the blade adjustment lever, the power on/off switch, the battery indicator screen, and the USB charging port. The overall height of the clipper is indicated as 18.5 cm.
- Vlekvrye staal lem: High-quality cutting blades for precise trimming.
- Blade Adjustment Lever: Allows fine-tuning of cutting length from 0.8mm to 2.0mm without a guide comb.
- Krag aan/af skakelaar: Activates and deactivates the clipper.
- Digitale skerm: Toon batteryvlak en laaistatus.
- USB-laaipoort: Vir die koppeling van die USB-laaikabel.
- Guide Comb Attachments: Various sizes for different hair lengths.
Opstelling
Laai die Clipper
Before first use, fully charge the clipper. A full charge typically takes approximately 3 hours and provides extended cordless operation.
- Maak seker dat die knipper afgeskakel is.
- Insert the USB charging cable into the charging port at the bottom of the clipper.
- Connect the other end of the USB cable to a USB power adapter (not included) or a compatible USB port (e.g., computer, power bank).
- Die digitale skerm sal die laaivordering wys. Sodra dit volledig gelaai is, sal die skerm 100% aandui.

Figuur 2: USB charging and digital display. The image illustrates the clipper being charged via a USB cable, with the digital screen showing the battery percentage. It also highlights the power switch for quick operation.
Aanheg van gidskamme
The clipper comes with 12 guide combs to achieve various hair lengths from 0.8mm to 25mm.

Figuur 3: Guide comb lengths. This image displays different guide comb attachments, indicating their respective trimming lengths: 1.5mm, 3mm, 4.5mm, 6mm, 10mm, 13mm, 19mm, and 25mm. It also mentions 4 reserve attachments for 1, 2, 3, and 4.
- Kies die verlangde gidskam vir jou voorkeurhaarlengte.
- Rig die gidskam met die knipperlem en druk dit stewig totdat dit in plek klik.
- Om te verwyder, trek die kam versigtig van die lem af.
Bedryfsinstruksies
Basiese werking
- Ensure the clipper is charged and a guide comb is securely attached (if desired).
- Press the Power On/Off switch to turn on the clipper.
- Hold the clipper with the blade pointing downwards.
- Beweeg die knipper stadig teen die rigting van haargroei.
- After use, press the Power On/Off switch to turn off the clipper.
Adjusting Cutting Length (without guide comb)
The blade adjustment lever allows for precise cutting length adjustments from 0.8mm to 2.0mm without a guide comb.
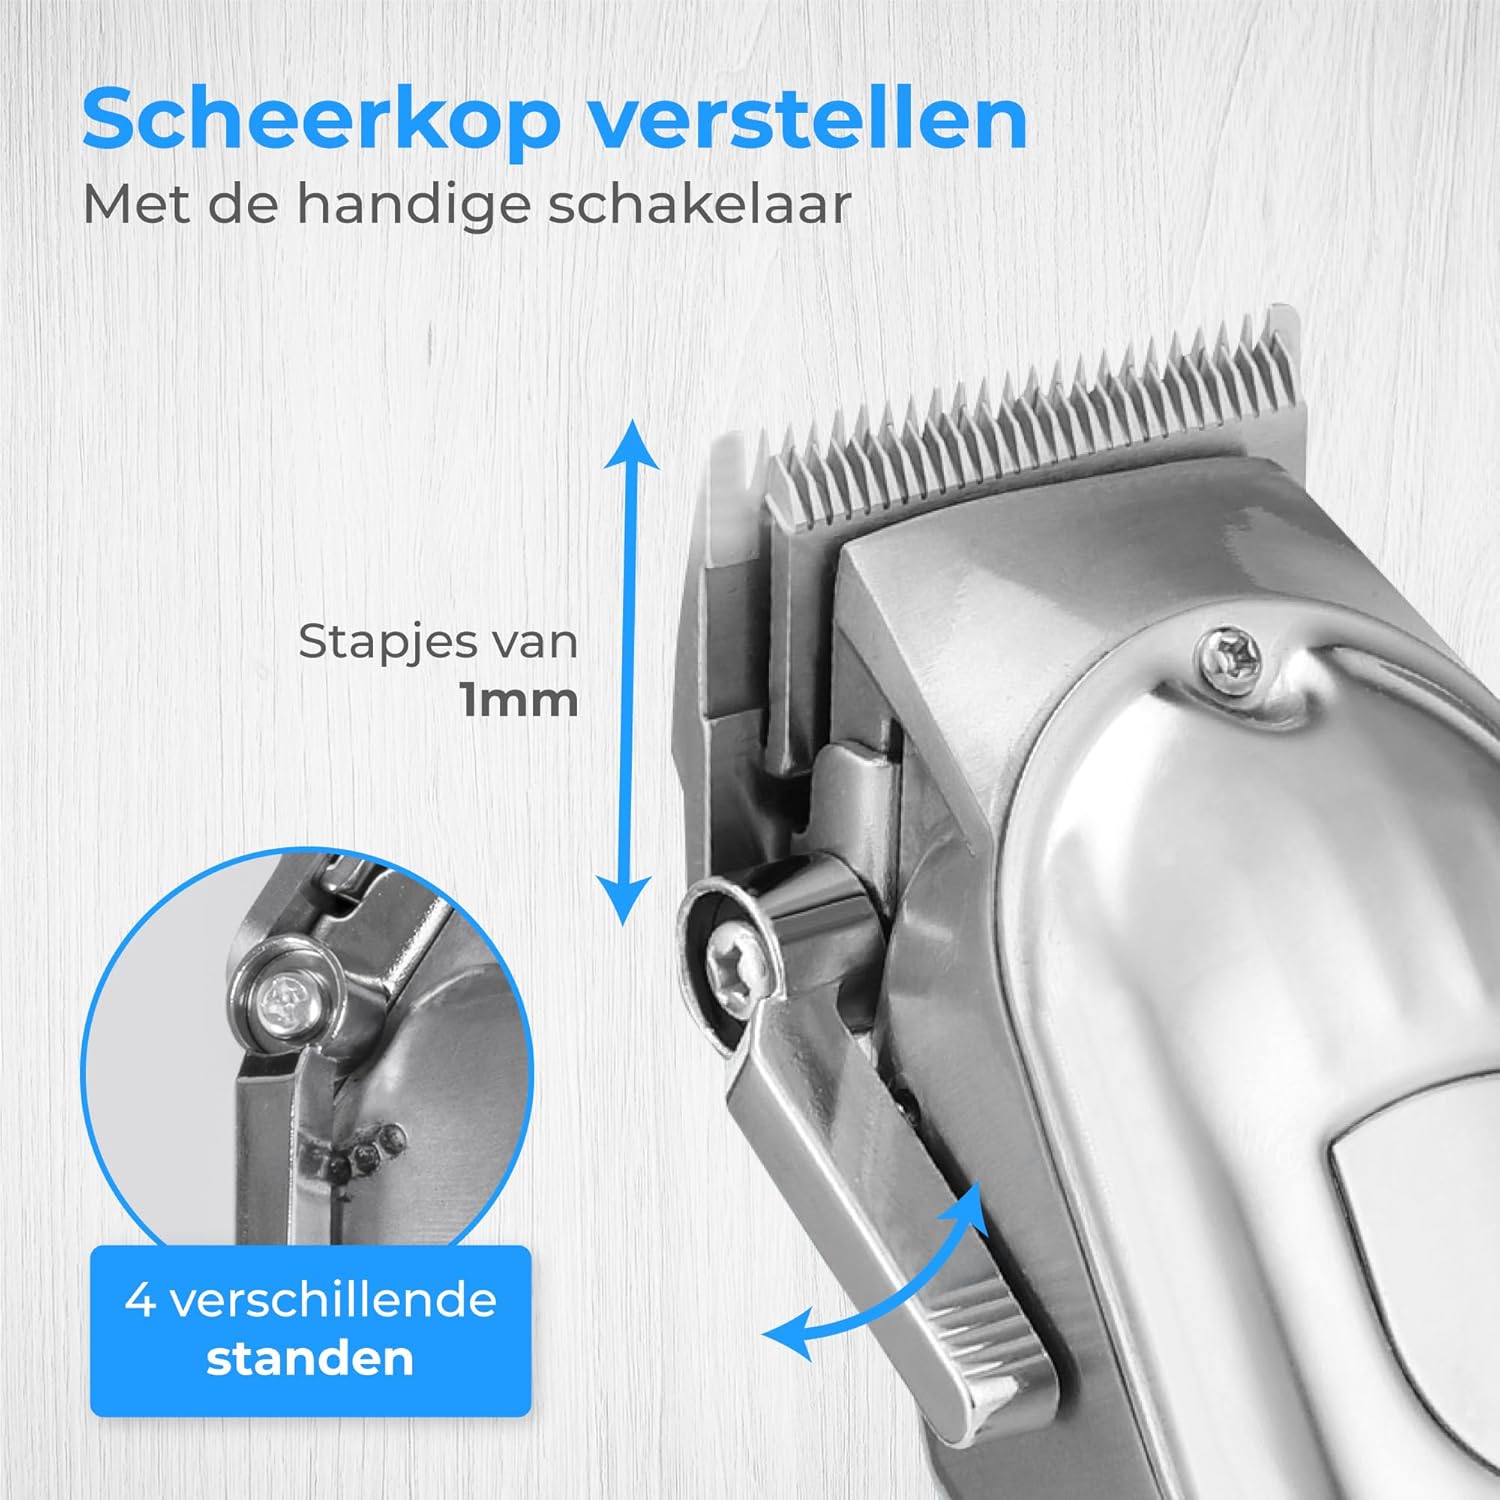
Figuur 4: Blade adjustment lever. This image focuses on the side of the clipper, illustrating the lever that allows for fine adjustment of the blade's cutting length in 1mm increments, offering 4 different settings.
- Move the lever up for a shorter cut (closer to 0.8mm).
- Move the lever down for a longer cut (closer to 2.0mm).
Trimming Hair and Beard
This clipper is suitable for various grooming needs, including head hair, beard, and body hair.

Figuur 5: Multi-functional use. This image highlights the clipper's ability to trim hair on various body parts, including head hair, beard, chest, and stomach, indicating its versatile application.
- For head hair: Start with a longer guide comb and gradually reduce the length until the desired style is achieved.
- For beard trimming: Use a guide comb to maintain an even length. For detailing, remove the guide comb and use the blade adjustment lever.
- For body hair: Use appropriate guide combs for sensitive areas.
Onderhoud
Maak die lemme skoon
Gereelde skoonmaak verseker optimale werkverrigting en verleng die lewensduur van jou knipper.
- Skakel die knipper af en ontkoppel dit.
- Verwyder enige aangehegte gidskam.
- Gebruik die meegeleverde skoonmaakborsel om los hare van die lemme te verwyder.
- For a more thorough clean, the blades can be carefully detached (refer to specific instructions if provided in the physical manual for blade removal). Rinse detached blades under running water and ensure they are completely dry before reattaching. Do not rinse the clipper body.
Olie van die lemme
Apply a few drops of the supplied blade oil to the blades after every few uses to maintain sharpness and smooth operation.
- Apply 1-2 drops of oil to the top of the blades.
- Skakel die knipper vir 'n paar sekondes aan om die olie eweredig te versprei.
- Vee enige oortollige olie af met 'n sagte lap.
Probleemoplossing
| Probleem | Moontlike oorsaak | Oplossing |
|---|---|---|
| Die knipper skakel nie aan nie. | Battery is leeg. | Laai die knipper volledig. |
| Die knipper trek hare of sny swak. | Lemme is dof, vuil of nie geolie nie. | Maak die lemme skoon en smeer met olie. Indien die probleem voortduur, moet die lemme moontlik vervang word. |
| Die knipper maak ongewone geluid. | Lemme is nie behoorlik in lyn of gesmeer nie. | Ensure blades are clean and oiled. Check for proper blade attachment. |
| Digitale skerm werk nie. | Unit is off or battery is completely dead. | Turn on the clipper or connect to charger. |
Spesifikasies
- Model: HF-8933
- Handelsmerk: Nuvance
- Kragbron: USB herlaaibaar
- Bladmateriaal: Vlekvrye staal
- Sny lengtes: 0.8mm - 25mm (with 12 guide combs)
- Battery aanwyser: Digitale vertoning
Waarborg en Ondersteuning
Nuvance products are manufactured to high-quality standards. For warranty information or technical support, please refer to the contact details provided with your purchase or visit the official Nuvance webwebwerf.
Bewaar asseblief u aankoopbewys vir enige waarborgaansprake.